The attic room differs from the traditional rooms on the lower floors with its pitched ceiling. However, this design is not a disadvantage, but rather an advantage of the attic, because by interestingly decorating and decorating the ceiling, you can give the room a certain flavor and charm. The attic ceiling in a wooden house is lined with different materials. Each of them has its own advantages and disadvantages, installation nuances. When choosing finishes for an attic room, take into account the purpose of the room and its style.
Why insulate the roof
The roof quickly heats up in the sun, allows heat to pass through in cold weather, collects condensation when temperatures drop, and does not protect against extraneous sounds (branches, raindrops, birds and animals).
Before tackling the ceiling, take care of the roof above the attic living area.
Good roofing material plus high-quality heat and waterproofing equals savings on the operation of the house. Putting the formula into practice will reduce heat loss by a third, reduce the frequency and cost of repairs, and create comfortable living conditions in the upper chambers.
Technological progress of work
Finishing the attic with plasterboard involves the following steps:
- Preparing the attic space for finishing - vacate the room, clean the foundations, carry out work to eliminate leaks in the roof, check the reliability of the beams and rafters of the roofing system;
- Design and calculation work;
- Perform markings according to the drawings;
- Mount the frame;
- Laying and wiring of communication systems;
- Installation of plasterboard sheets;
- Corner protection;
- Preparation of surfaces for decorative finishing.
GKL cladding
What does thermal protection consist of?
The heat-saving sandwich includes six layers:
- roof
- sheathing
- counter-lattice
- waterproofing (protects the insulation from moisture from the outside)
- thermal insulation material
- vapor barrier (obstacle from moisture from the room)
The principle of insulation is to fill the under-roof space with a heat insulator, to prevent moisture from entering from outside (precipitation) and steam condensate from inside the house.
The layers are laid with seams staggered and sealed with construction tape to seal. The insulation is placed tightly in or on the roof sheathing, so that there is an air gap between the insulation - the structure must breathe.
The ceilings in the attic of an already built house are insulated from the inside, starting from the roofing.
At the construction stage, the “pie” is formed in the reverse order. Don’t forget about the membranes in the roof, they are needed to remove condensate fumes.
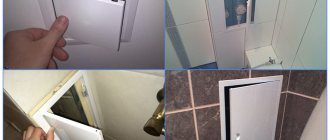
Finishing the partition
Finally, check that all the screw heads are screwed in completely, otherwise they will interfere with further finishing work. After this, all that remains is putty, closing the seams and decorative processing . In turn, it may include:
- applying plaster;
- painting;
- wallpapering.
Now you know how to correctly attach a partition made of gypsum board sheets to a sloping ceiling. The process is not too complicated, but requires excellent concentration and accuracy .
Thermal insulation materials
There are many thermal insulators on the market, these are
- mineral wool,
- expanded polystyrene,
- fiberglass boards,
- foam concrete,
- ecowool,
- polyurethane foam mixture.
Using spray insulation (the last three positions) yourself is difficult - the work requires skills and special equipment.
When purchasing, pay attention to thermal conductivity, density, moisture absorption, and vapor permeability. The material must meet the requirements of environmental friendliness and fire safety, and its weight must meet the strength of supporting structures.
When the work is completed, nothing prevents you from doing the cladding and making the ceiling in the attic to the highest standard.
Stucco features, advantages and disadvantages
Stucco molding
The classic way to decorate the ceiling is stucco
Just a few decades ago, stucco molding belonged exclusively to large administrative buildings, ancient houses and museums, but nowadays stucco molding is a common element of a classic interior.
A variety of materials are used to make stucco:
- gypsum;
- stone (soft);
- alabaster;
- polyurethane;
- polystyrene;
- fiberglass.
Advantages of stucco
Stucco on the ceiling
The last three options represent alternative solutions that make the production of decorative elements less expensive. The advantages of stucco molding made from classic materials are impressive, reliable, and durable, but modern versions can also boast some significant advantages: lightness, moisture resistance, good workability and low cost.
Disadvantages of cheap stucco
- The outlines of the structure give the impression of being fuzzy and blurred due to the characteristics of the material.
- Products are fragile and prone to deformation. Any mechanical impact from the outside will damage the structure.
Tools for installing stucco molding
Finishing the ceiling with stucco
- Nails.
- Air gun.
- Assembly adhesive.
- Miter box.
- Hacksaw.
- Special glue.
- Sandpaper.
- Wet sponge.
DIY installation of stucco on the ceiling
Stucco on the ceiling
Stucco molding made of polyurethane and polystyrene, as a rule, is sold in the form of ready-made structures, so at the preliminary stage you only need to select the products you like and purchase them. In order to know the required number of elements, you should make calculations, that is, measure the perimeter of the room. At this point, the preparatory work can be considered complete.
The most difficult process is installing the stucco cornice. The installation technology is presented below.
Step 1. Make marks on the surface of the ceiling and cornices using a simple pencil.
Step 2. Insert the cornice into the miter box and use a hacksaw to cut the product at an angle of 45 degrees. This is required to connect the corners of the room as simply as possible.
Step 3. Apply mounting adhesive to the surface of the wall, ceiling and cornice.
Step 4. Apply the cornice according to the markings made and secure it with nails using a pneumatic gun.
Step 5. We fill the gaps with special glue, the shape of the tube and the outlet of which allow the procedure to be carried out without additional tools.
Step 6. Sand the defects using sandpaper.
Step 7. Wipe off any remaining glue with a damp sponge.
Step 8. Decorate the cornice with paints.
An example of decorative stucco on the ceiling
Attaching the cornice is the last stage of installing stucco on the ceiling. All other work is extremely simple, since to carry it out you only need to apply glue to the surface of the material and the ceiling.
Cladding materials
An insulated roof guarantees a favorable indoor climate. If the room is well heated and ventilated, the choice of materials for arranging the attic ceilings of a private house is unlimited and depends on the amount of money you are willing to spend.
We offer a list sorted in descending order of price:
- drywall
- plywood
- lining
- stretch ceiling
- parquet board
- caisson blocks
The list is not closed - while you are reading the article, new items may have appeared on sale.
Design options
Modern manufacturers offer a wide range of canvases for suspended ceilings. Among them there are satin ceilings, glossy films, multi-colored, monotonous, with patterns and ornaments. If desired, you can transfer any design you like onto film using large-format printing. In this way, stars, clouds, and birds of paradise can appear on the ceiling. It's nice to lie on the bed and admire views like this. In a children's room, images of animals and cartoon characters look appropriate. They allow you to develop your child’s imagination and involve him in interesting adventures.
Children's room in the attic with beautiful stretch ceilings Source yandex.ru
Drywall
Drywall is construction cellulose (cardboard) lined with gypsum.
The sheets are easy to install; when wet, the material takes any shape, which it retains when dry.
Complex design ideas become reality - bulges, bends, depressions, attic ceilings of different levels and intricate configurations. Communications and electrical wiring are hidden by a smooth surface, and the dense structure supports the weight of mounted lamps, chandeliers and decorative elements.
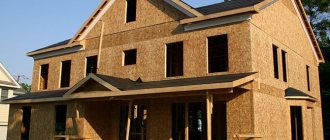
The material is inexpensive and environmentally friendly, however, it is susceptible to deformation during shrinkage of premises, which limits its use in houses under construction.
Manufacturers offer sheets with enhanced fire-resistant properties (marked in red), increased moisture resistance (green), and anti-noise acoustic plasterboard.
GKL is attached to the ceiling sheathing, the joints are sealed with putty, the material serves as the basis for wallpaper, textured plaster, painting or becomes an addition to them.
Cost table
In order for you to have a rough idea of future expenses and be able to prudently adjust your budget, we offer you a small table that shows the average current prices for the materials used for finishing the ceiling with plasterboard.
| Name | Vacation unit | Price |
| self-tapping screws | packaging (200 pcs.) | from 120 rubles |
| gypsum board sheets | sheet(3 m2) | from 250 rubles |
| UD profile | PC. | from 40 rubles |
| CD profile | PC. | from 45 rubles |
| ceiling hangers | PC. | from 4 rubles |
| dowels | packaging (200 pcs.) | from 125 rubles |
Lining
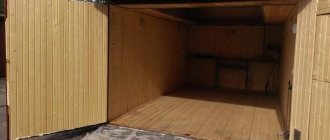
An economical option is lining; its installation is simple and the price is low.
A 30X30 mm block serves as a frame for fastening the lining and creates an air gap between the vapor barrier and the finishing.
The block is mounted to the ceiling sheathing using dowel-nails with threads, which allows you to level the surface of the cladding. When the installation is completed, the lining is covered with stain, varnish or acrylic-based paint.
Eurolining and imitation timber are varieties of conventional lining that do not require additional processing, have a smooth shiny surface, a noble appearance and are a little more expensive.
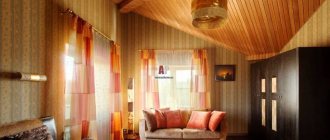
The ceiling in the attic will look original if you place the slats at an angle, combine multidirectional zones, and create play of light and shadow.
We make a frame for fastening
Comparison of ceiling lining methods with different materials
So, once you have decided on the material for the ceiling sheathing, it’s time to move on to making the frame for the sheathing.
Option #1 – metal slats
Attaching any facing material to such a frame is as easy as shelling pears: fireproof, lightweight, designed specifically for fastening. Today, metal slats for cladding are made mainly from two types of metal - steel and aluminum, as well as a special alloy “to look like metal”.
The rack structure is easier to assemble than a children's toy, and in the end it turns out to be almost weightless:
But there are also significant drawbacks: corrosion from the slightest scratch and a complete lack of sound and heat insulation. And also all the wooden elements that are located above such a frame quickly deteriorate.
Option #2 – wooden slats
In its design, the wooden sheathing for the ceiling of a pitched roof is similar to metal. The only difference is that wood, as a living material, is capable of expanding and contracting more rapidly depending on humidity and air temperature. In addition, moisture causes wood to become deformed. Be sure to treat the bars that you use to construct wooden slats with fire protection.
In general, there are no contraindications to the use of wood when arranging the ceiling of such a roof. Is it better to give preference to metal structures if you are finishing a sauna or bathhouse.
You will need bars with a cross section from 20x40 to 80x40. In addition, the wood must also be treated with an antiseptic and antifungal agent.
Coffered ceilings
Coffered blocks are a memory of the ceilings of ancient castles and palaces.
Imitations of cells made from intersecting beams are made from wood, polyurethane, wood fiber material (MDF) and gypsum board. A coffered ceiling in the attic is a luxury that is suitable for rooms with a high vault (3 meters or more).
Plasterboard blocks, in our opinion, are the optimal solution in terms of price, quality and ease of installation (you can do it yourself).
Preparing the premises
- remove all large objects and furniture that could potentially interfere with work and movement during the installation process;
- if it is impossible to carry out the first step, cover the furniture with film to protect it from construction debris, adhesive and dust;
- clean the ceiling of everything unnecessary: dust, small knots and everything that you are unlikely to get to in the foreseeable future after installation.
Beams out
By the way, about beams, it is not necessary to imitate them, much less hide them. The design features and profile of the attic ceiling can be effectively played up by highlighting the protruding elements with light and color.
A low vault can be raised by reflecting light from glossy surfaces, merging the tones of walls and ceilings, or contour lighting.
Dark colors, transverse lines, eat up space. Light colors and vertical orientation work more actively in contrast. High ceilings don’t matter; the more complex the relief, the more interesting the interior.
A beautiful and practical ceiling, or how to kill two birds with one stone
Each of the finishing options has both its advantages and significant disadvantages. The choice of ceiling mainly depends on the design and financial costs of arranging and decorating the attic, especially since modern technologies allow you to install both plasterboard and tension structures yourself.
Needless to say, the possibilities of photo printing on a stretch ceiling make this finishing option very attractive. What a starry sky, panoramic paintings, 3D effects in the attic interior. But in practice it becomes clear that the most beautiful and original designs are obtained by combining two or more materials in finishing.
The most common design technique for decorating attic ceilings is a combination of plasterboard structures and inserts made of glossy stretch fabric, or beautiful photo printing. It is original, impressive, and most importantly, you can use PVC film with a glossy surface on the attic floor, which will noticeably raise the height of the attic, and plasterboard areas will allow the attic to breathe. But during installation, in order to protect the insulation from getting wet, it should be covered with a high-quality vapor barrier.
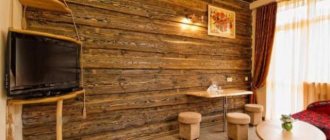
The combination of lining and drywall looks no less impressive. This technique also allows you to visually raise the room; if part of the upper slope is sheathed with wood, the height of the walls will noticeably increase. And if you install diode lighting at the junction with a cold glow, then the structure will become lighter, floating, as if the ceiling is the sky.
In the attic of a small unheated country house, lining the ceiling with plasterboard is not relevant; installing a breathable tension membrane is an expensive process. In this case, it is advisable to cover it with clapboard, plywood, OSB. It may seem that this attic decoration is very ordinary, but you just have to paint the wood in a non-standard color, install a contrasting plinth, and the interior will immediately become graphic and original.
Finishing the attic ceiling, the photo demonstrates how to visually make the walls higher
When arranging, do not forget that light colors and glossy surfaces make the room lighter, taller, more spacious; they are suitable for attic bedrooms, children's rooms, and living rooms. Dark ceilings are appropriate only in high attics or, when creating an authentic sybarite zone, bright ceilings are good for decorating an oriental style. Play with contrasts of colors and textures, don’t be afraid to experiment, the attic ceiling itself is a very interesting element of the interior, and your creative potential and creative approach can make it a real masterpiece that will cause admiration.
Stretch ceiling
A popular method of arranging ceilings in apartments is acceptable for the attic of a private house. Stretch ceilings hide defects, create multi-level configurations of various shapes, colors with matte, shiny surfaces and graphic inserts.
One square meter of stretch ceiling weighs about 250-300 grams, its load on structures is negligible.
It is hardly wise to do the installation yourself. Finding equipment, stretching the fabric, decorating window openings, installing chandeliers and lamps without preparation will not be possible.
If you hire a specialized company, you will only have to choose a design and think in advance about whether the ceiling height is sufficient so as not to accidentally damage the coating. A careless movement or a break will undo the work done, and you will have to start all over again.
Arrangement of ceilings is a creative and technically complex matter. It doesn’t matter what the ceiling cladding will be made of, the main thing is to do everything according to technology, then the bedroom, office or bathroom in the attic will be the best place in the house. It is up to the owner of the house to try on the roles of an architect and decorator or call on craftsmen for help.
Video description
The video shows how craftsmen install a stretch ceiling in an attic room:
In general, you need to be careful with PVC stretch ceilings. They are not recommended for installation in residential premises, because polymer sheets do not allow air to pass through. And the period of guaranteed operation does not exceed 5 years. Therefore, we classified this option for attic ceiling decoration in the “unusual” category.
Open beam design
Another unusual option. This is when the rafter system of the attic roof is not covered, but, on the contrary, their presence is reinforced. To help you understand what we are talking about, look at the photo below. It clearly shows the beams that serve as rafter legs.
The rafter legs of the attic roof are part of the design of the room Source fandemia.com
In fact, the option is very effective. And creating it is not very difficult. For this purpose, the rafter legs are not completely covered. The cladding is mounted between them on the so-called cranial bars. These are square wooden slats that are nailed along the rafters (to them) so that the lower part of the rafter legs is visible after installing the facing layer. That is why rafters are chosen with a width of at least 250 mm.
They are often replaced with timber. This increases the cost of the roofing structure, and installation becomes more difficult. Therefore, another simpler option is used - so-called false beams are installed. They are made from plywood, plasterboard, polypropylene, and gypsum. Essentially, these are just boxes that are mounted at the location where the rafter legs are installed. They are secured either with self-tapping screws or with adhesive. By the way, you can use ordinary boards as false rafters.
Lighting
How cozy the attic will be depends on proper lighting. Using lamps, you can not only achieve optimal illumination of the room, but also emphasize the chosen style.
For low ceilings, the best choice would be original lamps, sconces and floor lamps. A chandelier in such a room would be inappropriate. In the attic, you can abandon general lighting and focus on local lighting, but you should focus on a specific place in the room.
To achieve a better effect, you should point the spotlights at the wall, so the room will visually become more spacious. The same effect can be achieved by placing lamps around the perimeter. A large mirror in the attic will help maximize the room.