A small roof with a bay window has always been an effective way to decorate a country house. The article describes the design features of bay window roofs and methods of their construction. You will get acquainted with the varieties of the popular hip roof with a bay window, find out what stages of preparation and construction go through, why a reinforced belt and valleys are needed.
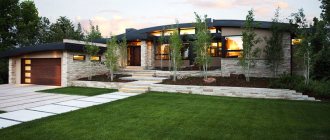
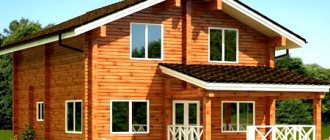
Modern project with a central bay window Source krov-torg.ru
Bay window in combination with other external decorative elements
The bay window itself is the dominant element of the building's exterior decor.
Any, the simplest and most inconspicuous house turns into a mysterious medieval palace with its own history and atmosphere. And designing a large cottage of several hundred square meters using a bay window at the head of the exterior design turns it into a real family castle. Meanwhile, the bay window can be combined with other elements of exterior decoration.
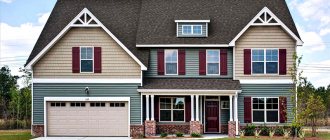
House with bay window and balcony
An excellent solution for two- and three-story buildings. In this case, the bay window is located only on the first floor, and the second floor has a classic design. Outside, the ledge starts from the foundation itself, rises to the height of the floor and ends with an elegant balcony that exactly follows the contours of the bay window. In this case, the balcony can be either covered and glazed, or simply an enclosed space.
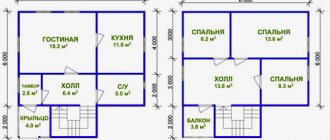
3d house plan with bay window and balcony
Houses with a bay window and attic
This solution is suitable for small areas when you need a compact but functional house. In this case, the bay window can be placed both on the first floor and on both floors at once. Or you can completely abandon the bay window on the first floor, decorating only the attic with this element. As a rule, bedrooms and children's rooms are located in the attic. For both options, a bay window will be an excellent solution.
House with two bay windows
What could be better than one bay window? That's right, two bay windows. You can decorate your home with this element not once, but twice. The appearance of the building will be unique. And in the interior there is space for creativity and self-realization. As a rule, if there are two bay windows, they are placed in the living room and kitchen-dining room, zoning the space.
This combination looks more harmonious in fairly spacious houses. And often bay windows are made of different heights, for example, on one floor and the entire height of the building. However, the design of a house with two bay windows requires careful design and accurate calculations. The task is not just to beautifully fit and combine these two elements, but also to make the structure safe and reliable.
Project of a two-story house with two bay windows of different heights
DIY installation features
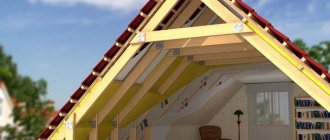
The roof frame consists of:
- from a central ridge beam on which all four planes rest;
- from diagonal rafters (run along diagonals in the direction from the center to the center lines);
- from ordinary rafters (the same as in a conventional rafter system);
- from splices (they have certain dimensions and are used for sewing up the side planes).
The main installation steps are:
- Preparatory work.
- Installation of the Mauerlat. Due to the large load on the walls, the roof-envelope rafter system is not laid on the walls, rather than the backing beam of the mauerlat.
- Installation of ceiling beams.
- Covering floor beams with a front board.
- Installation of corner braces.
- Manufacturing of rafter system.
- Laying boards on the ceiling.
Manufacturing and installation of ridge beams.
- Manufacturing and installation of ridge frame. In order for the frame to be stable, several central rafters are first laid.
- Installation of the frame.
- Installation and fixation of short diagonal rafters (in pairs). This is the most difficult stage of roof installation.
- Manufacturing of main frame slopes.
- Manufacturing of side frame slopes.
- Installation of spigots. Each flange is measured separately and fitted to the roof frame.
- Miter sawing and laying of rafter ends.
- Reinforcement of the frame with metal corners and overlays.
- The final stage.
- Installation of sheathing.
- Installation of counter-grille.
- Laying vapor barrier.
- Insulation (if required) and other elements of the roofing cake.
To strengthen the structure, all roofing elements are laid in pairs, and the joints are fastened with corners and plates.
Important! Long rafter beams for large houses are convenient to saw down and fix to the ground. Finished structures are lifted and installed on beams.
Hip roofs photo designs of interesting designs
Projects of houses with a sloping roof
Hip roofs are a type of roof consisting of four slopes and, due to their design features, are highly resistant to strong gusts of wind. This is explained by the fact that instead of gables in houses with a hip roof, hips (inclined triangular slopes) are used, thanks to which the shape becomes more streamlined and the roof itself is durable.
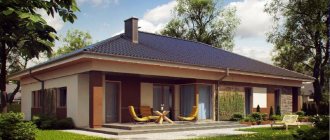
Wooden house with a hipped roof
The absence of gables makes the height of a house with a hip roof visually smaller, but in general, house construction with such a roof looks organic. Photos of one-story houses with a hip roof indicate that often the space directly under the roof is used to create a cozy attic space. To illuminate the attic, full-fledged window structures are located in the roof.
A photo of houses with a hip roof illustrates the neat external contours of the roof, which is often equipped with dormer windows. This makes the roof colorful and interesting in design terms. Hip roofs are usually used for large houses, the base of which forms a rectangle. If the perimeter of the house is square, then another type of hip roof is used - a hip roof.
One-story house with a hip roof
The main feature of a hip roof is that all its slopes have the same shape of an isosceles triangle and an identical angle of inclination. All faces of such a structure converge at one upper point. Hip roofs are also appropriate in houses that have a regular polygon shape. As many sides as there are in a polygon, the roof will have as many symmetrical slopes. From an architectural point of view, such structures are no less attractive.
Another subtype of hip roof is the half-hip roof. This is a combination of a gable and hip model in one design. To give the roof a streamlined shape, the pediment is covered with a small triangular slope (half-hip), the length of which is shortened along the slope. This option ensures that the ridge element of the roof becomes inaccessible to wind currents. When using the space under the roof as an attic, it is possible to install full-fledged windows in the gable part.
Hip roofs with a bay window look exceptional. Bay roofs add romance and sophistication to the entire housing construction. You can find roofs with bay windows attached to the main structure or separately erected over a wall projection. The main disadvantage of such roofs is the complexity of design and rather expensive installation.
House with a semicircular bay window
To cover a hip structure, you can use almost all modern roofing materials: slate, corrugated sheets, metal tiles, ceramic and bitumen tiles and other materials. The roofing covering is selected taking into account the roof slope, the climate of the region, and the characteristics of the material. In addition, the durability, aesthetics and cost of the coating itself play an important role.
Getting acquainted with the design of a hip roof, you will find that it is quite difficult to coordinate all the slopes with the same slope. Accurate calculations, competent design and theoretical recommendations from professionals are required. But, despite the complexity of constructing the frame, hip roofs are undoubtedly popular among private developers.
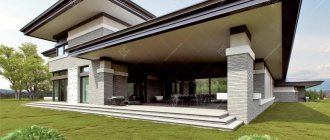
Modern house with hip roof
Types of convertible roofs
The envelope roof is available in 2 options:
- Hip - 2 slopes in this model are trapezoids, and the other 2 are isosceles triangles. If there is a ridge girder, this makes it easier to calculate the diagram and construct the roof with an envelope. A hip roof is erected on buildings that are rectangular in projection.
- Tent - all sections have the shape of isosceles triangles. There is no ridge run. This design is more difficult to calculate, as it requires precise fitting of the elements. A hip roof is also more difficult to install. This option is suitable for a residential building or a square-shaped extension.
Both roofing options are resistant to loads, reliable and durable. In the photo there is a tent-type envelope roof.
Hip roof rafter system with bay window
Projects of houses with sloping roofs
Quite popular in private construction is the construction of house walls with bay windows (protrusions). This is a very interesting architectural solution, however, the projects of such houses are characterized by the complexity of design and construction of the structure. A bay window can be erected not only during construction, but also attached to an existing building. The ledge can be single-story or multi-story.
It is worth noting that the most difficult thing in building houses of this architectural form is the design and installation of a hip roof with a bay window. The basic rule is that the roof of the bay window should harmoniously support the main roof of the building, forming a general style. It is very difficult to build a bay roof, so not everyone will decide to build such a house. The slightest inaccuracy in calculations can lead to the design being unreliable.
The structure of a hip roof with a bay window of various shapes
The shape of the roof for it depends on what shape the protrusion has (rounded, multifaceted, rectangular). It can be a hip, multi-gable, gable structure or a hemispherical roof. Sometimes a spire-shaped roof is erected over the bay window.
There are two types of roof over the bay window: an independent overhang roof or combined with the roof of the main building. For the bay window rafter system, a material with a smaller cross-section is used than for the rafter legs of the main roof structure. This is due to the fact that these elements will take less load.
The technology for laying the roof covering over the bay window is identical to the method for covering the main roof. It is recommended to use tiles, since a small area with several slopes requires a material that would leave a minimum amount of waste when used. Bituminous or ceramic tiles meet this requirement. To calculate metal tiles for a hip roof, you can use a special calculator.
Installation of metal tiles
When constructing roofs with a bay window, special attention should be paid to the valleys. They are used in two types of construction - upper valley strip and lower
One covers unsightly cuts, the other will allow sediment to flow down. In addition, professionals do not advise saving on fasteners (screws, nails, studs, plates). They must be purchased in the right quantity and of good quality.
You can learn about the construction features of the structure from the video of the installation of a hip roof with a bay window.
Metal tiles for a hip roof with a bay window
Preparation for construction: materials
In order to eliminate annoying downtime in roofing work, even before the construction of a hipped roof with a bay window begins, they stock up on the necessary materials, which include:
- Lumber . Board and timber; care must be taken to pre-treat them to protect them from moisture.
- Hardware . Self-tapping screws, screws, roofing nails, studs.
- Tie wire and galvanized plates for additional fastening.
- Materials for roofing pie , including waterproofing membrane. The choice of a two-layer waterproofing film eliminates the need for a ventilation gap; in this case, the insulation layer and the membrane are placed closely.
- Roof covering.
Bay window under a soft roof Source yandex.kz
Construction of the rafter system
House with an attic Pros and Cons photos of real houses with projects
A rafter system is a must for many types of roofs. Of course, a roof with a bay window should also have one. The construction of a rafter system for this type of roof can be made from wooden beams and boards. Their connection to each other, as well as to other structural elements, is carried out using screws, self-tapping screws and other suitable fasteners. The rafter system must consist of beams of sufficient size, and you need to choose with a margin, cutting off the excess length or width directly during installation. By and large, the principles of performing work on the construction of a rafter system in this case are not much different from traditional work when installing different types of roofs. The mauerlat is laid along the reinforced belt, while the rafter legs are attached to the mauerlat.
Installation of rafter legs is carried out at the initial stage. The rafter legs must be moved beyond the plane of the walls. This could then be used to form eaves overhangs. This will prevent moisture that flows down the roof from having a negative impact on the wall material. To secure various wooden roof elements, traditional self-tapping screws or special fasteners are usually used, which are resistant to corrosion and coated with a layer of galvanized steel.
In addition, it is possible that individual elements of the system will be assembled on the surface of the earth. This will depend on the design solution and project - whether the roof with a bay window will be an independent structure, or will become a continuation of the roof of the house. In those situations where the rafter system for a yand roof is assembled with separate trusses, then after they are raised onto the roof, they must be secured not only with a Mauerlat, but also to the ridge. Fastening to the ridge is usually done using steel plates. In this case, it is recommended to fasten the metal plates using a special rolling machine. If it is not possible to use it, then you can use a regular hammer.
Video description
About the bay window rafter system in the following video:
- The sheathing is being filled . If a flexible material is chosen for the roof, the sheathing is made solid. If the material is hard (corrugated sheet or metal tile), sparse (cellular) sheathing is installed.
- A roofing pie is formed . It consists of sequentially fixed layers of film vapor barrier, insulation and waterproofing.
- The counter-lattice is attached . It holds the roofing pie and is a system of wooden slats that are laid across the rafters.
- The lower valley strips are installed . They are placed at the joints of negative angles and connect the bay window and the main roof. The valley is additionally protected from sagging by installing a continuous sheathing (regardless of the chosen finishing coating).
- The finishing coating is being laid . After the roof is completely laid, the upper valley strips are installed. They perform a decorative role, covering the joints of the slopes.
Corner bay window Source pxhere.com
Types of attic roofs of private houses
The attic floor looks different depending on the type of roof structure. The choice is based on the size of the house, design project and further use of additional space.
- The easiest way is to build a house with an attic under a pitched roof. Despite its simplicity of execution, this design is more in line with fashion trends and looks original.
- It is pleasant to consider gable mansard roofs as a classic solution. For a simple gable structure there can be two types of premises: symmetrical and asymmetrical, it all depends on the location of the ridge. The second option is the design of a one-and-a-half-story attic.
- A broken roof is more difficult, but you get a room that is only 15% smaller in size than other full-sized rooms.
- A hip or hip roof is one step ahead in terms of design. However, you will have to sacrifice useful space, because the volume of the room is cut off on each side.
Price
This type of roofing, compared to a gable roof, is much more expensive and depends on:
- on the selected parameters of the future roof;
- on the presence and number of ventilation ducts;
- on the roof configuration (roofs with bay windows, with dormer windows, with dome elements, with sphere elements are much more expensive);
- on the installation method (by yourself or with the help of professional craftsmen).
Included in the price:
- expensive building materials (long rafters, fasteners);
- roofing materials (for joints, junctions, nodes);
- installation of the rafter system (installation by professional installers);
- further operation (due to significant heat loss).
Prices in the price lists of construction companies for the construction of a turnkey envelope roof start from 6,000 rubles. per square meter.
Scheme of the hip roof rafter system
Hip hip roofs are more difficult to construct than conventional gable roofs. This is explained by the difficulty of accurately joining all four slopes at the required slope. Such roofs have two large trapezoid-shaped slopes and two triangle-shaped end slopes. When forming a rafter system, the main difficulties in installing a hip roof arise.
The design of a house with a hip roof takes into account that the slope of the slopes should be in the range from 10 to 60 degrees. The choice of angle of inclination is influenced by the amount of precipitation, the material of the roofing, as well as whether the under-roof space will be used as an attic space. In regions with high rainfall, the slope should be at least 45 degrees.
The hip roof diagram must provide for the cross-sectional shape, dimensions and exact location of all structural elements of the frame. In addition, the drawings of the hip roof rafter system reflect the length of the ridge purlin, the height of the roof, the angle of inclination of the slopes, the width of the spans, methods of strengthening the structure and the specifics of fastening the elements.
Schematic design of a hip roof
Considering that the slanted rafter legs are long and provide support for the framers, they need to be strengthened. To do this, a sprengel is used, the beam of which is cut into the mauerlat, and the oblique leg is supported with a stand. To strengthen the rafter system, they use a wind beam. It is fixed on the inside of the central rafters diagonally, mainly on the windy side of the house.
In the case when the rafters have a length of more than 4.5 m, diagonal struts are used to strengthen them, the use of which allows you to choose beams of a smaller cross-section for the rafters. The struts rest against the tie rods (floor beams), which prevent the rafters from moving apart. If the ties are attached closer to the ridge beam, they can serve as a base for the attic ceiling cladding.
The rafter diagram for a hip roof substantiates the feasibility of using layered or hanging rafters, as well as the use of additional reinforcing elements. If during calculations it turns out that the parameters of the beam do not correspond to the required load, it is possible to use glued or stacked rafter beams. These modified elements are much more massive and can be longer.
Rafter system of a house with a hip roof
If the house construction does not have an intermediate load-bearing wall, then hanging rafter legs are used, which rest on only two supports (on two walls of the house). In this case, the rafters experience compression and bending loads. Due to the fact that the rafter legs create a pushing force on the walls, a wooden tie is used, which connects the rafters together. It is usually installed below at the base of the rafter legs.
When a building has an intermediate load-bearing wall or middle support pillars, a layered rafter scheme is used. In this option, the rafters rest at one end on the outer walls, and for the middle part of the legs, the support is columns or an internal load-bearing wall. With this design, the rafter elements bend, like a beam.
Compared to a roof that uses hanging rafters, a structure with layered rafter legs is lighter. The construction of such a roof requires less materials, which reduces construction costs. It is possible to use a combined rafter system in one structure. This happens when one part of the house has an internal load-bearing wall, and the other does not. To install a roof over such a building, both rafter options are used.
Scheme of wooden layered rafters with emphasis on one purlin for a hip roof
The rafter pattern for a hip roof with offset is used when it is necessary to increase the eaves. In this case, the rafter legs will rest against the floor beams. When installing a hip roof with the rafters supported on the floor beams, such an element as the Mauerlat can be completely excluded from the structural design. Instead, it is proposed to use wooden leveling spacers.
How to properly build an envelope roof, what materials and elements are used for this
February 24, 2019
Read later
We will send the material by email
Envelope roofs have always been used in private housing construction. But today they are especially popular. Therefore, in this article we will tell you what roofing structures erected with an envelope are, what distinctive features they have in their design, and from what elements they are assembled. We will also briefly talk about the technology for constructing roofs of this type.
Envelope roof over a private house - top view Source lalafo.kg
Hip roof design
There are several types of roofs, the most aesthetically pleasing and durable is the hipped roof.
Such a roof will withstand strong winds, snowfalls and heavy downpours. A hip roof may not be complex in design and has some elements.
A hipped roof differs from a gable roof in appearance and design. The design of the hipped roof is somewhat more complicated, but for small buildings you can build it yourself.
A standard hip roof has trapezoidal slopes and triangular slopes.
Semi-hip - two trapezoidal slopes, two cut hips. This design makes it possible to equip an attic with large windows in the attic.
A hip roof is different from a hip roof.
A complex hipped roof has attic windows and valleys.
The construction of this roof can only be done by professionals, or take a project with calculations of materials.
A hip roof includes the same parts as a gable roof, but due to some structural complexity, additional frame parts are required for its construction.
Details of the hipped roof:
Mauerlat is a timber placed on the upper part of the main walls;
Floors are support beams that are located inside and laid on load-bearing walls;
Rafters are diagonal, slanted or side beams;
Sprengels and racks are supports that support the truss structure;
A purlin or ridge beam is a horizontal support for rafters located on top of the roof;
Crossbars and tie rods are horizontal parts that connect the side rafters;
Sprinklers - parts that are placed on diagonal rafters;
Wind beams and struts are braces that increase the strength of the roof;
Fillers are boards that form the desired roof overhang.
The design of the roof determines what parts can be used during construction, for example, cornices over windows or a porch, sheathing.
Before starting construction, it is necessary to calculate the amount of raw materials, also determine what size and shape the roof will be, then make a drawing.
Features of the installation process
Any construction process has its own characteristics, and the construction of a hip roof with a bay window is no exception.
- Before starting installation of the frame, it is recommended to treat all lumber with an antiseptic.
- To make and secure the rafter frame, it is necessary to prepare a mauerlat, which is laid on top of the walls, along the entire perimeter of the building. It performs the function of tying the rafter system to the walls of the building.
- Since intermediate rafter beams have a steep slope, unlike slanted rafters, boards with parameters of at least 5 * 15 cm are used for their manufacture.
- When erecting a rafter frame, vertical posts are first installed to support the ridge girder. The racks are fixed to the central beam using a bevel system.
- The fastening of short rafters is carried out not to the ridge beam, but to the sloping elements of the frame. The slope angles of intermediate and short rafters must match.
- The bay window rafter system, photos of the diagrams of which are presented above, should be in harmony with the overall design, but may have a smaller cross-section of beams, since the imposed load from external climatic factors is much lower.
- The beams used for the construction of the rafter system and the ridge run must have the same cross-section. If this requirement is met, the structure will be strong and its rapid deformation will not occur.
- The intermediate rafters are attached to the ridge purlin and the upper part of the trim.
- When constructing a roof of small height, it is necessary to install additional support posts.
- To obtain a durable roofing structure, it is recommended to use softwood lumber, free from defects and knots.
- For high wind loads, the diagonal and central beams must be thick.
- After the frame is erected, it is hydro- and thermally insulated using a pre-fabricated sheathing.
To summarize, we can say that to equip a building with a bay window, a hip roof is often used, which has several varieties and, depending on the shape of the protrusion, the most suitable type is selected.
Before constructing a rafter system, it is necessary to draw up a project, which includes drawing up a drawing and performing calculations of building materials . To obtain a strong and durable structure, it is better to entrust the creation of the project to professionals.
Construction of the rafter system
Roof rafter system
To select the length of the rafters, it is necessary to accurately understand the angle of inclination of the roof being created
It is important to maintain the proportions of the roof so that the house does not look like a birdhouse
To visualize the appearance of a future roof, such as a hip roof, three-dimensional modeling is used during design.
The rafters should be prepared on the ground, after which they are lifted up and sewn together at the roof ridge using self-tapping screws and galvanized backing plates. Next, the two sides of the future “triangle” of the roof are attached to the rafter beams and jibs.
How to calculate the area of a bay window
To measure the bay window area, the following tools are used:
- a ruler is the least accurate measuring device, giving large errors;
- tape measure – suitable for measuring small areas;
- A laser range finder is a tool that shows the most accurate measurement result and makes it possible to carry out work without the help of a partner.
The main problem when calculating the area of a bay window is its complex shape, beveled or rounded. If it is not a rectangle or triangle, but a more complex polygon, it should be divided into several simple shapes.
The next steps are:
- Measure all sides.
- Draw a drawing and mark the data obtained on it.
- Using formulas for calculating areas, make calculations for simple figures.
From mass standard development to individual projects
When building a private house, future owners try to get away from the standard templates used in mass construction. But at the same time, preserve and bring into your cottage the best that ordinary high-rise buildings have.
Project of a one-story house with a bay window
The individual design of a one-story house with a bay window will not only make the house unique in appearance, attracting the views of passers-by. But it is also very wise to use the emerging advantages from the attached porch.
Different types of houses use different shapes and types of bay windows. This is due to the ability of the main building materials to take the desired shape, as well as the design features:
Square or rectangular bay window. The most common type of bay window, as it does not require the construction of complex structures and is the simplest of all other types when designing. It is possible to build a brick or block house; with a certain degree of skill, you can build a frame house with a bay window and a panel house. This type of bay window is much easier to fit into the interior, especially for those who are new to design laws. But, despite its simplicity, it is no less effective and practical.
Round bay window. It is also called a Venetian-style bay window. It can be placed either in the middle of the wall or fits perfectly in place of one of the corners of the building. Most often there are brick houses with a bay window of this type, but it can be built in block houses, it is unacceptable in houses made of timber, logs, rounds, and it does not fit easily into frame and panel structures. Of course, a house with a semicircular bay window will stand out among the neighboring cottages. The bay window will become a dominant element in the interior and exterior of the house; it requires a competent design approach, otherwise it turns into a tacky, tasteless spot
With the proper approach, the bay window turns into a favorite resting place, no matter in which room of the house it is located. Multifaceted bay window. An intermediate option between round and rectangular solutions. Looks interesting due to its unusual complex design
A multifaceted bay window is most often used in houses made of timber, although it is also suitable for buildings made of other materials. There are a lot of options for using it in the interior.
In typical mass developments, you can most often find the latest versions of bay windows. Simple, accessible, elegant.
Tips and tricks
Experienced builders advise paying attention to the following points:
- Before you finally choose the size and type of roof over the bay window, it is worth making a scaled-down three-dimensional model.
- Any lumber used in roof construction must be treated with antiseptics.
- Foam for waterproofing must have at least two layers so that insulation can be placed close to it.
- The waterproofing film must be highly permeable to water vapor.
- Valleys must be galvanized, since the requirements for their moisture resistance and corrosion resistance are the highest.
Roof drawing and calculation of its area
Before erecting a roof with a bay window, it is necessary to draw up a project that includes preparing a diagram of the future structure, as well as calculating the necessary building materials. Calculation and drawing up of the diagram is carried out in the following sequence:
Selecting the angle of the sides
The choice of the angle of inclination of roof slopes is made taking into account the following criteria:
- In what climatic conditions is the building located, as well as the wind load. With a heavy load, the roof slope should be as flat as possible. The lower the slope, the stronger the structure.
- If there is a large amount of precipitation, the roof slope should, on the contrary, be as high as possible so that it rolls off in a timely manner without thereby affecting the roof surface.
- A variety of roofing material, since each type has its own requirements for the sheathing, and also has different weights. For each type there are some restrictions on the slope of the slope:
| Type of roofing | Optimal slope in degrees | Nuances when laying material |
| Slate | from 13 to 60 | When using a slope of less than 13 degrees, moisture or snow may leak in during the winter, which will reduce the service life of the roof. |
| Ceramic tiles | From 30 to 60 | When installing tiles on a roof with a slope of less than 25 degrees, it is necessary to take measures to improve the waterproofing layer. |
| Metal tiles | The minimum slope is 15, the maximum value is not defined | |
| Bituminous slate | The minimum slope is 5 degrees, the maximum is not defined | The pitch of the lathing for laying bitumen slate depends on the inclination of the sides. With a slope angle of 5 to 10 degrees, it is recommended to make a continuous coating. |
| Steel seam roof | The minimum value is 20 degrees. There is no maximum | |
| Bituminous tiles | Minimum slope - 12 degrees, maximum - undefined | This coating follows the shape of any roofing surface, which is convenient for the construction of roofs with a bay window. |
Important! The higher the angle of inclination, the larger the roof area, which entails the purchase of additional building materials. This nuance must be taken into account when drawing up a drawing.
Drafting
Having taken into account all the features, you can proceed to designing the roof structure with drawing up a drawing and calculation of building materials. To do this you need:
- Measure the parameters of the house and the ledge: height, width and length.
- Schematically display the facade and end of the building on paper, using a certain scale.
- Depending on the characteristics of the house, choose the type of hip roof.
- Having decided on the height of the roof, according to the above criteria, draw several models of the roof frame on one of the sketches. Having chosen the most suitable option, it is necessary to indicate the angle of inclination of the sides of the structure. To do this you need to use a protractor.
- Next, the location of the rafters is plotted on the drawing, marking them with dots. To do this, the length of the wall is divided into equal sections, which will be the step between the slings.
- The pitch between the slings also depends on the section and characteristics of the wood used.
- The need for thermal insulation of the roof. In this case, the location of the rafters must correspond to the width of the insulation.
- The drawing should also indicate the bay window rafters.
- If the type of roof includes a ridge girder, it must be taken into account that it must connect a pair of beams of the rafter system. On one of the drawings you need to mark equal sections from each edge of the wall.
- From the resulting sketches, one large drawing is compiled, which will also be useful in the future for calculating materials.
Important! Having a project and a schematic representation of the design is a good help when purchasing materials, manufacturing workpieces and during the installation process
Review of sofas for a bay window with a berth in this article.
How is area calculated?
Calculation of building materials is carried out according to certain formulas, taking into account the slope of the roof and the area of the roofing surface.
For the calculation you will also need the following data:
- The presence of chimney pipes and dormer windows in the roof. Their presence increases the consumption of building materials.
- The length of the slope, its calculation is made from the ridge to the edge of the cornice.
- The parameters of the firewall walls, overhangs, parapets, and other parts are calculated.
To obtain accurate data when calculating, it is recommended to seek help from professionals or use a special program on the Internet. When deciding to perform the calculation yourself, it is recommended to divide the roof surface into separate sections, which will make it easy to calculate their area. After which all values are summed up.
The more accurately the roofing surface area is calculated, the lower the cost of purchasing excess building materials will be.
Types of roofing coverings
Roof covering is the outer finishing layer that protects the roof and building from exposure to the atmosphere. Performs sound insulation and waterproofing. There are piece and sheet coverings . Made from various raw materials. They differ in the method of installation and duration of operation. Each type has its pros and cons.
Corrugated sheets and other sheet materials
They are made from various modern materials in the form of sheets. Installation of sheet materials is carried out faster than piece materials. They have different shapes and colors. Excellent weather resistance.
- Metal tiles . Galvanized steel sheet, coated with primer, polymer, protective varnish. Installation to the grid with sheets overlapping each other 45 mm, maximum 150 mm, is carried out with self-tapping screws. With a slight slope, the joints are hermetically sealed. Durable coating.
- Corrugated sheeting . Cold rolled galvanized steel with rectangular or corrugated profile. Has polymer protection. Installation with an overlap of about 20 cm using self-tapping screws to the sheathing.
- Ondulin . Eco-friendly, waterproof material made of cellulose impregnated with bitumen resin and polymers. Painted with heat-resistant polymer-based paint. Installation with a longitudinal overlap of at least 30 cm on special fasteners.
- Slate . Corrugated material based on cement and asbestos. Laying in an overlap of one or two waves on a lining made of roofing felt or glassine with nails.
- Seam steel roofing . Steel sheets with or without zinc coating. Covered with polymer. They are mounted with special connections - folds.
- Seam roofing, copper, aluminum . Beautiful, durable material, with a similar installation method as its steel counterpart. Fasteners are selected only from aluminum and copper.
Soft roof
A type of coating of durable, elastic modern materials. The base is impregnated with bitumen and polymers .
Durable material with excellent sound insulation. Flexible tiles. Fiberglass with modified bitumen impregnation, covered with a layer of basalt or shale chips. Installation on a continuous sheathing made of OSB or waterproof plywood.
Piece materials
Made from various materials in the form of individual small-sized elements. Each element is individually fixed to the lathing.
- Ceramic tiles. A type of coating that has been proven over centuries. High temperature fired clay. The weight of the tiles is from 2 kg. Kinds:
- flat tape;
grooved tape;
- groove stamped;
- ordinary ceramic;
- single wave;
- two-wave;
- grooved.
- Sand-cement tiles . A solution of sand and cement, pressed under high pressure. Glazed or unglazed. Fastening through special fastening holes to the sheathing on the waterproofing layer.
- Slate roofing . Handmade slate tiles. Placed on the sheathing, secured with galvanized or copper nails.
Installation on a lathing with a waterproofing layer and a ventilation gap, overlapping with special locks and fasteners.
Step-by-step instructions for installing a hip rafter system
The description will begin from the moment the mauerlat is laid, all previous operations are considered completed, the ceiling is completely ready.
All calculation and design work has also been completed.
There is prepared (dried) material - timber and edged boards made of coniferous trees, which are most suitable for the construction of a rafter system in all respects.
To properly install the elements of the rafter system, it is necessary to stock up on connecting elements that allow some movement of the parts in relation to each other.
This is necessary to compensate for shrinkage processes of the walls, foundation and the system itself
This is especially important for some load-bearing elements resting on the Mauerlat
Movements of the base with fixed connections of the main components can lead to weakening of the connections and the formation of leaks.
- Installation of the Mauerlat. The timber is laid on a waterproofed base and secured with studs. If necessary, the segments are connected along the length of the “half-tree”, with the connections reinforced with nails. The fasteners are installed immediately.
- The corners of the Mauerlat are reinforced with trusses.
- Installation of the bed. One or two (depending on the project) planks are laid on a waterproofed base.
- Stands are installed on which the purlin is attached. In this way, the supporting skeleton of the rafter system is created.
- Diagonal rafter legs are being installed. Immediately, depending on the length, struts and (or) racks are installed.
- The rafters are installed according to the design data. The length/angle is immediately adjusted and the spigots are installed. All elements are, if necessary, reinforced with struts.
- The rafters at the points of attachment to the base and to the purlin are additionally reinforced with brackets, wooden blocks and other fasteners.
Actually, the installation of the rafter system is completed at this stage. Further work consists of creating a roofing pie, constructing sheathing, laying the roof, etc.
It is necessary to take into account the impossibility of complete and detailed coverage of all the nuances and small details on which the high-quality and reliable construction of the rafter system depends, since there are many of them and they are all worthy of separate consideration. Nevertheless, the general sequence is reflected in sufficient detail.
Creating a hip rafter system is not so much a complex process as it is responsible and dangerous in that mistakes made in the early stages become noticeable much later.
Therefore, it is very important to draw up a detailed work plan before starting work, ensure full compliance with the project and do everything as carefully as possible. The entire structure is supported by the connections of wooden parts, so it is advisable to have experience and skills in working with wood
Without possessing this knowledge, it is better to seek help from specialists, since the responsibility of the rafter system for preserving the functional qualities of the entire building is too great.
Hip roof: drawing of the rafter system below.
Drawing of the rafter system
Features of planning and construction
The quality of the design directly depends on strict adherence to all stages of construction, which are identical to the construction of an entire house. Drawing up a project and preparing related documentation. If this kind of extension was planned along with the construction of the entire house, then no additional permits will be required in this case.
If the owners of the house wanted to embellish their estate after a certain period of time, then it is necessary to make appropriate amendments to the house design and obtain permission for the extension from the competent authorities. The layout of the bay window depends on how the owners want to use this additional space. At this stage, do not forget about the shape of the structure.
Builders who do not have much experience in assembling spherical buildings are better off not taking on a Venetian bay window. It is much easier to build a square or rectangular bay window.
Laying the foundation. In terms of structure and constituent elements, it should not differ from the main foundation. Monolithic tapes that have gone through the cladding stage are best suited here. Don't forget that the procedure remains the same:
- first a trench is dug;
- then formwork is made;
- insulation work is being carried out;
- reinforcement;
- the final stage is pouring.
When the pouring process is completed, the finished foundation is given time to shrink and only then the finished platform is treated with waterproofing materials (roofing felt, bitumen mastic).
Construction of the structure. The substrate of the entire building should be protected from moisture as much as possible. In a situation with a wooden house, larch boards would be a good solution. In addition, the house will receive additional support, which will make the building more stable.
The most important work at this stage is cutting corners. After all, cutting corners for a semicircular bay window should be carried out at an angle of 450. But from the correct geometric figure it is much easier to obtain the expected result.
After adjusting the corners, you can begin fastening all the elements. The crowns of the extension are covered with a sealant, and the already assembled structure is covered with caulk. The entrance and openings in the extension are cut out when all the necessary elements are assembled and secured together;
Bay window roof. The simplest roofing option would be to simply extend the roof of the main building. If the customer wants a separate roof, then it can easily be made in the form of a dome or umbrella. Since the amount of work and materials becomes small, a do-it-yourself bay window roof is an excellent option for saving financial costs on labor.
When all roofing work is completed, there is no need to rush to install double-glazed windows. It is necessary to wait until the end of the shrinkage. Based on its results, shortcomings made during construction will be visible, which must be eliminated before finishing work begins.
Bay window roof options
The main rule when making a bay roof is its combination with the main roof of the building. The construction of such a roof is quite a difficult task. Not even all professionals take on such a task, let alone beginners. Any mistake or defect in the design of the bay window roof can affect it in a negative way and lead to disastrous consequences.
The bay window can be rounded, rectangular or multi-faceted in shape. Based on the shape of its structure, one or another version of the roof is built. The roof configurations above the bay window can be as follows:
- Tent. This roof has the shape of a multifaceted pyramid and is designed for small bay windows. Such an element will look like a turret attached to the main building.
- Hip, used if the bay window is longer in width. This roof has its own ridge and 4 slopes, 2 of which are triangular in shape, 2 are trapezoidal.
- A valley roof that looks like it extends from the main wall or roof of the building itself. This option helps to fit the bay window most organically into the structure of the building.
The first two options are distinguished by the complexity of their design, so their construction will definitely require a person who has sufficient qualifications and experience in such work. The latter can be done independently, but, again, by those who know the basics of construction work on erecting roofs on bay windows. But in any case, it is better to entrust the work to a professional, so as not to worry about the possibility of incorrect installation and the problems that may arise during operation.
How to cover with material
The covering is laid in accordance with the instructions for it. Let's say, in our case, this is a roof envelope made of corrugated sheets:
1. Vapor barrier. The film is laid along the rafters along the eaves with a slight sag, secured with a stapler. The top strip is laid overlapping the bottom strip. The seams are taped with construction tape.
2. Insulation. The slabs are placed between the rafters.
3. Waterproofing is placed on top of the insulation in the same way as a vapor barrier. Both films are placed with the discharge surface facing outwards, away from the insulation.
4. The pitch of the lathing depends on the brand of the selected profile. If the slopes are sufficiently steep (at least 15 degrees), the step is 0.5-1 meter.
5. Install cornice strips along the eaves. Fix the sheathing to the outer board with self-tapping screws for corrugated sheets.
6. The first sheets are placed on the cornice, leaving a small outlet behind the wall for overhangs. Adjacent sheets are fastened together with self-tapping screws into the crest of the corrugation, and to the sheathing - into the depression of the corrugation. You can cut blanks for sheets with a hacksaw or metal scissors.
7. Install the ridge element on the ridge and hip ridges. On the ridge, the element is placed with an overlap in the direction of the wind, on the ridges - with the top overlapped with the bottom.
To build a roof, contact our company. We have fifteen years of experience in installing roofing structures, high installation speeds and affordable roof envelope prices. You will receive a high-quality roof and a guarantee for it.
Bay window characteristics
A bay window is a structure protruding beyond the load-bearing walls, which is similar in appearance to a balcony, but has solid walls. Such a structure can be completed not only during the construction of the building, but also by attaching the bay window structure to an already finished building.
Thanks to the presence of a bay window, the facade of the house looks amazing, and the atmosphere inside changes, thanks to the unique design of the walls. Such a room will receive maximum natural light due to the presence of a large number of windows on the bay window. There are also often projects where windows are arranged from floor to ceiling, which allows you to observe the landscape without any restrictions. By making a bay window, the usable area of the house increases, and it can be used as an office, dining room, children's room, or in some other way, depending on the owner's wishes.
The most difficult thing in decorating a bay window is designing and erecting a roof over it, so this issue is worth dwelling on in more detail.
Advantages and disadvantages of the design
In addition to beauty, a bay window has a number of other advantages, namely:
- provides additional natural light;
- makes the room more spacious;
- improves the design of the building inside and out;
- niches located under the windows can provide additional storage space.
Regarding the shortcomings, they are mainly associated with the difficulties of arranging the protruding part of the facade. After all, it must be glazed with special bay windows that have a complex design. Moreover, their installation requires certain knowledge, including proper waterproofing of joints.
Another disadvantage may be the difficulties that arise when making curtain rods that will cover the bay window. After all, the crossbar must be curved in the same way as the ledge, so it must be made to order. Another drawback is that the design is almost completely glazed, which is why in cold weather the temperature in the room will not be high either.
Construction of a complex hip roof
The frame of a complex hip roof is erected in a similar sequence, but with minor modifications. For example, diagonal rafters should be fixed in a more durable way, with the installation of additional supports. The ridge part is installed after installing the support frame, which includes a bed at the bottom and a ridge girder at the top.
It is much more difficult to erect a hip roof truss system than a conventional gable roof structure. However, a hipped roof looks more attractive both over the house and over a light building.
Having tested your strength in erecting a hip roof over a gazebo or other domestic building, you can achieve good results in independently building a hip roof over a residential building.
What is this mysterious bay window?
Bay windows are for the most part similar to large covered balconies, which, however, have solid walls similar to the walls of the building itself. Such bay windows have various shapes; they can be semicircular or multifaceted.
The bay window roof is selected taking into account the existing structure, it can be:
- multi-pincer;
- in the form of a hemisphere;
- complex hip;
- decorative with turrets and other architectural decorations.
Types of bay windows and loggias for an apartment building.
The bay window is most often made glazed; it is more like panoramic glazing, which is quite difficult to install, but it is what gives it a decorative appearance. This improves the illumination of the interior, giving the entire structure a feeling of airiness and lightness.
The most difficult thing is to install a roof over a bay window, since it will not only have a rather complex shape, but also many valleys (grooves) and ridges. The design stage of such a yand roof is the most important and complex; it requires the participation of a professional designer.
A hip roof with a traditional pyramidal shape can be easily calculated using our online calculator. To make the calculation, you only need to have data on the size of the house itself and the exact dimensions of the building materials.
Online calculator for hip roof
The hip roof has the following features:
- pyramidal shape;
- one vertex;
- triangular slopes;
- the difficulty of connecting the rafters.
Online calculation of a hip roof will save time and money. Time, because it will be difficult for a non-specialist to perform such complex calculations. Money, because every extra board or beam, roofing and other materials (insulation, waterproofing) are not cheap, and ready-made ones will help you purchase building materials without extra costs.
General information
Advantages and disadvantages of a roof with a bay window
In appearance, a bay window is very similar to a balcony or terrace. But structurally it is part of a house with permanent walls. Depending on the project, it can occupy several floors, have a trapezoid, semicircle, rectangle or other polyhedron at its base.
Bay window roofs have a large number of advantages:
- Beautiful appearance.
- Excellent resistance to strong wind gusts will be ensured by the absence of a roof gable.
- The streamlined shape makes the roof structure above the bay window reliably protected from various types of precipitation.
- Simplified insulation process.
- Possibility to use the under-roof space as a room for domestic needs or living.
- The ability to use complex design solutions when arranging the space under the roof.
- An additional type of protection for load-bearing walls above the bay window thanks to the large roof overhang.
- Reducing the load on the base and its more uniform distribution due to the absence of a roof gable.
The bay window roofing structure has many advantages, but there are also certain disadvantages:
- The complexity of installation work - mistakes made are difficult to correct, and they greatly reduce the reliability of an architectural element and neutralize its advantages.
- The construction of a roof on a bay window requires large financial investments - the design and construction work is quite difficult and expensive.
- Increased heat loss.
Let's consider what types of bay windows there are.
Types and types of bay windows
The bay window may differ in size and shape, and they can vary in area. Builders and designers can give the bay window almost all possible shapes.
The most popular include:
- Trapezoid - the side parts are adjacent to the facade at different angles, with the exception of the straight one. The central type window is usually larger than those located on the sides.
- Venetian type of bay window, that is, a semicircle. It will give the appearance of the house smooth lines. It looks great both from the street and inside. This type includes turrets located in the corners of buildings.
- Rectangle - can be made by joining the sides to the facade at an angle of 90 degrees. The interior has the usual parameters, but everything does not look so interesting.
- Triangle is not as popular as other structural varieties. But it all looks very original.
There are also more complex forms of geometry, and it is they that will determine not just the appearance of the building, but also the interior of the room.
Preparatory work
First of all, you need to decide on the type of roof that will be used above the bay window; the customer must do this during the design of the building. This importance of the type of roof is determined by the fact that the roof of the bay window will be multi-sloped, which means that the construction of ridges, gutters and other structural elements is required to help melt water, snow masses and leaves not linger on the surface of the roofing material. During project development, all options are analyzed, after which the optimal one is selected in a particular case.
Creating a yand roof is a difficult and energy-consuming process, so it should be entrusted to professionals; trying to build the structure yourself is not recommended. To create a high-quality rafter system, you need a lot of experience and special skills; an ordinary person does not have them. Independent development of a yand roof can lead to failure and be fatal, so experiments here would not be appropriate.
During the preparatory work to create a roof above the bay window, you need to create a reinforced belt, which will require cement mortar and reinforced rods or metal mesh.
The reinforced belt performs the following functions:
- Serves as a support for the beams supporting the rafters. Creating a rafter system without beams is impossible.
- With its help, they strengthen the brickwork and relieve the lintels of window structures.
- Strengthens the walls of the bay window, as it directly communicates with them.
Details
Introduction, calculations, estimates
Rafter roofing house system with bay window
The structure of the bay window rafter system is made of ridge beams, as well as rafters with different purposes. How to make a bay window on the roof with your own hands? Since roof slopes can have different angles of inclination, there are several types of rafters, the main ones being:
- Intermediate central ones - they are attached to each end of the ridge beam, 3 pieces.
- Sloping (that is, corner) rafters - serving as the main load-bearing structural parts, are located at the corners of the frame, and also have the smallest slope compared to intermediate rafters.
- Intermediate - located from the trim to the ridge, between the rafters of the central type.
When installing the roof rafter system, the following is additionally installed:
- Ridge-type purlins are crossbars that are directed horizontally and create support for corner and central rafters.
- Short (that is, outer) rafters are structural elements that are attached to the corner rafters and trim, and also have the same slope.
- Mauerlat is a beam that is attached to the top of the walls from the outside and evenly distributes the rafter load, which serves as the base, that is, the connecting frame link between the walls and the roof.
- The brace is a support for the legs of rafters with large spans, and also makes it possible to cover more spans and at the same time save sections of the main beams.
Let's look at how to calculate the total area.
How to calculate the area of a bay window
To measure the area of a bay window, you need to use the following tools:
- A ruler is a minimally accurate measuring device that gives a large error.
- Construction tape - suitable for measuring small areas.
- A laser rangefinder is a tool that shows the most accurate measurement results, and also makes it possible to carry out work without the help of a partner.
The main problem when calculating the bay window area will be its complex shape, rounded or beveled. If it is not a triangle or a rectangle, but a more complex polygon, it is important to divide it into several simple shapes. The following actions are:
- Measure all sides.
- Make drawings and mark the data obtained on it.
- Using calculation formulas, perform calculations for ordinary figures.
Let's consider a step-by-step algorithm.
Making a bay window with your own hands
The first stage of the bay window construction process is making the design, as well as planning the shape. In certain cases, additional paperwork is required. If you build structures that run parallel to the house, then there is no need for them. if a bay window extension is being made to a building that has been in use for some time, it is important to make amendments to the design and get destruction for the extension.
Laying the base
The structure of the foundation for the bay window structure is similar to the base of the building. A monolithic strip one is suitable, and there are stages of construction. The foundation is in great need of shrinkage, after which it will be possible to treat it with waterproofing materials.
How to build a bay window
If you build a roof bay window with your own hands, it is not recommended to do everything above one floor with your own hands. the most suitable materials are aerated concrete or bricks, and masonry has many features that are important to consider:
- For internal walls, you can use gas silicate blocks or aerated concrete.
- For the external type of masonry, it is best to take high quality facing bricks.
- When using both aerated concrete and brick simultaneously, it is necessary to correctly calculate the load on the base.
- Thermal insulation should be in the middle layer, and this can be mineral wool or other, much more modern spray-type materials.
- It is necessary to provide waterproofing - a membrane-type film or other similar solutions.
- The walls of the building and the bay window must be a monolithic structure. This makes it possible to avoid problems during the operational process.
We should also talk about the roof over the bay window.
Roof over bay window
The main rule for application is that the roof must fit correctly into the main roofing style. In practice, you can find several types of roofing over a bay window. The simplest option for roofing over a bay window would be to make a continuation of the roof of the main building. Its shape will depend on the shape of the bay window (trapezoidal, semicircular, triangular or rectangular).
Roofing varieties above the bay window
You can distinguish the following popular types of roofs over bay windows:
- Hip - it is made in buildings with an oblong roof, has ridges and four slopes, two of them are triangles in shape, and two are trapezoids.
- Hipped - used for bay windows with a small area, and also gives the building a similarity to a tower, and also has a large number of edges.
- Multi-gable - a complex roofing structure for a bay window with valleys and gables, a type of pitched roof with two or more gables, gable-type elements with ridges.
- Decorative - it is equipped with additional structures, for example, the same towers.
The main criterion when choosing a type of roof over a bay window is the performance of its own functions. Most often you can find the roof of a one-story house with a bay window, which is the simplest in terms of design. It will not require large material and labor expenses.
Scheme of the rafter roofing system above the bay window
Dimensions, the exact location of each frame element and cross-section - all this is provided by the rafter system diagram. Moreover, the rafter system drawings include the following characteristics:
- Roof height.
- Span width.
- The angle of inclination of each slope.
- Dimensions of the ridge run.
- Methods of structural strengthening.
- Features of fixing structural elements.
The photo shows a diagram of the rafter system on the bay window of the hip roof.
How to make a roof with your own hands
When installing the roof truss system and bay window, the same materials are usually used as for the main roof. In addition, to make the roof of a house with a bay window, the following materials are required:
- Lathing beams.
- Galvanized iron.
- Rafter type beams.
- Self-tapping screws, screws and nails.
Working steps:
The initial working stage will be the preparation of the belt for reinforcement. This beam support, which also makes the masonry much stronger. The belt material will be reinforced mesh and concrete.- Next, it is important to start installing rafter beams; here they use timber and boards, which are connected using screws and self-tapping screws. It is important to cut them with small gaps, which are removed after the beams have been secured.
- Before you begin installing the rafters, check the angle of the roof slope. The rafters need to be adjusted on the ground, and after lifting, sewn onto the roof ridge using metal plates and self-tapping screws, and also attached to rafter-type beams.
- Afterwards, the rafter system needs to be covered with waterproofing material and the sheathing is made.
- Now you can move on to the most difficult installation stage, and also install valleys using different gutters. Bottom strips are required to drain snow and water. The top bar will serve a decorative function and also perfectly hide imperfections. They are attached to the valley board, and the joints are also treated with sealant.
- At the final stage, the roof above the bay window needs to be insulated and also hemmed.
Now some useful things for beginning craftsmen.
Supports for diagonal rafters
Either struts or vertical posts made of timber or paired boards can be used as support for diagonal rafters. The stand can rest directly on the ceiling , through a layer of waterproofing and a wooden lining.
IMPORTANT!
This requires sufficient rigidity and strength of the floor. If such conditions do not exist, then a strut is used, resting on the beam and supporting the slanted rafter at a given point.
The angle of inclination of the strut does not play a role in this case , the main thing is the connection point, i.e. Load concentration location. For a rafter length of up to 7.5 m, a brace from the top point of maximum load is sufficient, but for a length of more than 9 m, an additional support is required at the bottom.
This can be either support on the ceiling, if it allows, or support on the truss - the so-called. truss truss - a stand reinforced with struts on the sides.
Supports for diagonal rafters
Construction of a gable roof step by step
Installation of the Mauerlat of a gable roof
The Mauerlat takes on the entire load from the roof and transfers it to the walls, so a fairly thick and strong beam is chosen as the Mauerlat. The thickness is chosen based on the thickness of the wall on which it rests. As a rule, they tend to choose the thickness of the mauerlat beam equal to or close to the thickness of the wall.
The Mauerlat must be laid flush with the outer part of the wall, firmly connecting them together. To connect the Mauerlat to the wall, anchor bolts or wire are laid (poured into the reinforced belt) even at the stage of wall construction. If wire is used as fastening, then after laying the timber it is tightly tied with this wire around and remains firmly fixed in this form. If anchor bolts were walled into the wall, through holes are pre-drilled in the mauerlat, with which the beam is placed on the bolts and tightened from above with nuts and wide washers.
It is also important not to forget to lay a layer of waterproofing material in the form of a gasket between the wall and the Mauerlat. As a rule, roofing felt or similar materials are used as waterproofing.
More information about securing the mauerat is described in this video.
Installation of gable roof rafters
After the base has been prepared, we begin to assemble the rafter system of the gable roof. Installation of rafters can be done in several ways: install the rafters directly on the roof or perform some structural elements on the ground and then lift them to the installation site using special equipment. Correctly placing the rafters on a gable roof with your own hands without the help of a partner is quite problematic, so it is better to get help so as not to make a mistake and not nullify all your efforts.
To make it easier to attach the beams, it is worth marking the attachment points on each wall and connecting the opposite walls with beams (beams), on which racks will be installed to support the rafters. A ridge beam is installed on the racks, which serves as a guide for installing the rafter system. In order to connect the rafters as accurately as possible so that the entire skeleton of the rafters is the same, templates are used. This way you can avoid dips and distortions in the roof.
After installing the ridge beam, proceed to the most important part - the installation of rafters (already fastened together or separately)
It is important to constantly monitor the level and evenness of the installation. The rafters are fastened together, usually with nails or using iron staples.
Common schemes for placing rafters on a gable roof and attaching them to each other are shown in the figure below.
After completing the roof frame, it is necessary to install auxiliary fasteners to improve the rigidity of the roof. To do this, install struts and middle skates.
We invite you to watch a video that clearly shows how to install rafters with your own hands for a gable roof.
Gable roof sheathing
Sheathing a gable roof in the simplest case involves installing transverse boards on the rafters for laying roofing material on it. But, as a rule, modern roofing is a more complex pie of various layers.
After installing the sheathing, the roof is covered with a layer of waterproofing, the layers of which are mounted overlapping each other, and the joints are fastened with tape.
The next step is to secure the counter-lattice - strips fixed at an angle of 90 degrees to the main sheathing. This is necessary to provide a ventilated gap in the roof pie to get rid of moisture.
At the final stage of installation of a gable roof, the roofing covering is laid, the choice of which, as mentioned at the beginning of the article, depends on several factors, including the financial component
External work on installing the roof ends with filing the eaves and arranging the gables, if they are not part of the walls. After this, they move on to interior finishing work and roof insulation, if necessary. We will talk in detail about roof insulation in the following articles.
It is worth noting that building a gable roof with your own hands is not so difficult, the main thing is to make the calculations correctly and follow the instructions step by step so as not to miss important points during installation.
A brief video instruction on installing a gable roof is presented in the video: