For the normal functioning of the water meter, water supply and heating system, a check valve must be installed on the water. This is one of the elements for protecting pipeline fittings, allowing the systems for supplying water and heat to the house to function without failures and frequent repairs.
As we wrote in previous articles, for the correct installation of a water meter it is necessary to install several elements, it would not be superfluous to list them again
- Water meter
- Fresh carving
- Shut-off ball valve
- Coarse filter
- Check valve
For the normal functioning of the water meter, water supply and heating system, a check valve must be installed on the water.
This is one of the elements for protecting pipeline fittings, allowing the systems for supplying water and heat to the house to function without failures and frequent repairs.
In some emergency situations, reverse flow of water may occur, which leads to water hammer, which causes longitudinal cracks to appear in the pipeline.
Also, if we remember the principle of communicating vessels, we can see another possibility of the occurrence of reverse flow of water. Water will flow from a pipeline with high pressure to a pipeline with lower pressure. In this case, the hot water meter can take into account the consumption of cold water. A water check valve ensures that water flows only in a given direction, eliminating the return of liquid back.
How to disassemble a check valve?
The check valve is a fairly simple and reliable mechanism, so when used correctly it rarely fails.
But any mechanism can break down. When a valve fails, it is no longer capable of containing the fluid. In order to understand what's going on, you need to disassemble the fittings. How to do this correctly can always be found in the user manual. Before dismantling the check valve, the following points must be checked:
- there must be no pressure in the system,
- the working environment must be released from the system,
- the working environment must cool down,
- the system must be ventilated when working with toxic and caustic flows;
- After completing the work, you need to check the tightness of all connections.
Main tasks of the device
It stabilizes the pressure in the system, protects against water hammer, and prevents reverse fluid circulation. If the valve is installed in a submersible pump in front of a well in a summer cottage, it allows the pump to operate without failures or breakdowns.
Causes of check valve failure
Let's look at the reasons why the valve may not work and what to do in this case.
If you are alarmed by the low consumption of the working medium, possible problems may be:
- the filter in front of the valve is dirty,
- water supply blockage.
To eliminate the first problem, changing or cleaning the mesh will help. In the second case, it would be advisable to clean the water supply system.
2. Loud operation of the fittings
If you are concerned about loud operation of fittings, possible reasons may be:
- incorrectly selected size of the check valve; accordingly, to eliminate it, it will be necessary to replace the valve with the correctly selected diameter of the fittings;
- there are no straight sections or compensators to stabilize the flow before and after the fittings,
- strong flow speed,
- The valve is installed close to the pump.
To eliminate the last three possible causes, you just need to use compensators.
It so happens that you have discovered a leak in the valve. It could arise as a result of:
- particulate pollution,
- valve or ring damage.
In case of contamination, the panacea will be to clean the valve and install a mesh; in case of damage, you will need to contact the supplier and replace the mechanism.
Possible difficulties
In the process of self-production, home craftsmen face a number of difficulties:
- Incorrect calculation of downforce. The spring has to be shortened or, more unpleasantly, wound again. This problem is usually solved by selection.
- Insufficient quality of surface treatment of the seat. The valve does not press against it completely and allows water to pass through. Solved by grinding the surface.
- The flow resistance is too high for the specific system conditions. I can’t decide whether I’ll have to choose a different type of valve or buy an industrial one.
Making a check valve yourself will be a good test of your engineering and plumbing skills.
Check valve disassembly
The check valve is disassembled in the following sequence:
First you need to unscrew the nuts, remove the flanges and washers. Then remove the shut-off valve, unscrew the cap and remove the casing, compress the diameter of the pipe and pull it out, remove the casing from the flanges.
The check valve is assembled, respectively, in the reverse order: a shell is put on the shut-off element and screwed on with a lid, the pipe is compressed and inserted into the body, then the shut-off element is installed in the body, the shell is put on the flanges, and they are also inserted into the body, then screwed studs, the valve is installed on the studs and the nuts and washers are tightened.
Disassembling the check valve installed in the water heater
Many people have water heaters in their homes and cottages; let's also pay attention to removing the check valve from the boiler. First you need to turn off the power to the electrical appliance. After unscrewing the nut, turn the cold water pipeline, unscrew the nut from the valve block, remove the sleeve, spring and the valve itself, clean the seat in the valve, and if necessary, replace the valve.
If the check valve cannot contain the flow of the working fluid, then the best option would be to call a specialist who is guaranteed to fix the problem. If a normal blockage occurs, you can handle it yourself: clean the valve with detergents and put it back. What is important is that safety precautions must always be followed.
Source
How to repair a water check valve
The designs of check valves are simple and reliable, therefore, provided that the operating parameters are observed, they rarely fail.
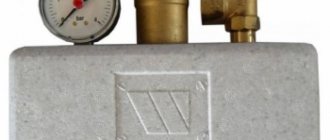
But to monitor their performance, it is recommended to periodically check the check valves for tightness of the flow shutoff. To do this, the section of the pipeline under pressure up to the inlet pipe of the valve is turned off and drained, and attention is paid to the pressure gauges installed before and after the check valve. If the pressure in the area after the outlet pipe of the valve remains the same, but before the inlet pipe has dropped, then the valve has hermetically blocked the flow, and if the pressure on both pressure gauges has dropped, the check valve does not prevent the reverse flow.
If the check reveals reverse flow through the valve, it should be removed. The most likely cause of failure is clogging of the flow area with sludge and can be eliminated by simple cleaning.
In order for modern household appliances to work and to have normal pressure in the tap and shower, it is necessary to create a certain level of pressure in the water supply system. One of the components that is responsible for this is a water check valve. What kind of device is this, how does it work, where to put it. Read on about this and much more.
Tools
To make devices, you will need the following tools and equipment, which are probably available in every self-respecting home workshop:
- Desk or workbench.
- Vise or massive clamp.
- Hacksaw for metal.
- Drill or benchtop drill press.
- Pliers.
- Assembly knife.
- Set of files and needle files.
- Sandpaper of different grits.
- Jigsaw (electric).
Different materials and components are required for different designs and will be listed in the appropriate section.
What is a water check valve, its purpose and scope of application
A check valve is one of the types of shut-off valves. The essence of its work is to block the flow in the opposite direction. Its second task is to prevent pressure drop.
In relation to water supply, it blocks the reverse movement of water. In private water supply systems (from wells or boreholes), a check valve is installed so that after the pump is turned off, it retains water in the suction pipe. If the system is based on a pumping station, then most likely it contains a check valve. But this must be looked at in the passport. Is a second one needed or not in this case? Depends on the length of the supply line, pipeline cross-section, pump performance and several other factors. But more often they put it on.
Illustration of the operating principle of a shut-off valve
In apartments or with central water supply in the house, it is placed in front of the meter. But here his task is different - to prevent the possibility of “rewinding” the testimony. The presence or absence of a check valve in this case does not affect performance. But its installation is a prerequisite for the operating organization. The seal is placed in such a way as to prevent unauthorized tapping of water.
Where else might a water check valve be needed? In the heating system. Not centralized, but private. It may contain circuits in which reverse flow may occur under certain conditions. A check valve is also installed on such circuits. In the boiler piping, with a hygienic shower. These devices can also cause backflow. So shut-off valves are needed.
Recommendations for production and.
Ball for water
To make a valve you will need:
- Plumbing coupling with external thread.
- Tee made of steel or brass with internal thread.
- A spring that fits freely into a tee.
- A metal ball that fits into the tee with a small gap.
- Plug for tee.
- Leta FUM or plumbing thread.
If it is not possible to select a spring, it is wound from elastic wire. Take a rod, drill a hole in it and tuck the end of the wire into it. Next, the steel wire is clamped in the rod with a vice, and the spring is wound with pliers, laying the coils closely.
Figure 4. Ball valve diagram
Assembly is carried out in the following sequence:
- The coupling is screwed into the tee so that it covers the clearance of the side pipe by at least 2 mm.
- A ball is inserted into the hole opposite and supported by a spring.
- Screw in the plug.
- The coupling and plug must be wrapped with a sealant before final assembly.
The pressure of water coming from the coupling presses the ball and opens the lumen for flow in the forward direction. If the pressure drops, the spring presses the ball back and presses it against the coupling cut, blocking the flow in the opposite direction.
It will be necessary to adjust the clamping force of the spring so that the standard pressure in the system is enough to press the ball. You will also have to carefully polish the cut of the coupling so that the ball fits against it without gaps.
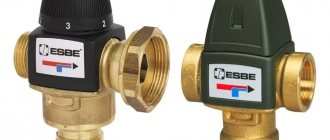
Types of check valves, their design and operating principle
The check valve device is simple. There is a slightly tapered seat and a locking element. With the “correct” flow, the shut-off element is pushed away from the bottleneck. As soon as the direction changes, he presses against the saddle, blocking the passage. By the way, there should be an arrow on the body that indicates the “correct” direction of water movement.
How a water check valve works and how it works
Basically, check valves are distinguished by the type of shut-off element. He can be:
- ball type (ball);
- disc-shaped;
- disk;
- petal or bivalve.
In a ball valve, the ball is “free floating”. It is not attached to anything and is transported by water. Quite a reliable system. It’s just that it doesn’t always cover the saddle tightly enough, so it’s used quite rarely.
Types of check valves for water
Disc-shaped ones can be lifting or rotating. Rotary, as well as ball, open and close under the influence of water flow. Lifting ones have a spring-loaded rod. In the “normal position” the passage is closed; when water pressure appears, it presses the spring, pushing the locking element upward.
The most common type in home water supply systems is the disc check valve. It differs in that fittings of this type can be small in size. And the design is simple and reliable. The locking disc is placed across the flow and is pressed against the seat by a spring. Water squeezes the spring, clearing its way.
A check valve is a device to prevent the reverse movement of the transported medium
There is also a two-leaf valve for water. Its locking element consists of two halves of the disk (petals), which are fixed to the axis. Hence another name for this model - petal. They are held closed by springs. The water entering the water supply system presses them back, folding them and pressing them against each other. This type has the least hydraulic resistance. In some cases (with a long suction line) this may be important.
Possibility of making it yourself
There is no deep financial sense in making valves yourself; purchasing components will cost almost more than a ready-made industrial valve. Or the home workshop should have high-precision drilling, turning and milling machines for self-manufacturing of device parts.
Most often, home craftsmen make valves with their own hands to test their strength in design and assembly. They also make custom valves for home process units for making beverages or aquarium filtration and aeration systems. Next, the design and manufacturing technology of the valves will be considered:
- Ball for water.
- Gravity ball for water.
- Disc-shaped.
- Petal for ventilation.
Figure 3. Reed air valve design
The designs chosen are simple, the technology does not require the use of expensive equipment. Making a simple check valve in a home workshop is quite possible. It is enough to have intermediate level locksmith skills.
Materials, markings, sizes
The check valve for water is made of stainless steel, brass, larger sizes are made of cast iron. For household networks, brass is usually used - it is not too expensive and durable. Stainless steel is, of course, better, but it is usually not the body that fails, but the locking element. This is where you should approach your choice carefully.
For plastic plumbing systems, check valves are made from the same material. They come in polypropylene and plastic (for HDPE and LDPE). The latter can be welded/glued or threaded. You can, of course, solder adapters to brass, install a brass valve, then again an adapter from brass to PPR or plastic. But such a unit is more expensive. And the more connection points, the lower the reliability of the system.
For plastic and polypropylene systems there are check valves made of the same material
The material of the locking element is brass, stainless steel or plastic. Here, by the way, it’s hard to say which is better. Steel and brass are more durable, but if a grain of sand gets between the edge of the disk and the body, the valve jams and it is not always possible to return it to functionality. Plastic wears out faster, but it doesn’t jam. In this regard, it is more reliable. It’s not for nothing that some manufacturers of pumping stations install check valves with plastic discs. And as a rule, everything works for 5-8 years without failures. Then the check valve begins to “poison” and is replaced.
What is indicated in the labeling
A few words about the marking of the check valve. It states:
- Type
- Conditional pass
- Conditional pressure
- GOST according to which it is manufactured. For Russia, this is GOST 27477-87, but there are not only domestic products on the market.
Return valve for water: marking according to GOST
The conditional diameter is designated as DU or DN. When choosing this parameter, you need to focus on other fittings or pipeline diameter. They must match. For example, you will install a check water valve after a submersible pump, and a filter next to it. All three components must have the same nominal diameter. For example, all should have DN 32 or DN 32 written on them.
A few words about conditional pressure. This is the pressure in the system at which the shut-off valves remain operational. You should definitely take it no less than your working pressure. In the case of apartments - no less testing. According to the standard, it exceeds the working one by 50%, and in real conditions it can be much higher. You can find out the pressure for your home from the management company or plumbers.
What else to pay attention to
Each product must come with a passport or description. It indicates the temperature of the working environment. Not all valves can work with hot water or in a heating system. In addition, it is indicated in what position they can work. Some should only stand horizontally, others only vertically. There are also universal ones, for example, disk ones. That's why they are popular.
Opening pressure characterizes the “sensitivity” of the valve. For private networks it rarely matters. Only on supply lines close to the critical length.
Also pay attention to the connecting thread - it can be internal or external. Choose based on ease of installation. Don't forget about the arrow that indicates the direction of water movement.
Dimensions of check valves for water
The size of a check valve for water is calculated according to the nominal diameter and they are produced for all - even the smallest or largest pipeline diameters. The smallest is DN 10 (10 mm nominal bore), the largest is DN 400. They are the same sizes as all other shut-off valves: taps, valves, drains, etc. Conditional pressure can also be referred to as “dimensions”. The lowest is 0.25 MPa, the highest is 250 MPa.
Is a caisson necessary?
A caisson is a relatively small buried structure, which is installed above the well and serves for:
- protection from ground surface waters,
- preventing pipes from freezing,
- protection against pollution,
- securing the safety rope,
- well plumbing,
- distributing the pipeline to several disassembly points,
- power supply connections.
In an isolated spacious caisson, which does not flood or freeze in winter, an automatic well pump and a hydraulic accumulator are often located.
Now you can purchase a ready-made borehole caisson made of plastic or metal, but many homeowners prefer to build it with their own hands, for example, from concrete rings or bricks, and then somehow decorate it aesthetically.
It is not necessary to make a caisson if you need water supply from a well solely for watering green spaces in the warm season. In this case, a plastic head is purchased, which is attached directly to the casing. It serves as the basis for creating a “gander” with cranes; the safety cable of the pump is fixed to it.
It seems that this solution is not suitable for organizing a constant water supply, because in this case the water pipe must go to the house in a trench - below the depth of soil freezing in winter. In fact, you can limit yourself to the head and use the so-called “well adapter”. In fact, this is a threaded corner that has a collapsible design.
Where to install the check valve
First, a few words about how a water check valve is indicated on the diagrams. There is a special icon for it. These are two triangles with their vertices facing each other. One of the triangles is shaded, one is not. The direction of movement of the working medium is indicated by an arrow. In the opposite direction the flow is closed.
Graphic designation of a check valve in diagrams
In general, there is no clear indication of where exactly the check valve should be installed. It is important that it performs its functions, and the location of its installation is a secondary matter. The water supply or heating system must work correctly. And you determine its specific location based on the system parameters and ease of maintenance. The exception is the water supply in the apartment. Here they will clearly tell you that we install the check valve in front of the meter and nothing else.
Where to put a check valve on the water when introducing it into the apartment - after the meter
For example, in the boiler piping there should be a non-return (shut-off) valve in the supply pipeline. It prevents hot water from entering the system, which can happen when the water heats up and this creates increased pressure that can “overwhelm” the water supply. In this case, it is better to place the return line closer to the source of hot water, so as not to subject other piping elements and cold water pipes, which today are not always made of metal, to thermal stress.
On a well or in a well with a submersible pump
If you are looking for information on where to install a check valve on a submersible pump, the information may be contradictory. Some advise installing it immediately at the outlet of the pump, others at the entrance to the house or in a pit if we are talking about a well. Oddly enough, all three options work. Just for different occasions.
We select the installation location of the check valve in the water supply system depending on the parameters of the system and equipment
It is possible to install a check valve in a house or in a pit above a well if the vertical section of the pipeline does not exceed 7 meters. The length of the horizontal section (if it is without slope) does not matter. With such a length of the pipeline, water will not flow back into the well or well.
Installation location of the check valve in a water supply system with a submersible pump
If the water surface is below seven meters (the pump draws water from a depth of more than 7 meters), we install a check valve after the pump. You can do it right away (as in the photo above), or you can install a filter, then a check valve. It is permissible to install the valve a couple of meters above the water level. This no longer plays a big role. But this installation method - at depth - is inconvenient for maintenance. Sooner or later the valve will have to be either cleaned or replaced. If it is in a well or in a well, everything must be taken to the surface. The replacement itself takes just a few minutes. It takes about five minutes to unscrew the thread, remove the old one, check/clean it or install a new one. But all the preparatory work is hard, wet and unpleasant. So, if possible, we move the check valve into the house or pit.
With pumping station
As already mentioned, some models of pumping stations have a check valve. Is it necessary to install a second one on the suction pipe? Again, if the water rises less than 7 meters, you can do without it or place it at the entrance to the house.
For a pumping station, a check valve with a filter is better
If the vertical rise is greater, it should be installed at the entrance. For what? Because when the pump is turned off, the water will flow back. And when turned on, it will pump air, and only then water. And let’s say right away that not all stations tolerate this regime well. Therefore, if you hear that water returns to the well or borehole after turning off the pump, it is better to redo the system.
Check valve with filter for installation with a pumping station
As you can see, in this scheme the check valve is installed at the end of the pipe. Since it is sensitive to contamination, it is better to pre-purify the water. You can screw on standard filters, or you can supply them with a built-in mesh. Which option is better? Probably, after all, the first. Firstly, you can assemble as many filters in series as necessary to supply relatively purified water. Secondly, it is cheaper to change one filter or one valve than a filter with a valve. There is more fuss during installation, but not critical.
Pump power supply
High-performance pumping equipment may require a three-phase connection.
Most household well pumps are connected to a regular 220 volt network, so they may have a complete cable with a capacitor box and a traditional plug at the end. A power cable with a cross-section of working cores of 2.5 square meters is supplied to the caisson, but always with a grounding conductor. This cable is powered from the control automation, or is connected to the electrical panel through a separate circuit breaker of a suitable rating.
The socket for the pump must be of an outdoor type. It can be placed either in a caisson or under a canopy. If the manufacturer allows the power cable to be connected in a coupling, then it is necessary to strictly comply with all the requirements set out in the operating instructions. If the cable is laid in a trench along with a pipe, then a special polymer channel must be used to protect it.
Downhole submersible pumps must be powered using grounding!
Why is the valve not working?
A sign that the check valve is broken - the system cannot maintain the accumulated pressure. Or rather, a broken valve is only one of the reasons. The second is a leak in the supply pipeline. So you'll have to check both options.
What does a water check valve look like in cross section?
If you look carefully at the check valve device, you will understand that there is nothing to break. Possible breakdowns include a wedge on the rod and debris that prevents the disc from pressing tightly. The locking plate may also be worn. The latter is incurable, we change it immediately. Wear also includes pressed grooves from the seat on the sealing ring. So having a seal is a mixed advantage. The rubber is pressed through and the valve begins to “etch”.
This is what a blockage looks like on a small diameter OK
If the stem is lopsided or jammed, in some cases you can correct it. As a rule, this does not last long, and it will jam again quite soon. If the locking plate is clogged, it can usually be cleaned. To prevent this situation from happening again, place a filter in front of the check valve. If it is already there, and the water is still too dirty, there are several options:
- install a second, smaller filter;
- or raise the end of the pipeline from the bottom level;
- clean or deepen the well or borehole.
If we are talking about a submersible pump of the “Kid” type, dampening the vibrations that occur during its operation will help reduce the amount of turbidity. There are different methods - from the use of springs in suspension, to rubberized suspension. This really helps. Another option is to place a barrel with a wide neck in the bottom of the well, and a pump in it. Less silt and sand will rise.
You can see this picture
Next note. If, after a long period of operation without breakdowns, the check valves begin to “fly” one after another, the water level may have changed and you need to move the suction point. The second option is that the pipes are clogged with sand or silt and the pipeline needs to be simply flushed. Well, check it for leaks. By the way, if the station does not gain pressure, then the problem is most likely not in the check valve, but in the bulb, its fastening, nipple, etc.
The check valve is a fairly simple and reliable mechanism, so when used correctly it rarely fails. But any mechanism can break down. When a valve fails, it is no longer capable of containing the fluid. In order to understand what's going on, you need to disassemble the fittings. How to do this correctly can always be found in the user manual.
Before dismantling the check valve, the following points must be checked:
- there must be no pressure in the system,
- the working environment must be released from the system,
- the working environment must cool down,
- the system must be ventilated when working with toxic and caustic flows;
- After completing the work, you need to check the tightness of all connections.
Installation depth
Manufacturers recommend leaving a gap of at least one meter between the bottom of the pump and the bottom of the well. Some make softer restrictions - 40 cm. This allows you to avoid bottom debris being sucked into the pumping device and to obtain the necessary water flow around the pump to cool it.
When hanging the pump and when calculating the length of the pipe and safety cable, it should be taken into account that pumping water makes the plastic pipe significantly heavier and slightly wider.
Causes of check valve failure
Let's look at the reasons why the valve may not work and what to do in this case.
If you are alarmed by the low consumption of the working medium, possible problems may be:
- the filter in front of the valve is dirty,
- water supply blockage.
To eliminate the first problem, changing or cleaning the mesh will help. In the second case, it would be advisable to clean the water supply system.
2. Loud operation of the fittings
If you are concerned about loud operation of fittings, possible reasons may be:
- incorrectly selected size of the check valve; accordingly, to eliminate it, it will be necessary to replace the valve with the correctly selected diameter of the fittings;
- there are no straight sections or compensators to stabilize the flow before and after the fittings,
- strong flow speed,
- The valve is installed close to the pump.
To eliminate the last three possible causes, you just need to use compensators.
It so happens that you have discovered a leak in the valve. It could arise as a result of:
- particulate pollution,
- valve or ring damage.
In case of contamination, the panacea will be to clean the valve and install a mesh; in case of damage, you will need to contact the supplier and replace the mechanism.
Operating pressure
In many ways, it is the pressure that determines the possibility of using a check valve. A similar indicator is designated Рр. Working pressure is characterized by the following features:
- Maximum water pressure at a certain temperature. It is worth considering that temperature affects the main elements of the valve, reducing strength and reliability as this indicator increases.
- Operating pressure affects the mechanism over a long period.
- Often a special graph is used to display the relationship between pressure and temperature. At certain temperature values, the operating pressure remains unchanged, but when a certain threshold is overcome, the indicator drops sharply.
This indicator is also indicated in GOST and can vary over a fairly wide range.
Check valve disassembly
The check valve is disassembled in the following sequence:
First you need to unscrew the nuts, remove the flanges and washers. Then remove the shut-off valve, unscrew the cap and remove the casing, compress the diameter of the pipe and pull it out, remove the casing from the flanges.
The check valve is assembled, respectively, in the reverse order: a shell is put on the shut-off element and screwed on with a lid, the pipe is compressed and inserted into the body, then the shut-off element is installed in the body, the shell is put on the flanges, and they are also inserted into the body, then screwed studs, the valve is installed on the studs and the nuts and washers are tightened.
Disassembling the check valve installed in the water heater
Many people have water heaters in their homes and cottages; let's also pay attention to removing the check valve from the boiler. First you need to turn off the power to the electrical appliance. After unscrewing the nut, turn the cold water pipeline, unscrew the nut from the valve block, remove the sleeve, spring and the valve itself, clean the seat in the valve, and if necessary, replace the valve.
If the check valve cannot contain the flow of the working fluid, then the best option would be to call a specialist who is guaranteed to fix the problem. If a normal blockage occurs, you can handle it yourself: clean the valve with detergents and put it back. What is important is that safety precautions must always be followed.
Source