Floor plan is a graphic representation of horizontal structures that perform load-bearing and enclosing functions. The immediate purpose of the floors is to divide the building into floors to increase the usable area of the structure, which could be used, for example, to accommodate residential premises.
To draw up a floor plan, it is necessary to determine what load-bearing structures will be used - this is also included in the design of houses (prefabricated or monolithic reinforced concrete; reinforced concrete beams, wood or metal, etc.).
General information about precast floor slabs
Houses made from prefabricated reinforced concrete slabs have standard dimensions, but differ in type.
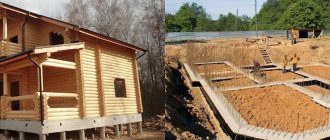
Prefabricated buildings have a number of advantages compared to a monolith:
- high installation speed;
- laying the slabs can be carried out regardless of the conditions: frost, heat, rain, etc. will not be a problem;
- low price, you can save up to 15% of the cost of the monolith.
Reinforced concrete slabs together with the concrete floor of the first floor lead to the main disadvantage of the structure - large mass. Due to their high weight, the slabs have a limited area of use and require the installation of a high-strength foundation. By increasing the depth of foundations for internal and load-bearing walls, the construction estimate increases. Even taking into account additional costs, reinforced concrete slabs are cheaper than a monolith.
Numerous comparisons have proven that slab floors are 50-70% cheaper than monolithic floors and hollow core slabs
The thickness of the external and internal walls of the building differs; the load-bearing slabs are 140-220 mm thick and up to 9 m long, depending on the span. The thickness of the internal walls is about 8-12 mm. When working with panels, it is important to consider the layout and type of construction.
In total there are 3 main types:
- full-bodied. Without voids, they have the greatest weight. They are distinguished by the greatest strength. They are included in the plan, drawing of the floors of exclusively multi-storey buildings. They are used to create interfloor slabs. Due to their solid structure, the slabs have reduced heat and sound insulation properties;
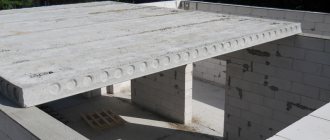
- empty. Inside there are longitudinal voids, usually round in shape. The addition of air tanks resulted in an increase in thickness - 220 mm. They are the most common prefabricated elements. They are distinguished by high insulating characteristics. Due to the presence of voids, in comparison with monolithic floors, hollow blocks create less load on the base and walls. An additional advantage is the ability to cover large spans and load-bearing walls, since the length of the slabs reaches 12 m;
- tent They are a tray with ribs pointing down or up. The thickness of the slabs ranges from 140 to 160 mm.
When working with roofs and external walls, monolithic floors are often used due to their advantages compared to prefabricated slabs:
- distribute the load evenly;
- construction does not require the use of special equipment;
- can be laid not only on walls, but also on columns;
- the monolith can be prepared in any size, including non-standard.
The ceiling retains its monolithic-reinforced structure.
Monolithic panels have 3 main disadvantages:
- labor intensity of construction;
- the need for a complex process of strengthening the structure, which is unlikely to be possible without the help of highly qualified builders;
- The formation of formwork is required; the process is labor-intensive and requires a lot of materials.
When drawing up a plan and considering the layout of floor slabs, it is worth taking into account the features of each type of floor.
Choosing: cheap or high quality?
When choosing building materials, in particular reinforced concrete products, you can, of course, save a couple of thousand by purchasing floor slabs from a handicraft manufacturer. But it should be understood that only factory production guarantees compliance with the technological process. Starting from high-quality concrete, because concrete science is a whole science, observing proportions, pouring and drying technology (and in large industries, also steaming). The metal from which the internal reinforcement of the floor slab is made also plays an important role. The steel grade must meet certain characteristics in order to withstand the stated load. It follows from this that only a competent technologist at a large, time-tested plant can monitor the entire technological chain, observing all standards. Therefore, if you want to get an excellent material made in accordance with GOST, with a smooth surface, from high-quality concrete, choose floor slabs made in the factory using modern equipment. This will allow you to avoid additional investments in the further construction of your home. And remember: The miser pays twice!
Floor slab plan
An important step in drawing up a diagram is calculating the number of slabs. The indicator is defined as the sum of the floor areas and the area of one slab. When dividing, the result may be a non-integer value; rounding is carried out upward.
When considering the plan, you can choose several types of floors for different floors. Differences are often made for rooms below grade level, but changes can be made for each floor separately.
It is better to leave the drawing of the floor plan in the hands of a professional. The work itself can be done by a beginner or an unskilled worker, but the drawing requires an understanding of the properties of reinforced concrete slabs and correct calculations. Any mistake can result in the destruction of the structure. The architect will take into account the building's features and help determine the best plan.
Floor plan - a graphic representation of horizontal structures that perform load-bearing and enclosing functions
For flooring, reinforced concrete beams with a T-section and inter-beam filling are used (lightweight concrete slabs or hollow liners). The length of the beams ranges from 2.4-6.4 m. Support on the wall - from 150 mm. The ends are anchored into the wall on both sides. The pitch is defined as the size of the aggregate, usually 60, 80 cm or 1 m.
If you plan to lay wooden floors, the situation is greatly simplified, since you will not have to operate with heavy structures, but with easily movable beams. If errors are made in terms of overlaps, they are easier to eliminate; the result of the error is not disastrous. Even a beginner can perform flooring with wood. It is important to choose impregnated beams, and their installation is a simple procedure.
Wooden beams are capable of covering a span of up to 4.8 m. The height of the beam is selected in the range of 5-10% of the span, and the width is in the range of 60-120 mm. The support for the interbeam shields are 40-50 mm cranial beams, which are attached to the sides of the beams. The pitch of the beams is taken from 600 to 1500 mm, this has a decisive effect on the width of the boards. The length of the shields is calculated based on the length of the boards.
Spiraea vangutta - planting
Online calculator for calculating the amount of foam block
There are two main types of planting: cuttings and seeds.
Planting by cuttings
The planting period is selected depending on the time of year in which the spirea blooms. The main principle of planting spirea vangutta is: replanting either without leaves or after the leaves have fallen, that is, there should be no leaves on the cuttings!
Planting and caring for spirea vangutta will not cause any particular difficulties even for the most inexperienced gardener. It is best to plant this plant in late autumn or early spring. Before planting, you need to work with the seedlings: shorten the branches by a third, trim off damaged roots.
It is important to ensure that the cut is perfectly even. The size of the planting hole should be several times larger than the size of the root system
The roots of spirea need space; they should not rest anywhere. Before planting in the hole, you must immediately add fertilizer: the same amount of turf soil, peat and sand. The seedlings must be inserted into the holes in such a way that the root collar is neither lower nor higher than ground level. At the end of planting, the soil needs to be flattened, a hole made and watered.
Ground cover roses planting and care Park rose: planting and care
Floor slab layout plan
After drawing up sketches regarding the approximate location of the slabs, it is important to determine the axes and overall dimensions of the panels along the axes. The dimensions of the slab will help determine the height of the building and the number of panels. Vertical dimensional values take into account relative heights from the finished floor level.
To draw up a plan, it is important to take into account the location of the load-bearing walls to which the floors will be attached.
When laying out the load-bearing elements of the floor, you will see that the selection of their width is as important as the length
How to divide monolithic reinforced concrete panels into parts
When performing installation activities, it becomes necessary to reduce the length of the standard panel. To complete the task, you can use a regular grinder with a diamond wheel designed for cutting concrete. You will also need a disc for cutting steel reinforcement, a sledgehammer and a crowbar.
Carry out work on cutting slabs according to the following algorithm:
- Mark the required panel size with chalk.
- Place a backing along the markings to protect the concrete from chipping.
- Cut the reinforced concrete slab along the chalk line.
- Apply blows with a sledgehammer to the top plane and end surfaces.
After the unnecessary piece of slab settles under its own weight, perform the following operations:
First, a cut is made with a grinder on the upper surface of the slab along the marked line
- Use a crowbar to break through the bottom of the concrete panel.
- Use a grinder to cut the reinforcement using a metal disc.
Following the given sequence of operations, it is easy to cut the panel along the longitudinal axis. In this case, using a grinder with a metal circle, you will have to cut the metal mesh used to strengthen the slabs.
Plan of load-bearing floor structures
Hollow-core floors are supported on a load-bearing brick wall on the short side, at least 90 mm. If the support is cellular concrete - 120-150 mm. It is not recommended to rest the long side on self-supporting elements. For the construction of low-rise buildings, it is better to use slabs with a width of 1.8 m and a length of up to 7.2 m.
If the walls of the building are made of cellular concrete, it is better to use a ceiling made of the same material. On the short side they should be supported by load-bearing walls - 10-15 cm, and on the sides - 2-5 cm. To strengthen the structure, the plan should include a reinforced concrete belt made of a monolith that encircles the building and internal walls.
When drawing up a plan for a structure made of prefabricated reinforced concrete or cellular concrete slabs, it is important to make footnotes with the dimensions of the elements, indicate the sections of the monolith, the height of the support, the width of the reinforced concrete belt and the anchorage of the panels.
Mostly for floors, I-beams with a height of 16-27 cm are used. Floor beams should rest on the walls by 18 cm or more. To form a hard drive, you need to connect the beams together and attach them to the walls. The distance between the beams is 60, 77, 80 cm or 1, 1.1 m. The type of interbeam filler has the greatest influence on the step. It is better to fix the beams along the edges of the structure near the load-bearing walls (up to 5 cm from the edge of the beam to the wall). It is better to make elements of non-standard shape from monolithic concrete.
Upon completion of the arrangement of load-bearing elements on the walls of the building, they proceed to applying designations and dimensions
Preparation for installation
Before laying the panels, you need to complete the preparation that occurs during the construction of the walls. The upper edge of the load-bearing walls must be made perfectly flat - this is controlled using a water or laser level.
Installation work on the construction of subsequent tiers of the building is carried out only after the structures of the previous tier have been secured
400 mm before the end you need to start checking the level, make marks and then, using a tape measure, make sure that the edges are even. The bricks in the top row are laid with the butts inside the room. As an option, you can consider laying a reinforced concrete belt on a brick wall.
If we are talking about hollow-core slabs, then before laying them, the end holes should be cemented in them - this is necessary so that the wall that can be placed along the edge does not collapse the edge, and also so that the mortar does not leak out when closing the gaps.
Before you begin laying floor slabs, prepare a level area for the installation crane. The soil should be firm enough so that the crane does not sink into it - for this you can consider laying a special covering. If you have a pit for a basement, do not place the crane nearby to prevent it from sliding along with the crumbling soil.
General installation information
Prefabricated reinforced concrete slabs are installed with a minimum gap between each other. Installation will require special lifting equipment. The seams of the floors are filled with cement mortar. Metal anchors that are mounted to the hinges of the slabs will help create a complete and extremely rigid horizontal floor. In places where the panels come into contact with the internal slabs, composite anchors are used, which are fastened by welding.
If precast slabs are based on external walls, it is recommended to attach their end parts to the masonry using L-shaped anchors. After installation, they are filled with cement, it will prevent corrosion. If gaps appear between the slabs and partitions, they can be eliminated with brickwork.
An important rule is that reinforced concrete slabs are laid exclusively on load-bearing walls; other self-supporting structures and partitions are laid after the slabs are installed.
When laying slabs, a foundation is formed under load-bearing and self-supporting walls with a thickness of over 250 mm. Additionally, the base is installed under ventilation ducts and individual supporting elements. To create a foundation sketch, you should take into account the size of the base under the walls and determine the connection of the base of the foundation to the modular alignment layers. When using columnar and prefabricated foundations, the width of the foundation slabs is determined according to the strength required to withstand the loads.
In addition to the good economic effect in terms of construction costs and speed of building construction, the use of reinforced concrete provides a number of other advantages
The thickness of the rubble concrete and rubble strips is determined 8-10 cm wider than the wall. The size of the prefabricated foundation is determined equal to the thickness of the blocks (30-60 cm), but the wall itself is sometimes 4-5 cm wider than the base. Common block lengths: 80, 120, 240 cm To reduce pressure on the soil, the foundation can be made with an expanded base with 1-2 ledges, dimensions (HxW) - 30-40x15-25 cm. In a prefabricated foundation for widening, a foundation slab-cushion with reinforcement with a width of 60 cm to 1.6 m is used , height 30 cm.
Information on the purpose of the calculator
Online calculator for profiled and laminated timber
designed to calculate the quantity and volume of lumber for the construction of houses, bathhouses and other buildings. The amount of inter-crown insulation, dowels, crowns, cost and anti-corrosion impregnation is automatically calculated based on the average value. For more accurate calculations, be sure to contact specialists in your region.
When filling out the data, pay attention to the additional information with the Additional information sign
To understand the advantages and disadvantages of profiled timber compared to laminated veneer lumber, you should start with the basic concepts about the production of both.
Profiled timber is made from coniferous trees. In most cases, it has standard section dimensions:
- 100x100 mm - best suited for building a bathhouse or summer country house
- 150x150 mm - suitable for a good home
- 200x200 mm - for the construction of large wooden houses or cottages
If desired, you can individually order timber of a different section. The appearance of the timber can be either with a straight front side or with a D-shaped one. A log of the required thickness is processed on planing and milling machines, after which it is ground on the required sides. The side of the beam that will be located inside the future house and may not require further finishing is usually subjected to high-quality sanding. For convenience and reliability of installation of a log house and for protection from cold and moisture, the profile most often comes with 1 or 2 tenons for a lightweight structure or a “comb” for a residential building. The finished log house must shrink for further completion of construction, usually this period is about 1 year. To reduce this period to several months, you can dry the timber in advance in special chambers.
To produce laminated veneer lumber, logs are sawn into boards, which are also called “lamellas”. The boards are cut and placed in a drying chamber, where the soft drying process produces material with a moisture content of about 10%. The boards are then planed again to the required dimensions, sorted, and then glued into timber using a hydraulic press. For gluing, special waterproof adhesive compositions are used. To make laminated timber resistant to rotting and significantly increase its strength, the boards are laid in a special way - each is laid opposite to the cross-section of the fibers of the neighboring one.
When assessing the strength of materials, it is necessary to recognize the best performance of laminated veneer lumber.
When comparing the moisture content of the material and the shrinkage time, it has already been noted that laminated veneer lumber has a moisture content of about 10% and, accordingly, a short shrinkage time, which makes it possible to reduce the construction period of a house. Profiled timber has the natural moisture content of wood, and even drying it can reduce the moisture content only to 20%, so shrinkage cannot be avoided. When comparing shrinkage periods, we must not forget the fact that solid material, due to its greater massiveness, is practically not susceptible to cracking, but on laminated veneer lumber there is a possibility of small cracks occurring.
Due to technological manufacturing features, each type of timber may have different overall dimensions. The profile usually has a length of up to 6 meters, and a cross-section of 100x100, 150x150 and 200x200 mm. Manufacturing timber of a different section size (for example, with a step every 10 mm) can increase the amount of waste, which cannot but affect the price. The length of laminated veneer lumber can reach 12 meters, and the cross-section is usually made from 80 to 280 mm.
In terms of cost, solid timber is almost 2 times cheaper due to the less complex manufacturing process.
In terms of environmental friendliness, profiled timber is not just a favorite, but rather a champion, preserving all the beneficial properties of such an excellent material as natural wood. For processing, you may only need special mixtures to protect against fire and rot, which the owner of the house can choose. In the production of laminated veneer lumber, adhesive compositions can be used, which are divided into several groups according to the degree of danger, and it is not a fact that the manufacturer did not decide to save on the cost of the glue.
In conclusion, we can say that each of the 2 types of timber considered has its undoubted advantages with a small number of disadvantages. And only the owner can decide what material to build the house from in order to continue living in it.
The following is a complete list of calculations performed with a brief description of each item. If you haven't found the answer to your question, you can contact us via feedback.
Sequence of installation of floor slabs
Initially, you need to complete 2 steps:
- Preparation. It is important to create the correct level between all the supporting walls of the structure. The permissible difference is 1 cm, it is not necessary to eliminate it. To check the horizontal plane, use a building level. A beam is laid between opposite walls and the evenness is checked. If there are small irregularities, they can be eliminated with cement mortar.
- Next, a distribution belt is made to level the wall. The reinforcing belt is made of cement M500 1 to 3 with sand. It is important to ensure the cleanliness of the sand, rinse and sift if necessary. A solution of medium viscosity is prepared. The mixture is poured into the formwork and pierced or tamped to remove voids. The solution takes up to 3-4 weeks to dry.
The main qualities for which reinforced concrete is valued are always called strength and good resistance to bending moment.
Anchoring reinforcement
Anchoring in reinforcement frames is carried out to allow the rods to absorb the forces acting on them by installing anchors of various designs at their ends or by inserting the reinforcement beyond the design sections to a length that ensures the inclusion of the rods in joint work. In the fixation zones, the reliability of fastening stretched reinforcing bars in concrete or the transfer of forces from elements working in compression to the concrete is ensured. The necessary calculations are carried out at the stage of design development of structures.
Anchoring of reinforcement in concrete is carried out using the following main methods or a combination of them:
- using straight ends of rods (not acceptable for smooth reinforcing steel);
- the device of bends in the form of hooks or loops at the end of the rods, as well as bends (the legs are bent only when using a periodic profile). This method is not recommended in compressed areas. The minimum diameters of bends or bends must ensure the impossibility of splitting or destruction of concrete at the bends and within them. The radius of the arc must be ≥ 10 times the diameter of the rods, with clamps attached to the bent sections to protect the elements from unbending;
- welding of transverse shorts;
- fastening various anchor devices (set heads, plates, nuts, washers, angles and other elements) to the ends of the rods.
The anchorage length of the reinforcement is ≥ 15 rod diameters and at least 20 cm, with a sufficient thickness of the protective concrete layer to protect them from corrosion.
Joining of non-prestressing reinforcement ≤ 36 mm in tensile zones is allowed by overlapping by knitting or welding of rods. The joints should be spaced apart in places where minimum torque and bending moments are applied. The length of the overlap, mainly performed by rods A-III, depends on their diameters. The building codes contain special tables, so for 10 mm rods the overlap should be 30 cm, and for 25 – 76 cm.
Calculation of the required anchorage length should take into account:
- method of execution;
- profile, diameter and class of reinforcement;
- presence of transverse elements;
- arrangement of rods in cross section;
- stress state of concrete in the anchorage zone and its strength characteristics.
When welding anchors, the method and conditions of welding work and the weldability characteristics of reinforcing steel must be taken into account.
Prestressed reinforcement with a periodic profile and steel ropes, when tension is applied to the stops and the concrete has sufficient strength characteristics, can be placed in the structure without the use of anchors, and bundles of smooth high-strength wire are necessarily secured in the concrete with special anchoring.
When tensioning concrete, it is important to ensure good transfer of stresses from the reinforcement to it. Steel plates are installed under the anchor devices to ensure that the concrete absorbs forces from the reinforcement equally
The ends of the structures are strengthened by installing additional welded mesh, clamps and spirals.
Reinforcing bundles are stretched to specified stresses by placing jacks at the ends of the elements, after which the wire bundles are wedged with conical tubes in steel blocks using a special piston pulled out from the jacks.
More powerful reinforcement beams are secured with glass-type anchors. Grabbing the body of the anchor, the jack pulls it away, focusing on the concrete and creating a gap from the end of the structure, into which washers with longitudinal slots are installed. In this way, the reinforcement beams are fixed in a state of a given voltage.
Floor slab installation technology
To install prefabricated reinforced concrete slabs, it will be necessary to rent a crane and 4 workers: a driver, a slinger and 2 installers.
Load-bearing walls should be calculated taking into account the need for a 5 cm gap on the street side. Insulation is placed in the recess; it prevents drafts through the cracks in the ceiling. Wear of thermal insulation in such houses leads to cold, dampness and drafts.
Installation procedure:
- Concrete is laid in a layer of 15-20 mm on the prepared cement mortar cushion on the supporting walls.
- The panel is lifted with a crane and placed on top of the installation site.
- Installers rotate the slab to guide it to the desired position. Crowbars will help to accurately position the slab before removing the slings. The correct location implies a contact point between the wall and the slab of at least 15 cm on each side.
- The slings are released and a final check of the installation is made.
There are no temperature restrictions for reinforced concrete
Checking the correct installation of floor slabs on supporting load-bearing walls
A viewfinder and a building level will help you most accurately determine the correct installation. If the walls have a difference of more than 4 mm on opposite sides, the slab should be re-installed. It is raised, the solution is corrected and the mixture is added in large quantities from the low side. If the cement begins to harden, it is better to remove it and mix it again. Even after adding water to the old mixture, it will no longer acquire the desired strength. If there are no problems with the level, the slabs are fastened.
To fix reinforced concrete panels, anchors are welded to the mounting loops. Next, the loops are welded together. The cracks are filled with cement. To prevent the solution from spilling out from below, crushed stone (up to 2 cm) is poured into the gap.
The following tools will be useful during the fastening process:
- tap;
- compressor unit;
- scaffolding;
- building levels;
- hammers, including jackhammers;
- crowbars;
- trowels;
- hacksaws for metal;
- tank or surface for preparing the solution.
Features of installing prefabricated floor slabs in private construction
The procedure is similar to the previous methods, but there are differences that occur due to the reduction in size and weight of the slabs. Even with a reduction in weight, the load on the supporting elements remains high. To prevent the destruction of the structure, you will have to increase the estimate to order the calculation of the load, the construction of the foundation, and the thickening of the walls. An additional cost is the need to hire skilled workers with experience.
It is easier to perform the ceiling from a wooden beam; the technique is much easier and less expensive. Reinforced concrete slabs are clearly preferred when constructing flat roofs. Roll or sheet roofing material is simply laid on top of the panels. When using reinforced concrete slabs for roofing, a more durable and durable coating is obtained.
Primary requirements
In the process of manufacturing floor slabs for heating mains and trays, standards must be used that detail the recommended tests for the material regarding :
- Strength, reliability, homogeneity and resistance of concrete at low temperatures.
- Waterproof and compression.
- Compliance with the declared quantity and quality of reinforcement for the manufactured frame.
- Thickness of the concrete block and dimensions according to the project.
- The formation or absence of microcracks that occur during shrinkage of the structure.
If manufactured products do not pass tests under production conditions, they are sent for production revision. The standards governing the production of floors include :
- GOST 12730.4-78;
- TU 5859-001-86780364-2008 (table of trays);
- Series 3.006.1-8 (features of channels and tunnels from tray elements), etc.
The main characteristics regulated for slabs of heating mains and trays must comply with the following indicators :
- Water resistance - more than W4.
- The compressive strength of concrete material is 22.5V and above.
- Frost resistance –
- Indicators of frame steel – class A-I, A-III, including also BP-I.
For factory-made reinforced concrete products, there are mandatory requirements for the presence of markings (letters + numbers), which are applied to each slab. Marked designations indicate the main characteristics and parameters (dimensions, weight), as well as the withstand load per 1 m2 (strength). Additionally, the date of issue, company (firm), as well as a mark on passing technical control are indicated.
Important! Special requirements are imposed on the location of reinforcement in the frame of products, which must be included in the nomenclature. The project also calculates pressure and future loads.