- Pros and cons of cast iron baths
- Siphons are a necessary element of plumbing
- What types of siphons are there?
- Materials for siphons
- Functional differences between siphons
- Specifics of siphon installation
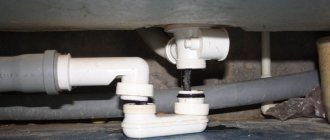
A siphon on plumbing equipment is an irreplaceable thing. It serves to remove wastewater and prevent odor from entering the sewer into the room. Is there any difference between a siphon for a cast iron bath and another type of siphon? Let's try to figure it out.
Siphon for cast iron bath
Tell me, why are there 2 faucets in the bathroom?
Another advantage of 2 mixers *We, for example, have a bath/shower mixer with a thermostat.
That is, one knob is temperature, the second is pressure. So we rarely touch the temperature knob - everyone likes approximately the same water. Very comfortably! But the faucet above the sink is ordinary, one-armed. And in the sink we often use water of varying temperatures - for example, we pour cold water to water flowers.
Another drawback: If you try to hang a curtain, the goose will not allow it to adhere to the wall and the splashes will fly out, in particular onto the floor. In general, they said it correctly - one mixer is solely due to poverty/economy/toad
And I have three. That's how everything works  *
*
There should be 3 faucets in the bath: sink - bathtub - shower
OFF.
“Bathtub” in this conference is like “Subs in automobiles.” A bathtub is essentially a container for water.
Room - bathroom.
:-))
3 maaaalo, there should be 4! More trouble! :)) *
One faucet is a sign of poverty *from when apartments were still provided for free :-). In fact, this is inconvenient: the duck, no matter how “designed” it is, is located inconveniently above the sink. And mechanically, as has already been correctly pointed out, sooner or later it begins to leak.
Baths are different. *In any standard and with a standard layout it reaches, but if there is 1-1.5 m from the bathtub to the sink. Then it is necessary Sergei
Here’s another argument: a faucet with a long swivel spout has a more complex design, which is more susceptible to mechanical stress and will certainly leak over time.
However, I have only one mixer made, because it happened historically. So far the flight is normal.
One in the sink, the other above the bath I had 1 originally, with a swivel gooseneck. I threw out the old sink and installed a new one with a ball faucet. The old faucet was between the sink and the bathtub, I removed it and filled the holes. Above the bathtub I installed a separate one with a bar and a watering can. It is more comfortable.
Vladimir
What's the convenience? We at the holiday home were “fortunate” to use this option. On the contrary, I was left with the feeling that it was terribly inconvenient.
Georgiy
Imagine a situation: your wife is in the shower... ...and you need to wash your hands or vice versa. Of course, a faucet with a toilet allows you to get out of this situation beautifully, but many people have the space to install it?
Represented. There is also a kitchen. Even when there were no children, this happened occasionally, but now the door is still locked.
Georgiy
In the kitchen there is a mountain of dishes in the sink (whisper :))))) It takes time to load the dishwasher, so it is temporarily stored in the sink. In addition, the bathroom has more of all kinds of products, aromatic soaps.
Overall, it was a good Friday question! :))
Rating of semi-automatic systems
Kaiser bathroom waste and overflow brass
A beautiful device that will give your bath a rich appearance. Suitable for connection to various structures and sewerage systems. Closing and opening of the valve is carried out using a special head. The body is made of brass, which distinguishes the product from many similar products. The controls are convenient, and the cable is made of high quality, which allows it to withstand frequent use.
The average cost is 2,810 rubles.
Kaiser bathroom waste and overflow brass
Advantages:
- Beautiful external design;
- Reliability;
- High service life;
- Efficiency.
Flaws:
- Not found.
GEBERIT 150.520.21.1
A reliable model with a water seal that is suitable for installation in various bathtubs. The approximate service life is 10 years, but with proper use the product can function for 15 years. Connection diameter – 50, 52 mm. The pipe is made of durable plastic, the rotation mechanism and the lid are made of stainless steel.
The average price is 2,200 rubles.
GEBERIT 150.520.21.1
Advantages:
- Efficiency;
- Durability;
- Drain speed;
- High quality plastic;
- The presence of a water seal;
- Good equipment;
- Price.
Flaws:
- Rigid construction.
McALPINE MRB2CB-PB
High-quality equipment with a pipe siphon, designed for connection in the bathroom. The pipe is made of plastic, and the metal elements are made of stainless steel, which are coated with silver paint. The throughput is 50 liters per minute, which is a good result. Like the previous model, the average service life is 10 years.
Sold at a price of 1,950 rubles.
McALPINE MRB2CB-PB
Advantages:
- High-quality organization of drainage;
- Easy connection;
- Durability;
- Bandwidth;
- Value for money.
Flaws:
- Not found.
Can the faucet be moved?
The pipes in the bathroom were replaced with polypropylene. GVL walls have been leveled. The tiles are almost done. We tried on the bath. It turned out that the wiring for the bathtub mixer was shifted by about 10-12 cm from its center (longitudinal axis). I didn’t have enough experience to check everything right away, and everything was done quickly. The ends of the distribution pipes are at the level of the tile surface. Is it possible to move the mixer? Maybe there are some boxes in which you can lengthen (displace) the wiring.
comment to favorites 4 years ago
Honestly, I don’t see any particular problems in the fact that the axis of the center of the mixer is shifted relative to the center of the bath by 10 centimeters. In addition, in bathrooms, there is usually only one faucet - for both the sink and the bathtub, and therefore, according to the design, it is not located exactly above the center of the bathtub. If the faucet is moved closer to the sink, then this is not a problem, but if it is against the wall, then the “gander” may not reach the sink, and it is not convenient to remove the faucet from the edge of the bathtub. That's the only reason it's worth doing the remodeling.
Re-soldering PP pipes will not be difficult; I installed both faucets and water heaters in the apartment myself. The main thing is to get a kit for soldering PP pipes - it contains an “iron” and scissors - the main tools.
A wall chaser is not necessary; you can also use a grinder with a special disk to cut out the stone and knock out a groove with a chisel. Carry (solder) the PP pipes to the required distance and wall them into the wall.
Leak prevention
It is very important to constantly inspect the pipes and joints of the siphon; this will help identify leaks in advance. Because leaks do not start abruptly one day, but arise gradually, at first letting in a little water
It is important to replace the pipes before they start leaking if they are already very old and worn out.
Siphon leak
A sewer leak is scary not only because of wet floors and an unpleasant odor, but also because of troubles with neighbors. Typically, such situations occur due to wear and tear of old pipes, or if new pipes have manufacturing defects. Leakage can also be caused by improper installation and assembly of the siphon.
If the pipes are worn out and rotted or are defective, a leak will definitely occur. And in this case, the siphon must be replaced immediately.
You can save the siphon from leaking for a short time by using for this purpose several rubber gaskets installed around the pipe and tightening them with an iron clamp.
Also, in order to protect the siphon from leaks, you need to periodically clean it, removing foreign objects that interfere with the normal passage of water through it. This is an important factor, because various small objects can get into the bathtub drain and remain in the siphon rather than going into the sewer pipe. Also, often sand, dirt and earth get into the bathtub, which, despite their small size, also do not pass into the sewer, and just like all the dirt, remains in the siphon. Also, large blockages of the siphon in the bathtub occur due to hair. Such severe blockages need to be cleared by disassembling the siphon and cleaning it completely.
Siphon clogged with hair
But for small blockages, you can use specialized gels and liquids that dissolve dirt, which will subsequently go down the drain with the next portion of water.
But such products must be used with extreme caution, because many substances can damage a plastic or metal product. You need to select such products based on what material a particular siphon is made of.
To avoid leaks, you need to monitor not only the condition of the drain pipes, but also the condition of the joints and gaskets. Timely replacement of gaskets will help protect the siphon from leakage.
By following these rules and buying a good quality siphon, you can hope for many years of its service.
Is it possible to install a bathtub faucet not above the bathtub drain (not on this side), why?
Not above the drain, but on the opposite side, or in the center (on the length side) of the bath.
comment to favorites Elden [87.1K] over a year ago
I have not seen any documents regarding the installation location of the bathroom faucet; there is a description of the height of its installation, like 800 millimeters from the floor, but there is no where exactly it should be.
Personally, I installed it on the opposite side of the drain, the reason was laziness, in fact I was just too lazy to hammer into the concrete wall on the drain side, and I didn’t want to let it overlap, so I ran the pipes to the opposite wall where the gas silicate blocks were.
Of the minuses, I felt only one - when you want to take a bath, i.e. lying in the bathroom, you can’t turn your back towards the drain, because the additional drain gets in the way, it rests on your back, and when you turn over to the opposite side, then water from the tap or shower, or mixer drips on your head, which is also an inconvenience.
I see the advantages in the fact that there is easy access to the faucet, since there is a sink on the opposite side.
But my mother-in-law has a faucet installed in the middle of the bathroom, which also has its own conveniences and disadvantages, one of the disadvantages is that it’s bad to take a shower, you constantly cling to the faucet sideways and you can’t get it anywhere, you can only turn the pipe in one direction.
the system chose this answer as the best comment add to favorites link thank Kim Jong-un [412K] 3 years ago
It is possible, especially since there are bathtubs on sale (usually acrylic bathtubs) with a drain in the center of the bathtub,
and not from the edge (any).
By definition, the mixer in such bathtubs is installed either in the center or offset from the center, but along the long side of the bathtub that goes to the wall.
If you have a bathtub with a “classic” drain arrangement, then in this case the mixer can be installed on the side where it is more convenient for you to use it.
You can also go on the opposite side of the drain, just keep in mind that in many models of such bathtubs the side of the drain is narrower than the side on the opposite side.
That is, the gander (“spout”) of the mixer may need to be longer.
The water itself will drain from the bathtub in any case; at the manufacturer's factory, the drainage (slope) is already set, even if the bathtub is set to zero level, on all sides, there is already a slope at the bottom of the bathtub (slope towards the drain).
Very often in my practice I have come across the installation of a faucet in the center of the bathtub, the reasons are different, the design is more interesting, or the washing machine is simply preventing you from installing the faucet in its regular place.
That is, it is not convenient to approach the mixer from one end.
If you install in the center of the bathtub, then take a faucet without a movable spout,
the rotary gander in this case will be a hindrance.
If the mixer has already been purchased, then you can buy a short swivel jib,
separately from the mixer.
Pipes (Hot and cold water) can be stretched along the bathtub under it, and brought out under the mixer in grooves.
Functional differences between siphons
Also, siphons can be different in functionality, and, accordingly, have different technical characteristics. There are ordinary siphons and automatic siphons. In the first case, everything is done manually: plug the rubber drain plug, pour water. I bought it, felt my hand in the soapy water, and pulled out the plug. Or he pulled the chain, risking that the latter would come off very quickly.
In automatic siphons, everything is a little simpler during operation. The water is drained by turning a special valve on the overflow. I turned it, the plug rose, and the water flowed out. At the same time, my hands remained dry. In this case, a metal plug with a rubber seal is used.
But when installing the machines, they are somewhat more complicated. Automatic opening of the plug occurs through a system of levers or cables, which are located in the middle of the overflow tube and connected to the drain hole.
Manual and automatic siphons also have differences in the drain hole. As a rule, the first ones use a metal plate with cut holes. Secondly, the drain hole is either not covered with anything, or is blocked by a cross. As a result, when draining manually, water drains a little slower than in an automatic siphon. Experts do not recommend using plastic drain necks, as they may not fit well into the hole and become deformed, which will lead to water leakage.
In addition, there are more modern, non-standard types of windings: with filling through an overflow or drain hole, or siphons with a cascade drain-overflow system.
When choosing a siphon for a cast-iron bathtub, you must be guided by simple rules: high-quality materials, reasonable price and ease of assembly, given the heaviness of the bathtub itself.
What if the bathtub mixer is placed in the middle?
The bathroom is combined, after the demolition of the plumbing cabin. From the entrance there is a washbasin straight ahead, along the wall to the right there is a bathtub. I thought that if the bathtub mixer was placed in the middle, and not in the corner (next to the sink, at the foot of the bathtub), it might be more convenient, for example, to control the water without getting up from the bathtub.
Or not? Those who swam - share your impressions.
Sorry that I’m distracting you with offs on Friday, but I need to get started.
did something similar, keep in mind that to complete the picture you need to choose a bathroom with a drain hole in the center
The hardest thing is to figure out where to hang the watering can when you wash. Hanging it in the center is not convenient for washing. Hanging in a standard place, a flexible hose may not be enough, from the center of the bathroom to the wall.
What it is?
A trap is a plumbing device that is used to connect a bathtub or shower drain to the sewer system. This device performs three main functions: it ensures fast, unhindered drainage of water, tightness and absence of sewage odor in the room.
All this is possible thanks to the special design of the siphon in the form of a curved pipe, in which a water seal is created that does not allow unpleasant odors into the room. Before installing a siphon on a bathtub, you need to choose a new suitable model. There are the following main types of devices:
- Metal. Metal models are most often made of cast iron or copper. They are more expensive, their assembly and installation are more difficult for an untrained craftsman due to their bulky size and rigid shape. Cast iron siphons were used in Soviet-era bathtubs, so everyone is familiar with their reliability and durability firsthand.
- Plastic. Modern models are usually made of plastic with the addition of metal parts. They are lighter, more compact, flexible and inexpensive. Thanks to these qualities, assembling a bath siphon has become much easier and more convenient.
How to install a wall-mounted bathtub faucet correctly
During a major bathroom renovation, along with a large amount of construction work and equipment installation work, a wall-mounted bathtub faucet is also installed. The installation process is influenced by many factors, which we will consider in order:
Firstly, the mixer must be located strictly in the center of the bath. That is, the axis of symmetry of the mixer must coincide with the axis of symmetry passing through the centers of the holes for draining and overflowing water;
Secondly, the height of the centers of the reflectors (2 chrome caps covering the connection points of the mixer to the water sockets) should be at a distance of 80 cm from the floor level (the front surface of the floor tiles). This arrangement of the mixer, in most cases, ensures that the water stream hits the drain hole exactly. Thus, over time, yellow spots do not appear on the surface of the bathtub from the stream of water gushing past the drain hole;
Thirdly, when planning the location of the faucet in height, it is also necessary to take into account that the faucet with its reflectors does not block the curb, which is usually located at approximately the same height along the entire perimeter of the bathroom. After all, a border is a decorated tile that decorates a bathroom, and it should not be covered by anything, even partially;
Fourthly, the mixer must be mounted in such a way that the threads of the eccentrics - additional internal elements designed to connect the mixer with water sockets - are not visible between the reflectors and the mixer nuts. That is, the reflectors are adjacent to the tiles without gaps, and the mixer with its nuts is adjacent to the reflectors without gaps.
If all these four conditions are met, then the mixer is installed correctly and it looks really beautiful!
Our best masters
32
work for the last month
16 years
years of experience
Semenov Andrey Valentinovich
| Age: | 51 |
| Specialization: | Generalist |
| In company: | from March 25, 2022 |
| About the master: The master has a large number of completed orders behind him. Responsible. Works quickly and efficiently. | |
28
work for the last month
26 years
years of experience
Brezhnev Sergei Semenovich
| Age: | 50 |
| Specialization: | Electrician, carpenter |
| In company: | from December 13, 2022 |
| About the master: Qualified master. Specializes in electrical installation and carpentry work. Responsible, serious and fulfills orders conscientiously. | |
36
work for the last month
27 years
years of experience
Ozerny Vladimir Viktorovich
| Age: | 56 |
| Specialization: | Electrician, carpenter |
| In company: | from October 29, 2022 |
| About the master: Sociable and responsible master. Can cope with a task of any complexity. Takes a responsible approach to fulfilling orders. | |
All masters
Mixer is misaligned
Which kitchen façade is better to choose: a review of 10 popular materials and types
5 Kitchen Storage Tricks You Can Borrow From Chefs
Kitchen interior in Provence style with a mint set and a patchwork apron
Are you a professional architect or designer?
IVD. Repair and finishing
Are you a professional architect or designer?
The IVD.ru website is a leading Internet project dedicated to the issues of reconstruction and interior design of residential premises. The main content of the site is the archive of the magazine “Ideas for Your Home” - exclusive author’s articles, high-quality illustrations, practical tips and lessons. A team of professionals is working on the project in close collaboration with famous designers, architects and leading publishing experts.
On our website you can choose comprehensive design solutions; view detailed reviews of the market for construction and finishing materials, furniture, machinery and equipment; compare your own ideas with design projects of leading architects; communicate directly with other readers and editors on the forum.
Positioning the mixer with shower on the long side of the bath
Loft-style bathroom: guide to choosing materials and accessories
Bathroom with blue furniture and patchwork tiles
Where does a king go without his retinue?
Are you a professional architect or designer?
IVD. Repair and finishing
Are you a professional architect or designer?
The IVD.ru website is a leading Internet project dedicated to the issues of reconstruction and interior design of residential premises. The main content of the site is the archive of the magazine “Ideas for Your Home” - exclusive author’s articles, high-quality illustrations, practical tips and lessons. A team of professionals is working on the project in close collaboration with famous designers, architects and leading publishing experts.
On our website you can choose comprehensive design solutions; view detailed reviews of the market for construction and finishing materials, furniture, machinery and equipment; compare your own ideas with design projects of leading architects; communicate directly with other readers and editors on the forum.
Main selection criteria
The main selection criteria include:
- price;
- completeness of the system (presence of main and control elements, seals, etc.);
- material of manufacture;
- distance from the drain hole to the floor;
- diameter of siphon and sewer outlet;
- bathroom design, the presence of a decorative screen;
- system manufacturer;
- the presence of additional functions (water supply, branches for a dishwasher and washing machine).
If you have a small budget and do the repairs yourself, you need to choose a mechanical drain and overflow. In addition to the type of system, it is worth considering the configuration of the siphon. The water seal (glass) of the pipeline must have a volume of at least 300 ml.
Bathtub with central drain and overflow
How to install a faucet in the bathroom with your own hands
In search of a “ceramic friend”
Let's talk about intimate things
Are you a professional architect or designer?
IVD. Repair and finishing
Are you a professional architect or designer?
The IVD.ru website is a leading Internet project dedicated to the issues of reconstruction and interior design of residential premises. The main content of the site is the archive of the magazine “Ideas for Your Home” - exclusive author’s articles, high-quality illustrations, practical tips and lessons. A team of professionals is working on the project in close collaboration with famous designers, architects and leading publishing experts.
On our website you can choose comprehensive design solutions; view detailed reviews of the market for construction and finishing materials, furniture, machinery and equipment; compare your own ideas with design projects of leading architects; communicate directly with other readers and editors on the forum.
Leak test
After installing the siphon, you must wait a day for everything to “sit” in place and for the sealant to completely harden. Leak tests are carried out as follows: a large amount of water is poured into the bath. The plug should cover the drain. Be sure to check for leaks at the very first stages. If everything is in order, continue drawing water. When the bath is half full, open the plug and watch the siphon. If leaks appear, mark the places so that you can cover everything with sealant in the future. To test the overflow, take a few scoops of water and pour it into the hole. Observe the presence or absence of leaks. This can also be done using a shower, directing it towards the overflow.
The absence of leaks is a sign that the replacement of the siphon in the bathroom was completed successfully. As a rule, if you follow the instructions, everything goes without any problems.
Bathroom Faucet Center Distance
Construction
Installing a faucet in a bathroom is somewhat different from installing a faucet for a kitchen sink, because the pipes in the bathroom can be walled into the wall and only a small part with threads for connecting the faucet protrudes outside. If the pipes are not embedded in the wall, then they run along the walls, and the mixer will be at a distance from the wall.
Content
What do you need to know before installing a faucet in the bathroom?
Practically, all mixers have a connecting size of 1/2 inch and a distance between the axes of the tubes of 150 mm plus or minus 15 mm (see diagram below). These dimensions should be taken into account when installing the pipeline, and be sure to measure these distances from the mixer purchased in advance.
If the mixer is rotary, then we choose a place to install the mixer, also taking into account the rotation:
The height of the mixer from the finished floor is 120 cm.
However, you can determine the location for the faucet above the bathtub as follows: temporarily place the bathtub in the place where it should be. Then we draw a line on the wall vertically upwards exactly in the center of the bathtub, select the desired height, usually no more than 30 cm. We drill two holes with a center-to-center distance of 150 mm:
Holes are needed if you need to bring hot and cold water pipes from a room located behind a wall (partition) to the mixer; this is the layout in most apartments where the bathroom and toilet are separated by a wall. Usually the risers are located in the toilet, and the tubes go into the bathroom from there. If you have everything in one room (say, an old apartment with a shared bathroom or a private house where the bathroom is also shared for some reason), then, most likely, you don’t need to drill through the wall. I am hinting that you should proceed from your own situation and not blindly copy. But since this article is only about installing a faucet in the bathroom, I will not tell you here how to install a water supply from different pipes, but will continue on the topic of the article.
The mixer kit includes gaskets, eccentric bushings and decorative cups:
Installation of a bathroom faucet: operating sequence
Let's take a step-by-step look at how to install a faucet in a bathroom. Moreover, we will assume that
We wind tow (flax) onto the small thread of the eccentric bushing along the thread:
After winding, smooth the wound flax with your hand and lightly spread a special sealant:
Attention! When purchasing plumbing components, you may encounter the following problem: some threads do not have a notch, which is why the tow will slide along the thread when screwing on the second part. So, if there are no notches, we make them ourselves: you can use pliers or a gas wrench to slightly (not too much!) compress the thread until notches appear.
You can use fum tape to seal the threads: take a fum tape, preferably thicker, and wind it tightly along the threads. It is torn off and smoothed by hand. Sealant for the fum tape is NOT needed.
Eccentric bushings are needed if the pipeline terminals are not at the same level, or if the center-to-center distance is not 150 mm.
After the required center distance and level are set using eccentrics, all other parts of the mixer are screwed on:
And then we screw on the shower head hose and the shower holder:
That's all for installing a faucet in the bathroom. Nothing complicated, no expensive tools, just wrenches and your hands. Good luck.
Materials and tools for installation work
Before we begin installing plumbing equipment, let's try to decide what exactly we need for this.
The photo shows the unpacking of the mixer and accessories.
We will need the following materials and tools:
- Mixer - a device in which hot and cold water is supplied separately or mixed and then supplied to the tap or to the “rain”;
- “Rain” - a watering can attached to a hose;
- Decorative trims that will cover the area where the plumbing equipment meets the wall;
- Eccentrics are adapters adjustable in the vertical plane from water pipes to the mixer;
- Fum tape is a Teflon seal that is wound directly onto the external thread of the fittings;
- Hammer and drills of suitable diameter;
- An adjustable wrench or a set of open-end wrenches;
- Large shaped screwdriver;
- Assembly knife;
- Spirit level and measuring instrument.
Installation technology
As an example, let's look at how to install a faucet in a bathroom where the piping is hidden.
This is the most common case when short pipes with internal threads protrude from the wall and it is on them that the plumbing fixture will be installed. In other cases, a special bracket for the bathroom faucet is used.
The installation instructions are as follows:
- Before assembling the faucet for hot and cold water, we clean the impurities, if any, from the water supply pipes;
- Unpack the eccentrics;
How to wind a seal? Wind clockwise
- We wrap fum tape in several layers on the thread of the eccentrics from the narrow edge;
We wind Teflon tape, tow and other types of seals clockwise when looking at the eccentric from the end. If you wind it differently, the seal will become confused when screwed into the fitting and it will not be possible to achieve optimal tightness of the connection.
- We insert the prepared eccentrics into the fitting and tighten them several turns, that is, so that they are held well, but, nevertheless, not all the way;
- We unpack the mixer itself and insert the included sealing gaskets into the fittings;
- We apply the mixer to the eccentrics and see if the seats coincide in the centers;
- If there is a discrepancy, turn one of the eccentrics in the right direction so that the centers coincide;
- We screw the mixer to the eccentrics and do a test run of water to see whether there is a leak at the junction of the pipe in the wall and the eccentric or not;
- If there is a leak, turn off the water, disassemble the assembly, repack the connections, wrapping more sealant and repeat the previously listed steps;
- If there is no leak, turn off the water and remove the mixer;
Decorative trims installed
- We install decorative trims on top of the eccentrics;
- We finally fix the mixer in place;
We check for leaks, and at the same time dirty water will drain
- We turn on the water again and check the installation for leaks;
- Unpack the hose with a watering can to install the “rain”;
Assembling the hose and watering can
- We insert a gasket into the fitting on one side of the hose, to which we attach the watering can with our own hands;
We twist the fittings carefully so as not to damage the gasket
- On the other hand, we also insert an O-ring into the fitting and screw the union nut to the thread on the mixer;
When connecting the “rain”, do not place the hose directly into the bathtub; it is better to lay it down with cellophane, especially if the bathtub is acrylic. As you tighten the fittings, the hose will move from side to side, and you can scratch the glossy finish of the plumbing.
- We disassemble the bathtub holder;
Most often, it is not the height from the floor that is taken into account, but the height of the watering can relative to the person’s height
- We try it on and mark its location on the wall;
For information on how to drill ceramics correctly, read the installation instructions.
- According to the markings, we drill holes for screws with a seal;
- We drive the seals into the holes made;
We fasten the base of the holder firmly, so that the installed part does not play.
- We fasten the holder with screws;
We set the distance from the floor to the watering can either according to the standard or in accordance with your height
- We finally check the functionality of the entire structure.
The instructions given are not universal. Therefore, if individual installation steps are irrelevant for the mixer you purchased, ask the appropriate questions in the comments to the text. I look at your comments every day and, on occasion, I will be happy to explain how to do it right.
Required materials and tools
To change the drain device, you will need a minimum set of tools consisting of a screwdriver, pliers and a wrench.
Before starting work, the completeness of the factory delivery of the sanitary siphon is checked, including:
- frame;
- drain pipe;
- decorative grille masking the drain;
- cuffs made of rubber and polymers;
- fastening hardware (bolts and nuts);
- elastic gaskets for sealing joints.
If one or more items are missing, the missing parts must be purchased separately.
In addition, high-quality installation work is impossible without additional materials:
- tow or rags;
- sealing composition based on silicone or rubber;
- FUM tapes.
When dismantling, you will need a container to drain the water. A large bucket or basin will do.