Many car owners would like to build a garage. And this is not surprising, because if you leave your vehicle under a canopy or just in the yard, it will not be protected from weather conditions or hooligans who can damage it or, in the worst case, steal it. This is a guarantee that your “iron horse” will be safe and sound. Moreover, the garage can be used for car repairs and maintenance, so the building itself should be spacious, well equipped, comfortable and, if necessary, warm to protect you and the car from bad weather. If you purchased a house without a garage, or did not build one when building your home, then everything can be corrected by building it yourself. Most often, brick is used for construction, which is popular due to its fire safety, durability and resistance to biological decomposition. If you are a car owner who wants to make a “home” for it, from this article you can learn how to build a brick garage with your own hands .
Types of garages
Before you start building your garage, you need to decide on its type. How many cars will be there – one or two? All designs are divided into types. It depends on where and how they are placed. Below are the three types of garages:
- attached to the house;
- built into the house;
- separate building.
Garage attached to the house
Garages attached to the home are very convenient, since you can enter them not only from the front, but also from the side, right from the house. They are heated together with the house, as they have a common energy and water supply system.
Garage in a house
A garage built into a house is built at the initial stage of building a house. But such a garage has its advantages: it is convenient, since you can get into it directly from home, and this design does not require additional laying of communications.
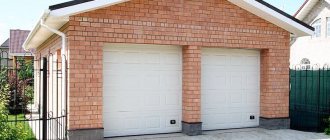
Detached garage
A detached garage is the most common option in our area. Such a garage needs to be built as a separate building with its own communications: heating, electrical network and water supply (if necessary). It is better to place such buildings near the exit point from the yard. The best option is to build a garage in line with the fence, at the level of the site, so that the gate goes directly to the street.
Since most people choose a separate building, let's look at how to build such a garage yourself in several stages.
Material calculation
Before construction, be sure to calculate the amount of building materials that will be needed to create a garage. The amount of materials used directly depends on the size of the future garage structure.
To determine how much building materials you need to buy, you will have to:
- calculate the volume of the walls based on their length and width;
- determine the volume of window openings, doors and gates;
- calculate the volume of brick laying;
- determine the amount of building materials based on the results of the calculations made.
The first stage of construction - garage project
Garage plan
Any construction project, be it a house, a bathhouse or a garage, begins with planning. A project is not always a huge roll of paper with detailed drawings. You must see and imagine what needs to be built and how. Therefore, you can even take an ordinary sheet of paper from a notebook and pre-draw the future building, so that you can then be guided by something.
Gate installation
Gate hinges
For garages, both sliding and swing gates are acceptable. First you need to weld the door frame to the garage slopes. This must be done clearly at the level so that there are no distortions in the structure. Next, we weld the hinges to the frame; gates made from a frame covered with sheets of metal can now be placed on them. Let us remind you that the gates should be insulated with polystyrene foam.
Article on the topic: Where to place an advertisement for the sale of a garage
It is worthwhile to prepare well theoretically before starting independent work on constructing a garage.
Drawing of a swing gate
Garage project
Natural ventilation scheme
Gate stiffeners
Construction of a monolithic foundation
Garage attached to the house
Gate insulation
The second stage of construction - terrain marking
Marking the site
After the drawing of the future garage has been made, all this needs to be transferred to the construction site. For this you will need:
- Long rope or nylon cord, 30–40 m.
- A dozen pegs measuring approximately 40 cm.
- Hammer or sledgehammer.
- Tape measure at least 5 m.
Having prepared all the tools, it is necessary to clear the area for construction. Based on the drawings, drive pegs into the corners of the future building, adhering to the specified dimensions. Connect them with a rope or cord. Thus, you have prepared the foundation for the next stage of garage construction, which will serve as a guide.
Tool
For construction you need to prepare the following tools in advance:
- roulette;
- water level;
- tamper;
- shovel;
- hammer;
- pickaxe;
- Master OK;
- container for concrete;
- buckets;
- plumb line;
- metal corner.
To reduce the labor intensity of the work, you can buy or rent a concrete mixer.
We hope that thanks to our instructions, you will be able to build a reliable, comfortable garage with your own hands, which will serve as a reliable shelter for your car for a long time.
The third stage of construction - earthworks
Digging a trench
So, based on the markings on the soil, it is necessary to dig a trench for pouring the foundation. This can be done manually by yourself or with a friend using a shovel. If the project includes a cellar or pit, it will be quite difficult to do this without an excavator.
A regular strip foundation is suitable for a garage. Its width should be at least 40 cm. And depending on the depth to which the soil freezes, the depth of the foundation can range from 60 cm to 120 cm. The average depth, optimal for a garage, is 100 cm. Based on these dimensions, you should dig a trench. Make sure the walls are vertical and level. The bottom should not be loose. To improve the quality of the foundation, you can make a five-centimeter cushion of crushed stone or sand at the bottom, compacting it.
Brick prices
Firstly, the total cost depends on the price of the brick. It has a fairly wide range and depends on the type of brick:
- Ceramic - there are ordinary and facing. The second type has a more attractive appearance, although it is also suitable for a garage. Price range: from 3 to 15 rubles. a piece .
- Silicate - ideal for garage construction due to a number of physical properties, such as frost resistance, strength, heat resistance, etc. In addition, today silicate bars for laying walls can be found in different colors. Prices for such bricks: 4 - 10 rubles .
- Hyper-pressed is inherently decorative, so a garage made of such bricks will be much more expensive. Prices vary from 9 to 30 rubles. a piece .
Often the manufacturer gives a discount for bulk purchases. And many construction companies enter into supply contracts with even lower prices for the material. Therefore, by ordering the construction of a garage from a contractor, you can save a lot on building materials.
The price of construction also depends on other factors: the type of foundation, the size of the project, what material the gates and roof will be made of.
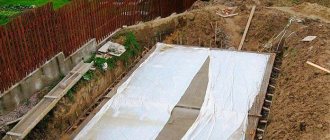
The fourth stage of construction - pouring the foundation
Pouring a garage foundation
A simple and inexpensive type of foundation that can be used is a rubble concrete foundation. It is quite simple to do: rubble stone is placed in the prepared trench, and each row is filled with cement mortar until the trench is completely filled. It is known that the stronger the foundation, the longer the building will stand. The degree of shrinkage of the building and the likelihood of cracks also depend on it. That is why you need to choose high-quality materials for the solution.
You can make your own garage door. Most often they are installed on a foundation and then covered with bricks. If the garage will be heated, then the gates will need to be insulated.
To make a solution, you need high grade cement, sand, plasticizer and water. The solution should be mixed in a concrete mixer. For 1 bucket of cement you need 2.5 buckets of sand. Water is added until the desired consistency is obtained.
Rubble foundation
To fill the foundation, you can use a regular solution with crushed stone without using rubble stones. In this case, more solution will be required, and a reinforced mesh should be installed in the trench.
If the soil is hard, formwork is needed only in the above-ground part to make the base. It can be made from boards, setting everything on a level. To prevent the cement from spreading, do not allow gaps or holes in the formwork. It also needs to be strengthened with braces. The foundation should be poured in several layers, and not partially in some areas. After pouring, you need to remove the air from it and compact it, and at the end level it with a trowel. The cement will dry in a week, but you should start laying walls no earlier than in a month.
Repair of cracks and other defects
Before starting repairs, it is necessary to establish the causes of cracks in order to avoid recurrence of the problem. Most often, strengthening the walls, the process of which was described above, helps eliminate the cause.
Possible reasons:
incorrect masonry construction technology, weight redistribution occurred unevenly;- use of low-quality building materials;
- shrinkage of the garage, which led to deformation of the building;
- lack or poor quality waterproofing;
- frosts, unfavorable climatic conditions;
- human factor (saving solution, inexperience).
Stages of repairing garage walls:
- If cracks have formed in the seams, the mortar has crumbled and voids have appeared, you need to clean the area with a stiff brush and treat it with a primer. After the gap is filled with a small amount of solution, reinforcement is placed inside with pressure. Finally, the solution is tightly driven into the gap and leveled.
- Small cracks in the wall just need to be cleaned and sealed tightly with mortar.
- Explore large cracks, find the beginning and end. Install metal brackets in the upper and lower parts (drill holes at a distance of 6-10 cm from the edge of the crack, drive in dowels with metal strips); if the split is long, you can make several more ties along the entire length. Clean and prime the cracks, pack them tightly with the solution; you can use a syringe for this.
If the crack is wide and deep, use foam or silicone sealant to seal it.
Fifth stage of construction - laying walls
Laying walls
Once the foundation is completely dry, you can begin building brick walls. They can be made in 1 brick in areas with a warm climate, and in 1.5 bricks where it is cold, to insulate the garage. When working, it is important to follow three rules:
- Avoid distortions. The masonry must be perfectly level.
- Choose a brick laying pattern and stick to it until the very end.
- Mix the solution correctly. It should be the same throughout the entire masonry. If you have chosen the ideal proportion - 3 to 1 (sand, cement), then the solution should be like this all the time.
- Follow the thickness of the seam, which should be the same, no more than 1 cm. You can use a sample in the form of an 8 mm lath when placing each brick.
To work you will need:
- building level;
- plumb line;
- lace or fishing line;
- Master OK;
- bricks;
- pick;
- large capacity for mixing the solution;
- buckets;
- shovel.
Chain masonry
As always, you need to build walls using chain masonry, so that one row overlaps the seams of the other row. It is necessary to start laying bricks from the corners. To begin, lay out the brick corners so that everything is perfectly level, using a building level. Then stretch the cord or fishing line between the corners so that it is flush with the top of the brick. It is important that the rope does not sag and is evenly stretched.
Now you can start laying. Place new bricks from the corners, adjusting them to the level of the line with the handle of a trowel or a pick. Once the rows around the perimeter have been laid, raise the corners, pull the cord and continue working. Pay special attention to the corners. To check the verticality of the walls, use a plumb line and level.
If shelves will be installed in the garage, then think about their location in advance.
If the roof is pitched, it is important to provide an appropriate slope for water drainage. Taking this into account, the end walls must be made of different heights, and the upper edge of the walls on the sides must be sloping. If your garage is 6 m long, a slope of 30 cm will be enough. To do this, make a slope of 5 cm for every 1 m. To keep everything level, you can use a stretched cord.
Strengthening
The creation of additional measures to strengthen the walls is required after 2 years of operation of the garage, when the shrinkage of the walls is completed. Sometimes, after going through this process, cracks appear in the masonry, which lead to the destruction of the structure, making the room cold and allowing moisture to pass through.
There are several ways to prevent these consequences:
- Reinforcing the opening . The part most susceptible to destruction is the wall on which the gate is supported. If there are no cracks in the surface, a metal frame is installed on fastenings. The opening along the edges is protected with a channel, and metal anchors are installed every 20 cm.
- Reinforced concrete jacket . It is used for garage walls that are already covered with cracks and are a real threat of collapse. To create, you will need reinforcing mesh and cement mortar. The mesh is attached along the entire perimeter of the walls, then it is covered with 1.5-2.5 cm of solution. The concrete layer may be larger, but its application will require special equipment.
Screed. It is used if the verticality of the walls is broken during the construction process or after shrinkage.
For implementation, reinforcement rods (diameter 25-30 mm), couplings and end fastening nuts are used. A groove 4 cm deep is drilled in the wall at the level of the ceilings along the perimeter, couplings are attached, and a rod is placed inside. It is recommended to heat the cords with an autogen before starting to tighten.After tightening, secure with nuts, fill the grooves with foam. The fasteners are covered with cement mortar. To form the encircling reinforcement, metal plates are also used, which are fastened with bolts and connected to each other with lanyards. At the corners they are connected to channels. This belt is considered tougher and more reliable.
- Steel clips . They are used when it is planned to build a superstructure over the garage. To implement this you will need: metal vertical posts, round fittings or strips of metal. The racks are fixed at a distance of 1.5 m from each other, reinforcement or strips are pulled between them (they are attached to the racks and to the wall in the center of each cut). To make the fixation more reliable, use cement mortar for the posts and lintels.
Strengthening the masonry during its creation is carried out only with reinforcing mesh or rods inside the horizontal seams.
The sixth stage of construction - roofing
Shed roof for garage
Shed roof is simple and inexpensive. To construct it you will need wooden beams with a cross section of 100–120 mm. Thanks to them, it is possible to provide a garage floor with a length of 6 m. The length of the beams is selected depending on the width of the garage, but they must be 20–25 cm longer. They must be laid across the garage, in increments of 80 cm. The beams must follow the slope of the walls. You can attach them directly to the garage wall.
The ceiling definitely needs to be insulated.
Then 40 mm thick boards are laid on the beams, moving them as tightly as possible. After which they are nailed to the beams so that large gaps do not form. The next step is waterproofing. A layer of roofing felt is laid from bottom to top on top of the boards so that an overlap of the bottom layer of several centimeters is formed. Thus, water will not fall on the boards, but will be able to roll down freely. The roofing material is fixed with nails.
Video description
The video shows the technology for forming a wooden garage floor with subsequent installation of corrugated sheeting:
Roof
At this stage it is necessary to erect the roof. With gable and single-pitch structures, everything is more or less clear. As for the flat roof. In principle, screed mortar must be poured onto the floor slabs so that it creates an inclination angle of no more than 5°. And the roofing material is laid on this dried surface. Most often it is a roll type, but you can also install corrugated sheeting by laying a thin sheathing of boards 100 mm wide underneath it.
Laying rolled roofing material over a poured screed Source moydom.net.ua
The seventh stage of construction - pouring the floor
Concrete floor
Concrete base and self-leveling floor are the main types of flooring in a garage. To make a concrete floor, you need to remove the top layer of soil and compact the area with sand, a layer of 10 cm. In order for the water that enters the garage to flow out of it, you need to maintain a slope of 2-3˚ to the gate. After compaction, lay waterproofing material (roofing felt is the best option) and make a concrete screed 10–15 cm thick.
The garage floor must withstand heavy loads and be strong enough. To increase the durability and strength of the base, the floor is additionally covered with reinforced mesh. The grade of concrete should also be high.
But concrete is not the only option for pouring a floor. In some cases, it is made of wood, but more often they resort to cement screed. To complete this, the site is covered with small and large crushed stone. Then it is well compacted and the cement mortar is poured in 2 stages. The first layer, which is 4–5 cm thick, must be poured immediately. After a few days, a second layer is poured, the thickness of which is 2–3 cm. It should be more liquid. After which the floor is leveled and waits to dry.
Self-leveling floor
Today, self-leveling floor mixtures have become very popular. The second layer of filling can be made from this mixture. The finished floor can be painted as desired.
You can also make a self-leveling floor in the garage. The resulting durable coating does not require painting.
Self-leveling floor in a garage
Outside, you need to make a blind area of 50 cm. It is done in the same way as the floor inside, only its thickness can be 4–5 cm, this is quite enough. Since the blind area serves to drain liquid, it must be done at a slope.
Beautiful brick house with garage
Electrical wiring must be installed before plastering.
That's all. If desired, the garage can be plastered and whitewashed, or simply the walls can be covered with cement mortar. Now the “home” for your vehicle is ready.
Garage standards
Let's start with the size of garage buildings, depending on the dimensions of the car for which they are being built. There are so-called minimum standards, which are characterized by the distance from the machine to the internal surfaces of the walls of the building.
Building width
– this is the width of the car, plus 70 cm on each side.
Length
– this is the length of the car, plus 50 cm on each side, measured from the bumpers.
Garage height
for a passenger car: 2-2.5 m, for a truck – the height of the car, plus half a meter.
For passenger cars, the optimal dimensions of the building are: length 6 m, width 4 m, height 2.1-2.5 m. We take them as the basis for our story. Of course, these are just the minimum parameters. That is, garages can be built wider and longer, two- or three-story. It all depends on the customer’s requirements; there are no other selection criteria.
A mandatory communication network that simply must be present in the garage is electrical. To do this, it is necessary to install a distribution panel inside the building, from which a lighting cable and a separate line to the sockets are diverted. The first section is usually equipped with four lamps: two ceiling and two side. The second is either 2 or 4 sockets.
Standard red brick garage 6x4 m Source youla.ru
It is possible to install water supply into the garage and, accordingly, sewerage. This is a serious bonus in increasing the comfortable maintenance of the car.
As for the inspection pit, everyone has recently abandoned this building element. The thing is that repairing modern cars is the work of professionals who use special equipment and tools for diagnostics and repairs. The only thing you can do inside your own garage is to recharge the battery. And for this purpose an inspection hole is not needed.
Photo
Installation of metal gate frame
House with garage
Brick garage with attic
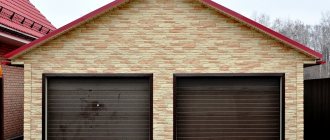
Garage made of facing bricks
Flat roof garage
Brick garages in an auto cooperative
This garage does not have a good foundation.
Did the article help you?