The most active consumer of electricity in a house or apartment is kitchen appliances. Therefore, it is important that all sockets in the kitchen are located correctly. This will ensure ease of use and protection. After all, one incorrectly installed socket can bring many negative consequences, including causing a fire.
We will introduce you to all currently used power point design options and types of electrical installation products. We scrupulously outline installation technologies and list common mistakes that an inexperienced craftsman may make.
We offer the best layout plans for interested visitors. Taking into account the information presented, you can easily cope with choosing a location and designing an outlet. The text is supplemented with illustrations and video instructions.
Which cable to choose for the kitchen
Next, you need to calculate the cross-section of the common supply wire of the electrical panel and the outgoing wiring to each pantograph. Follow the rules here:
- for device loads up to 3.5 kW - copper cable VVGng-Ls 3*2.5mm2
- for device loads up to 5.5 kW - copper cable VVGng-Ls 3*4mm2
- with a total load of all devices up to 10 kW - copper cable VVGng-Ls 3*6mm2
- with a total load of all devices up to 15 kW - copper cable VVGng-Ls 3*10mm2
Why there should be a brand VVGnG-Ls is discussed in detail in the article below:
Even if you have a house with an old grounding system (without a third protective conductor), still do the wiring with a 3-core cable. This will save you in the future from additional costs for reconstruction and replacement of wires.
As a last resort, the third wire will be a backup for zero or phase, in case of a possible break or other damage.
Power calculation procedure
Often, when users unpack a brand new oven, they are faced with an unpleasant surprise - the appliance does not have a power cord. This is not a mistake by the supplier, but an opportunity for the owner to independently choose the desired connection method.
Often such devices are connected directly to the panel , without intermediate elements (sockets).
Connecting an oven without an outlet
Connecting the oven using a socket
This method is safer in terms of fire, but the ability to turn off the device sometimes becomes a necessity. For example, if you need to wash the oven, clean it and other similar procedures, it is easier to remove the plug from the socket and turn off the power to the device than to go to the control panel and select the desired machine.
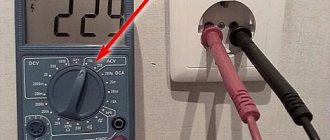
To correctly select the type of outlet and supply wiring, you need to know the operating characteristics of the device. The main parameters of electrical equipment are indicated in the passport or on a special nameplate installed on the surface of the oven, usually on the back side. The parameter we are interested in is the power of the device .
Oven power 2480 W
It can also be denoted by the Latin letter P, for example, P = 3200W means that the oven power is 3.2 kW. Using this indicator, you can calculate the current strength, for which the power (in watts) must be divided by the voltage in the network:
3200 : 220 = 14.545 A
Since differential machines according to the standard are manufactured for current strengths of 6, 10, 16, 25, 40A (etc.), in our case we need a 16A . If the calculation turns out to be 18 or 20A, the difavtomat should be selected for 40A .
Difavtomatic 16A
Difavtomat 40A
In addition, you can determine the required wire cross-section. To do this, it is not necessary to make complex calculations; it is easier to use an online calculator or the table below:
Wire cross-section selection table
For a current of 14.5 A, a wire with a cross section of 2.5 A .
Now you can understand why a separate socket and machine are used for each powerful device. The point is the difference in parameters. If two devices with a significant difference in cutoff current are connected to the same power point, one of them will be connected with a large margin.
If it has problems, the machine may not respond, since its settings are designed for a much higher current. This can cause many troubles, from electric shock to people to fire. Therefore, you should not neglect the rules and hope for “maybe”; nothing good will come of this venture.
The term “power calculation” in our case is used incorrectly, since the power of the oven is known initially, and there is no need to calculate it. The current strength is calculated, which determines the type of outlet. However, users are accustomed to using the term “Power calculation”, which defines almost any similar operation when installing and connecting household appliances. Therefore, the usual name is also used here.
Layout of sockets in the kitchen
After choosing the wiring, you need to decide on the sockets.
Always plan the placement of outlets after the kitchen design is approved, otherwise there may be problems. For example, work area sockets can easily end up in the wrong place and end up hidden behind the refrigerator.
To ensure that your sockets and switches are in their places, take a plan for arranging your kitchen furniture.
After that, mark all the necessary sockets on it. You can even do this by hand.
On this plan, there is still no need to clearly assign installation locations and calculate dimensions and distances. Just count the number and purpose of each outlet.
How to install it yourself?
It’s not difficult to figure out the correct wiring and installation of wiring boxes. The main operations are carried out even before the finishing of the premises.
- Having decided on the consumers and locations for installing the sockets, they move on to marking them on the walls.
- The center is outlined, after which a hole 40–60 mm deep is made with a 63 mm crown for the “socket box”. If you don’t have a special tool, you can get by with a chisel and a hammer. Many professional electricians prefer to work with a grinder and a hammer drill.
- Then you can proceed to securing the mounting box with the wire passed into it. Usually fixation is done using building gypsum or plaster mixture. It is permissible to use special glue.
- After “cementing”, all voids and cracks around the perimeter of the box are sealed with plaster.
The length of the protruding wire must be at least 150 mm so that when connecting, you can easily install a socket or switch.
Number of sockets
How many minimum outlets are required in the kitchen?
Here, follow the rule - for each stationary kitchen appliance, plan your own socket + 2 blocks along the edges of the countertop + 1 piece near the dining table.
The category of stationary appliances includes a refrigerator, range hood, hob and oven, microwave, dishwasher, garbage disposer.
In addition, it doesn’t hurt to mount one socket immediately under or near the switch at the entrance to the room.
The area with switches usually remains uncluttered, and a free point where you can take voltage (for example, for a vacuum cleaner) is never superfluous.
Now mark the points on the apron for connecting non-stationary devices. Place at least two pieces on each part (right and left) of the kitchen.
This will include an electric kettle, blender, mixer, etc.
Homestyler
Free online service from developers of professional 3D modeling programs - 3ds Max and AutoCAD. Homestyler is suitable for interior design and landscape design. It allows you to create rooms of any shape and build multi-story buildings. You can work in 2D and 3D modes.
You can select a ready-made project from the database, create an interior from scratch, or take a photo of your own room through the application. At your disposal are thousands of options for finishing materials, furniture and accessories from the latest collections of famous brands. The service should appeal to those who are planning a rearrangement: it will help to sketch out a furniture layout. But for a detailed interior design, you should choose a different planner.
Distances and locations
When you have decided on the quantity, it’s time to move on to calculating the required sizes and indentations. To do this, draw something like a scan of the walls where the furniture will stand.
Here you will need the exact dimensions of the kitchen - length, height of the room. Gradually, in the form of rectangles, you draw the equipment and all the cabinets.
If the kitchen is corner, do the same with the adjacent wall.
Next, take your plan with the number of sockets and transfer them to the wall layouts. For each technique, follow its own rules.
Fridge
For refrigerators, manufacturers recommend placing the socket group under the appliance itself, that is, in the bottom row, so that the connection is not visible.
It is impossible to say unambiguously with 100% certainty at what height the bottom row of sockets should be made.
Based on IKEA recommendations, they advise placing them at a height of approximately 10cm from the floor, i.e. flush with cabinet legs.
This is explained by the fact that if you install it higher, the built-in equipment will rest against the forks.
If you intend to turn off the plug quite often, then the bottom connection for the refrigerator is not always convenient. In this case, you can place the whole thing at the height of the working area.
Sockets in the work area and above the tabletop
The height of the tabletop is usually 85cm, maximum 90cm. Then there is a partition with a height of 550-600mm and then cabinets.
Place sockets in this area 105cm from the floor.
In this case, they will not end up in the middle of the wall, and it will be convenient to cover them with the same microwave.
The minimum distance from the countertop should be at least 5cm so that the kitchen plinth does not touch them. Location: one set in any corner, plus between the hob and sink.
As mentioned above, at least two pieces. If you don't like the look of sockets above the kitchen splashback, consider the option of a pull-out unit from the countertop.
You definitely need to consider whether there will be built-in appliances in the upper cabinets. For example, a microwave.
You will also have to make a separate outlet for it. It is not feng shui to pull the cords from above to the tabletop area.
Hood
Also at the top, at a height of 1.9m-2.0m, there is an outlet for the hood. However, a lot can depend on the brand. If this is a cheap option, then you can get by with the cable outlet and then connect it directly inside the equipment.
But if this is an expensive model, then it comes with its own fork. And cutting off the factory plug will void the warranty.
Hob and oven
If you have a powerful hob, either a cable outlet is made, followed by connection directly under the panel contact blocks, or a special power socket is installed.
Ovens, unlike cooking ovens, come with regular forks, so there’s no need to be fancy here. Plug them into simple sockets.
When there are cabinets with hinged doors to the left or right of the cooker and oven, it is very convenient to place sockets directly inside them. Step back 15-20cm from the edge and mount it.
If this is not possible, then you will have to connect from the lower group.
If the oven is installed separately from the hob, for example at chest height, make a socket for it in the lower cabinet at a height of up to 750mm.
Dishwasher
According to SP 31-110 2003 clause 14.29, it is prohibited to install any sockets under or above sinks or sinks.
Therefore, always back off a few centimeters when installing a socket group near this plumbing fixture. This applies to both the lower placement and the working area at the top. It is also prohibited to place sockets behind the dishwasher and washing machine.
Near the dining table (if it is located near the wall and not in the center of the kitchen), it is advisable to plan one outlet.
On major holidays, when there is an influx of guests and relatives in the apartment, you will definitely need to connect something on the table - a mixer, a juicer, a food processor, etc.
And on simple days, you can easily attach a laptop there when working in the kitchen.
Installation of electrical accessories
Once all electrical installation and finishing work has been completed, you can begin installing electrical fittings. Note that, subject to a certain sequence and safety precautions, almost any person can cope with the task.
Important! All operations related to stripping wires, connecting the socket, and installing it must be performed only after the network has been de-energized.
Brief sequence of steps for installing accessories:
- The insulation is removed from the end of the wire cores at a distance of 10–15 mm from the edge (in the case of a multi-wire cable, all wires must be twisted together and crimped with a sleeve).
- The ends of the wires (usually there are three, including the phase wire, the neutral wire and the ground wire) are inserted into the corresponding screw or spring terminals.
- The quality of contact is checked.
- Excess wire is placed inside the “socket box”.
- The socket is pressed tightly against the wall and fixed to the mounting box using spacers with a screw tightening.
- The decorative strip is installed and secured with a screw.
In the case of blocks with 2, 3, 4 or more sockets, the sequence is similar, with the exception that the metal mounting frames must be fitted end-to-end and to the same level. It is ideal if you can find the appropriate tool for stripping wires - a stripper, which allows you to safely and efficiently remove the insulation. Multiwire cables are crimped using sleeves and crimping pliers.
Attention! Before starting electrical installation work, you must make sure that there is no voltage on the phase wire. This can be done using a simple indicator screwdriver.
You should not skimp on sockets - you should always purchase options with grounding (provided that the electrical wiring in the apartment provides for this). At a minimum, in some dangerous situations it can save someone's life.
After installing the socket, you need to use a tester to check not only the presence of a phase, but also a neutral with grounding. This is done simply, by alternately checking the “phase + zero” and “phase + ground” pairs with the device. In both cases, the voltage should be in the range of 220–240 volts. If this is not the case, you need to look for and fix the problem.
Recommendations for wiring and circuit breakers
- for a group of sockets into which devices up to 3.5 kW are connected, a 16A circuit breaker is installed
- for devices up to 5.5 kW automatic 25A. Moreover, it is better to extend a separate group to this pantograph
You can also navigate using the following table for selecting machines and cables when connecting a hob:
- since the kitchen is a wet room, plus a huge number of objects with a metal case, it is mandatory to install an incoming RCD with a current of 30 mA in the panel in front of all machines
- all sockets must have a grounding contact, for a rated current of up to 16A, for hidden wiring
- A separate socket is installed for each pantograph
- do not use carriers or extension cords in the kitchen
This is not only an additional load on the wiring, but also a potential short circuit (due to spilled tea or other liquid).
Important Design Points
To prevent emergency situations, you need to take into account a number of rules:
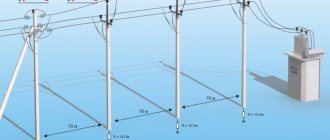
- The power of the lines supplying electrical outlets brought into the room should be twice the demand of all connected devices. To determine this, we divide the room into sections, each of which has one outlet group. We calculate its power and double the result. Add up the resulting values.
- We distribute energy consumers so that the total power of equipment connected to one source does not exceed the permissible values.
- It is better to power high-power electrical equipment through separate lines with automatic protection. Therefore, it is worth bringing the required number of such lines to the room from the distribution panel. To make it easier to understand the wiring, each machine can be signed.
The best option would be to calculate the approximate consumption of all devices. To do this, you can use the following average values:
- lighting 150-200 W;
- refrigerator 100 W;
- kettle 2000 W;
- microwave oven 2000 W;
- hob 3000-7500 W;
- oven 2000 W;
- dishwasher 1000-2000 W.
It is necessary to calculate the total power of the equipment. It should be in the range from 10 to 15 kW. All equipment will not turn on at the same time, so it is not worth calculating the wiring for such values. However, it is necessary to determine the maximum possible power when several pantographs are switched on. If it exceeds 7 kW, it is worth considering connecting a 380 V line and distributing the load in phases.
Types of electrical networks
The first thing they do when it is necessary to install sockets in the kitchen is to find out what kind of network is installed in the house. There are two types of electrical networks - single-phase with a voltage of 220V and three-phase with a voltage of 380V. The type, quantity, and total power of the devices that are planned to be installed depend on this. If the network is single-phase, then the maximum load does not exceed 11 kW - in this case, sometimes you have to give up powerful electrical appliances or excess equipment. With a three-phase organization of electricity supply, a load of 33 kW is permissible, which allows you not to think about choosing household appliances.
Externally, networks differ in the number of wires in the cable - for single-phase there are 2 or 3 wires, for three-phase - 4 or 5.
Strip the wires
Inspect the inside of the outlet to see if it has two or three wires. In old houses there are most often two of them - phase and zero. In modern apartments, grounding is added to the latter.
joinfo.ua
If the cable is too long, cut it with wire cutters so that it extends about 5–7 cm beyond the wall. Carefully remove the outer sheath and remove 5–10 mm of insulation from each conductor.
Electrical panel installation
Electrical wiring for the kitchen begins with the installation of a distribution panel. Since a corresponding machine is installed here to power all the wiring. The rating of the machine for powering the wiring in the kitchen should correspond to the most powerful devices, so it can be as close as possible to the input unit.
For large kitchens that include built-in appliances and furniture, a large number of connected devices, you can install a separate electrical panel in the kitchen. It will simplify access to various devices and make it possible to de-energize some node in the wiring for repairs while the rest are available for use. It will also help localize emergency situations by disconnecting only the section of wiring in the kitchen where the short circuit occurred.
Rice. 2: Kitchen distribution board