The idea to equip myself with a trash can that would pull out from the closet like a drawer came to my mind while cleaning the kitchen again. My small vessel quickly became filled with kitchen waste, and the area around it was constantly dirty and smelly. My desire to do as little work as possible in my kitchen inspired me one day to come up with the idea for a pull-out trash can, which I immediately shared with my husband.
He liked the project, and it turned out that bringing it to life was quite simple. This is what we got. Convenient, always clean and looks advanced!
This interesting idea can help our readers do the same at home.
Necessary materials and tools
To create such a drawer, we had to work hard to find on the Internet a suitable volumetric tank with flaps along the rim, which would not only fit inside our cabinet, but would also leave enough space around it.
In addition, we found it useful:
- a drawer from another cabinet that was about 5cm shorter than the depth of the cabinet (and 10cm shorter on each side);
- wooden blocks for fastening on the inside of the cabinet walls;
- plywood;
- jigsaw;
- drill;
- flat screws;
- wood glue;
- level;
- roulette;
- two simple pencils;
- sandpaper;
- furniture varnish.
Distance from kindergarten, school
A kindergarten or school does not always have a separate yard for economic activities. If there is no such place, then the site for the waste collection site is selected in accordance with SanPiN standards and agreed with the management company and the administration of the locality.
The garbage container must be located at least 20 m from the place where children walk. It is advisable to choose a site in the backyard - where no one walks. Thus, the waste collection site is removed from the building and playgrounds.
Access to the tanks is not through the main yard, but through a separate gate.
Preparing to install box hardware
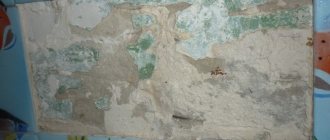
First, my husband removed the shelf from inside the closet. It was fastened tightly, so he had to saw it in half and use a hammer to knock it out of place, and then rip it out of there. He then used sandpaper to sand down the damaged areas.
New fragments of biblical scroll found in cave in Israel
Alexander Myasnikov decided to refute popular opinions about the dangers of tea and coffee
Daughter is daddy's love: Yulia Savicheva spoke about her relationship with her father
After the shelves were removed, he measured the height of the trash can and added another five centimeters to this figure. He marked this point on the inside of the side wall of the cabinet on both sides.
My husband used a level to draw a straight line on the inside wall of the cabinet. He needed this line as a guide to place two pieces of wood to hold the drawer hardware. In the project he used bars 2.5x7.5 cm thick. We bought them, and after taking the necessary measurements, we cut one block into pieces of the required length in advance.
Hidden kitchens in St. Petersburg
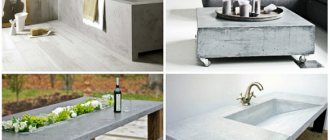
The design of a hidden kitchen assumes that there are no pots, small appliances and other utensils in sight: only clean walls and an empty table. Fresh flowers in pots and lamps with warm light are appropriate as decoration. Such options allow you to create an atmosphere of comfort and get rid of kitchen associations.
Our specialists will help you develop a design for a hidden kitchen and implement any of the customer’s ideas. In our catalog you can see photos of works and exclusive ideas for studio apartments and a kitchen combined with a living room. Contact us for a consultation or to buy a hidden kitchen now.
Securing wooden blocks to cabinet walls
The husband secured the resulting wooden blocks to the cabinet walls with four screws with sharp ends. The good thing about point screws is that they are sharp enough to drive into wood without having to drill holes first.
First, we made sure that the screws were smaller than the width of the cabinet walls. We don't really want their ends to come out on the other side. On each side, the husband aligned the bars so that their upper part coincided with the previously drawn line, and secured them along this line with adhesive tape. He then secured each block with four screws at the marked points.
Birds in Australia have forgotten their own songs, scientists have to learn them again
Cake “Stripe” with butter cream and vanilla pudding: a no-bake dessert
Leo and 2 other zodiac signs, absolutely indifferent to any reproaches addressed to them
Making a drawer
To cut out the platform that would accommodate the trash can, my husband carefully measured the exact width between the pieces of wood installed inside the cabinet.
He then subtracted 1.5 cm from this distance and cut the plywood to this width. He cut the other two identical pieces of plywood to a depth that matched the intended length of the drawer.
Garbage bin platform design
In order to create a good edge for attaching the drawer hardware to the platform (apron), you will need three pieces of wood - one in front and one on each side. My husband cut these bars in advance with the same dimensions of 2.5x7.5 mm.
He cut the piece for the front of the apron exactly according to the width of the piece of plywood for the platform, and the side parts of the apron were cut carefully to the size of the two side pieces of plywood (minus 1.5 cm).
To allow birds to immigrate to the United States, street lights in cities are dimmed.
Look and feel younger: why you need to eat less and less often
Black is a mysterious color: how people dye their hair, depending on their personality type
Then I needed to glue these three pieces of wood onto the plywood.
My husband had to work hard to ensure that the sides were parallel. After all, if the box is not parallel, it will not slide smoothly. While the glue was drying, I had to use clamps to keep the whole structure in place.
Situations in which a hidden kitchen is the ideal solution
A hidden kitchen set allows you to save living square meters, disguise clutter and maintain a unified interior style in a small apartment. This solution is proposed in the following situations:
- lack of space for a full kitchen (for example, in small modern studio apartments);
- development of additional square meters due to hidden kitchen space (relevant if it is possible to connect the kitchen and living room);
- a thirst for experimentation in apartment design and a desire to create a non-standard environment.
Hidden kitchens are only gaining popularity. However, there is already a demand for them from our customers. Many of them come to the idea of hiding the kitchen in the living room, as this allows them to create a single and complete living space. A kitchen hidden in the interior has a number of advantages:
- modern furnishings;
- implementation of bold design ideas;
- the possibility of using different materials and types of facades;
- saving space (relevant for small rooms).
Securing the trash can to the platform
Once the wood glue had dried, we placed the trash can bottom up on the platform right in the center and traced the outline around it.
The husband secured the two pencils together with duct tape and once again traced the outline of the trash can with a double line. His goal was to move the line about 0.5 cm inside the edges of the trash can to cut out the shape using a jigsaw. The smaller shape keeps the trash can from falling through the hole.
He then drilled a hole next to the newly drawn trash can outline. The hole was large enough to fit a jigsaw blade.
Why did Sergei Yursky's father hide his real last name and not give it to his son?
Became brunettes: Lady Gaga and Margot Robbie are no longer blondes (photo)
Nutrition is more important than movement: scientists have broken down the Amazonian diet
He then inserted a jigsaw and began cutting a hole along the line. He did this carefully, so as not to cut out more than the smaller outline of the trash can, for fear that the entire structure would fall out of the hole when he began to put it in place. He then carefully sanded down the sharp corners of the trash can platform and carefully sprayed the wood with varnish.
Construction of waste containers
The delicate topic of household waste has become a field for engineers and designers who pay attention to such a prosaic item as a garbage can. In-room and pull-out garbage cans for the kitchen under the sink are made taking into account sanitary and aesthetic standards.
Freezing trash bin is ideal for hot climates
The Japanese: from robots to trash cans
The company Ideaco from the Land of the Rising Sun has released a two-piece Tubelor waste bin. How to prepare Tubelor for use:
- Insert a garbage bag into the bottom part;
- Bend the edges of the bag outward;
- Place the second part on top.
The main disadvantage is the lack of a lid, so it is only suitable for dry waste: packaging, husks, shells.
Japanese bucket
Sorting system
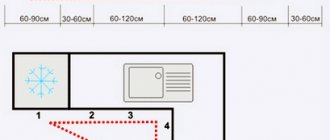
Consists of several plastic containers for different types of waste, mounted under the sink. The system takes up more space, so it makes sense to install it if the city practices waste disposal by category. In rural areas, food scraps can be composted, and other waste can be burned/disposed of traditionally.
Model European waste site
Bucket with lid
The bucket with a lid is serviced manually, which is unacceptable during cooking and washing dishes. The swinging lid moves like a children's swing. The product weighs up to a kilogram, and the plastic will not leave scratches on the floor.
Container with swing lid
Advantages:
- Inexpensive (5 liter costs 190 rubles, 9 liters – 290 rubles). Prices are valid for spring 2022;
- The lid blocks odors;
- Easy to clean.
Flaws:
- You need to bend over, which is inconvenient for older people;
- Manual control".
Model with pedal
A more advanced version of the bucket with an opening lid is equipped with a pedal that eliminates tactile contact. It is made of plastic/metal, which is reflected in the price (plastic for 12 liters costs 690 rubles, a similar metal one costs 1850 rubles).
Disadvantage - the pedal mechanism wears out, which leads to the cover being skewed.
Wall mounted waste container
Bucket of intelligence
Made of metal, it has such an excellent design and rich color palette that it would be foolish to use it as a built-in bucket. The infrared sensor eliminates contact with the lid. By bringing your hand closer to a distance of 15–20 cm to the sensor, the sensor will detect the movement, the lid will open on its own, and after 5–6 seconds it will close.
Contact with smart bucket
Beware of the "Chinese". There are buckets with inhibited “intelligence” that ignores the distance from the hand to the sensor, so you have to almost touch the sensor.
Sensor tank lid opening option
The sensor bucket requires constant cleanliness of the sensor and monitoring of the batteries. Therefore, if the cover does not open, do not try to pick it out manually, it is better to replace the batteries.
Plus:
- Beautiful, will fit into the design of any room;
- Moderate cost of miracle technology (from 5,000 rubles).
Minus:
- Constant monitoring of the power supply.
Bucket with seal
On the one hand, it’s a useful thing - compressed waste takes up less space, therefore, the capacity increases. The pedal/electric version ensures clean hands. On the other hand, there are more inconvenient moments.
Container with hand press
What is inconvenient about a bucket with a press:
- High price - the electric model (by the way, it is also noisy) costs about 70,000 rubles, and a set of special packages costs up to 2,000 rubles;
- Bulky - volume 40 l;
- “Does not like to compact wet waste”;
- A hand press is cheaper, but the sealing lid must be washed every time the bag is removed.
Installing the drawer in its place in the closet
After my husband installed the drawer piece in the middle of the sides of the platform, he drilled a vertical hole so that if he positioned the drawer incorrectly, the hardware would at least be able to move up or down easily when he slid the platform into place.
Once the drawers were secured to the cabinet walls and trash can platform, my husband was ready to slide the platform into place and use the fixed bin for its intended purpose. But it was not there! It turned out that the wood he had glued to the backsplash platform had moved before the glue had dried, preventing the structure from being perfectly parallel. So he pulled the platform out again, removed the bracket from the drawer, and sanded the edges until they were parallel. Then he put everything in place, after which we began to actively use this invention.
After using this trash can for a few days, we decided to attach the cabinet door to the front of the platform so that when we opened the door, the trash can would slide out on its own. But this will be a completely different thing, also made with your own hands!
Found a violation? Report content
MSW sites
Federal Law No. 89 of June 24, 1998 “On Production and Consumption Waste” clearly regulates the creation and maintenance of places intended for the storage of MSW.
Clause 2 of the Rules for the Management of Municipal Solid Waste, which was approved by Government Decree No. 1156 of the Russian Federation “On the management of MSW”, states that the place for their collection must comply with the standards and undergo regular sanitary treatment.
The responsibility to monitor the maintenance lies with the companies and owners of the sites where the waste collection site is equipped. They also do repairs and painting. Obligations for waste removal and equipment purchase were assigned to the regional operator.
To remove waste from construction sites and areas adjacent to shops and office premises, additional containers are installed that can hold up to 8 cubic meters.