Children dream of a bed at a height and for this they are willing to put up with even inconvenience. The second attractive point for them is the opportunity to make a “house” of their own territory below. For parents, this option is attractive due to its rational use of space. The only drawback of ready-made options is the substantial price. An excellent solution is a do-it-yourself loft bed. Firstly, the costs will be small, and secondly, build it exactly to your size.
What's the best thing about loft beds? That both children and adults enjoy using them. Moreover, children of any age - from kids who are still in kindergarten to teenagers. It’s a little more difficult with an adult audience. Young people agree on loft beds; older people no longer find the delights of relaxing upstairs. Nevertheless, the age range turns out to be solid. All models described below can be used for both children and adolescents, and adults. Everything can be solved simply by changing the dimensions.
Option for youth and teenagers
Benefits for children
The main advantages of the loft bed model include:
saving free space . Under the bed you can organize a play corner or a work area;- presence of a work area . Children will use the furniture not only for sleeping, but also for lessons and other activities;
- additional physical activity . Regular descent and ascent on the product will have a beneficial effect on the child’s health;
- functionality . With proper planning, the area under the sleeping place can be arranged for games, or you can place a computer desk in it or install a closet;
- saving money . Making your own bed will save you a considerable amount of money. In a store, such a product will cost twice as much;
- practicality and durability . Since you will select the manufacturing materials yourself and assemble the structure yourself, you can be confident in its quality, safety and durability.
Comments
Maria Ustinova 01/22/2017
The beauty is unreal! And all with my own hands, I can’t even believe it! It's amazing! But we bought one like this, although we had forging, it cost 41 thousand, almost, all my life I’ve been dreaming about such a bed and finally we have it, as I understand you, it’s such happiness!
Maria Ustinova 01/22/2017
alpha 27-01-2017
Can you tell me what tolerances were made? Well, that is, if you have a mattress (mattress base) 160x200, then what are the internal dimensions of the box?
Design selection
The classification of such beds is conditional; depending on the number of supports and the method of their placement, the following models are distinguished:
- With a loft on 4 legs, considered quite reliable and easily moved to other places. This option is the most common. Patterns and sizes of such beds can be easily found on online resources.
- With 2 supports and additional wall mounting. Such structures are the safest, but changing their location is understandably difficult.
- Suspended models, fixed exclusively to reliable fastening systems to ceilings with sufficient strength and load-bearing capabilities. Despite all the advantages (stylish appearance, saving materials, freeing up space, the ability to convert a conventional loft bed into an original design), this design is not considered safe and has significant weight restrictions. Relocation to another location is possible under the same conditions as installation.
There are models with strictly vertical or, conversely, inclined ladders attached from the end or facade. The first beds are dangerous for small children, the second are comfortable, but take up a lot of space. There are also products with retractable or roller systems, step boxes or podium-type stairs. Each of the varieties can successfully fit into modern interior styles. When assembling a loft bed with your own hands, the easiest way is to attach a vertical or inclined ladder to the furniture.
On 4 supports
With 2 supports and wall mounting
Hanging
Inclined ladder
Vertical
Step boxes
Organizing your desk or desk
If there is sufficient height from the floor to the bed, it is recommended to leave some space for the tabletop. This option is optimal for study and work: the width of a single bed is about 80–100 cm, the same depth is optimal for a spacious table.
For double beds, the installation height in this case should be 10–15 cm higher than the height of the person using the work or study place. Also, due to the overhanging bed and side rails, shading is possible, so the table will need a close electrical connection point and at least a simple table lamp.
The table does not have to be tied to the bed structure, but when making a support structure from chipboard, it is very convenient to use one of the side panels as a support point for the table top. All that remains is to place another board 70–80 cm high on its edge - the space for work and creativity is already ready. To further save space, the tabletop can be made folding or retractable.
Decor options
The good thing about a house bed is that it can be easily decorated with a canopy. By sewing two or three different sets of fabric curtains, you can change the appearance of this piece of furniture beyond recognition.
If she stands opposite the window and bright sunlight wakes up the child earlier than necessary, a canopy made of dense opaque material will come in handy. If the cape is only to decorate the bed, you can choose any material you like.
A narrow long curtain woven using the macrame method can also serve as a decorative element. It will also make your sleeping area more comfortable.
If desired, a short canopy can be styled to resemble a tiled roof. This decoration option is suitable for beds where there is only a triangular frame and no wooden floor.
However, you can do without fabric curtains altogether. And so that the structure does not look empty and boring, it is worth decorating it with soft toys, garlands of paper letters that make up the child’s name, hanging a dream catcher or a beautiful trinket with tassels or pom-poms from the top beam.
You can create an atmosphere of mystery and at the same time comfort by wrapping the vertical supports and cross beams with an LED garland with star-shaped bulbs and hanging three-dimensional clouds cut out of paper from the ceiling. The design will be complemented by wallpaper depicting the night sky.
Older children who often read in bed in the evenings will love the lighting option shown in the photo below. Before putting it into practice, it is worth treating the wooden parts of the bed with a fire retardant (a special liquid that prevents fire).
Making a house bed with your own hands is quite simple. In addition, the family budget will not suffer much, even if you buy not only lumber and consumables, but also tools. This is also a creative process, and all family members can participate in it, spending time together doing a useful activity.
New life for an old bed. Easy ways to reupholster a bed
If the bed has become thin or the leatherette or fabric upholstery has gone out of fashion, you can reupholster it yourself at home with new material. For this work you will need a small arsenal of tools and at least 5-10 hours of your own labor.
The article describes in detail how to do everything correctly, whether it is difficult to make a fashionable carriage tie or reupholster a narrow chair-bed. Step-by-step instructions are given for upholstering the headboard with leather or fabric, as well as other ways to update the bed.
Collapsible bunk bed - how to choose the optimal solution
If you are purchasing a bunk bed for children, you must immediately decide whether it will be divided into two single elements in the future. If yes, then you need a collapsible option, from which you can make two full beds in just half an hour. In this article we will talk about the main features of such furniture and figure out what aspects you should pay attention to when purchasing.
The ability to split a bunk bed into two single beds is a huge advantage for the future
For the little ones.
What should be included in a baby corner? This is, first of all, of course, a crib and a changing table.
Any mother will appreciate it if all the children's things are at hand and in one place. For this purpose, you can make several drawers.
Basic nuances of work in 7 steps
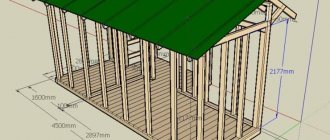
Taking into account all the pros and cons, wood is considered the most suitable material for self-assembling an attic, so we will assemble a wooden structure. The general action plan looks something like this:
- We decide on drawings and sketches - we draw with our own hands or design using a computer program, for example, PRO. Using the drawings, we paint the details, that is, the exact number and dimensions of all parts of the structure. By the way, in most furniture design programs, detailing is calculated automatically.
- We decide on the materials and prepare the tools.
- We assemble the main supporting frame.
- We arrange the flooring on the frame.
- We assemble and screw the ladder to the attic.
- We decide on the contents and install the work area on the first floor, that is, a table, cabinet, shelves, etc.
- At the last stage we are finishing our wooden attic.
Step No. 1: drawing of a loft bed
Not everyone can make a professional drawing; in fact, we don’t need one; a well-made sketch, with all dimensions and fixation points, is enough. It doesn’t matter whether you make a plan by hand or use a computer program, the first thing you need to decide is the size of the bed.
Drawing up a sketch begins with determining the size of the bed.
If you are not planning to make a huge attic for half a room, then you need to start from the dimensions of the mattress. All leading manufacturers strictly adhere to the standards in this regard. True, there are Western and domestic standards; they may differ slightly from each other.
It is advisable to make the upper bed according to the size of the mattress.
There is one small nuance here. Ideally, it is advisable to buy a mattress and make a loft bed under it. It’s not a fact that if you take some standard sizes as a basis, you will then find the same mattress in the nearest store, and ordering from another city can cost a pretty penny.
| Illustrations | Recommendations |
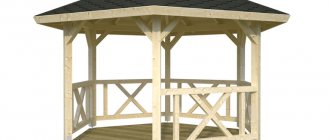
| Single bed . A full-size single bed is suitable for a teenager's room or a miniature home office. The main material is wood. | |
| Children's bed made of timber . Here we have a children's bed raised a meter from the floor. Children like such models, and adults find it easier to control the child. The main material is wood | |
| Complex with wardrobe . The sleeping place in this model is designed for a person no taller than 170 cm, but the filling of the lower level is arranged to the maximum. In addition to the closet, there are also a lot of shelves and a small desk. The main material is chipboard. | |
| Model with wardrobe . A spacious closet and a wide desk are closer to the office version. The main material is chipboard. | |
| Staircase with landing . A durable and comfortable ladder suitable for both children's and adult models. |
Wooden structures can be increased or decreased as desired; the wood will withstand additional loads. But if you take a ready-made drawing of a bed made of laminated chipboard, then it is not advisable to redo it, especially in the direction of enlargement. The fasteners may not hold up.
Step No. 2: list of necessary materials and tools
We will be making a non-standard attic for the entire width of the room, so the main material will be timber with a section of 50x150 mm. For free-standing frames, you can use 100x100 mm timber. The flooring will be covered with a 25x100 mm board.
Only dry, planed wood is used to make furniture.
The easiest way to assemble wooden structures is with metal fittings, this includes metal corners, overlay plates, rafter hangers, etc. Moreover, it is better to buy fittings in construction stores rather than in furniture stores, because they are used in arranging roofs and assembling wooden houses.
A large attic bed is easier to assemble using fittings designed for the construction of a roof rafter system.
Either nails or self-tapping screws are used as fasteners. The first option is cheaper, and the second is more reliable. It is not advisable to take things like rough nails; if you have to disassemble the structure, it will be problematic to pull them out of the timber, so if you don’t trust simple nails, then take self-tapping screws. Anchors are needed for wall mounting.
Nickel-plated screws are best suited for assembling wooden furniture.
For such work, a minimum set of tools is sufficient:
- Tape measure, ruler, pencil.
- The level is bubble and water, or laser can be used, but it is expensive.
- Screwdriver.
- Drill with impact function or hammer drill.
- Wood saw.
- Hammer.
- Awl.
- Set of chisels.
- A pair of clamps.
- Pliers.
- Emery block and a set of emery for it.
The construction of an attic bed made of wood does not require a large number of expensive tools.
Step No. 3: assembling the frame
| Illustrations | Recommendations |
| Fastening the wall beam . Holes and anchors are drilled in the load-bearing wall using a hammer drill, and a support beam is screwed horizontally. Fixation step 40 cm. | |
| Suspensions . Metal rafter hangers under the transverse beams are screwed onto the wall beam at intervals of 50-60 cm using self-tapping screws or powerful screws. | |
| Opposite structure. It just so happens that our opposite wall is weak and it is impossible to “attach” to it, so we will mount supports. The structure consists of 3 vertical supports and a horizontal load-bearing beam. It is assembled using T-shaped metal plates on screws or nails. All elements must fit snugly against the wall, so it is advisable to remove the baseboard or make cuts under it in the racks. | |
| First cross member . In the same way, metal hangers are attached to the supporting structure. To ensure that the frame holds itself, the first transverse beam 50x150 mm is inserted and fixed into the hangers. | |
| Installation of logs . The remaining logs are inserted into hangers and fixed with self-tapping screws in the same way as a feather beam. |
Step #4: flooring
Here, a tongue-and-groove floor board with a cross-section of 30x100 mm was used as flooring. We cut off the tenon of the first board adjacent to the wall and pressed it close to the wall. Then, according to the standard tongue-and-groove pattern, the rest of the flooring was assembled. There is no point in fastening the flooring boards with self-tapping screws, so nails were used.
The board is nailed to the joists.
In this case, we made a small mistake; the tongue-and-groove board produces a continuous, monolithic flooring, without any gaps. While for a large mattress it is desirable to ensure air flow from below, so it is better to use a smooth planed board and nail it with a gap of 5-7 mm.
It is advisable to make flooring for an orthopedic spring mattress with ventilation gaps.
Step #5: building the stairs
| Illustrations | Recommendations |
| Bowstring installation. The minimum thickness for timber for bowstring and steps is 30 mm. We used the same timber as on the 50x150 mm logs. The staircase was made at an angle, so the string bars were trimmed for better fixation to the flooring. | |
| Marking and fixing steps. For our height of 2 m, 7–10 steps are needed. The string bars are divided into equal distances and the places for the steps are marked using a level. The step is attached to 3 self-tapping screws on each side. | |
| Handrails . This part can be attached at will; we thought it would be more convenient this way and screwed the metal handrails onto the bars of the staircase string. |
Step No. 6: equipping the work area at the bottom of the loft bed
| Illustrations | Recommendations |
| Tabletop. A tabletop is glued from a board 20–30 mm thick, and slats are screwed on the back side for rigidity. When the glue has set, the tabletop is carefully sanded. | |
| Table top pendant . For these purposes, we used special furniture fittings. We thought that a folding table in a small room would be more relevant. | |
| Shelves . To ensure that the space above the table was not empty, hanging shelves were assembled from boards. The parts of the shelves were assembled onto wooden dowels, glued together and secured with clamps while the glue dried. | |
| Fastening shelves . When making the table and shelves, we focused on the gap between the posts, so all these elements were screwed not onto a light wall, but onto strong wooden beams. |
Step #7: finishing
In theory, it is advisable to sand all wooden elements of such structures before assembly, but we missed this point and had to sand the wood at the very end. After sanding comes decorative processing. Here, whoever likes it, we covered the wood with oil and wax in 2 layers, but this finish needs to be renewed every couple of years.
Oil-wax for wood is an environmentally friendly material.
If you do not want to constantly renew the coating, then use paint or furniture varnish. The second option is more preferable, since the natural beauty of the wood remains visible; by the way, before varnishing, you can stain it and give the wood a certain shade.
There is an important point. After the first coating with any composition, micro-lint rises on the wood; you need to take sandpaper and remove this lint in 3-4 strokes. All other layers of the selected decorative composition are applied without sanding.
Smart storage systems, innovative design
Is your goal to save footage and increase efficiency? The attic complex must replace all furniture. Designers are working in this direction and offer us numerous variations of loft beds.
Innovative design and the use of storage mechanisms/systems help increase functionality and content. Each child has a lot of clothes and personal belongings, including toys and textbooks.
Without organizing the space, the capacity of the furniture is reduced. Equipment helps increase capacity:
- The drawers are made retractable and swivel. They are equipped with cells for storing small items.
- The cabinet is built in at an angle, which increases its internal volume.
- Roll-out boxes are installed under the ladder.
- Modular stairs consisting of boxes are used.
- An empty corner of 30–40 cm can be filled with a cabinet with a pencil case.
- The free wall is equipped with shelves or covered with a rack.
Additional drawers can be organized in steps
How to plan an attic for a nursery
When deciding on the design of a nursery in the attic, you will have to be guided by the configuration of the room. It usually has a low ceiling height. Sometimes roof slopes serve as both walls and ceilings.
This causes certain difficulties. But kids like the intimacy of the room much more than adults, and a properly selected wall design will smooth out the shortcomings.
The layout of the room includes the following points:
- technical calculations;
- insulating the attic, if necessary;
- design choice;
- embodiment of an idea through the selection of finishing materials, furniture, textiles, lighting.
When arranging a nursery in the attic, it is necessary to take into account such a thing as ergonomics. The child should have enough space for different aspects of life: play, study, relaxation.
Finishing
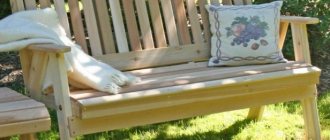
After making the bed, it needs to be given an aesthetic appearance. If desired, the bed can be covered with stain and varnished in two layers . Some parents get creative and paint the beds in bright and rich colors. This option is more popular with young children. So the bed becomes for them not only a place to sleep and relax, but also for active and exciting games.
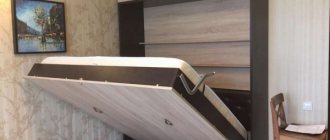
Advice : if you are serious about saving space in your apartment, try making a lifting bed, a bed-wardrobe and a bed-chair. For children, it also makes sense to make a sand painting table, desk or children's table.
Organizing your desk or desk
If there is sufficient height from the floor to the bed, it is recommended to leave some space for the tabletop. This option is optimal for study and work: the width of a single bed is about 80–100 cm, the same depth is optimal for a spacious table.
For double beds, the installation height in this case should be 10–15 cm higher than the height of the person using the work or study place. Also, due to the overhanging bed and side rails, shading is possible, so the table will need a close electrical connection point and at least a simple table lamp.
The table does not have to be tied to the bed structure, but when making a support structure from chipboard, it is very convenient to use one of the side panels as a support point for the table top. All that remains is to place another board 70–80 cm high on its edge - the space for work and creativity is already ready. To further save space, the tabletop can be made folding or retractable.
Scheme and drawing with working area
Now you know what materials your bed will be made of, what design and size it will be. Next, you will need to transfer all your thoughts onto paper. Having a well-designed project will speed up the work process and prevent errors during the manufacture and assembly of the bed.
You can make a drawing of a piece of furniture in different ways:
- Draw it yourself with a pencil on a piece of paper. To do this, you need to have a little understanding of drawings and be able to independently calculate the ratio of sizes of different elements;
- order from a specialized company . Here they will design a drawing for you, according to all the wishes and features of the room;
- find a loft bed diagram on the Internet . PC users often share their experiences with other people. On such sites you can find a ready-made drawing and, if necessary, modify it according to your personal wishes.