A gazebo in a country house or in the courtyard of a house is a place for drinking tea and gatherings in the summer. In slightly larger buildings, a barbecue can be installed. Then you can think about glazing it: barbecuing in winter is a rare pleasure, and the barbecue will at the same time warm the air inside. They usually start with simpler and cheaper models: they build a gazebo with their own hands, most often there is not enough time. Hence this choice. We’ll talk further about how to do this correctly, about materials, methods, and methods of construction.
The relevance of a homemade gazebo
Before you build a gazebo, you need to find out how relevant it is. The main purpose of the thematic design is protection from precipitation, heat, onlookers and insects.
But the walls and roof can serve other purposes:
- Organization of barbecues in winter and summer;
- An extension to a house to disguise a worn-out facade or protect it;
- Successful completion of the landscape;
- Use as a supporting base for climbing plants;
- Providing children's entertainment.
The secondary purpose of the gazebo influences the choice of its type no less than the main one. For example, for children it is enough to create a small playhouse in the shape of a steam locomotive or a car.
Climbing plants welcome an outdoor wooden pergola, deck or wrought iron equivalent. The presence of a barbecue affects the level of complexity of the foundation and roof.
Moreover, instead of a barbecue, you can use a full-fledged oven (especially if the gazebo is closed and year-round).
Japanese style gazebos
Oriental style is one of the most popular when decorating gardens. Japanese aesthetics are based on attention to detail. This is a whole philosophy.
Choose a picturesque area near the water or on a hill. Focus on laconic trends, like minimalism. Use hardwood and natural stone.
Instead of solid walls, stretch fabric inserts like oriental screens and partitions. Make them sliding or folding - and it will also be functional.
A characteristic feature is the roofs. There are three options: gabled, hipped or with gables. They are difficult to make, but they themselves are a stylish design technique.
A pond with a bridge is the best decorative element, but not the only one possible. Pay attention to stone gardens or complex landscape compositions with Japanese plants. They can be replaced with interesting varieties of succulents.
Photo: krov-torg.ru
Photo: de.gardendecorgalore.com Photo: kakatu.ru Photo: 7dach.ru
Photo: almode.ru Photo: besedkis.ru Photo: svoyabesedka.ru Photo: on-desktop.com Photo: yandex.ru Photo: aquastroy-spb.ru Photo: jackwharperconstruction.com Photo: sk-resultat.ru
A type of gazebo
In order for the drawings and dimensions of the gazebo to serve as the basis for successful design, the structure itself must correspond to the area of the site.
In particular, we are talking about the ratio of areas and the similarity of styles:
- Firstly, the gazebo should occupy no more than 10% of the total area of the site (the structure can be located anywhere, depending on the specifics of the project);
- Secondly, the thematic shelter must match the residential building and landscape (therefore, for the construction of a gazebo, it is recommended to choose the building materials from which the residential building was built).
On the other hand, the landscape may not resemble the main structure. It is not without reason that for a flowering garden, vineyard and pond one has to choose a pagoda with a curved roof, a wooden pergola and a structure on stilts, respectively.
The relevance of the gazebo allows you to find out the functionality, and the latter, in turn, makes it possible to decide on the following configurations:
- Seasonality – open, semi-open, closed (summer, summer and demi-season, year-round);
- Composition – logs, beams, bricks, boards, forged metal, branches;
- Shape – square, rectangular, polygonal, round, oval;
- Area – small (up to 6 sq.m.), medium (6-10 sq.m.), large (more than 10 sq.m.).
Also, a gazebo for a summer residence can be framed and solid - lightweight and heavy. In the first case, the load-bearing part (frame) is first erected for subsequent finishing. In the second case, the structure is erected in stages (in several rows).
The composition is mainly selected according to the style of the residential building. But if the gazebo will serve only in the warm season, then the consumption of building materials will have to be reduced. In this case, it is not necessary to close window and door openings.
The choice of area is influenced by the number of users. The area and shape are selected depending on the area of the site and the requirements for the style of the finished structure.
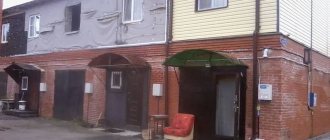
Gazebos with stove or barbecue
Gathering with friends for a barbecue - what could be better? Carrying a barbecue with you all the time and turning it up urgently during the rain is at least inconvenient. The gazebo in this case plays the role of a stationary canopy.
To use a barbecue or stove even in winter, make a closed or semi-closed gazebo. Choose fireproof materials that smoke less - for example, stone or brick.
Don't forget about the hood. And think about the furniture. In addition to the dining table, you will need a work surface, storage space for firewood, dishes and accessories.
Photo: zaggo.ru Photo: aleksandrovich-stroy.ru Photo: infradom.ru Photo: new.alexeynikitin.ru Photo: lachat.ru Photo: krov-torg.ru Photo: ust174.ru Photo: uutvdome.ru Photo: sukkonovelika. ru Photo: vse-otoplenie.ru
Type of foundation for a gazebo
The gazebo can hardly be called a massive structure. However, even this must be built on a foundation.
The load-bearing base is selected depending on the weight of the structure and the complexity of the landscape:
- Columnar brick foundation - suitable for small and medium-sized structures weighing up to 1 ton, welcomes low and medium groundwater levels;
- Pile foundation - suitable for small structures weighing up to 800 kg, serves as a good foundation for any groundwater level and even allows you to build a gazebo over a pond;
- Strip foundation - suitable for light and heavy structures, welcomes any groundwater level, because may include a plinth for utilities;
- Monolithic foundation - similar to a strip foundation and allows you to install the stove both in a corner and along the wall.
The simplest do-it-yourself gazebo made of branches or boards does not put any load on the ground, and therefore can stand on a 10-centimeter drainage pad made of sand and crushed stone.
There is no need to install strip or monolithic foundations under lightweight frame gazebos. Piles or pillars are sufficient. Moreover, red brick or foam concrete are always used for pillars.
Cheap country summer gazebo: the best ideas
At the moment, various materials are used to build an inexpensive gazebo, allowing you to bring to life the most daring and original ideas:
- Living design. A gazebo can not only be built, but also grown. It is enough to buy willow seedlings and start growing the structure, tying the tops together, which will allow you to form a frame. The general period for the formation of a gazebo is 3-4 years.
- Ready-made collapsible structures - a gazebo, which can be bought at a specialized or hardware store. The cost of such gazebos is small, and you can assemble them yourself, because this does not require a foundation or special construction skills.
- A wooden gazebo is an inexpensive design, the features of which depend on the budget. The base is a columnar foundation, on top of which is a floor made of concrete or stone, sand or crushed stone. The frame can be made from cut trees or inexpensive boards. The roof is a gable structure made of wood itself or covered with slate or roofing felt.
- Metal structure - gazebo made of steel profiles. Of course, such a structure is more expensive than a wooden one, but the strength and service life of the gazebo fully justify the costs.
- Gazebo made of polycarbonate with a metal frame.
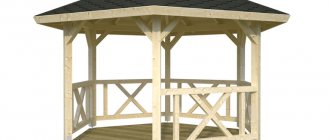
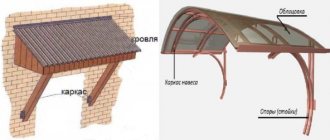
Choosing a roof for a gazebo
The shape of the roof is selected depending on the shape of the gazebo. Simple square and rectangular structures have single- and double-pitched roofs. If desired and with an unlimited budget, the structure is completed with a hip or hip roof.
There is also a dome that suits rounded gazebos like a Mediterranean rotunda. Inside such a gazebo there is no fireplace or it is open. Other designs include a chimney that exits through an opening on the side, the center or the roof slope.
In addition to the shape, you will have to choose the roofing material. It is customary to finish the roof of the gazebo:
- Flexible tiles;
- Profiled sheeting;
- Polycarbonate;
- Tarpaulin.
All of these materials have one significant advantage - light weight. They can also be easily and conveniently dismantled.
Original ideas for economy class gazebos
- Garden design for a summer residence made of plastic bottles. The container is pierced through metal rods and then secured to the main frame. By experimenting with the color and shape of bottles, spectacular results are achieved.
- Gazebo made of glass containers. Colored bottles in green, brown and blue shades let the sun's rays through and sparkle. Lay the containers in rows, fastening the elements with a solution.
- A canopy made from trunks and branches of cut trees. In a shady corner of the garden such a gazebo will look especially colorful. For decorative purposes, the wood is cleared of bark and covered with stain and varnish.
This is a small part of the options for unusual canopies that you can make with your own hands. A garden gazebo is space for the summer resident’s imagination. If you approach its construction with a bit of creativity, such a structure will become a favorite vacation spot and a landmark of the site, which neighbors and friends will look at with admiration.
Step-by-step instructions for building a gazebo
Heavy gazebos include structures made of brick, timber and logs. On the other hand, lumber can be used as load-bearing posts for an outdoor gazebo or a load-bearing frame.
The complexity of constructing a gazebo mainly depends on its seasonality and foundation.
Conventionally, construction can be divided into several stages:
- Drawing a sketch;
- Drawing up a drawing according to the sketch;
- Clearing the area;
- Digging trenches, holes or pits for a specific foundation;
- Directly organizing the foundation - filling the recesses with a drainage layer, installing formwork, reinforcing and filling with cement mortar if necessary;
- Construction of the lower trim;
- Installation of load-bearing vertical pillars or stacking building materials on top of each other;
- Construction of the upper trim;
- Organization of the roofing system - installation of rafters on top of the top frame, fastening of the sheathing, laying of waterproofing and roofing material;
- Wall finishing except for openings for glazing and doors;
- Installation of doors and windows if necessary.
If the gazebo has a barbecue, then the latter will have to be erected before building the walls or frame. An appropriate approach minimizes damage to the structure when carrying bricks, and also allows you to build the kiln itself in good natural light. True, the furnace can be mobile metal.
Options for the building material used
Support pillars.
The following materials can be used to construct supports:
Broken or old brick. An attractive option for saving your budget would be used bricks. Substandard brick is also quite inexpensive.
Stone. Plastic sheets are well suited for constructing supports. Rubble stone can also be used, the only drawback is that it is more difficult to work with, since it will have to be broken down to a suitable size.
Tree. Wooden poles are quite popular and economical. The disadvantage is that the supports rot over time due to increased humidity and precipitation. Before construction begins, it will be necessary to apply or impregnate a moisture barrier.
Foam blocks or its fragments. This is a lightweight and inexpensive material. The only drawback is that it will have to be plastered to make it look more attractive.
The insufficiently beautiful appearance of such supports can be improved if you use paint or plaster with a colored whitewash applied to the surface. In addition, an old brick from a disassembled stove or a weld is perfect for a barbecue, if the gazebo provides such an option.
Advice: if supports made of wooden beams are used, then it is not advisable to insert them into cement mortar. Even if it is isolated, it will rot over time. It is better to use an iron pipe for part of the support, in which to make several holes for self-tapping screws. A wooden post inserted into a metal frame that is directly fixed into a hole with concrete will last longer.
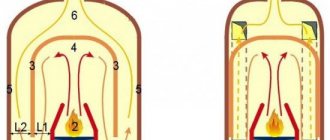
Choosing a stove for a gazebo
A gazebo with a stove is a common occurrence. Moreover, the firebox can be located inside a thematic shelter for several reasons:
- The need to prepare savory dishes;
- Heating the space during the cold season;
- Decorative completion of the interior.
Inside the light open gazebos, the stove is useful only for cooking kebabs. Although even such projects, for fire safety reasons, require the furnace to be remote from the structure.
The question arises, how to make a gazebo with your own hands so that the shelter serves as a kind of kitchen and hearth at any time of the year? First you need to decide on the type of oven:
- Brick - serves as a stationary smokehouse, puts a large load on the foundation, heats up slowly, retains heat for a long time;
- Metal – portable, relatively light weight, heats up and cools down quickly.
For a metal stove, you will have to install a protective screen that will protect the walls from fire and users from burns.
You will also have to take care of installing the chimney. At the exit from the roof, it must be surrounded by a fire-resistant layer so that the roofing material does not ignite. It is desirable that the chimney rises above the highest point of the gazebo.
Otherwise, the thrust for ignition will leave much to be desired. This rule applies to a brick stove, under which, due to the large weight of the firebox, a small additional foundation will have to be erected, i.e. monolithic platform.
Alternative materials
A metal gazebo will become a real work of art. This is not necessarily expensive forging based on an individual project. You can make a stylish and interesting option even from a metal profile.
PVC profile is good for modern styles and practical prefabricated structures. It is lightweight, quickly installed, and is not afraid of moisture and frost.
Polycarbonate is always light and cozy designs. But they require the most clear and accurate calculations and drawings.
Photo: kovka-g.ru
Photo: da4nik.ru Photo: vk.com Photo: kovkaelit.ru Photo: apriltime.ru Photo: proffil58.ru Photo: ghlazzerini.wordpress.com
Photo: otkatnyevorota-mo.ru Photo: kovkavtveri.ru Photo: sochisvarka.ru
Photo: kovkakovka.ru
Photo of a homemade gazebo for a summer residence
From metal and wood: how to make a gazebo with your own hands?
If you decide to build a metal structure, then it is better to use a profile pipe, the wall thickness of which should be at least 2 mm. This is because round pipes are more difficult to weld.
If you intend to use a roof made of lightweight material: flexible tiles, corrugated sheets or slate, then a profile with a cross-section of 50x50 cm is suitable for the racks. And in the case of tiles, it is recommended to use a pipe with a cross-section of 75x75 cm. As jumpers, you can use a metal profile, the cross-section of which is not exceeds 50X50 cm.
The selected area must be cleared of debris and grass so that it does not rot under the floor. Then dig a hole and cover it with a layer of sand. Pipes can be installed directly into the ground.
Using a drill, make shallow holes, about 90 cm. Pipes are inserted into them and filled with crushed stone or construction waste, after which everything is carefully compacted. The stand must be filled with cement mortar.
Vertical posts must be checked using a plumb line.
If you need to raise the structure a little, it is recommended to use foundation blocks. Then place them over the entire area, as shown in the image below.
At the next stage, the lower piping is done; for this, pipes with a cross-section of 50X50 mm are laid on concrete blocks. The coals are welded by a machine. A profile with a cross section of 40x20 mm is suitable for the lintels; boards will be laid on them.
The profile must be coated with a primer, especially at the joints. The height of the racks should be slightly more than two meters. To strengthen them, the jibs should be welded.
The middle harness should be at a height of about one meter. For this, a pipe with a cross section of 40x20 mm is used. To add rigidity, it is recommended to fix the vertical posts, as shown in the image below
If bitumen shingles are used as a roof, then the roof rafters should be made of wooden blocks with a cross-section of 75X40 mm. The sheathing can be made from wooden lining. At the top, the rafters are fastened with self-tapping screws.
Secure the board in the middle and nail a beam to it, on which the rafter system will rest.
The image below shows how to secure wooden jibs made of timber with a cross-section of 75X40 mm.
After this, you need to lay out the bitumen shingles.
A board with a section of 70X40 mm is used for the floor, and a board with a section of 70X20 mm is used for the walls.
In this way, you can build a structure using two types of materials in a few days. To install the structure, you need to have experience working with a welding machine, and at other stages, difficulties should not arise.
3ef1745a5e70fdbe627ddc9aa85da2f1.jpe 2b830870bdb2dba8e13595f62b20395e.jpe 47eaf5fa1e4501e8d2182962d4a31b30.jpe 1a287bef4749e4cf0d95fda7 91edde2a.jpe a318f0c65c6428ad0fce3647799a423a.jpe
Construction instructions
Let's look at a step-by-step plan for constructing a gazebo. During work, strictly adhere to safety precautions. Do not forget that reeds are a highly flammable material, and even after treating them with a fire retardant, it is better not to light a fire near them.
Foundation
First, install the foundation (if the proposed structure is very light, you can do without it):
- Clear the area of weeds. If possible, treat the soil with herbicides. Be careful not to harm beneficial plants.
- Dig holes 50x50 cm for supports. For a small compact gazebo about 2x2 m, four pillars in the corners are enough; for a more massive structure, you need to add one more support for every 1.5 m. Place gravel and sand at the bottom of the holes as drainage.
- Treat the beams with antiseptics to protect against mold and insect repellents. You can briefly immerse them in a solution of copper sulfate or used machine oil. Another way to extend the life of timber is short firing followed by coating with bitumen mastic.
- Wrap the timber with roofing felt, install it in the hole and fill it with cement. You can also place the support in an unnecessary metal pipe if it has the right diameter. Then you need to wait 3-4 weeks for the concrete to harden.
Frame
Now let's see how to make walls. You can use boards for them, including waste from the sawmill industry.
Work process:
- Using corners and anchors, secure the boards to the supports, laying them around the perimeter.
- Attach the cross beams to the support boards.
- Use the angles to install the support posts. Their role can also be played by cleaned and prepared logs from whole trunks. Small bends and clumsy places will not be a problem, now this is in line with fashion trends. If you did not make a foundation, bury the support logs into the soil to a depth of 40–50 cm.
- There is no need to sheathe the walls, but simply install the roof on supports. Another popular option is to build a blank wall only on the south side to create shade. You can also sheathe two more walls about half human height, just to make the structure look more solid. For sheathing, you can use boards and even large branches, you just need to secure them tightly enough to the supports.
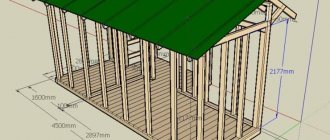
Roof
Now let's look at the process of creating a roof:
- Knock down two triangles from the boards. The base of each of them should be equal to the width of the gazebo. The lower edges of the rafters should extend below the base by about 15 cm for better protection from the sun. The angle of the rafters should be about 45°.
- Connect the triangles with three boards equal to the length of the gazebo. In the lower part they are attached to the joints between the base and the rafters, and in the upper part - to the joint of the rafters.
- If the gazebo is shorter than 2–2.5 m, crossbars between the two lower long bases are not needed. Otherwise, for greater strength, you can add one crossbar per meter. Add a pair of rafters for every 0.5 m.
- Raise and secure the frame to the supports. Make sure that the structure is absolutely stable and will not fall to one side.
- Cut reeds for the roof. The stems must be long, at least 1 m, uniform in length, without signs of disease or rot. Clean them of leaves and treat them with water-repellent agents and fire retardant to protect against fire. Secure the stems into bundles using stainless steel wire. Make a collar in the middle of each bun.
- Place the sheaves on the roof frame and secure them with wire.
Don't forget to follow the instructions for creating a gazebo
Flooring
Now let's look at laying the floor. For him, boards would be a suitable choice. They should be smooth enough to be easy to walk on.
Work process:
- Treat the boards, sanding them if necessary.
- If the foundation supports are low, additionally cover the soil with roofing felt to protect it from moisture.
- Secure the flooring using screws or nails. Try to ensure that there are no gaps between the boards.
So, the gazebo is ready. There are several ways to decorate it. For example, you can paint all parts of the structure. It is better to use calm tones for this, close to natural ones, but if you hung a bright hammock nearby, you can beat their proximity by painting the gazebo in the same colors.
Another decor option is flower pots mounted on walls and supports. You can decorate the gazebo with decorative figurines of birds and animals. Show your imagination!
Advantages and disadvantages of wooden gazebos
Before building a gazebo on their site, each owner takes into account all the advantages and disadvantages of the materials used in construction, giving preference to the most suitable ones. It is no coincidence that the majority opt for wooden structures. This is due to their advantages, namely:
- relatively low cost of raw materials;
- the wood is environmentally friendly, has a natural pattern;
- does not heat up under the sun;
- allows you to build any non-standard structures of one or even several floors;
- compatibility with any stylistic design;
- long service life;
- the ability to combine with other building materials;
- wood is easy to process;
- Installation work can be done with your own hands, having minimal construction skills.
They are not without structure and weaknesses, which are expressed in the following:
- When constructing a barbecue, it is necessary to follow safety rules, since wood is highly flammable;
- raw materials are susceptible to rotting, do not tolerate moisture and temperature changes;
- is a good food source for various pests.
Roof types
The roof for the gazebo carries the same aesthetic load as the interior decoration and can advantageously emphasize individuality. Mainly for such buildings the following types of projects with roofs are used:
- Single-pitched - for walls of different heights of rectangular or square shape.
- Gable - used for buildings with a rectangular foundation, the rafter system is hanging or built with overlapping layers.
- Hip (four-slope) - characterized by the presence of equally (2:2) rectangular and trapezoidal slopes. A particularly strong rafter system is important for it. Looks great on gazebos with a square base.
- The tent is a variation of the previous type. All four triangular slopes converge at one point - the ridge.
- In the form of a dome - it is needed for gazebos with a round base; it is covered with soft tiles.
- Exotic roof - asymmetrical shapes, sometimes concave, with up to three tiers. For such upper structures, a unique and complex rafter system is needed (involves inwardly curved ribs).
Complex multi-slope - for technically complex design solutions. Complex design and equally complex installation
Main types of light buildings
Generally accepted classification of country gazebos:
- open structures on supports under a canopy;
- classic semi-closed structures;
- closed buildings (summer kitchens, barbecue or grill houses).
It is advisable to supply water and lighting to the gazebo intended for cooking. Then it will be convenient to use it in any weather, during the day and evening.
Attention! Professional chefs are often invited to the spacious, well-appointed gazebo to organize a picnic with friends or a family holiday in nature. The usual requirement for hired chefs is hygiene (washbasin with running water) and an equipped catering facility - oven, barbecue, barbecue and table for cutting meat.
When drawing up a project, be sure to decide in advance what the design style will be - an important aesthetic component. Bricks are a traditional material for country houses. The bases of gazebos for a personal plot, where everything is built from this material, are best made in one design.
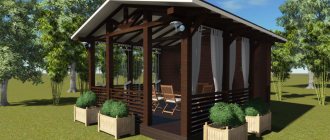
You can put a sofa in the gazebo and relax there in your free time
Japanese style gazebo design
An unusual version of a gazebo without a roof with a sofa
A temporary gazebo is a frame under an awning, draped with fabric. Such vestments can be removed unnecessarily and used when the family periodically comes to the dacha on rare weekends. It is filled with garden furniture with soft seats, which are then brought into the house.
If food is prepared in another place, then you can limit yourself to a simple gazebo of an open shooting range. For example, forged versions of metal structures under climbing plants - photos of gazebos in landscape design.
See alsoDesign features and choice of materials. What else to consider when choosing a porch design?
Choosing a location and tools
If you want to place a gazebo in the garden, it is better to choose a place in the shade of a tree. Nearby you can install a hammock or swing, as well as a barbecue.
A location on the south side of a pool or pond is good. If you place the gazebo near the house, the north side is preferable, so that it is a little cooler in the heat.
For example, consider the construction of a gazebo made of wood and reeds. To do this you will need the following tools and consumables:
- saw;
- nails or screws;
- corners;
- roofing felt for moisture insulation;
- cement;
- wire;
- water-repellent and fire-retardant impregnation.