do-it-yourself transformer bed cabinet
An extra bed is needed, but there is no extra room to convert it into a bedroom. Then we suggest you make a transformable wardrobe bed with your own hands , this is an excellent solution, especially if you have a small room. In this article we will look at various options for making folding beds with a wardrobe from scratch and assembling them from ready-made kits at home. What is the advantage of a homemade design? Control over design and cost. In our selection you will find announcements of articles with step-by-step photos and links to instructions on how to make a wardrobe bed with your own hands with drawings and diagrams for various interiors. This is all very possible, if you have at least basic woodworking skills, you have a plan, you use the right tools and follow the step-by-step instructions (we have a link to a guide for each example) - then you will undoubtedly achieve excellent results.
Living room. Hidden gadgets
Numerous devices that surround us everywhere do not always decorate the room. If you want to take a break from them, you should find a special place that hides them. In a small apartment, a variety of electronic devices overload the decor, and to disguise them, you can design a special drawer or drop-down drawer.
An outlet hidden inside will allow you to charge gadgets without spoiling the look of the room.
Tools
To make a transforming bed you will need the following materials :
- MDF 2 cm thick;
- plywood 1 cm thick;
- fittings and guides;
- PVC edge for trimming;
- lifting mechanism;
- self-tapping screws;
- glue;
- safety belt;
- magnetic buttons.
Tools that will be useful:
- meter;
- pencil;
- sandpaper;
- drill and drill bits;
- screwdriver;
- circular saw;
- perforator;
- anchor bolts;
- metal corners.
Kitchen. Hidden shelves and drawers
In a kitchen, especially a compact one, most appliances should be kept in closed cabinets: this way less dust accumulates on them, and the environment seems tidier. We recommend using every centimeter to make the most ergonomic use of the area.
You can create a separate “garage” for household appliances by using part of the countertop - it will not be visible behind the facades.
For small appliances, spices, bags, bottles and jars, it is worth setting aside a drawer in a narrow partition: the space involved here is small, but the benefits from it are great. Don't forget about plinths: this is an excellent option for storing trays, baking sheets and lids.
Mechanisms
According to the transformation mechanisms, transformable beds can be equipped with the following lifting mechanisms:
- manual _ This is the simplest and most affordable option. The bed is raised and lowered manually using physical force. This device has no shock absorbers or springs;
- spring . Thanks to the use of twisted springs, the service life of the lifting mechanism is more than half a century.
But this mechanism makes unpleasant sounds over time due to stretching of the springs;
- on gas lifts . This is the most convenient, but at the same time expensive option. To raise or lower the bed, you do not need to use force, since the mechanism will do everything itself.
Kitchen. Roomy seats
Hidden storage can also be organized in the dining area if you use unusual seats instead of chairs and stools: a special bench with a lifting lid or a furniture corner . Wooden boxes would be appropriate in a loft style. And if you strive for originality, place a chest in the kitchen and cover it with a soft pillow.
Manufacturing process
As mentioned above, the simplest design for self-production is considered to be a wardrobe bed, so we will focus on it.
Tools and materials
As the main material, we will use chipboard with a thickness of 16 mm. From experience, it is not advisable to buy a solid sheet at a hardware store, take it home and unravel it by hand; it is easier to order the material from the nearest furniture workshop, there are several reasons for this:
- The minimum size of a laminated chipboard sheet with a thickness of 16 mm is 2440x1830 mm, so for delivery you will need to hire a cargo taxi, and if the apartment is on the upper floors you will still have to call assistants or pay for loaders to lift the sheet.
- In order to unscrew the sheet evenly and beautifully without chipping, you will need a hand-held circular saw with a special blade and appropriate power. An electric jigsaw leaves chips on the chipboard, but it’s generally better not to approach this material with a hand hacksaw.
- When you draw a sketch and write down the details (the dimensions of each part separately), you will need to arrange all the parts on the sheet as economically as possible, taking into account the thickness of the cut. In the workshop they use a special program for this, but at home, even if you have a cutting map in hand, it’s easy to make a mistake.
An accurate cutting map can only be created using a special program.
- In the workshop you will get high-quality lamination of the ends of the parts, but at home with your own hands you can glue only the cheapest melamine tape with an iron, which will begin to peel off in a couple of years.
- And finally, the price, based on the cost of a laminated chipboard sheet on the market, then purchasing, cutting and laminating the ends in a workshop will cost 15–20% more. But taking into account independent transportation, time spent and possible defects, this markup is lower than when doing the work yourself.
Ordering material from a workshop is more profitable than preparing it yourself.
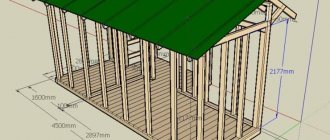
In addition to laminated chipboard, we will need a sub-mattress shield. You can make it yourself from wooden beams and plywood or buy a ready-made metal structure. The first option is 2-3 times cheaper, the second is considered more reliable.
The use of a finished metal structure guarantees the quality of the final product.
From auxiliary accessories you will need:
- confirmations;
- self-tapping screws;
- bolts or studs with a cross-section of 8 - 10 mm, plus nuts with washers and engravers for them;
- dowel-nails;
- metal furniture corners;
- two blocks of lifting fittings with gas or spring shock absorbers.
You may need retractable legs, but you can get by without them, as I'll explain later.
Lifting blocks with gas shock absorbers are considered to be of higher quality.
If you order cutting of parts in a workshop, then to assemble the structure you will need the following tool:
- Electric drill with impact function.
- A set of drills, including drills with a Pobedit tip and a confirmation drill;
- Screwdriver.
- Wood saw or jigsaw.
How to assemble a built-in bed
First of all, remember - a homemade transformer bed is designed to fit the dimensions of a specific mattress, so first a mattress is purchased and a sketch is already drawn up based on it.
| Illustrations | Recommendations |
| Assembly diagram for confirmations . To fix parts with confirmations, you will need a confirmation drill and a hex key. | |
| Assembling the outer box of the cabinet. Step 1. After marking, holes are drilled at the ends for confirmations and the parts are pulled together. Fixation step 100 – 150 mm. | |
| Step 2. At intervals of 50 cm, adjustable furniture legs are screwed to the base of the structure with self-tapping screws, after which the box is leveled near a solid wall.
| |
| Step 3. Using steel corners with a thickness of 1 mm, the box is fixed on the wall at 4 points. The corners are screwed to the wall with dowel nails, and to the cabinet frame with self-tapping screws. Before fixing, you need to measure the diagonals of the box; fastening can begin only if the diagonals are the same. | |
| Assembling the inner box. Step 1. At the initial stage, the inner box is assembled similarly to the outer one, using confirmations. Then the location of the lifting system is measured on it and adjusted on both sides. | |
| Step 2. The inner box experiences high dynamic loads, so it must be reinforced with strong metal corners at all 4 corners. The lifting system is screwed to the box with powerful studs or bolts; here, wide washers must be used and engravers are used. | |
| Step 3. Next, the counter strips of the lifting system are screwed with studs or bolts to the cabinet body. By the way, in order not to spend money on retractable metal legs, the side installed at the legs of the structure is made higher than the inner box, as a result, when unfolding, the bed rests on the footboard. True, when folded, this side will form a visor. | |
| We build the base under the mattress. Step 1. There are no problems with the metal system; it is not even necessary to assemble the inner box, but with a wooden mattress pad there are some nuances. We used a mattress pad with slats from an old bed. If you do not have such a structure, then you can make a support frame from 50x50 mm timber and lay plywood with a thickness of 10 mm or more on it. | |
| Step 2. The bars from the mattress pad are screwed onto the side posts of the inner box with self-tapping screws. The central support in the same plane is attached using 4 metal corners. | |
| Step 3. In this case, lamellas were used as support, but no one is stopping you from laying a sheet of plywood instead of lamellas. The technical assembly of the transformer is completed, all that remains for us to do is decorate the facade, but we will talk about this in the next chapter. |
Bedroom. Shelves inside the headboard
If you don’t want to fill the space under the bed, you can use a headboard: both ready-made designs with built-in drawers and free-standing narrow cabinets are sold. It is very convenient to store things in special compartments - they do not gather dust and are always at hand.
In addition to books, you can store night cream, small decorative pillows, a change of bed linen or a blanket inside.
Deciding on the design and construction of the future bed
Before drawing up a project and purchasing material, you need to decide what kind of design you need. Over decades of experiments in furniture making, craftsmen have come up with many models of transformers; it is impossible to talk about them all, so we will focus on proven and most popular options.
Bed in the closet
This type of collapsible structures is considered the most popular and accessible for self-assembly. A box with a mattress is created, which is attached to a folding mechanism in the headboard area, as a result of which the entire panel rises vertically.
There are 2 options for folding beds built into the closet:
- The first option is built into a real wardrobe. In such models, the appearance of the structure is not important, the bed is simply integrated into the internal filling of the closet, after which the common panel, along with real shelves and drawers, is covered with sliding sliding doors;
A real wardrobe with a folding bed provides significant savings in usable space.
- The second option is made from scratch, that is, the box is assembled specifically to the size of the bed and then decorated as a wardrobe. Such a homemade wardrobe-bed costs half as much and is much easier to assemble.
The wall-mounted transformer can be decorated to match any voluminous piece of furniture.
Sofa bed
Here we are dealing with the same folding bed decorated as a wardrobe, but only on the facade of this wardrobe is a real sofa attached. When a person needs to unfold the bed, he removes the sofa back cushions and folds back the panel with the mattress.
Such models are especially popular in one-room apartments and studio apartments. The main advantage is that when the bed is folded, the owners get a full, comfortable place to sit.
Such models are not suitable for self-assembly, since the craftsman will have to create a new or remake an old sofa, and such work requires serious professional skills.
Transformers with an attached sofa are convenient in studio apartments.
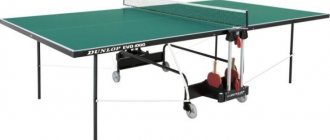
Table-bed
Tables that can be transformed into a bed were originally designed for a teenager’s small room, so single models predominate here. Compared to the two previous options, they have more complex mechanics.
It is possible to make such a transformer with your own hands; the cost of the design is relatively inexpensive, but all the parts require precise adjustment. If this is your first time encountering the creation of furniture, then it is better to order the production of the main components in a professional workshop, and only assemble it yourself at home.
When choosing a folding table design, it is advisable to give preference to the option in which the tabletop moves horizontally downwards and still leaves room. This way, when unfolding, you won’t need to completely remove all the items from the table.
The most convenient are transformers with a horizontal tabletop that does not require cleaning when unfolding.
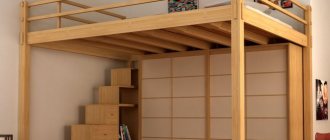
Two-level transformer
In essence, the two-tier folding design is an improved model of a folding bed wardrobe. The photo below shows that the mattress shield is simply cut in half and a folding mechanism is installed on each of these single sections.
And to ensure synchronization and reliable support, parallel plates are installed on both sides, which replace a ladder for the inhabitant of the second tier. Making this model with your own hands is not much more difficult than a wardrobe bed; of course there is more work, but the technology is simple and of the same type.
The two-tier model was developed for children's rooms.
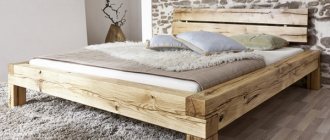
Dresser bed
From a technical point of view, a bed-chest, or as it is also called a bed-bedside table, is absolutely identical to models built into a closet. The only differences are the size of the mattress flap and the orientation of the bed (it is attached to the side). All the components are the same, but the box is decorated not as a cabinet, but as a cabinet or chest of drawers.
Models decorated as a chest of drawers are designed for a single or one-and-a-half bed.
Ceiling bed
These transformers are ideal for saving space. The only problem is that these designs are assembled to order and have a high price. To describe it briefly, here guides with a powerful lifting mechanism are installed on the wall, which lifts the mattress shield in a horizontal position to the ceiling.
In order not to spoil the interior, a plasterboard hanging box with a niche under the bed is installed on the ceiling, into which the horizontal structure is placed. Without special knowledge, it is simply stupid to take on the construction of a ceiling bed.
Firstly, this requires an accurate calculation of the load on the mechanism, plus a calculation of the power of the electric drive with the winch, and secondly, if the master makes a mistake, then this whole heavy structure can fall from the ceiling and crush someone.
In terms of cost, a ceiling lift bed is considered the most expensive.
Bathroom. Hidden shelves
Often the space under the bathroom is undeservedly empty, but a functional screen can easily unload cabinets and open shelves, hiding household items. You can order the design from craftsmen, make it yourself, or purchase a ready-made screen-cabinet with sliding doors.
It is important that the ventilation in the bathroom is working properly and that dampness does not accumulate in the room, otherwise storage under the bathroom will become impossible.
How to make furniture with secrets and hiding places with your own hands (cabinets, drawers and other furniture)
Despite the fact that most of us buy furniture in stores, there are enough home craftsmen with skilled hands who can not only make beautiful furniture, but also furniture that is unusual in its design and filled with secrets.
They are no less relevant today: valuable papers, expensive jewelry, important correspondence and documentation are stored in stylized safes and hiding places.
Among the items that are traditionally used to decorate secret places are:
- tables with additional drawers;
- bookcases with an additional hidden shelf;
- chairs with hollow legs;
- hollow headboards
- “double bottom” beds, tabletops;
- other parts of furniture.
What is needed for production
To make furniture with hiding places and secrets, you need:
- determine what exactly will be manufactured;
- make a sketch;
- make calculations for purchasing the necessary material;
- prepare the necessary tools;
- complete the drawing.
Among the factors characteristic of furniture with a secret, the design features of such products are highlighted, making it possible to prepare places for storing a specific type of valuables.
Preparation of all materials and tools
To accomplish this you will need a set of tools, the mandatory list of which includes:
- hand saws for wood and metal, planes and jointers, chisels of various sizes, furniture stapler, cutting tools, set of screwdrivers;
- electric drill, screwdriver with sets of bits and drills;
- workbench with a vice;
- measuring instruments.
This is the minimum set of tools that will be required for the job. Depending on the sample being performed, it may be supplemented.
As for materials, their choice is also individual, depending on whether it will be a full-fledged piece of furniture, or whether the work will be aimed at making secret compartments.
As a rule, if hiding places are specially equipped, they are equipped with secret locks, and today - with an electronic security system.
Schemes and drawings
Having a sketch and then drawing up a drawing are prerequisites for high-quality and productive carpentry work. By making wooden furniture with secrets with your own hands, the master will be able to realistically think through and calculate the required dimensions of the furniture itself and built-in hiding places, as well as the financial costs that will be required for production.
Today, the furniture market offers products not only for personal use, but also for enterprises and organizations.
In addition, during execution it is necessary to constantly check the drawing so that the finished product fully corresponds to the idea.
For those who do not have the skills of a draftsman, graph paper will be an assistant, on which it is quite simple to apply all the elements, observing the dimensional parameters.
In addition, it can be made to order according to individual drawings.
Manufacturing process
The order of work depends on the location of secret niches, shelves and drawers. You can get acquainted with the exact manufacturing procedure by visiting one of the thematic sites or taking part in a master class taught by experienced home craftsmen.
Today's craftsmen make modern furniture in the old style, helping to create a special interior and complement it with hidden elements.
Hidden household items
A variety of household aids (ironing board, clothes dryer, vacuum cleaner and mop) do not decorate any interior. Hidden storage systems are also useful in these cases:
- for the ironing board, a special shallow cabinet masquerading as a tall mirror is successfully used,
- and instead of a free-standing dryer, a built-in dryer is often used: wall-mounted or in the form of a drawer.
Necessary materials
The set of necessary materials will directly depend on what type of furniture the home craftsman chooses. However, there is a list that is present with any choice.
MaterialMain parametersWhere it is usedLDF boards with a thickness of 10 to 22 mmManufacture of cabinets and shelves with high bending strength
DecorationMDFStrong sheets
Increased moisture resistance and density Tabletops, bench seats, kitchen facades Wood Solid wood, timber Any products Foam rubber Soft, comfortable, inexpensive For padding upholstered furniture Glass Thickness from For decorating cabinets and shelves Furniture fasteners Various types For all products Furniture accessories Various configurations and purposes For decoration
When decorating cabinet doors, drawers
Drawings and diagrams
Before you start making and assembling a transforming bed, consider its dimensions, design, and materials of manufacture. All this must be put on paper with a pencil, not forgetting to indicate the connection points with fasteners.
You can make a drawing of a bed in different ways :
- independently, armed with a pencil and paper;
- using special computer programs that can be downloaded on the Internet;
- in a specialized company that manufactures furniture;
- download a ready-made diagram from the Internet and improve it according to your personal wishes.
Advice : if you order the production of a drawing from a specialized company, you will also receive product details along with it, which will simplify the manufacturing and assembly process.
Assembly order
Following the drawings and diagrams, prepare all parts of the frame, table and bed. Only after this is the main frame assembled, attaching the transformation mechanism to it. Be extremely careful and careful.
Expert opinion
Smirnova Ekaterina Anatolevna
7 years of experience in interior design, professional architect
For convenience, it is better to carry out the assembly together. At the very least, you will definitely need an assistant to fix the power traction units with bushings (this process will require significant physical effort).