Wanting to place a larger number of sleeping places in a small area, the first thing any home owner thinks about is installing bunk beds. Moreover, they can be intended for both adult residents and children. When choosing a model, you need to pay attention to the performance characteristics of structures, their appearance and economic component.
DIY bunk bed - drawings and diagrams
Types of cribs for babies
Cribs, depending on their design, can be divided into several categories.
Classical
The most popular option is a simple rectangular model, mounted on legs or with wheels that ensure its mobility. It is intended, as a rule, for children from birth to three years. The bed can be equipped with drawers, removable side walls, and a lower bottom as the child grows older.
Transformer
Beds that can be adjusted depending on the situation will be a real solution in small apartments. When a child appears, in addition to the bed itself, he will need a changing table and a chest of drawers, where everything he needs is stored. In addition, it is convenient when it is possible to expand the structure as the baby grows. For example, a bed combined with a small changing chest can, after some time, be turned into a sleeping place for a teenage child. Round models with a diameter of 0.8 m are suitable for newborns. When the baby grows up, the transformer changes into an oval design. The absence of corners increases the safety of the piece of furniture for children.
Pendulum
Pendulum mechanisms installed in cribs help babies fall asleep faster. They can be longitudinal, transverse or universal. When choosing a model, you must carefully check the design for the absence of extraneous noise and jerking during operation. Pendulums must be equipped with clamps.
Cradle
If the financial capabilities of the family allow, cradles are installed for the newborn babies. Such designs are designed to provide maximum comfort to the newborn. Limited space creates conditions of complete security. A baby can sleep in a cradle until about six months of age, as it grows quite quickly. Cribs can be functional, equipped with various electronics and toys; simpler ones are intended only for motion sickness. Putting a baby to sleep in a bassinet is much easier than in a regular bed. In addition, many models have remote controls, making life easier for parents. An option for a cradle can be a cradle installed on a standard bed.
Manege
Beds with sidewalls made of mesh can be easily disassembled and transported if necessary. In such designs, which usually have bright colors, children not only sleep, but also play with pleasure.
Children's beds can be equipped with drawers, chests of drawers, and changing tables. To make it easier to move furniture around the apartment, rollers are installed, but you must not forget about the latches. Designs can have different shapes, be made in the form of a car, a house or a favorite cartoon character.
Preparatory stage
Before starting production, you need to take into account all the nuances and prepare materials, without which the work will be impossible.
Bed design
The crib must be simultaneously:
- comfortable (to give the child the opportunity to roll over in his sleep without hitting the walls, and due to the “breathable” design to ensure air flow);
- safe (protect from falling, have no protruding sharp parts, have a sufficient margin of safety);
- functional (the space under or above the bed should be used to store toys, clothes and bedding);
- attractive (cause pleasant emotions and the desire to use it for its intended purpose, fit into the overall style of the room).
When choosing a design, it is important to consider your carpentry skills and technical capabilities. A novice craftsman who has access to a minimal set of tools will be able to make only the simplest models of beds, consisting of sides, headboards, legs, slats and drawers, without loss of quality.
It is worth starting to create beds in the form of a car, airplane, flower or other complex structures only in cases where the person doing the work has considerable experience and plans to process the parts using professional equipment.
Tools
The more different tools a master has, the faster and easier it will be for him to complete the job. However, there are some that you can’t do without:
- Electric jigsaw.
- Knife saw.
- Sanding machine (it can be replaced with sandpaper, but in this case, processing the boards will take much longer).
- Screwdriver.
- Drill.
- Bulgarian.
- Needle files.
Materials
Solid wood is considered the best material for making children's furniture. A bed made of pine, beech or oak will last a long time and will be relatively resistant to moisture and pest attacks. At the same time, natural wood has two qualities that do not always make its use possible: the significant weight of finished products and the high price.
Instead of solid wood, you can use cheaper materials (such as MDF, chipboard, OSB, plywood and others). It must be remembered that during their production substances based on formaldehyde are used, the vapors of which negatively affect even the health of adults, and they can cause irreparable harm to the fragile body of a child.
Other
You will also need consumables:
- Self-tapping screws of different diameters.
- Metal corner and ties.
- Rails or other guides and wheels (for structures with retractable elements).
- Simple or colored pencil.
- Paper for notes.
DIY children's bed: basic design requirements
A self-made crib for children must meet the following requirements:
- this piece of furniture must be made exclusively from natural and environmentally friendly materials;
- the bed must have a reliable, durable and stable structure;
The bed must be made of high-quality, natural and reliable materials
- the product should not contain sharp corners or protrusions;
- the surface of all components of the structure must be smooth, without chips or roughness;
- it is necessary that the size of the bed corresponds to the height and physique of the child (with a margin of 25-30 cm in length);
- the structure must contain fencing elements and other devices that prevent the possibility of falling;
- a bed for a child should have high functionality, which is reflected in the presence of drawers, shelves and niches.
A do-it-yourself wooden children's bed has a number of advantages:
The size of the crib must match the height and build of the child
- you can be confident in the quality of the materials that are used for its manufacture, since many store-bought products lack information about design parameters;
- the bed design is created according to individual parameters, taking into account personal requirements and desires;
- during the manufacture of a product, it is possible to check the design for strength and stability;
- no large financial costs are required;
- Furniture made with your own hands gives incomparable pleasure and aesthetic pleasure.
First, buy a mattress that matches the child’s parameters; the exact size of the bed will depend on this
How to ensure safety for those who operate two-tier structures
The numerous advantages of compact structures do not exclude some of the disadvantages of such beds. The main factor that must be taken into account when installing furniture is the issue of safety . Cases of falls from the upper tiers or injuries when moving up the stairs are quite common. What is important to pay special attention to?
- Correctly calculate the size of the ladder, allowing you to move comfortably along it.
- Install railings around the perimeter of the bed (it is recommended to equip the stairs with them as well).
It is also better to equip the stairs with railings - Provide anti-slip linings on handrails and steps.
- All components must be made in such a way that connecting parts or parts of the structure cannot cause damage to children and adults.
High-quality grinding of materials, elimination of sharp areas and rounding of edges will significantly increase the safety of structures. Classic bed on two floors
DIY bed: dimensions, designs and diagrams, sketches and drawings
Today, children's beds are presented in a wide variety of species. They differ in the type of construction, dimensions, number of components, the presence of additional furniture accessories and material of manufacture. However, not every model can be done at home.
The most popular models that you can make yourself are classic do-it-yourself wooden beds. The photos clearly show product options with and without sides, loft beds and bunk structures. On specialized websites on the Internet you can find a variety of do-it-yourself drawings of children's beds and the dimensions of each individual structural element.
The classic single children's bed is the easiest to make. It carries a minimal functional load, since it can only be equipped with a drawer for linen. The design consists of a frame, headboard, footboard, base, sides and legs, which is clearly shown in the drawings of a children's bed. The size of the frame, for the manufacture of which a wooden beam is used, depends on the dimensions of the sleeping place, which is determined by the parameters of the mattress.
The base can be solid (from a sheet of chipboard) or lattice in the form of lamellas with ventilation holes. The second option is more preferable. The footboard and headboard are usually made of solid wood, plywood or chipboard. Designs can have a variety of shapes.
Important! The height of the headboard should be greater than the size of the footboard.
To enclose the berth, front and rear sidewalls in the form of a solid or lattice wall are used. The legs of the bed are made independently or purchased in the store. In the first case, they can be separately attached or are a continuation of the integral main structure.
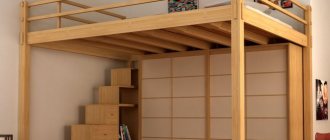
A loft bed is considered more functional. The sleeping area is located upstairs. Under it you can organize a full-fledged storage system by placing a chest of drawers, a cabinet or a rack. Creating such a design requires skills and abilities in furniture production. For two children, you can make a two-tier structure, the creation of which also requires a certain amount of experience from the master.
Installation of wall frame
The first step is to assemble a support structure made of timber, installed along the walls.
We measure and draw the markings of the bed-podium directly on the floor. We dismantle the baseboards, otherwise the support rails will not fall into place.
We install vertical posts made of timber along the perimeter of the flooring. The pitch of the racks depends on the load on the site. If there are two or three children in the house, who naturally cannot be driven off the podium, then we place supports at a maximum interval of 40 cm. A smaller load requires a wider step. The height of the racks should be lower than the height of the platform by the thickness of the timber.
We install a horizontal beam on top of the supports. We fasten both the posts and the cross beams to the wall with dowels and screws.
Do not try to place supports less frequently. Seasonal changes in humidity and temperature, constant dynamic load on the transverse beams will inevitably weaken the structure, and it will begin to creak. The stands give the podium the necessary rigidity.
Materials and tools
Master classes from experienced specialists contain useful tips on how to properly make a children's bed. Traditionally, the process begins with the selection of materials. Furniture must be safe and comfortable, so the most popular raw materials are:
- natural wood;
- metal;
- plastic;
- chipboard;
- MDF.
Models made from natural wood are environmentally friendly and safe. They do not have a specific odor or toxic elements in their composition. MDF boards are similar in performance to natural wood. Chipboard is somewhat worse, since it contains formaldehyde-based resins. When properly processed, the slabs are safe and cost less than other materials.
A wooden bed is the best choice, but this option will be quite expensive. Very beautiful colored models of different shapes and shades are assembled from plastic, but this material is toxic. It is difficult to choose high-quality synthetic raw materials.
In addition to materials, the master will need:
- special glue;
- self-tapping screws;
- drill;
- roulette;
- sandpaper;
- accessories;
- stain;
- brush.
Requirements for homemade furniture
New furniture, especially a children's bed, should correspond to the age and height of the child. In addition, there are a number of requirements that must be observed when building a bed:
- Cribs should be comfortable for a child of any age.
- Reliability of fastenings.
- For bunk models and loft beds, there must be a durable ladder (and the best option is to make a ladder with handrails).
- All materials used in the work must be environmentally friendly and not emit harmful toxins during operation. Compositions for decorating surfaces must also be safe for humans.
- After assembly, there should be no sharp edges protruding above the surface of nails, screws, or jagged edges.
All work on the construction of a children's bed with your own hands should be carried out strictly according to a pre-prepared drawing.
Deciding on the model
In a children's room, several types of beds are most often used:
- With drawers
- Loft bed
- Bunk bed (if there are two kids in the room)
If the room in the children's room does not allow placing a large bed in the room, but you need a compact model that can save square meters, then it is better to choose a design with drawers. Drawers are used to store bedding, toys, children's things and anything that does not fit in a child's chest of drawers or nightstands.
Baby cot on two levels for small children
See also: Proper grouting of tiles in the bathroom with your own hands
Step-by-step instructions for making your own baby beds
We present the sequence of basic steps when making a children's bed with your own hands, regardless of the design of the children's bed.
The drawing is the first stage of creating a children's bed with your own hands. The main size is the height of the child. The child is growing up quickly. Add 10-15 centimeters to the taken measurement.
Below are examples of designs for children's beds. Choose your favorite model as a basis. As you gain experience, you will be able to design furniture yourself and create exclusive samples of products.
Preparing parts
- Apply the basic dimensions to the material. Use special markers that are sold in specialized stores;
- number the parts to make assembly easier;
- make a cut using an electric jigsaw or saw;
- mark the location for the holes in the corners of the connection. Drill them using a drill;
- polishing of all parts;
- cover the parts with varnish or interior paint. It is recommended to choose water-based products. The second layer of varnish or paint is applied after the first layer has completely dried.
Frame assembly:
- first of all, install the base of the structure, attach the lamellas to it;
- strength is ensured by suitable hardware: corners, screws;
- the backrests are attached to the finished structure;
- fix the rails for the boxes. Additional supports are installed under the berth in the center;
- The final stage is fastening the fittings.
DIY materials for a children's bed
Cribs for children are made of metal corners, polymer materials and wood. The most popular is the last option. Here are some reasons for the tree's popularity:
- safe for the human body;
- the product has a noble appearance;
- wooden beds are always in trend;
- fits into any interior;
- simple processing process, simple tools;
- the product does not require special care.
What you will need to create the design:
- edged boards - from coniferous trees;
- wooden blocks with a cross section of 50*50 or 50*100 mm;
- slats of different sizes depending on the design;
- plywood with a layer thickness of about 5 millimeters.
Important! Regardless of the model, choose durable wood. This will ensure safety, quality, and extension of the service life of the furniture.
After you have chosen a model and decided on the material for its manufacture, you need to clearly understand what requirements a self-made crib must meet:
- convenience – the child’s rest should be complete. The baby’s behavior and emotions depend on the quality of night’s sleep;
- safety – not only when the child is sleeping. Children often play games on the bed, such as jumping;
- During the manufacturing process, remove all sharp corners from structural parts. You can wrap them in soft fabrics, rope, foam rubber. It will be like a decorative element;
- Do not use materials impregnated with harmful substances. They can cause allergies and harm the child’s health;
- think over a bed model that will serve your child for more than one year. Consider the fact that children grow quickly, their height and weight change;
- structural strength - reliable fastenings; ill-conceived drawings can lead to an accident. This is especially true for models with two floors;
- minor injuries - splinters, abrasions. Be careful when sanding the product. Use high-quality materials and tools for this;
- models in the form of houses should be designed so as to prevent stagnation of air inside the structure. Beds are primarily intended for sleeping. Quality rest is possible with sufficient air exchange.
Tools
To make a full-fledged children's bed with your own hands, you do not need to buy expensive machines. Here is the basic set of tools for sawing and assembling the structure:
- devices for measuring and marking;
- electric saw;
- clamp for fixing parts;
- screwdriver or electric drill;
- hand-held electric sander or sandpaper;
- wood glue.
Children's bed with drawers
A comfortable bed model for a child who controls his actions during sleep and will not fall out of bed. If desired, the bed can be additionally equipped with removable sides. There are spacious drawers under the bed. The side openings are made for doors or curtains made of thick fabrics. You can leave them open, use them for large boxes with toys, or as a middle part, add drawers. Ask your child’s opinion and fulfill his wish.
Assembly sequence:
Canopy bed
The baby will undoubtedly like the bed. You can attach various fabrics to the structure, or hang garlands with toys. The model can easily be converted into a bed in the form of a house or tent. Below is a design drawing made in inches. The dimensions can be changed to fit the mattress you already have. To convert inches to centimeters, use the factor 2.54. The height of the canopy also depends on your preferences.
Cutting parts
Bed house
This type of bed will allow you to transition painlessly from a crib for the little ones and successfully use the furniture all the way to school. On the right is a photograph with a set of fixtures and tools that will be required during the manufacturing process of the structure. Sequencing:
- determine the dimensions of the mattress and the height of the wall to the ceiling;
- prepare bars for the frame - upper and lower crossbars;
- make holes in them for fasteners - screws;
- fix the corner brackets and brackets;
- attach the crossbar parts. Connection angles must be 90°;
- to give strength to the structure, use high-quality glue to connect the bars;
- Sand the finished product and coat it with varnish intended for interior use. The safest paints and varnishes are water-based.
The simplest wooden design for children on chains
To assemble the beds you will need: timber (glued) 90x90 mm, plywood (18...21 mm thick), boards 25x55 mm for making stairs and railings, protective impregnation and paint for wood, as well as fittings.
Table. Accessories for making a bed.
| Name | Photo |
| Metal corners | |
| Dowels | |
| Bolts (180 mm) for attaching the frame to the wall | |
| Ring head screws (with washers) | |
| Chain | |
| Carbines | |
| Eye nuts | |
| Anchors 12x150 mm | |
| Confirmations | |
| Self-tapping screws |
To produce a structure, you need a minimum of tools, which every owner usually has. The only thing is that there must be a place for the work, for example, a garage, since neighbors in an apartment building are unlikely to like work related to wood processing.
Important! Since the beds will be attached to the wall, the floors must be strong and able to withstand significant loads.
Step 1. Prepare two identical bases for the upper and lower beds. Timber and plywood are sawn to size.
Wood slicing
There are no special drawings for this two-tier structure, which is distinguished by its simplicity. You just need to assemble two frames from timber of the required size. In our case - 1800x800 mm.
Sample drawing
Longitudinal cuts are made in the timber to create a groove for laying plywood.
Longitudinal cuts are made
The result is a recess in which the base will be securely fastened.
Photo of the finished cut
Small defects can be eliminated with a chisel.
Important! Wooden blanks must be treated with a wood preservative. It is recommended to use slatted flooring rather than plywood as a base, which allows for better ventilation of the mattress. It is important to treat all prepared elements with a grinding machine or sandpaper to eliminate the risk of splinters. It is also recommended to process the edges with a router to protect children from bruises.
The frame elements are fastened with glued dowels and corners (2 dowels are required for each connection).
Each connection requires 2 dowels
The corners are fixed with four self-tapping screws on each side.
Fixing metal corners
After this, you can begin fixing the frames to the wall.
Step 2. To fasten the beds to the wall, bolts 180 mm long are used (4 for each frame). To recess the bolts in the timber, since protruding heads will interfere with the installation of mattresses, it is also necessary to make a shallow cut with a feather drill.
The result of working with a feather drill
Four such holes need to be made - on each beam adjacent to the wall. The outer sides of the bed will be fixed to the wall with a chain. To do this, you will need screws with a head bent into a ring (such hardware is called a ring screw or a hook screw).
Ring screw
Frames ready for installation must be painted. For this purpose, any decorative coating (for wood) intended for indoor use is used. The lower base must be installed at such a distance from the floor that it is possible to place drawers for storing things. For convenience, the base is installed on a temporary support.
It is best to start fastening by fixing the outer wall of the bed with a chain. This makes it easier to later align the horizontal. Holes are drilled for installing anchors. Both chain mounts are fixed.
Fixed mount
Eye nuts are mounted through the washer. The chain is suspended from a carabiner. The lower end of the chain is also fixed to a ring screw using a carabiner.
Hanging chain
Dowels for fastening the part of the frame adjacent to the wall are installed in holes made with a 16 mm drill. The anchors are screwed in.
Anchors are screwed in
The plywood base is fixed to the frame with self-tapping screws.
Fixing the plywood base
The upper bed is attached in the same way.
The upper bed is also mounted
Step 3. Installation of the stairs. In order for a child to climb up, a durable structure is necessary. It can be assembled from 25x55 mm boards. In our case, larch was used. The ladder is attached to the upper and lower beds. Ladder dimensions:
- length of steps - 36 mm;
- the distance between the crossbars is 31 cm.
- number of steps - 5 pcs.
To fasten the steps, confirmats measuring 7x70 mm are used. You will need 2 Euro screws on each side. The ladder is secured to the timber of the upper and lower bases using long self-tapping screws, the heads of which are slightly recessed into the wood.
Self-tapping screws must be of sufficient length
The design is reinforced with metal corners.
Reinforcement with metal corners
To protect the child from falling, it is necessary to make a fence. It is also made from boards. The height of the railing is 20 cm (above the mattress).
The result is a simple but attractive design that does not clutter up the room.
Finished bunk bed
Pros and cons of making children's furniture yourself
The younger the child, the more time he spends in bed. When buying a ready-made crib, you cannot say with complete confidence that it is completely safe for your baby. So what are the advantages of a homemade crib? Let's compare both options:
Crib from the store
Positive points:
- There is no need to waste time on a finished bed.
Negative sides:
- there is no confidence in the quality of the material;
- reliability is in question;
- the quality of the coating leaves much to be desired;
- poor quality of bed manufacturing occurs;
- you always have to pay extra.
DIY children's bed
Pros:
- independent choice of material quality;
- the design is reliable;
- every detail is carefully processed;
- paint coatings are selected correctly, in compliance with sanitary requirements;
- minimal, justified costs for materials;
- pleasure from the process;
- acquisition of new skills.
Minuses:
- time-consuming.
Bed design options: choose the right one
There are a large number of modifications of sleeping places, but we will focus on the most popular:
- with and without sides;
- loft bed;
- transformer.
Below we will look at the process of making a regular baby crib with legs with a headboard and footboard with our own hands. The option is without tricks, does not involve particularly complex work and will not take much time.
Also, having understood the principle of operation, you can, by analogy, make a crib for a newborn, baby or child over 3 years old.
Drawings with dimensions
Regarding how big or small to make the bed when children are still small. In principle, you can immediately install a full-size bed. It just seems like it will take a long time for them to grow up. In fact, before you know it, “children’s” sizes will become small. And then the problem arises: where to put the old bed. Naturally, it’s a shame to throw it away, but used furniture doesn’t sell very well. Therefore, recommendations: make a standard size bed right away: 1*2 m or so.
Frame drawing for a bunk bed
Drawing of a double-decker bed frame and necessary materials
Drawing of a bunk bed with dimensions
Corner bed drawing
Corner bunk bed Bunk bed with wardrobe
Stairs to bunk beds
Drawings of stairs for two-level beds
How to update the appearance of old furniture can be read here.
Making a bed with your own hands
Having firmly decided to build a structure yourself, you should understand all the nuances associated with its creation. Initially, a drawing is developed that displays all the component elements. Then they acquire the materials necessary for the work, prepare the tools, and if any of them are missing, they buy them in addition.
Based on the diagram, raw materials are divided into component parts. They are cut out, combined into a single structure, treated with special compounds, painted, varnished, and decorated. For clarity, we will consider in detail the main stages that the process of making a classic crib includes.
Drawings and diagram
The creation of any object is impossible without a drawing. In a graphic image made to a certain scale, the dimensions of the nodes are indicated. To compile it, you will need minimal drawing skills; you can also use special programs. When developing a project, you should consider:
- Dimensions of the room where the product will be installed. The spacious room can accommodate a larger bed.
- The dimensions of standard products for children under three years of age are 120x60 cm. If you plan to use the design in the future, preference should be given to larger models 150x60 cm, 180x70 cm.
- At the bottom of the crib you can equip cabinets in which children's things will be stored.
- For preschoolers, it is worth providing removable sides that will protect them from rolling and falling.
- Design and decoration are chosen depending on the preferences of the parents.
Required tools and materials
To make and assemble the bed you will need the following materials:
- board;
- MDF sheet;
- varnishes and paints;
- screws, fasteners, rubber heels for legs.
Tools:
- wood saw, jigsaw;
- hammer, screwdriver, screwdriver;
- drill, drill bit;
- measuring instruments, a simple pencil.
Main parts and their preparation
A standard bed consists of 4 legs, 2 backs, sides, removable sides, frame, slats, mattress. The last element from the list is purchased ready-made, the rest are made by hand. The process looks like this:
- In accordance with the drawing, markings of all components are applied to the tree. This can be done using a tape measure and a simple pencil.
- The elements are cut using a jigsaw or saw.
- The components are sanded with sandpaper.
- Depending on the length of the sidewalls, metal corners are cut out with a grinder and used to install the mattress. Holes are drilled in them for self-tapping screws to secure them to the wood.
- All components are painted and varnished.
Main assembly steps
Work on assembling the bed is carried out in the following sequence:
- The backrests located at the head and foot are assembled. They are connected to the legs.
- Prepare the base for the mattress. To do this, metal corners are attached to the wooden sides using self-tapping screws. The lamellas are fixed to them from above, perpendicular to the side walls.
- The backs and base for the mattress are connected using furniture fittings; for reliability it is better to use corners.
- A mattress is installed on the frame.
- Removable protective sides are added to the sides, secured to special metal or wooden fittings.
- If necessary, the finished product is decorated.
Roll-out from laminated chipboard
To make such a model you will need the following materials:
- laminated chipboard sheet (19 mm) - for the main parts;
- furniture board (22 mm) - for the bottom;
- accessories, fasteners.
The assembly diagram includes the following steps:
- the sheet is cut into separate parts according to the drawing;
- assemble the structure using corners and fasteners;
- The lower tier is equipped with wheels so that the sleeping place can move freely.
A roll-out bed is an ideal option for a small apartment.
Homemade bed-car
Few boys will refuse a car bed. And you don’t have to go to the store to please your child. Using plywood or MDF sheets, water-based paints and varnish, an ordinary sleeping place turns into a dream come true: a do-it-yourself children's bed in the shape of a Batmobile (or any other car) can be realized in a week of leisurely work in the evenings.
First, find an image of the car that suits you, find a program with the ability to visualize pictures. Having transferred the image, it can be divided into squares with a side of 100 mm - so that later it is easier to convert it to real scale. It’s most convenient if the entire part fits into a sheet of plywood or MDF you bought, it’s even better if you can make two side panels from one sheet... In general, select the dimensions, change the shape. Once you are satisfied with the result, you can transfer the design to the sheet.
It all starts with drawing the sheet into squares with a side of 100 mm.
Referring to the existing sheet, transfer all the lines from the paper to the plywood. At first the lines are thin, after you have more or less drawn everything, you can outline the resulting contours with a thick line - it will be easier to cut out. Although the details are needed in duplicate, there is no point in drawing the second one: having cut out the first one, we will outline it and get the second one.
This project also has overhead parts - we draw them separately. When everything is ready, take a jigsaw and cut along the contours.
Decor ideas
To make a children's bed from wood with your own hands, you need to be guided by the accompanying drawings and dimensions. Since the size of the mattress is fundamental, you need to independently calculate the dimensions of the parts.
Based on Harry Potter
Making such a bed is not much more difficult than a regular one, but the joy of a child who dreams of touching the magical world of Harry Potter will be endless.
The main decorative elements are:
- number 5979 (the numbers can be easily cut out of wood, painted silver and glued to the footboard, or use metal badges for this purpose, which are sold in a hardware store to indicate apartment numbers);
- an inscription symbolizing the Hogwarts school of wizards (the easiest way to do it yourself is by printing it on a color printer, gluing it onto a piece of veneer cut to size and covering it with several layers of varnish).
The space under the bed can be left empty, but it is much more effective to fill it with drawers. An excellent option would be to equip an extra bed there, which will come in handy if one of the young wizard’s friends comes to visit.
The original dimensions of the bed and color combination are shown in the figure.
With canopy
This bed will be more to the taste of girls. According to the design concept, the canopy is made in the form of side curtains, and the top of the bed remains open, but if desired, you can improve the design (for example, tighten the top part with fabric).
Since curtains need to be washed regularly, the fastening should allow them to be removed and hung back without difficulty.
If for some reason the presence of a canopy is undesirable, the same bed can be made without it. To do this, it is enough to shorten the slats on which it rests, so that the legs end flush with the sides.
Cozy house
A real lifesaver for parents whose children have trouble falling asleep. The design of this bed creates a calm and at the same time fairy-tale atmosphere, and high sides in the form of walls and a roof help the child feel protected.
The effect of the night sky can be created on a tree in several ways:
- paint with acrylic paints, which have a beautiful glossy texture, are durable, and do not have a strong odor;
- purchase wallpaper or self-adhesive film with a similar design;
- cover the board with a fabric of the appropriate color (in this case you will have to regularly vacuum the inside of the bed).
Instead of drawers under the bed, you can equip a pull-out sleeping area for guests.
Two-tier with ladder-chest of drawers
If there are two children in a family, and the area of the apartment does not allow for a separate bed for each, you should pay attention to this option. True, unlike simple designs, creating a bunk bed will require more time, skill and effort.
Under-bed drawers and a chest of drawers will optimize space and provide additional storage space. If desired, the steps can be made ordinary.
When working on such a bed, you need to take care of the safety of the child who will sleep on the lower tier. All fastenings of the “top floor” must be reinforced with metal corners.
Features and advantages of the design
A compact bunk bed made by yourself is a godsend for a small room.
This furniture is placed near the wall or in the middle of the nursery, dividing the room into two zones. The functionality of the product can be expanded if you add a bed, which is located on the upper tier, with a wardrobe or a small desk below. Classic designs consisting of two berths located one above the other are also common.
Children love to play on the second tier, “transforming” it into royal castles, pirate ships, uncharted islands - this is another plus in favor of such furniture. There were also some downsides: at night, it’s not so easy for a sleepy child to get down from the top floor. In addition, the possibility of accidentally falling from the second tier and getting injured cannot be ruled out.
Children under 5 years old are not recommended to sleep on the top bunk of the bed.
It would seem that a huge assortment of various models of bunk beds allows you to quickly and easily make a choice. But ready-made designs do not always take into account the area of a particular room, the age of the children, and the wishes of family members.
The desire to make a children's bunk bed with your own hands is due to obvious advantages. Firstly, such furniture will cost much less than purchased furniture. Secondly, you can come up with your own unique design, supplement the design with the required number of side shelves, drawers or other useful elements.
As an option, you can always use a ready-made furniture project for your work; you can select suitable diagrams and drawings from free thematic resources.
Some types and models of bunk beds
Nowadays, in the assortment of stores you can find many models of beds with two tiers, and on their basis it is quite possible to create your own version of a sleeping place with dimensions and a comfortable staircase suitable for specific conditions and specific location. In addition to traditional bunk structures, you can also make a loft bed, which will free up useful space in the room.
If you consider several different options, it will be easier to choose the most suitable design for your apartment.
Traditional model
This type of bunk bed is traditional and has the simplest design possible. It is quite accessible for self-production and will require a minimum amount of materials.
This model is perfect for a children's room and will significantly save useful space in it, which can be used to arrange a workplace or play area. In addition, the structure can serve as a good platform for intricate children's games, so it should be quite stable, and in some cases it is recommended to firmly fix it to the wall.
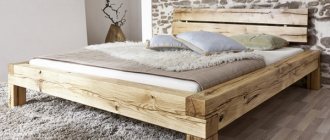
The big advantage of this model is the natural wood from which it is made, which is very important for a child’s room. Drawings and a detailed description of the manufacture of this bed model will be discussed below.
Bed option with sofa
A bed that has a folding sofa on its first tier will save even more free space in the room than a conventional two-tier design.
If there is an ordinary bed on the ground floor, it will be uncomfortable to just sit and watch TV, since there is no comfortable backrest. Therefore, in addition to the traditional version of a bunk bed presented above, in a children’s room you will still have to look for a place for a sofa or two armchairs, which, of course, will take up a fairly large area.
Well, if a sofa is built into a two-tier complex, it will serve as a sleeping place at night, and during the daytime it will create a comfortable corner for relaxing while sitting or lying down. In addition, when folded, this piece of furniture will not take up a single extra centimeter of space, and when unfolded, it will become a spacious, full-fledged bed.
To make such a complex yourself, you will have to buy or use an existing sofa and attach the rest of the structure to it, which, by the way, will be stable and reliable due to the massiveness of the lower tier.
Bed model with drawers
This version of a bunk bed, designed for three sleeping places and additionally equipped with drawers and shelves, will take up slightly more space than a regular traditional bed with two tiers.
However, in a children's room you still cannot do without various cabinets and drawers for toys and educational supplies, for which an attached structure can be used, which at the same time serves as a reliable, stable staircase leading to the second tier.
The sleeping places themselves will take up an area that would accommodate one regular bed. As you can see in the illustration, the third berth is a retractable structure, which is hidden under the mattress of the first tier during the day.
Thus, three children will be provided not only with sleeping places, but also with their own drawers and shelves, and in addition - an excellent play complex into which such a two-tier structure can turn.
Model with a double bed on the first tier
A bed with a double bed on the first tier can be used in a one-room apartment, or in a two-room apartment, where it is decided to allocate one of the living spaces as a living room with a workplace. So, the first floor of the bed is reserved for an adult bedroom, and the second is intended for a child.
This version of the trapezoidal design will take up the area of the room, which is usually reserved for an unfolded sofa. To make it, you will need few materials, but due to the widely spaced legs and the large massiveness of the lower tier, the bed will be stable and durable.
Bed for a large family
A bunk structure consisting of four beds is an excellent choice for a family with four or more children. This option is more difficult to make, and it will require a lot of material, but the room will become spacious, and the bed will look neat along one of the walls.
The design can be modified and even increased to six sleeping places if it is installed the length of the room and another two-tier section is added, or two pull-out mattresses are installed under the lower tier.
Loft bed
A loft bed is also used for the purpose of rational use of usable space in the room and a kind of “camouflage” of the sleeping area. This option is suitable not only for small children - it is often chosen for adults, especially if the apartment consists of one room.
This design allows you to use one area of the room for dual purposes - on the second tier there is a wide and comfortable bed, and the lower platform of the first tier is a fairly spacious office, which provides everything for comfortable work.
An important condition for arranging such a structure is its strength, especially if the sleeping place is intended for two people. Typically, such a loft bed is additionally securely fixed to the wall.
Corner designs
Corner bunk beds for children are more functional than classic designs. In some models, the berths are located directly above each other, while in others they are perpendicular.
Bunk beds allow you to fill usually empty space in the corner and hide surface defects. Sleeping places can also be located either above each other or perpendicularly. The staircase to the second tier can be of a classic design or have drawer steps.
May be interesting: Applying varnish to wood
Children's loft bed
The children's version of the loft bed is a whole complex that includes a table and a wardrobe in which not only toys, but also items of clothing can be stored. With some justification, such a complex can even be called a small room, which will become a favorite place for a child, since most children always try to create their own “secret” corner, building huts and houses from chairs and blankets.
By making this version of a bed with all the elements necessary for play and study, you can solve several problems at once and save on buying pieces of furniture for a child for many years, since the complex is suitable for both a five-year-old child and a fifteen-year-old teenager. Moreover, when starting to draw up a drawing, it is quite possible to include already existing cabinets and tables in it, which are perfect for the first tier of the structure.
Upon completion of the work, all elements of the loft bed are united in a common color that will be in harmony with the design of the entire children's room.
Types of designs
Manufacturers offer a wide range of standard bunk beds, models with a work area or with a sofa below. They differ in material of manufacture, configuration, shape, dimensions. To choose the right model for your apartment, you need to understand the features of each type.
Standard
A classic two-level bed with an attached or an extension ladder is the most common and popular model. Designs of this type are easy to manufacture and consist of 2 berths, one of which is located below and the other on the second tier. Such a product is durable, and since it does not have to be folded and reassembled every day, if treated with care, the attribute will last for many years. Classic bunk beds with drawers where the child can put toys or other accessories are very convenient - such models can significantly save space.
Most often, products of this type are installed in a room where two children live with a small age difference. Typically, the older child sleeps on top and the youngest on the bottom. Such a two-level attribute can only be installed in a room where the ceiling height is at least 2.35 m, otherwise sleeping on the second tier will be uncomfortable.
Transformer
Convertible beds are usually made of metal. Due to their versatility and practicality, such models are popular all over the world. It is worth considering that they differ in the method of transformation. The following options are considered the most popular:
- Bed with sofa underneath. Most often, structures of this type are purchased for one-room apartments, where there is no space to place excess furniture. During the day, the lower part of the attribute transforms into a small sofa, and at night into a full-fledged bed.
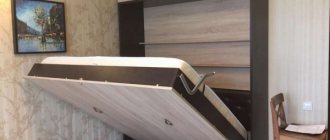
- Bed with a lifting mechanism in the form of a wardrobe. If necessary, the sleeping place is raised to the wall, after which the attribute looks like an ordinary wardrobe with mirrors and shelves. Such products are very ergonomic and beautiful, suitable for storing various things. Their only drawback is their high cost.
- Folding model. The basis of the product is not a frame, but a body, on two levels of which sleeping places are installed. During the day, folding bunk beds are folded and transformed into a closet with shelves, and at night they are used for sleeping.
- Pull-out bed. Such options are usually installed in children's rooms. Since under the bed there are drawers for storing linen, clothes, toys, this design allows you to significantly save space.
If you decide to purchase a transformable bunk bed, it must be selected in accordance with the individual characteristics of the person. You first need to think about which product will be more appropriate and necessary in a particular case. It is worth considering that most models are intended not only for recreation, but have wider functionality.
Wardrobe bed
Folding
Retractable
Matryoshka
A matryoshka bed is a product that consists of a frame with several pull-out compartments. This attribute is indispensable not only for small apartments, but also for kindergartens, since it allows you to save square meters. If you unfold such a bed, it will take up 2 sleeping places, but if you assemble it, it will take up only one. This frees up space for games and homework.
In most cases, double-decker Matryoshka beds are equipped with low sides that prevent the mattress from moving to the side and also prevent the child from falling during sleep. Another feature of the model is its low height. The child will be able to climb onto the second tier without the use of a chair, ladder or other devices. The side elements often have rounded corners, which reduces the risk of injury to the product. As a rule, models of this type are made of chipboard or MDF. Almost no metal is used for their production.
Attic
Usually it is a bed with a workplace. The relaxation area is often located on the upper tier, and the first is intended for daytime activities. Depending on the age of the child, the lower part can be made in the form of:
- Tables for studying and doing homework.
- Play areas.
- A chest of drawers with drawers and open shelves for storing clothes, textbooks, and sports equipment.
Also popular are bunk beds with a Swedish wall, where the child can play sports. In modern models with a sports complex in the side part, the lower tier is often transformed into an additional sleeping place. It is worth considering that the attic is suitable not only for a child, but also for an adult. If necessary, you can even find triple bunk beds of this type, when there are two sleeping places on the second floor. This product is fixed to the floor using wooden or metal supports.
A separate group includes bunk beds for workers, which are installed in cabins. Such designs are simple and do not have additional elements.
Stair configurations
Another parameter by which bunk beds differ is the staircase. Most often it is made from the same material as the frame. When choosing a product, you need to take into account not only functionality, but also the age of the people for whom the bed is selected:
- Vertical with podium. This product is fixed to the bed and is distinguished by the presence of a raised part in the lower zone. The design is quite stable and suitable even for preschoolers.
- With boxes in the steps. Due to the presence of boxes, the structure is equipped with wide steps, so it will be safe to move along it. Since you can store different things inside the drawers, they can save space.
- Inclined. As a rule, such structures are placed on the second floor - they are not considered the safest.
- Attached. When you need to climb to the second floor, such a ladder is moved towards the bed, after which it can be removed. If the lower part of the structure is wide and stable, the product is considered completely safe.
If the design is purchased for children, preference should be given to inclined or staircases with drawers. Such models are considered the most convenient and safe. Another good option for a child is chest of drawers for bunk beds, which can be used not only for their intended purpose, but also for storing things.
Vertical
With drawers in the steps
Inclined
Pristavnaya
Possible mistakes
Anyone who has not previously encountered furniture making may make a number of mistakes. Here are the most common ones:
- Using fresh wood. Since over time the material will dry out, become denser and, accordingly, decrease in size, the structure will simply fall apart. For a bed, you should only purchase boards that have been left in a dry, ventilated area for two or three years or have been machine dried.
- Neglecting to polish parts. All parts of children's furniture must be properly processed to avoid injury. Since a child can stick his hand even into narrow cracks or crawl completely under the bed, even those that are inside the structure should be sanded.
- Connecting parts using screws. This assembly option is good anywhere, but not in children's furniture. Under the influence of constant loads, the thread will destroy the structure of the wood fibers, and over time the structure will become loose. To assemble the parts, you should use special tenon joints, which are shown in the figure below, and be sure to glue them with wood glue. To strengthen areas that are subject to the greatest loads, metal ties are used.
Photo of a children's bed with your own hands
Sources
- https://mebel-expert.info/detskaya-krovat-iz-dereva-svoimi-rukami/
- https://remoo.ru/mebel/detskaya-krovat-svoimi-rukami
- https://mebel-sovet.ru/krovati/dlya-rebenka/975-detskaya-svoimi-rukami
- https://svoimirykami.guru/detskaya-krovat-svoimi-rukami/
- https://remoskop.ru/detskaya-krovat-svoimi-rukami.html
- https://dom-i-remont.info/posts/mebel/detskaya-krovat-svoimi-rukami-chertezhi-vidyi-i-materialyi/
- https://remont-spalni.ru/detskaya-spalnya/kak-sdelat-detskuyu-krovat-svoimi-rukami.html
- https://roomester.ru/interer/detskaya/detskaya-krovatka-svoimi-rukami.html
- https://kak-sdelano.ru/detskaya-komnata/detskaya-krovat-svoimi-rukami-foto-idei-i-chertezhi
- https://kakpostroit.su/detskaya-krovat-iz-dereva-svoimi-rukami/
- https://novamett.ru/krovat/dlya-novorozhdennogo