A garden bench in a beautiful location surrounded by nature is an opportunity to admire the view and give your tired feet a well-deserved rest. It does not have to be of complex design or made of expensive materials. In your dacha or garden, a DIY garden bench made of wood with a back can be made from budget boards, timber and even pallets.
Types of benches
Despite the fact that there are a great many types of benches, each master brings something of his own to his creation. But according to a number of characteristics, all structures can be combined into groups.
Without back and armrests
Two supports and a board in the middle - what could be simpler. But even such a bench can be interesting and original. For production, not only standard lumber is used, but also stumps, tree trunks sawn along or across, picturesque snags, etc.
All benches without a back have a significant drawback. Sitting in tension with a straight back, you cannot completely relax and rest. Models with body support do not have this.
With backrest
More comfortable garden furniture, conducive to a long pleasant pastime. The design is complicated by additional elements. The frame of the bench includes vertical supports for attaching the backrest. They are sheathed with boards or slats.
There are a lot of solutions to these models. The slats can be filled not only lengthwise, but also across, arranged in parallel or diverging rays. The backrest can be either strictly perpendicular to the seat or slightly inclined, stationary or folding.
The simplest bench can be made from 3 thick boards. The elements of the side supports are connected with powerful bolts. The seat and backrest are secured with self-tapping screws or nails. There is nothing superfluous in the design, everything is concise and easy to implement.
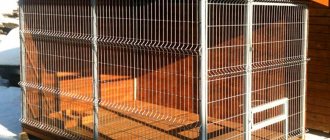
With a metal frame
The load-bearing elements of the bench are made of steel, and the paneling is made of wood - a very common combination. It combines the strength and durability of metal with the comfort and warmth of wood.
Combined benches are often decorated with forging. Openwork curls, monograms, and snails give a seemingly ordinary piece of furniture a luxurious and sophisticated look.
Bench-sofa
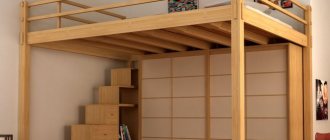
This is a more functional option, suggesting that you can not only sit on the bench, but also lie down. The bench with a backrest can be folded out horizontally, turning into a wide sunbathing lounger.
Lying on hard boards is not very comfortable, but you can throw on blankets, pillows or mattresses with polymer filling. And if you like to read a book in the shade of the garden, make a bench with a slightly raised headrest.
With built-in table
Making such a bench is not so difficult - a small tabletop is attached to the gap cut out in the back. It can be either folding or stationary. Another working option is to combine 2 benches using a table screwed to two adjacent armrests.
Transformer
Assembling a transforming structure is somewhat more difficult. Moreover, the level of complexity depends on how many and what kind of transformations can be made.
If a bench with a reclining back turns into a lounger, this is a simple form. Dining furniture with a full-fledged table for 4-6 seats is already more complex, requiring thoughtful design solutions. All parts of the transforming bench must be manufactured strictly according to the drawings, since even a slight deviation will make the transformation impossible.
The advantages of folding systems are versatility. One such bench can replace a whole set of garden furniture. An additional plus is that folded storage does not require much space.
Children's bench
To ensure safety, changes need to be made to the design for a child - the legs should be lower and the seat narrower. The fastenings should be as strong as possible, and the bench should be stable.
The children's theme will be emphasized by finishing with multi-colored paints, bright paintings or ornaments. To avoid bruises, scratches and splinters, the surface of the wood is sanded very carefully, sharp corners are rounded.
One of the options for children's garden furniture is a bench with a box for storing sports equipment and toys. It helps to quickly deal with the mess in the area. All you need to do is cover the bottom of the frame with a batten and make a hinged lid.
And if you put the structure on rounded runners, you get a rocking bench. To avoid falling when swinging, the “skis” should be long and have a small radius of curvature.
With a plant bed
What is a garden without flowers? You can solve the problem with the help of a two-in-one bench. To plant plants, containers are collected and filled with soil.
If the seedlings are perennial and tolerate winter well, the pots are made without a bottom so that the plants live in natural conditions. As a variation - a bench integrated into an existing garden. Then the flowerbed plays the role of a decorative fence for trees or bushes.
From unplaned wood
Not only lumber processed on a machine and having a strict geometric shape can serve as a material for making a bench. Picturesque stumps, branches and snags will perfectly cope with the function assigned to them. The surface must be cleared of bark, thoroughly sanded and coated with colorless varnish with an antiseptic so as not to destroy the natural aura of the tree.
An interesting result can be obtained by intertwining sanded branches with each other. For racks, crossbars and seats, you need to take thick stems; for the back, more flexible and thin shoots are suitable.
Location
The first problem that needs to be solved is choosing a location for the bench. It affects the material of the structure. For example, for an old garden with large branchy trees, wood products are suitable; for a small area not heavily planted with trees and shrubs, small openwork structures are recommended.
If you look online for examples of photos of benches in the country, you will see that they are often an integral part of gazebos, verandas and summer areas. If you are planning to do something similar, then make sure that all the details are made in the general style.
Choose a place for the bench so that it offers a pleasant view. It’s unlikely that you’ll want to admire your neighbors’ fence or the walls of your barn.
It is advisable to choose places in front of lakes or rivers, flower beds, etc. The main thing is that the surrounding objects attract and please the eye, help you relax and put you in a positive mood.
It is advisable that the bench be located in the shade. It is placed under the crowns of large trees or under canopies. Remember that it acts as a place for rest and relaxation.
You can put benches next to the beds. There are several advantages here. Firstly, the owners of the site will be able to monitor the growth of the crop. Secondly, the bench is suitable for taking a few minutes’ rest from physical labor (digging, watering, harvesting).
Don't forget about decorative decorations. Have you made a simple bench with your own hands? Place flowering shrubs around it. Flower beds are also suitable for decoration. They are placed on a raised platform or a special platform is created from bricks, tiles or logs.
Materials
The wood for benches must be of high quality, free from rot, knots and other defects. Poorly dried lumber is also unsuitable. Being in the open air, wood fibers periodically swell and dry out, and torsion begins. Subsequently, cracks form and fungi and insects colonize the wood, causing decay.
Ideally, lumber should be kiln dried or weather aged for at least 6 months. Such wood is freed from excess moisture, therefore it is more geometrically stable and resistant to rot than raw wood.
For garden furniture, it is recommended to use coniferous trees - pine, larch, cedar. They are resistant to rotting due to the high content of resins - natural preservatives. Oak and ash are very durable, but due to their hard, dense structure they are quite difficult to process.
In addition to edged boards, slats and beams, whole or longitudinally loose trunks, colorful stumps, thick branches and winding roots are used. It is clear that the wood needs to be well dried, sanded and impregnated with an antiseptic.
Corner
The corner module of the original design is quite complicated (item 1 in the figure), not entirely convenient and not very hygienic: along the gap between the back and the seat, dust and crumbs will fall just where it is difficult to remove them. Since in our case the entire corner is made at the place of constant use, it would be more expedient to build a hanging corner for it, tightly fastened to the sofas. Drawings of its 5 parts - seat, support bar and 3 back segments - are given in Fig. The bevel of the corner seat with sofa seats 400 mm wide is 210 mm, and this is considered a half-window window that fits in a small-sized kitchen. The bevel can be straight, convex or concave. The most convenient thing is a slightly convex bevel, but then it will not be possible to attach a bench to arrange a sleeping place. The backrest has an upward camber, which further improves ergonomics.
Drawings of details of the corner section of the kitchen corner
The dimensions of the back segments must be verified according to the location. reasons. First, small parts are greatly affected by the thickness of the skin. Since the sofas were covered earlier, this value will be known by the time the corner section is manufactured. Secondly, all the dimensional errors accumulated in the sofas will converge into one in the corner.
And yet, the seat and backrest segments need to be trimmed freely, without tension, so that the backrest does not overtighten the fabric when assembling. The lower edges of the segments need to be beveled inward by 2 mm (at an angle of 10 degrees, this is with a margin). The tops of the segments can be figured (options in positions 4 and 5 in Fig.), as long as the contours converge at the connecting points.
Note: rear support posts do not need to be installed if there are no suitable scraps and the rider weighs less than 100 kg. If they are installed, then they are attached in pairs of confirmations through the face into the edge. The heel of the lower support is sealed with a piece of ABS and just stands on the floor.
Corners in a corner
This corner also has 2 secrets. The first is a nook under the seat. From the point of view of a domestic animal, this is a reliable reserve den at a safe distance from the main house. And from the point of view of the owners, it does not cause them unnecessary trouble.
Second. The middle segment of the backrest does not bear operational loads. If you place it on friction pins instead of self-tapping screws, a hiding place will form in the cavity behind it. You will just need to sew an outward-facing tongue-strap made of durable fabric to the upholstery of the lower edge, and sew up the corner section from the rear with fiberboard. When closing the cache, the tongue is tucked inward so that it is not visible. To open the cache, the tongue needs to be pryed and pulled out with a fork or something like that. Remove the segment by pulling the tongue and the top of the back. This cache is unlikely to hide anything from an experienced burglar or a professional search, but it is quite reliable from an amateur thief or overly curious household members.
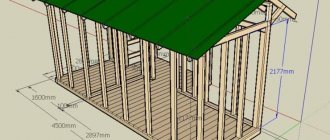
Drawings and dimensions of a garden bench made of wood with a back
Even for the simplest design, it is recommended to draw up a diagram. Then you can prepare parts of the required sizes and in the required quantity, and also calculate the need for materials.
The drawing of a garden bench with a back for two people shows that for the supporting frame you will need 8 short bars and 2 long ones, for the back frame another 2. To cover the seat and back, you need several boards 1.3 m long.
The bench with armrests has more details. For the frame you will need to prepare the front and back legs, bow, armrests, support bars, boards for the seat and back.
A bench with shaped armrests and a back made of vertical slats is assembled using dowels and screws. All parts are adjusted strictly to the dimensions in the drawing, since the dowels are installed at the ends. Of course, this is a rather labor-intensive model for a beginner, but that makes it all the more interesting to assemble.
What are kitchen corners?
A piece of furniture, as the name suggests, is installed in the corner of the kitchen. The ensemble can include all elements: sofas (straight and corner), table and chairs (stools). But most often the corner is purchased separately in the form of three modules: a long sofa, a smaller seat and a corner pouf . Table and chairs (if necessary) are purchased separately by the owners.
Kitchen Area
As a rule, the assembled configuration of the corner resembles the letter L, but U-shaped models are also available. The design can be solid or modular. In the first case, it is necessary to clarify the orientation of the furniture (right or left). Models are available that allow the use of a longer module as a linear element, while the second element can be installed at a distance. Models with poufs symmetrically located relative to the corner element, each of which can accommodate one person, also fit perfectly into small kitchens. The corner can even be installed in a bay window, only its shape will be semicircular, triangular or polygonal.
Bay window sofa in the kitchen
For housing in which there are not enough sleeping places, and situations when there is a need to accommodate a visiting guest for an overnight stay are not uncommon, a module with a full-fledged folding place to sleep will be a real salvation. A minibar can be placed at the end of the sofa or a folding shelf can be installed, which can be used as a bar counter.
Kitchenette with sleeping area
Bright kitchen corner
Assembly methods
Various types of fasteners are used to secure parts to each other:
- Self-tapping screws for wood. They differ from self-tapping screws for metal with a wider thread pitch. Installed in pre-drilled holes to prevent wood from splitting. The length is selected on the basis that the hardware should fit into the attached part by 1/3 of its thickness.
- Bolts. Connect two boards through a through hole. They are tightened with nuts and wide washers to prevent the wood from pressing through at the fastening point.
- Nails. Traditional fasteners for wooden structures. To avoid cracking, the rod is trimmed with pliers or filed with a file. A blunt point does not push apart, but breaks the fibers, thereby preventing the formation of cracks.
- Staples. They are U-shaped rods driven into 2 adjacent parts.
- Overlays. Fastening with perforated or serrated plates, corners, and brackets is widely used for furniture manufacturing and construction.
For external work, only corrosion-resistant fasteners are used - stainless, brass, galvanized or oxidized. It is not advisable to use black, it rusts quickly.
In carpentry, you can do without hardware at all and make connections on dowels. Wooden cylinders with a diameter of 6-10 mm are placed on glue in the prepared holes and keep the parts from moving. The adhesive composition must be intended for outdoor use.
A popular type of joining wood structures is mortise. A groove is made in one part, and a tenon is formed in the other. During installation, glue is used, and the joint is strengthened with nails or self-tapping screws.
Required Tools
To make a table with benches for your garden with your own hands, you need to prepare the following tools:
- wood hacksaw;
- electric jigsaw or circular saw;
- drill with various drill bits;
- screwdriver;
- hammer (if it was decided to use nails instead of screws).
This is a minimal list of tools that are simply impossible to do without when assembling wooden furniture. To make the work go faster and at the same time make the furniture look more aesthetically pleasing, you will also need:
- milling cutter;
- sander;
- rotating miter box (allows you to make precise cuts at the desired angle).
Do-it-yourself garden bench with a wooden back: step-by-step instructions
The first stage is preparing the parts. Using a jigsaw, cut long boards for the seat to the required dimensions, and bars for the frame.
For the legs you will need 4 planks with a thickness of 3 cm and a width of 8 cm. Connect them in pairs with bars at a height of 40-50 cm from the ground. The seat boards will be attached to them, so the thickness of the bar should be at least 40-50 mm.
If the legs are slightly inclined, the ends of the boards should be filed at a slight angle. The fit to the base should be maximum to avoid vibrations and uneven loads on the frame.
Now you need to secure the seat supports. The boards are nailed to the legs at an angle of 15-20°.
In the same way, only symmetrically, assemble the opposite part of the bench frame. It is recommended to fasten parts with bolts rather than self-tapping screws. The connections work to shear, and the screws may not withstand the load.
Install a spacer made of boards between the side parts of the frame. Here you can already use self-tapping screws.
For the seat, screw 4 boards 30 mm thick and 100 mm wide to the side rails. Leave a gap of at least 10 mm between the slats to allow precipitation to drain and compensate for temperature and humidity deformations.
Assemble the backrest in the same way as the seat. Use screws for fastening.
Next, attach the slats to the sidewalls, and the armrests on them. Sand all surfaces, cover with yacht varnish, paint or oil. Place the finished bench on a flat surface.
What to do and what not to do
The first mistake when designing a kitchen corner is a table with legs and straight front seats, pos. 1 in Fig. The secret of the comfort and self-zoning of a kitchen corner is its compactness and convenience, but here the table cannot be really moved, and its legs get tangled in the knees of 3 people sitting. The corner for the kitchen should be made under the table of a beam-and-panel structure, pos. 2 and 3, and the facades of the seats are either sloping (pos. 2) or with raised bottoms of the chests under the seats, pos. 3.
Tables and drawers for kitchen corners
The second mistake is not to make drawers under the seats, pos. 4 and 5. They interfere with each other and spoil the floor. To get to the contents of the drawers, you need to move the table far away and kneel down. If the house is run by a maid and a housekeeper, and the owner does not care about their worries, then a kitchen corner with drawers is a matter of taste. And we need to make a corner for ourselves in the kitchen with chests under folding or removable seats.
Unusual ideas
As supports, you can use not only boards or square beams, but also rounded logs and double-edged beams. They are laid horizontally, with the bench seat on top.
You can place the cuttings of the trunks vertically and secure the seat with dowels. The design without a single nail will perfectly perform its functions. For the back, the logs are cut longer and placed close to the bench. A sanded board is fixed vertically to them. If you select the middle of a large-diameter log and smoothly trim the inner surfaces, you will get an original, authentic bench.
Is there a luxurious spreading tree growing on the site? This can be successfully played around by installing a bench in a circle near the trunk. You don't have to cut entire boards. If the old but strong pieces of wooden chairs are firmly secured to the log, the garden bench will be ready in a matter of minutes.
A lightweight design with an openwork back is what you need in a small but cozy country courtyard. You will need very little material - an unedged board, round slats and branches freed from bark. You can even use the remains from pruning garden trees.
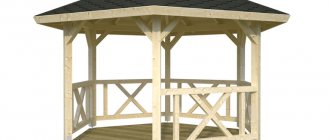
For gatherings in the gazebo or on the veranda, corner benches are useful. If you install them near the table, you will get a spacious dining area. It will be appropriate not only in the garden, but also on the terrace or veranda.
The bench, placed on wheels, is mobile and easy to carry. Just roll it to a new place - and you won't have to lift anything heavy.
From the benches you can build a whole complex with sitting and lying areas. A large company can be accommodated here comfortably, and for a fun party it is enough to place a low table and organize refreshments.
An unusual composition of scraps of untreated trunks will add originality to any garden plot. True, you will have to try and hollow out a rounded seat with a comfortable backrest in each pair.
Armrests can be made from anything. For example, from cart wheels, as in this picture.
There is nothing unnecessary on the farm. From a couple of pallets of building materials you can make a decent, and most importantly, free bench. The pallets need to be disassembled, the slats sanded and coated with paint and varnish.
Additional equipment
For ease of use, the bench can be equipped with various useful little things. Here imagination and consideration of personal needs will come to the rescue:
- to make it convenient to use the product for processing beds, for example, when you need to kneel down, weed or loosen plantings and trim plants, a variety of cushion seats are suitable;
- a foam rubber mat wrapped in oilcloth can be attached to both sides of the seat to make sitting and kneeling softer; to make it easier to wash soiled material, it is better to make it removable, for example, in the form of a pad with ties;
- on the sides you can attach fabric pockets with valves for small equipment or water bottles;
- For carrying, you can build a shoulder strap that allows you to free your hands.
To soften the seat mat, pieces of tourist foam, synthetic padding, polystyrene, holofiber, struttofiber, and other synthetic padding materials can be used.
As you can see, the simplicity of the design will make it easy to create a “shifter” yourself. Such a homemade weeding chair will remain a useful and necessary household device for a long time, and its use in the garden will help save strength and health.
Decorative and protective treatment
Wood is the most common material for garden furniture. It is easy to process, light and durable. In terms of tactile sensations, the surface of wood is much more comfortable than metal or concrete.
As a rule, wood is treated with impregnations with an antiseptic effect, and then covered with decorative compounds - waterproof paints, enamels for exterior use, stain, yacht varnish, wax, oil. It must be taken into account that natural material does not like ultraviolet radiation and reacts to sunlight with photodestruction. Therefore, choose paints and varnishes with a UV protective component.
If you like old things with their own history, even a new bench can be turned into an antique artifact. For this purpose, artificial aging, or brushing, is used.
Soft fibers are removed from the surface of the wood with a stiff brush, and the exposed structure is emphasized with paints and varnishes. The resulting effect is very picturesque. An aged bench looks harmonious against a background of greenery and grass.
Blowtorch firing is used as a decorative and protective finish. As a result of heat treatment, wood becomes denser, increasing its resistance to moisture, rotting and mechanical damage.
How to process wood
Since many tree species are not “friendly” with a humid environment that causes rot, products used outdoors must be carefully processed. Such protection will also protect against exposure to ultraviolet radiation, from which the material can fade and change its true color. Finishing is also done to transform the appearance of the wood. To do this, take the following compositions:
- Colored opaque paints that completely hide the wood texture. Various compositions are used, from which we want to highlight acrylic-based options. This material creates a durable and long-lasting coating. It comes in different colors. The material hardens in the form of a film.
Opaque paints
- This material looks like varnish, but it is not. In contrast, a vapor-proof film is not created on the surface - the wood still breathes. Azure saturates the wood with deep tones. It penetrates its structure and reliably protects it from moisture and ultraviolet radiation.
Azure
- Varnishes create a film on the surface and prevent water from getting under it. This material can be transparent or colored. For outdoor use, it is best to choose the option for yachts, as it will last a very long time and create an even, glossy finish that shines very beautifully in the sun. Clear varnishes are used in combination with various impregnations, for example, stain.
Wood varnish
- One of the oldest and best ways to protect wood is to coat it with oils. This material penetrates deep into the wood structure, giving it water-repellent properties and a beautiful deep shade. Oils are used to treat decking near swimming pools and even on piers, which indicates a high degree of protection (the choice of oil for garden furniture is discussed in the article).
Wood oil
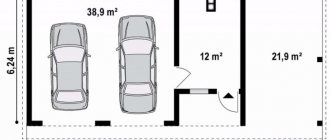
Where to put the sofa
When choosing a sofa model, it is important that after its installation there is enough space for free movement. Ideally, it should not occupy more than 20% of the total space. It is better to install a corner sofa in a kitchen that is at least 14 square meters. meters. Otherwise, you should limit yourself to a small straight sofa or completely abandon this idea.
You can install the sofa:
- Along the wall. Installation opposite the kitchen unit is a classic location for a standard kitchen.
- Along one wall with a set, it is practical to place a sofa in a long and narrow room.
- Near the window. They install small structures or a bay window sofa.
Making a sofa for the kitchen is not difficult, you just need to follow the instructions, or watch the video for clarity. You should not be afraid of difficulties - the creative process will bring pleasure, and the result will delight you with a comfortably equipped area.
Seat installation
From the same sheet of plywood or chipboard from which the bottom for the drawers was cut, you can make a base for the seat according to the dimensions indicated in the drawing. Progress:
Step 1. Take the foam rubber and cut out a piece from it, which should be 2-3 cm larger than the base on all sides.
Step 2. Glue the foam rubber to the chipboard.
Step 3. Cut out the batting along the contour and glue it to the seat with the same glue.
Step 4. Using a staple gun, attach the upholstery fabric.
The result is an excellent corner sofa that can decorate any kitchen.
Video description
In the following video, the master shows in great detail the process of making folding garden furniture on a metal frame from bent elements, indicating all the dimensions and methods of connection:
If you calculate the cost of such a bench, made by yourself, and compare it with the price of similar products sold on construction markets and through Internet, then it will be almost three times lower. The benefits are tangible, and you can choose the most suitable design for yourself, rather than buying what is on sale.