Icer
8455 0 0
Icer November 16, 2017Specialization: master in the construction of plasterboard structures, finishing work and laying floor coverings. Installation of door and window units, finishing of facades, installation of electrical, plumbing and heating - I can give detailed advice on all types of work.
Very often I hear the question, is it possible to turn on the air conditioner when wallpapering? In this short review, we will look at all the nuances so that you understand this topic once and for all. In fact, everything is simple, but some pseudo-specialists give incorrect recommendations, which is why inexperienced professionals have problems.
It is highly undesirable to use conditioner when wallpapering.
Preparatory stage
The preparation of walls in a new building and a residential apartment are somewhat different from each other. In a residential apartment, work begins with dismantling the old type of finishing: paint, whitewash, old wallpaper. After this, the walls are inspected. If necessary, the old plaster is removed and the walls are repaired.
In the new building, installation work is being completed on installing door and window units, wiring, pouring floor screed, and whitewashing the ceiling. After this, the work in both the new apartment and the old one is the same:
- the surface of the walls is prepared for applying plaster: notches are made, primed, beacons are mounted;
- the walls are plastered with gypsum (cement-sand) mortar or dry plaster (OSB board, plasterboard, plywood);
Attention: rooms with high humidity - bathroom, kitchen and toilet - are prohibited from being plastered with a solution containing gypsum.
- the plaster layer is puttied (if the finishing grouting is done at a high level, and the wallpaper is planned with a relief pattern, the operation can be skipped);
Important: a thin layer of putty must be applied to the plasterboard, which will allow you to subsequently remove the pasted wallpaper without destroying the plasterboard sheet.
- a primer is applied to ensure adhesion of the wallpaper glue to the wall.
The entire process of preparing walls for wallpaper is discussed step by step in the articles “How to prepare walls for wallpapering” and “How and what is the best way to prime walls before wallpapering.”
Dismantling the air conditioner during repairs
When renovation of apartments in Mytishchi begins, you can order from us the dismantling and subsequent installation of the air conditioner - this will keep it intact and make the work of the builders easier. We will do the dismantling using technology, preserving freon.
We are talking about split systems consisting of indoor and outdoor units. It is the indoor unit that is removed during finishing. It is impossible to plaster a wall when there is an air conditioner on it, hang wallpaper, or install a suspended ceiling
If the indoor unit is not removed, it will most likely be damaged. It will be covered with construction waste, filled with primer, and when it comes to putty, it will be hung on pipes or a piece of wire. And only when freon hisses out of the broken pipe, will they turn to the owner with a request to invite specialists for dismantling. These are not fictions, but stories from life that are repeated in our practice time after time. Therefore, attention:
Even before starting renovations in your apartment, contact us to dismantle your air conditioner.
We will rent the indoor unit; the street one can be left in place, but access to it will still be required both during dismantling and during subsequent installation. The master will save the freon,
Here is the procedure for pumping freon into the external unit:
- Turn on the air conditioner in the “cooling” mode, wait for the compressor to start
- Connect a pressure gauge to the service port of the external unit, turn off the tap on the liquid tube
- Wait until the pressure gauge needle goes to “vacuum”, turn off the valve on the gas pipe
- Turn off the air conditioner
it into the external unit, and after installation it will pump out the air with a vacuum pump and release freon back into the system. If the external unit is in an inaccessible place.
Selection and preparation of glue
The quality of wall decoration with trellises is primarily influenced by the type of wallpaper glue. The correct choice of composition allows you to glue walls without bubbles and air pockets, with invisible joints, and uncontaminated canvases.
When choosing an adhesive composition, it is necessary to take into account the type of wallpaper base. So, for paper wallpaper, glue KMC, “Moment”, etc. is suitable. For vinyl wallpaper, special types of glue are produced, as indicated on the packaging. Non-woven ones can be glued with a special adhesive for non-woven fabrics.
You can read about the types of glue, methods of their preparation and application, as well as their suitability for different types of wallpaper in the material “How to choose wallpaper glue.”
Advantages of a design technique
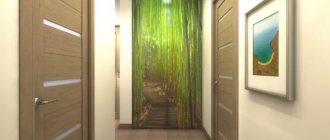
The design of wallpapering two types of wallpaper in the hall has many advantages. The wall covering looks expensive, interesting and rich. At the same time, combinations of patterns and textures help to perform some practical functions in interior decor. You can visually expand the boundaries of the room, place accents, and make the zoning of the space unobtrusive and soft.
The result looks impressive and stylish. It lasts for a long time, helping the room not to lose its attractiveness and impeccable aesthetics over time.
This direction in interior design has other significant advantages:
- Affordability
You can save on hiring professional decorators and do the work of combining wall coverings yourself.
The best gifts you need:
|
- Lots of options
Halls in conservative styles, living rooms in combined studio apartments, ultra-modern rooms will look harmonious and holistic with the proper choice of wallpaper for the walls.
- Simplicity of gluing technology
Decorative plaster, tile mosaics, imitation brickwork - all these ideas look impressive in the design of the hall.
However, implementing them is not so easy. It takes a long time to master the technology, hone your skills and delve into the nuances. It will be faster to hang wallpaper. The work of combining this material is not complicated and requires minimal labor and time.
| Discover the best gift ideas for Men, Women, Girls and Boys. |
Choosing wallpaper depending on the room
A huge range of wallpaper allows you to choose them both for the type of wall and for a specific room in the apartment. For example, for a concrete wall base that is smooth and without flaws, smooth wallpaper is suitable. Volumetric (embossed) are suitable for all types of wall materials. They mask small bulges and depressions well, and hide slightly unraveling seams.
In rooms on the south side of the building, it is best to use cool colors: gray, blue or green. By the way, they visually enlarge the rooms in Khrushchev-era buildings, with their small dimensions - area and ceiling height.
Warm colors.
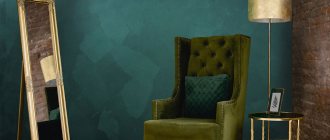
On the north side, you need to choose trellises in warm colors (beige with variations) or golden color. In the hallway and corridor, dark washable wallpaper in rich shades is suitable. The living room looks great in both light and dark colors. Here the main idea in choosing trellises is to maintain the overall style of the interior.
The bedroom should have calm undertones. The harsh color is annoying and prevents you from falling asleep. Photo wallpapers with views of nature look good here and fulfill their role functionally.
What are the benefits of tinting plastic windows with film?
Windows with solar control film applied to them have many advantages. Tinted windows:
- automatically acquire a spectacular appearance;
- protect rooms from heat leakage in winter and from heat in summer;
- eliminates glare on monitors and TVs;
- minimize the risk of furniture and interior items fading;
- qualitatively muffle the sunlight shining through the windows.
Installing film on windows does not take much time, but it guarantees light protection in the long term. Our experts carry out installation work on any films, strictly following the manufacturer's instructions.
Wallpapering technology
Many apartment owners, when replacing the trellises themselves, believe that they know how to properly glue wallpaper. Indeed, they can stick simple single-layer paper wallpaper on the wall without any problems. However, when working with other types and types of wallpaper, questions begin to arise. So how to hang wallpaper yourself?
The technology of covering walls with modern wallpaper is not complicated and consists of several interrelated stages. It can be represented step by step as follows:
- the required amount of wallpaper is calculated;
- wallpaper and glue are purchased;
- the necessary tools and devices are prepared;
- select the location for gluing the first sheet of trellis;
- the pattern according to which the wallpaper should be glued is determined;
- wallpaper sheets are cut;
- the adhesive mass is prepared;
- the trellises are glued to the wall.
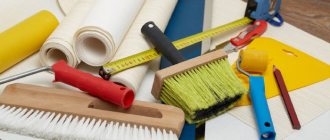
Materials and tools
For continuous and high-quality work, you will need materials and a set of tools with accessories.
Materials. To paste the walls you need to buy:
- wallpaper (non-woven, photo and glass wallpaper, paper, vinyl, etc.);
- wallpaper glue (preferably specialized).
Tools and accessories. You can apply wallpaper with a minimal set of tools. But in order for the job to be done quickly and beautifully, you need to have on hand:
- stepladder;
- plastic bucket - 2 pcs. (for glue and clean water);
- cuvette (bath) for glue;
- a roller 250 mm wide and a paint brush (brush for edging wallpaper and finishing corners) for applying adhesive;
- metal spatula for cutting wallpaper on the wall;
- plastic wallpaper spatula (wallpaper brush) for leveling thin wallpaper or trellises with a three-dimensional (relief) pattern;
- a plumb line or laser level to find the vertical;
- a ruler with a pencil for drawing a vertical starting line;
- construction knife (scissors) with replaceable blades for cutting wallpaper to length;
- roulette;
- rubber roller for pressing the wallpaper to the wall;
- rubber roller, narrow, cone-shaped, for smoothing seams (joints);
- foam sponge for removing glue from the front side of the wallpaper;
- napkin (towel) for hands;
- screwdriver for removing sockets and switches;
- electrical tape for working with electrical wires.
Buying wallpaper
When going to the store to buy wallpaper, you must strictly meet two conditions:
- buy the required number of tubes;
- purchase tubes of the same shade.
Calculation of material quantity
You can calculate the required amount of wallpaper in 2 ways.
1. The height of the wall surface to be pasted is measured (it may not coincide with the height of the ceiling due to the non-removable plinth and baguette). The length of the roll (10 m) is then divided by the measurement, resulting in the number of complete trellis panels in one roll.
After this, the length of all walls is measured, the measurement results are added up - the perimeter is obtained in meters. The resulting number is divided by the width of the wallpaper tube (0.53 m, 1.06 m) and the number of sheets in it. The measurements taken can be written by the formula:
T = P/L x H/K , where
- T - number of wallpaper tubes, pcs.
- P is the length of the perimeter of the walls, in m.
- L is the width of the wallpaper tube (0.53 m or 1.06 m).
- H - the height of the wall surface to be pasted (the length of the wallpaper sheet to be pasted).
- K is the length of the wallpaper roll (10 m, 15 m and 25 m).
Attention: professional finishers advise not to take into account windows and doors when calculating the amount of wallpaper to buy.
The result obtained must be rounded up and 1-2 tubes of wallpaper should be added to match the color, for unexpected defects and reserve (repair of trellis sheets damaged on the wall).
2. The length of the perimeter of the walls is measured, after which the required amount of wallpaper is taken from the prepared table below.
Attention! If the height of the pattern (rapport) is more than 0.6 cm, it is necessary to add 1 more roll of wallpaper for every 6 tubes to all calculations.
It already takes into account all the nuances of calculating the required amount of wallpaper, but without taking into account the adjustment of the pattern.
Wallpaper requirements
When producing wallpaper, machines are filled with paint for a specific batch. When refilling, the tonality may be disrupted. At the same time, at a retail outlet you may not be able to see the difference in shade, but on the wall it will be clearly visible.
Therefore, you need to buy trellises from the same production batch, the same production date and the same article number. You can view this data on the liner (label) that is wrapped around each tube of wallpaper, which is clearly visible in the photo. Practice shows that not everyone knows this, and many ignore it. The result is clearly visible on the walls - the different tones of the trellises are striking.
Label on a roll of wallpaper.
Wallpaper markings.
Buying glue
The adhesive mass is purchased according to the type of wallpaper purchased. The number of packs (containers) of wallpaper glue is easy to determine - the packaging indicates the consumption in rolls with a length of 10 m and a width of 0.53 m.
If the wallpaper has different sizes, the amount of consumption is adjusted. The number of packages is the result of dividing the total number of trellises purchased by the amount of consumption (in rolls).
Where to start gluing
All recommendations for choosing a place to start work on decorating walls with trellises state that it does not matter where you start gluing wallpaper in the room - you can start from any place you like: a door, window, corner or even from the middle of the wall (the main thing here is that the first piece should be glued strictly vertically). However, such advice is not entirely correct. Paper wallpaper, especially single-layer (simplex), should be glued away from the window, and in different directions - so the seams are not visible.
Determining the pasting scheme
Depending on the type of wallpaper, experts offer two pasting schemes. How to glue paper wallpaper is shown in the diagram. Here work starts from the window and proceeds in different directions.
Scheme for covering walls with paper wallpaper.
For other types of trellises, we can use both the option shown in the diagram and work in a circle, when the beginning and end meet. In this case, work can start from:
- windows (following long-standing traditions);
- doors - the frame serves as a guide (replaces the vertical line);
- angle - in this case, using a plumb line, a vertical line is drawn from which work will be carried out;
- a vertical line drawn on the wall in any randomly selected place.
Step-by-step instruction
You can wallpaper your walls yourself, without involving professionals. To do this, you must act strictly in accordance with the instructions.
- Using a plumb line, a pencil draws a vertical line on the wall from which work will begin.
- The height of the wall to be pasted is measured and the first sheet of wallpaper is cut to size. Experts advise non-professionals to make an allowance of 10 cm, although those with even minimal experience working with trellises cut them immediately to size.
- The remaining panels are cut, matching the pattern on the floor, and not on the wall, as some authors of works on this topic recommend. Tapestries without a pattern are simply cut to size.
- The glue is diluted according to the instructions printed on the package.
- The adhesive mass is applied to the wallpaper (on the wall in the case of non-woven wallpaper) with a roller or a special brush. The edges are coated with a brush. First, spread the first (any) half (a little more than half) and fold it in half. The fold should not be fixed. Then the other half is spread and also folded in half (the correct folding method is shown in the figure below).
Scheme of folding wallpaper coated with glue.
The folded wallpaper is kept in this state until the impregnation process is completed - the approximate time is given in the table below.
| Wallpaper type | Time for impregnation, min. |
| Paper | 5 |
| Double-layer paper: | |
| dense | 7-8 |
| very dense | 10 |
| Vinyl | 8-10 |
- The upper half of the wallpaper sheet is opened and pasted on the wall (the lower part remains folded all this time). You need to orient yourself not by the ceiling, but by the drawn vertical line (if the upper half is glued correctly, the second half will easily follow the drawn line).
Having attached the top part of the wallpaper sheet, proceed to the bottom.
Attention: if the wallpaper is cut with an overlap, a margin of 4-6 cm is left at the top of the wall.
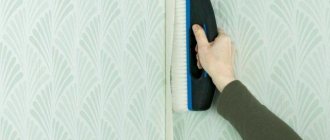
The wallpaper is smoothed with a wallpaper roller (plastic spatula) from top to bottom, from the center to the edges (see photo).
Smoothing the wallpaper with a spatula.
- The second half of the panel is revealed and also glued to the wall.
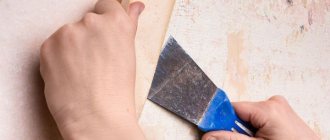
- The overlaps at the top and bottom are cut with a knife using a metal spatula.
The wallpaper is cut with a knife.
- The second and subsequent sheets are glued in the same way, according to the accepted scheme.
The recommendations given are considered universal, but are subject to adjustment for a specific type and type of wallpaper. More detailed information can be found on our website, where each type of wallpaper is dedicated to a separate work.
How to make joints invisible
During the work process, it is important to ensure that the joint remains invisible. Errors occur for 3 reasons:
- the consistency of the glue is incorrect (more liquid than required), as a result of which in some places the edge of the wallpaper bubbles (falls behind);
- wallpaper, by its nature, stretches under the influence of moisture from the adhesive mass, and when dry, contracts, forming a visible butt seam;
- An error was made when aligning the wallpaper - the sheets were glued overlapping.
The problem is solved by rolling the joint with a special narrow wallpaper roller. If an error is discovered after the trellis has dried, the visible seam is painted over with special corrective paint.
The places where the pasting was done with an overlap using a metal ruler and a construction knife are cut in the middle 10 hours after completion of the work (the wallpaper has shrunk, but the glue has not completely dried and allows you to remove both the lower and upper pieces of the cut trellis).
How to hang wallpaper in corners correctly
There are several secrets here that allow you to get the job done quickly and efficiently.
- You cannot glue a whole sheet on a corner because of a possible violation of its geometry, as a result of which the vertical line at the second part of the wallpaper disappears.
- Wallpaper in the corners is always cut off. It is necessary to leave 2-3 cm on the second wall. The next sheet is glued to the left overlap strip. Then, using a knife with removable blades and a metal ruler, a continuous cut is made in the middle of the seam. Strips of wallpaper from both the bottom and top are removed, and the seam is rolled with a narrow roller. If you wish, you can even choose a picture.
- External corners are covered using a similar technology.
Pasting of internal corners.
How to glue near windows and doors
The greatest inconvenience when covering walls with wallpaper occurs when encountering obstacles. You can avoid troubles by following the technology of gluing trellises near doors and windows. You can glue the trellises near the doorway using the following algorithm:
- wallpaper is glued to the wall over the doorway;
- the pasted sheet is joined to the previous one;
- The wallpaper is pressed tightly against the wall with a roller;
- scissors make a diagonal cut of the wallpaper towards the upper corner of the door casing;
- the wallpaper is rolled tightly to the side and top trim;
- the strongly protruding part of the wallpaper is trimmed with scissors;
- Using a metal spatula, the left strip of wallpaper is placed under the casing.
Attention: if the platbands sit tightly on the wall and it is impossible to put wallpaper under them, trimming is done with a knife using a metal spatula.
Covering the doorway.
Gluing near a window is much easier - the wallpaper is glued to the wall using conventional technology. After they have completely dried, the unnecessary part of the trellis is cut off along the edge of the window with a knife.
Preparation
But the choice has been made - the materials are in front of you. It's time to glue. First, let's prepare the walls correctly. We remove the old coating, cover the uneven areas with putty and prime. While it dries, prepare the glue correctly according to the instructions.
Draw a vertical line on the wall. This is a guideline for selecting a pattern, because corners and slopes are not always smooth. If you are still afraid to mow, use a level.
FAQ
At what temperature to glue wallpaper
Many recommendations indicate that wallpaper should be glued at a temperature of 23-25°C. However, this temperature regime can only be achieved in summer. Winter, when heating is needed, does not allow working in such conditions (in most Russian cities in winter the temperature in the apartment is 18-20°C).
So at what temperature can you wallpaper walls? Manufacturers of trellises and glue have taken this point into account and recommend finishing work at a temperature of 10-25°C. Therefore, it is not recommended to glue wallpaper in unheated rooms (dacha, veranda) in winter.
When can you open windows after pasting?
Impatient apartment owners try to quickly get rid of the smells of glue and wallpaper. But open windows mean drafts. And in drafts, the glue dries quickly and unevenly, as a result of which the adhesive mass does not have time to create the necessary adhesion to the wall. The result is that the seams come apart or the wallpaper peels off.
When can you open windows? You can open the windows after the pasted wallpaper has completely dried - after 1-3 days (the time for complete drying is usually indicated in the instructions printed on the packaging with the glue). For insurance purposes, it is better to add one day to the specified time.
What to do if the wallpaper bubbles
In practice, a situation often occurs, even among professional finishers, when minor violations of technology lead to the appearance of bubbles and air cavities on the surface of glued walls. This is both unsightly and a potential breeding ground for mold and mildew. How to get rid of bubbles on wallpaper?
Depending on the size of the lagging area, we can advise:
First, re-glue the canvas if there are very large air cavities. All attempts to fix the problem without tearing the wallpaper off the wall will be noticeable.
Secondly, for medium-sized pockets, it is also better to re-glue plain trellises (the mark of the cut will be very clearly visible). Wallpaper with a pattern is cut with a construction knife in the middle of the resulting cavity. The edges are carefully pulled away from the wall using a spatula and the adhesive mass is delivered into the resulting space using a brush. It is not necessary to coat the entire dry surface.
You can disperse the glue with a dry cloth while pressing the seam of the cut tightly. Allow the base of the trellis to soak in glue for 5-10 minutes, and then roll the lagging area with a wallpaper roller to remove excess mites and air. It should be remembered that paper wallpaper stretches from the glue and decreases in size after drying. Therefore, the edges of the cut should overlap. Vinyl and non-woven wallpapers have butt joints.
Thirdly, small bubbles are eliminated using a syringe. The needle must be taken according to the thickness of the glue - the thicker it is, the thicker the needle. The bubble is pierced in a circle, from the edges to the center, at an angle of about 30 degrees relative to the wall.
This pattern of punctures allows you to cover the entire loose surface of the wallpaper, as well as release excess adhesive mass through the punctures when smoothing the problem area. If large folds form, they need to be smoothed out. Small wrinkles will disappear on their own after the glue dries.
What to do if the wallpaper is see-through
The problem of translucent wallpaper after it has completely dried is solved in the only way - by redoing the work done. Therefore, at the preparatory stage it is necessary to try to avoid this headache:
- prime the walls with a special primer (as a last resort, whitewash them with water-based paint);
- buy thick trellises;
- check medium and thin wallpaper for transparency - place a piece of sheet on a bright spot and evaluate the degree of density.
How long does it take for wallpaper to dry?
No one will give a definite answer to this question. There are a lot of factors here. And the type of wallpaper, and the adhesive mass used, and the temperature conditions of the room, and air humidity, etc. The maximum delay is from 12 to 72 hours.
Duplex and paper-based non-woven wallpapers take the longest to dry - up to 3 days. Non-woven wallpaper on a different base (not paper) needs about a day to dry completely, vinyl wallpaper - about 48 hours.
Double-layer paper wallpaper.
You can determine the degree of drying of the pasted wall with your palm - pressing it against the wallpaper. If you feel warm - the wall is completely dry, there is a chill - you still need to wait. In passing, we note that it is strictly forbidden to speed up the drying process with heating devices.
How to glue meter-long wallpaper alone
The technique of gluing meter-long wallpaper alone does not have any special techniques that differ from the above instructions for gluing wallpaper.
Some tips from the professionals
Good quality work can be achieved if you take advice from specialists with extensive experience.
- Before starting work, the room where the work is planned is ventilated and then tightly closed for a day.
- It is better to dismantle the plinth - it can be easily removed (gluing the trellises will become faster and easier). In order not to look for the dowel holes under the wallpaper later, self-tapping screws are screwed back into them.
- It is better to cover the floor with cardboard or newsprint, but not with plastic film (on the film, glue easily gets under the wallpaper when coating the edges of the sheet, as a result of which it stains them).
- Use a stepladder. The table and trestles often leave marks on papered walls when moved to another location. In addition, it is more difficult to install the bottom of the wallpaper using them.
- Use specialized wallpaper glue - universal adhesive does not hold trellises on the wall well.
- Do not join the trellises at the corners - glue them with an overlap (1-2 cm), and then cut with a knife, forming a seam.
- Constantly dry (wash) your hands.
- Do not correct uneven cuts of wallpaper along the top and bottom of the walls. At the bottom, errors can be hidden with a plinth, at the top with a frieze or baguette.
How can you decorate slopes after installing windows?
When replacing windows, it is not possible to preserve the old wallpaper around the perimeter of the window opening in 99.99% of cases. Of course, you can try to save them. For most window companies, the standard solution for finishing the junction of a new slope panel and walls is gluing a 20 mm white plastic corner:
But as soon as you replace the banal corners with polyurethane foam moldings and platbands, the window will change significantly! Look:
Preparing the walls
So, the materials have been purchased, the tools have been prepared. Now you can get to work. We start by preparing the walls.
Removing old coating
If wallpaper was pasted on the walls, remove it. In order for old wallpaper to be easily removed, you need to wet it thoroughly. We take a rag or sponge in our hands and wet the wallpaper generously. You can use a special water sprayer - the kind you use to spray indoor plants or moisten clothes while ironing. Washable wallpaper needs to be cut a little so that moisture gets into the bottom layer. Attention: before removing old wallpaper with water, be sure to turn off the power so that moisture does not get into working sockets and switches.
After the wallpaper gets wet, carefully remove the old panels. For paper wallpaper, it only takes five minutes to peel off; for vinyl and non-woven fabric, a little more. If the wallpaper does not budge, scrape it off with a spatula, being careful not to damage the wall.
If the wall was painted with water-based paint or whitewashed with lime mortar, wash everything off with a weak soap solution. Oil-based paint can be removed using special solutions for removing old paint. They are sold in any construction supermarket. You can use coarse sandpaper and just scrape off the paint. If the paint does not come off, remove it with a spatula.
Leveling and preparing the wall
Even if you remove paint or wallpaper very carefully, the wall will have to be leveled and processed. Therefore, we remove the cracked plaster with a spatula. After this, we treat the wall with a primer solution and level it with putty or a special leveling mixture.
Primer is a useful thing. It not only promotes better adhesion of the leveling mixture to the wall, but also performs an antibacterial function: its composition usually includes substances that prevent the formation of mold and mildew. If the damage to the wall is significant, it makes sense to plaster it again - it’s cheaper than leveling it with putty.
After the putty or new plaster has dried, we treat the wall again with a primer or primer (a special solution based on PVA glue). We apply it to the wall with a roller or a wide brush, sparingly. On such a treated wall, the wallpaper will stick much stronger.
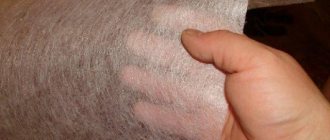
How to remove and stick WALLPAPER under an air conditioner?
Decorating a kitchen in black: beautiful ideas and tips
Put it away immediately: 10 things that don't belong on the kitchen countertop
50+ incredible kitchens in which the faucet became the main character
Are you a professional architect or designer?
IVD. Repair and finishing
Are you a professional architect or designer?
The IVD.ru website is a leading Internet project dedicated to the issues of reconstruction and interior design of residential premises. The main content of the site is the archive of the magazine “Ideas for Your Home” - exclusive author’s articles, high-quality illustrations, practical tips and lessons. A team of professionals is working on the project in close collaboration with famous designers, architects and leading publishing experts.
On our website you can choose comprehensive design solutions; view detailed reviews of the market for construction and finishing materials, furniture, machinery and equipment; compare your own ideas with design projects of leading architects; communicate directly with other readers and editors on the forum.
Sequence of work
Success, the speed of achieving results, depends on proper preparation for work. Purchase the necessary tools and available materials:
- Table for cutting and applying wallpaper glue.
- Step ladder.
- Clean container for glue.
- Grater with mesh for grinding.
- Sharp scissors, wallpaper knife with spare blades.
- Tape measure for measuring the length of panels and the height of walls.
- Level, wallpaper ruler.
- Wide wallpaper brush for applying glue.
- Painting fur, rubber roller for rolling wallpaper.
- Plastic spatula for wallpaper.
- Rags, sponge for removing excess glue.
- Hammer, insulating tape, pliers.