If you are planning to start wallpapering, you will most likely encounter some problems. After all, to understand how to glue wallpaper jointly or overlapping, you should know the rules and methods of gluing them. It is already clear that there are two methods of pasting - “overlapping” and “joint to joint”. Their main difference is the technology by which some “fit” onto each other, and the second fit tightly to each other.
Joining different types of wallpaper
With proper skill, you can avoid joints even on different types of wallpaper. To do this, it is important to consider the materials from which the wallpaper is made. Main types:
- vinyl sheets, which are often used for covering kitchens;
- more familiar paper wallpapers, which are often found in bedrooms and children's rooms;
- on a non-woven basis, they are great in any room, but are mainly used in bedrooms.
The moment of choosing glue should not be missed. There is an impressive number of its types; it is not a fact that a randomly chosen option will do. Therefore, it is important to ensure that the glue matches the wallpaper base material. Otherwise, there is a chance of running into wide seams or peeling wallpaper.
Due to the fact that when joining the joints are more likely to diverge, it is recommended to glue the wallpaper overlapping. But recently this method has faded into the background and is used only when gluing paper wallpaper. After all, the paper base is not as strong as the others and when joining, the seams may increase. While on vinyl or non-woven wallpaper, unevenness may appear that will interfere with the overall impression.
Where to start gluing wallpaper in a room with uneven corners: from the window or from the door
Every renovation in a house or apartment is accompanied by wallpapering. For a good result, it is not enough to select the material and the necessary tools. It is important to determine in advance where to start gluing wallpaper, learn about the options for landmarks and instructions from professionals on wall finishing.
Why is it important to decide where to start gluing wallpaper?
The starting point will become a reference point for the following fragments.
If the first piece comes out unevenly, the remaining pieces will be unsuccessful and the joints may not meet. It is worth familiarizing yourself with the places where you can start working and get a decent result. With joining materials, it is not critical to start covering from any place (preferably inconspicuous), but there is a likely risk of unevenness and alteration of the area.
Consistency plays an important role in repairs. Chaotic finishing will lead to inconsistencies.
Options for starting wallpapering
To ensure that the coating lays flat, without air bubbles and unevenness, evaluate the position of the room (lighting, openings, protrusions). In some rooms it is better to choose coverage from the center or corner of the wall.
From the window
Previously, the wide range was mainly for thin wallpaper, which was applied overlapping. To prevent shadows from appearing in the seams, it was customary to position the canvas away from the light, i.e. from the window. Another reason for pasting from a window opening was the straightness of the line, since doorways and corners were more likely to warp.
From the window, wallpaper can be glued in a circle or on both sides, placing the joint under it. Subtle variations are overlapped.
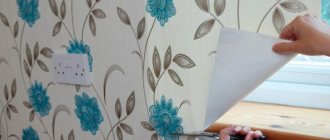
Properly glued wallpaper creates a single canvas. When the pattern does not match at the joint near the window, it is easily hidden behind the curtain.
From the door
Starting pasting from the doorway is suitable for a corridor, toilet or hallway, where there is a natural source of light and there are no other suitable landmarks.
Prints with patterns begin to be glued from the openings so that there is no need to adjust the pattern.
Irregularities are hidden behind the door.
Glue wallpaper in two directions or sequentially. To do this, mark a joint above it, and continue the repair in a circle.
From the corner
The most problematic and complex coating method. The problem with pasting from corners is the unevenness of the area. Method used:
- if there are no windows;
- the doors are warped;
- According to the plan, there are two types of wall coverings in the room.
You need to start gluing with a distance of 2-3 cm from the corner.
In two directions at once
If there are two doors or several windows in the hall, determining the landmark becomes a problem. In this case, choose a larger landmark and move in a circle.
The kitchen is papered using the same method.
The radiator is considered a hard-to-reach place for pasting. There are two ways to install fragments behind the battery:
- Remove the material and glue it carefully. To do this, turn off the water and drain the liquid. It is advisable to call a professional to avoid damaging anything.
- An alternative option is to glue the canvases one by one. The process will take no less time than removing the radiator, and it will be difficult to match the pattern.
Other landmarks
Thick wallpaper should only be glued end-to-end; it can be distributed from:
- arches or similar sized structures;
- inconspicuous areas;
- kitchen unit or under the radiator;
- far corner (the gaze is focused on a flat canvas);
- a corner located close to the balcony;
- far inner corner (trellises - vinyl).
How to properly start wallpapering a room with uneven corners
Uneven corners are a common problem in residential areas. It will not be possible to fix them without a builder. There are subtleties to visually eliminating a defect. Proper coating will save you from having to redo the wall covering for a long time.
It is not recommended to apply geometric wallpaper. On the contrary, they will highlight the shortcomings of the room. An alternative solution would be abstract types with increased density. It is better to replace smooth ones with textured ones with blurry patterns. Correct markings will help complete the repair successfully. It is important to take into account all the irregularities, holes for sockets and other details.
To apply the canvas without aligning the corners, you must adhere to the following order:
- Check the deviation of the angle from the straight line. Visually the line will be smooth, but you should not neglect the measurements. A crooked wall will cause the wallpaper to warp. The most accessible measurement method is a plumb line or building level. It is preferable to choose a longer tool. The most accurate result will be shown by a laser level. When gluing end-to-end, the starting point will be the doorway, when using a thin trellis - from the window. Vinyl and other dense fabric are distributed from the corner (the thicker the wallpaper, the more glue is required for fastening) with an overlap of 5-10 cm on the adjacent wall, cutting slots along this area in a herringbone pattern. This will ensure a tighter fit of the wallpaper.
- It is worth noting that non-woven variations can stretch and hide small depressions. The wall is first treated with glue. The first layer is a primer, the second is for fastening. After which the dry canvas is glued to the wall.
- Before starting to apply the fragment, apply a tape 15-20 cm wide or a painting mesh to correct the surface. In this case, the gaps formed by the slits will be hidden.
- Glue is applied to the wall and roll and allowed to dry.
- A bend strip corresponding to the angle is drawn on the incoming material. This part is cut off with a stationery knife, the joint is not noticeable.
- The second fragment is overlapped, the subsequent fragments are placed end-to-end.
Tips and tricks from experts
It’s not difficult to hang wallpaper yourself if you carefully familiarize yourself with the work to be done and prepare the necessary materials. To save effort and time, experienced craftsmen have prepared several tips.
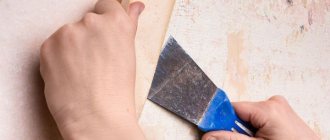
Wallpaper is glued for a long time, and there is no need to rush in this matter. If they are being remodeled, the old materials are removed, leaving bare walls. The material is moistened with water and scraped off with a spatula. When hot water does not cope, use a needle roller.
The clean wall is treated with antifungal agents and allowed to dry.
Remove the top layer from the painted wall using a drill with sandpaper or a chemical solution. Uneven places are leveled with putty (spotwise or entirely). The dried surface is treated with sandpaper and any remaining dust is removed.
Remove furniture from the room so that nothing restricts movement. The walls must be empty. Turn off the electricity, unscrew the sockets and switches. You need to stick wallpaper on the holes. When finished, carefully cut out the connectors and screw them back.
Pasting can begin from the corner. The fragment is placed a few centimeters from this zone. Starting work in a corner is only permissible using bright materials. They hide imperfections and visually expand the space. When finishing a door or window, it is recommended to first pay attention to the walls above and below the window, as well as above the doors. To glue the non-woven fabric, you need at least two people. Friends or relatives will help speed up the process and accurately carry out the planned repairs, since heavy rolls must be controlled along their entire length.
Rules for quality gluing
To obtain the expected result, it is worth considering a small list of basic rules for gluing wallpaper so that the joints are not visible.
- To simplify the further procedure and save material, this type of work should start from a corner, the beginning of a window or doorway.
- The adhesive must be applied in accordance with the selected material. When you need to process a canvas, it is advisable to start from the middle.
- When working with alignment in a crooked corner, the strips must be glued with an overlap; it should be around 10–20 mm. But it is better to avoid any joining in the corners of the room.
- If you have a problem with peeling corners, you should coat them separately with stronger glue.
- If the seams are visible to the naked eye, then you should not focus on smoothing them out; ironically, this can cause the formation of new defects.
After applying these rules, the joints will not only remain invisible, but will also serve as a decorative element.
Gluing the joint of non-woven wallpaper
Non-woven coverings are best glued level. Non-woven fabric is very convenient to use, since it does not stretch or swell. To make the coating look beautiful, the strips need to be glued level, after drawing lines on the wall.
Special attention is paid to the corners, each strip should fit 10-15 mm into the corner, the next strip is glued overlapping.
If folds appear, they will need to be cut and the air removed, after which you can inject a little glue with a syringe and smooth the wallpaper with a roller. For external corners, the sheets are glued with an overlap of approximately 25 mm.
Various customization options
If there is a pattern on the wallpaper, then you should be prepared to match it when applying it to the walls. There are several ways to match wallpaper and adjust the pattern.
Direct docking
For the convenience of gluing wallpaper using this method, it is important to correctly calculate the length of the strips for further adjustment. This is done according to the following algorithm:
- The wall is measured in length and height. We record the results obtained, for example, the width of the wall is exactly 4 m, and the distance from floor to ceiling is 2.5 m.
- We measure the repeat (repetition of the pattern on the wallpaper sheet), let’s say it is 54 cm, given the length of the roll is 10 m, and the width is 53 cm.
- Now you need to calculate a number that is a multiple of the rapport (in our case 54 cm) and as close as possible to the height of the wall (in our case 2.5 m). To obtain this number, the possible value of the rapport number is determined at which all parameters will be met.
- As a result, if the step is four (4*54), the full cut will be 2.16 meters. This value is not enough for a given ceiling height of 2.5 m. Therefore, we increase the step to 5 (5 * 54), and this number is already suitable, it will be 2.7 m.
- Having calculated from the length of the roll (10-2.7 * 3) we find that 3 whole strips can be used for further use.
In this work, the first tape plays a very important role. After all, if you glue it crookedly, in the future the joints of the wallpaper will go at an angle and the whole picture will deteriorate. To prevent this, a plumb line is often used, which can serve as an accurate guide for evenly gluing both the first strip and the next ones. This measure, although optional, is recommended, because neglecting this little detail increases the risk of beveled blades.
It is necessary to glue the first strip so that the selected edge is the beginning of the pattern. The glue should be applied evenly and uniformly to avoid unnecessary drips. If suddenly the glue is squeezed out at the joints, then it must be promptly removed.
Offset docking
With this method of gluing the joints of wallpaper, the pattern shifts along the second strip. It turns out that with the indicated shift of ½, the repeat length will be 2 times less than the original value. Consequently, a drawing 54 cm long will be reduced to 27 cm.
The pattern is adjusted so that every second strip is 2 times smaller than the first (in our case, 27 cm). But the multiplicity of the pattern in height is now determined to be 54 cm for the first, third and remaining odd stripes, and 27 cm for the second, fourth and subsequent even stripes.
Free docking
This gluing method will help you properly glue the wallpaper end-to-end and reduce material loss to a minimum. But it should only be used for canvases with small and symmetrical designs. Of course, it is worth calculating the length and height of the walls, but adjusting the design is no longer required, which saves resources and effort.
Counter joining method
This method is often used to simplify work. After all, as a result, the seam will not increase and the canvases will fit tightly to each other. To do this, the wallpaper is laid overlapping, and after adjusting the pattern, it is cut at the border in a straight line.
What is direct joining of wallpaper and when you can’t do without it
Direct joining of wallpaper is one of the main methods of gluing. It requires a lot of preparation and skills from a person, because you will have to connect the drawings as closely as possible so that the transitions from one element to another are not noticeable. This article will discuss what direct docking is and when it is needed.
According to statistics, approximately every third beginner asks the same question when it comes to gluing rolled trim: what is direct joining, and how to do it. If you ask the opinion of any expert, he will say that the process is difficult due to the fact that it is necessary to achieve a seamless fusion of parts.
The two canvases are superimposed closely (if the vertical plane allows). Moreover, all builders pay due attention to the uniformity of the seam: it must not contain gaps, it must be uniform and identical throughout its entire length. Construction life hack: many people use strips made of paper 4-5 centimeters wide. This solution improves the quality of the seam.
Sales consultants are asked the question about direct docking so often that some companies have already created ready-made layouts to answer this phrase. However, in reality everything is simple. It is enough to pay attention to those cases when there is a need for this type of wallpaper.
Direct joining is necessary when it is necessary to paste wallpaper with the same pattern, each new canvas of which is a continuation of the pattern. For example, any geometric pattern that does not end on 1 “sheet” and requires continuation on the next one and so on.
If we talk about how direct docking is designated, the following designation was invented: →¦←. There is also a number that shows after how many centimeters the pattern will be repeated. Let's say 60. This means that every 60 centimeters the pattern will be repeated. For example, if the ceilings are 3.2 meters high, then you will need to cut 3.6 meters of wallpaper, 40 cm of which will be thrown away, otherwise the pattern will not match.
The issue with width is also resolved: the total length and width of the room are measured. Then each of the indicators is divided into a repetition of the figure. Then it is rounded up (i.e., even if it turns out to be 7.1, you will need 8). Thus, the total number of rolls of wallpaper required for direct joining is calculated.
How to fix joints on wallpaper after gluing
If after work the joints are still visible, you need to know how to fix these joints on the wallpaper after an unsuccessful attempt. There are several options for this.
- Firstly, you can try to remove the defect using grout, matching it to the color of the wallpaper. And this would be a convenient method of struggle, but this cannot be done without painting the wallpaper itself, so this method is rarely used.
- Secondly, you can simply re-glue the edges of the wallpaper. But this task is quite difficult, because you often need to re-glue the edges of each tape, which requires a lot of time and patience. To begin with, you should wet the edges, and after softening them, pull them together, treating the joint with glue.
- Thirdly, if possible, try to remove the top layer from the remaining wallpaper. Soak these residues with glue and seal the seams. For a better effect, you can change their color and tone with crayons or pencils.
- The fourth option is a method in which the layer is not removed from the residues, and they are glued in small pieces to the gaps. The difficulty in this case will be matching the drawing.
As a last resort, moldings or special panels should be installed at the joints. Not only will this remove unnecessary white space, but it can also enhance the look of the room. In addition, there is an easier option - installing paper borders.
Features of butt wallpapering
This method of joining fabrics is one of the most difficult and in some situations requires some experience. In its absence, you need to practice.
Peculiarities:
- The advantage of such joining is the ability to obtain a uniform coating that will not have visible seams. This imposes certain restrictions on the gluing process: it is necessary to eliminate the smallest gaps and excess glue.
- In addition to smoothing tools (different devices are used for different types of wallpaper), a rubber roller with a soft roller is used.
Rolling seams with a roller gives good results when wallpapering end-to-end - Great importance is attached to the preparation of the walls. They must be smooth and free of defects. If work is carried out on geometrically complex surfaces, then end-to-end fitting will require much more time.
- Any violations of technology and the choice of unsuitable material lead to the appearance of gaps or peeling at the joints.
It is necessary to glue wallpaper in this way while strictly observing the optimal temperature and humidity levels. Drafts and the use of heating equipment should be avoided.