If you notice that a little water has appeared around the base of the toilet, this is not yet a cause for alarm. But if water appears regularly after flushing and even forms small puddles, then your toilet is leaking. Even if the toilet is high-quality and expensive, no one is immune from such a nuisance. A leak at the base of the toilet is not serious and difficult to fix. If you don't know a good plumber or are afraid that the plumber will charge too much for his work, try fixing the problem yourself. This does not require expensive equipment or special skills.
External damage
Violation of tightness. If the toilet is installed on cement mortar, then in the place where it is connected to the sewer pipe, the cement crumbles, cracks appear and it begins to leak. Sometimes this occurs because the toilet was used shortly after it was installed. It is not recommended to use the toilet for 24 hours after installation. Clean the joint area from old cement. Do this with a screwdriver, chisel or knife. Prepare a new solution by mixing cement and silicone-based sealant. Do not add sand to cement. Leave for a day until completely dry.
The first signs of water leakage
The flush function involves the long-term or short-term flow of water into the toilet bowl in order to cleanse it of waste products. The process begins by pressing the button built into the tank and ends arbitrarily or by pressing it a second time.
Instead of a button, there may be a lever or a handle on a chain, like retro models, but such options are extremely rare.
By pressing the button we control the drain valve. It is connected to a locking mechanism, which, upon completion of the drainage, opens the way for a new portion of water to enter from the cold water system. Thus, flushing occurs only at the request of the user.
If water flows into the toilet after flushing or, even worse, constantly flows in a thin stream, it’s time to check the tank’s fittings - one of the parts has failed.
There are two ways to solve the problem: on your own, by trying to understand the structure of the trigger mechanism, or with the help of qualified specialists - plumbers
But first you need to determine that there is indeed a leak.
Signs of improper drain operation include the following factors:
- constant or periodically appearing characteristic sound of rushing water;
- rusty and limestone stains at the water outlet;
- a constantly wet inner wall of the toilet, close to the cistern, even if the toilet has not been used for a long time;
- an unusually long and weak flushing process - a salvo discharge is considered the norm;
- the appearance of condensate on the pipes and tank, which never existed.
The last symptom is associated with the constant movement of cold water through the pipe, whereas under normal conditions the water is used periodically and has time to warm up to room temperature before it is drained.
If you notice a rusty track or yellowish stains that are difficult to wash off in the water drainage area, you should not stop at just cleaning - you must definitely inspect the tank
Sometimes the cause of leaks lies in the dirt that has accumulated at the bottom of the water tank. In this case, it is enough to thoroughly clean the internal surfaces of the tank. To do this, drain and turn off the water, carefully remove the fittings and, using a brush and cleaning agents, remove the sediment accumulated on the bottom and walls.
If operational cleaning does not help, you will have to become familiar with the design of the drain mechanism.
Crack in the base of the toilet
It often happens when a large amount of boiling water is suddenly poured into the toilet. Earthenware cannot withstand sudden changes in temperature and bursts. Two holes are drilled at the ends of the crack. The crack and holes are cleaned with sandpaper to remove irregularities and burrs. Apply epoxy resin to the leak site. Do not use the toilet until the epoxy resin is completely dry. If the epoxy resin does not help, then you need to replace the toilet with a new one.
Preventive measures against leakage
To prevent a leak in the toilet from occurring at the most inopportune moment, it is worth monitoring the condition of the tank fittings and regularly carrying out preventive measures.
The main and at the same time the simplest thing is to clean all parts, as well as the internal surfaces of the tank. Upon careful examination, you will notice that even in a short time the walls and bottom are covered with a red coating, mineral deposits and even a substance similar to silt. The composition of contaminants depends on the quality of the water.
To minimize the entry of various contaminants into the tank, the internal wiring must be equipped with filters. They are installed on the cold water supply next to the riser
From time to time it is advisable to check the condition of the sealing elements, fasteners and parts that are located at the joints in order to anticipate the occurrence of a strong leak. A small amount of moisture indicates that the connection is leaking. Accordingly, you need to tighten the nuts or replace the seal.
Timely minor repairs and regular cleaning will save you from leaking water into the toilet, and therefore from unnecessary costs. An important factor that ensures saving water, clogging and breakdowns is the correct setting of the fittings, the specifics of which we recommend that you familiarize yourself with.
The cuff or corrugation is worn out
The rubber gasket became less elastic over time and cracked. To fix the problem, you need to remove the toilet from the base. Remove the old cuff. Install a new cuff on the sealant. If it is not possible to buy a new gasket, then the old gasket is bent upward around the circumference and sealant is thickly applied into the resulting space. Most problems can be solved with sealant, glue or a new gasket. In the most severe cases, you need to buy a new toilet and call a specialist to install it.
We disassemble the tank device
There are several common reinforcement designs that can be called standard. Among them is an outdated type of drainage device with a rubber bulb, assembled according to the simplest scheme and suitable for tanks with side connections.
This is a rare phenomenon, uncharacteristic of modern models. Let us turn to the current type of fittings, consisting of two modules: drain and float.
The float on a thick metal wire was improved and turned into a more complex structure that shuts off the water supply not from the side, as before, but from below, although side models are occasionally found. The position of the float from them is adjustable, so you can dose a portion of the drained water.
Scheme of fittings. The drain is started by moving a button that is connected to the trigger. When water leaves the tank, the inlet valve opens until the required volume is reached.
Due to the similarity of the fitting models, it is easy to replace the entire structure or change individual parts: the drain float mechanism, the drain lever.
To understand how each element works individually, you can disassemble the model installed in the tank. Of course, before this you need to take safety precautions: shut off the flow of water to the riser or supply line and empty the tank.
All parts can be unscrewed manually or using a set of keys. There are almost no metal parts; instead, only plastic elements have long been used. They are quite durable, do not deform when interacting with hard water, do not rust, and are easy to clean with household chemicals.
In addition to the fixed parts, which are secured with bolts and rubber or plastic seals, there are parts that can be adjusted - the so-called sliders. They can be recognized by small divisions and notches
The sizes and colors of parts from different manufacturers may differ, but the operating principle is absolutely the same. Therefore, if the seal is worn out and a trickle of water constantly leaks from the tank into the toilet bowl, it is not difficult to find a replacement.
To be sure, you can measure the diameter of the ring or simply show the old gasket to the seller.
What to do?
Once the cause of the toilet leak has been identified, you can proceed to repairs. If the problem turns out to be insulation, you need to purchase a new gasket. It is important to indicate the exact design model in order to select the most suitable option.
Next you need to proceed according to the following algorithm:
- Shut off the water supply.
- Drain the liquid from the reservoir.
- Loosen the nut that should be at the location of the drain hatch. There will be a few more nuts that unscrew.
- Remove the tank along with the drain.
- Replace the gasket. It's quite simple - the old one is removed and the new one is put in its place.
- Reassemble the structure in reverse order.
- If the problem is rusty bolts, do the same work, but you don’t need to touch the gasket. The fasteners will have to be replaced. In this case, we should not forget about the need to install sealing washers under each bolt.
In some cases, the problem is only in poorly tightened fasteners. If you tighten the bolts with a wrench, the water leak between the tank and the toilet should disappear.
Video explanation of why water does not fill the toilet tank
It can be difficult for a person who has never dealt with plumbing work before to figure out what’s what. You need to understand how everything should work and why it doesn’t work out that way, that without professional knowledge it can be difficult and for some, in fact, it’s easier to call a real master than to suffer yourself. For those who really decided to study the issue and solve all the problems with the tank on their own, you are invited to watch the video below, where everything is quite accessible and simply explained, and is also shown with examples.
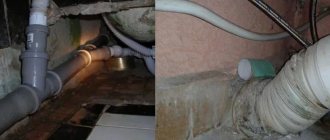
Leaking corrugations on the toilet
- There is no rubber sealing ring - it is either worn out and does not perform its functions, or they simply forgot to install it when installing the bowl. Once you add this part, the toilet will function normally.
- A crack in the corrugation itself. Only replacing the part with a new one will help here.
- No transition cuff. This reason only applies to toilets connected to cast iron sewer pipes. Without an adapter, it will not be possible to achieve a high degree of sealing, which is a prerequisite for installing a toilet. To do everything efficiently, place the adapter cuff on silicone sealant and coat all joints with it.
Repair methods
Float misalignment
Repair should be carried out after the source due to which the liquid is not flowing has been identified. If the liquid does not concentrate in the right place due to the skew of the float, then it is easy to correct this circumstance: it is enough to slightly adjust the displacer so that it takes its previous position.
Damage to the supply hose
If a person thinks that the etiology of the malfunction is damage to the supply tube, he should check this hypothesis. To do this, disconnect the hose , place it in any container (for example, a bucket) and turn on the water.
If the liquid does not flow out , then the fault is really in the tube. To correct the situation, you should buy a new hose, which then needs to be installed.
Valve clogged
If you suspect that the toilet tank is not receiving water due to a blockage, it is important to first turn off the water supply and then remove the hose connecting the tank to the water supply system. Then check the water supply through the tube . If it doesn’t flow, then the problem is a blockage in the place where the hose connects to the drainage device.
After the volume of water has been maintained and the flow has improved, it is necessary to open and close the valve 2 more times . This is to ensure that any remaining debris is completely removed from the valve. Then the valve needs to be assembled open with the valve closed. The final stage is to open the water supply tap and adjust its level by bending the lever.
Blockage in the drain
- First, you should look under the pear . And if the clog problem is there, remove the debris with your hands.
- If a foreign body gets into the drain, you need to use tweezers and try to remove the obstruction .
- If it is not possible to remove the blockage through the tank, the device must be disassembled .
Deposits on the walls of the drainage device can be removed using a special chemical , which can be easily purchased in stores that sell plumbing fixtures. When the drain has been safely cleaned, you need to assemble the device and install it in its original place.
Other cases
If the liquid concentrates slowly due to the fact that the parts were tightly twisted , then it will be enough for a person to solve this issue by loosening the parts.
A common factor that causes the cistern to not fill with water is that the inlet valve was bad to begin with. Then, regardless of whether it is a side or bottom supply, plaque and mucus may form on the float due to the quality of the water . Eventually the float stops working. Then you need to remove it from the rod and wipe it thoroughly.
If the toilet tank lasts quite a long time, then it happens that the release valve mechanism has simply worn out . In this case, you need to buy a new valve and install it in the device.
Possible consequences
If a person neglects to repair the drainage device and does not look for the reason why water does not flow, this will not end well. In addition to the fact that the owner will damage the equipment of his toilet room, he can also damage the bathroom of the neighbors below.
Also, a person who ignores the problem when the water flows too slowly may one day encounter the fact that the liquid will stop collecting altogether . Then he will have to wash off the contents with a bucket, which is an inconvenient and sad idea.
If the person does not do anything after this, then soon she will have to purchase a new mechanism and install a new device. This, of course, will take not only money, but also time.
What do you think of this article?
Leaks are the most common causes
The procedure depends on the cause of the water leak. Here is a list of the most common leak locations:
- The joint between the inlet fitting and the flexible hose.
- The connection point between the drain tank and the inlet fittings (place where the plug is installed). For compact toilets - the junction of the bowl and the tank.
- The connection between the sewer pipe and the toilet.
- Presence of microcracks on the bowl.
- Violations of the integrity of the toilet (transportation or production).
Water quality problem
Poor quality of tap water can also cause problems with filling the tank. Small debris and particles, and against this background the formation of plaque on parts, will constantly clog the filter and individual components of the device. Installing an additional filter will be the only right solution, or get ready to regularly monitor the cleanliness of the toilet tank.
Important: by neglecting preventive maintenance, repairing the toilet cistern, saving on replacing faulty parts and calling a plumber, you can create a situation with flooding of the neighbors below.
To summarize, we can draw the following conclusions: the design of the toilet tank is quite simple, and any malfunction can be easily corrected yourself. In this way, you will not only save your family budget and avoid unplanned expenses, but also learn how to carry out preventative and repair work. Follow new articles and be the first to receive useful information. See you again and good luck!
The tank is leaking where the bolts are attached
Manufacturers equip the mounting points with rubber or plastic washers. They prevent leakage through the mounting holes. During use, under the influence of mechanical influences, the elements become loose, and liquid begins to seep under the rubber washers.
You can fix the problem yourself. The fasteners are tightened with great effort. If after this the holes are not sealed, the fasteners will need to be dismantled.
To do this, empty the tank and unscrew the threaded connections. After dismantling, inspect the rubber and plastic washers for damage. Worn components are replaced with new ones. During installation, take into account the tightening torque of threaded connections.
If necessary, clean the mounting holes from plaque and dirt. The presence of roughness on the surface prevents the seal from fitting tightly.
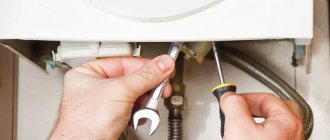
Required tools and materials
If your plumbing is leaking, you must turn off the water before making any repairs. Due to the fact that the liquid is supplied to the system under pressure, in the process of troubleshooting we can flood the premises. For repairs you will need the following tools:
- sealant suitable for plumbing fixtures;
- sandpaper;
- screwdriver;
- burlap, twine or tow;
- hammer;
- knife;
- pliers;
- If it is necessary to replace a component, a working part of a certain type will be required.
When the necessary tools have been collected, you can begin to carry out repair work.
Repairing leaks
Depending on the identified cause of the toilet leak after flushing, they begin to eliminate the problem in an appropriate way.
Troubleshooting pear and petal problems
Most often, after lifting the lid, a weak fit of the pear is discovered due to the loss of elasticity of its walls. The problem is eliminated by replacing the deformed pear with a new one.
Seat corrosion causes partial seating. In this case, the part is removed, all the screws and fastening elements of the lever are tightened, the corrosion is removed with sandpaper, and it is installed in place.
It is recommended to inspect the petal as well. Plaque appears on it from prolonged use. The petal and seat are cleaned.
Adjusting the float position
An incorrect position of the float will be noticed immediately after removing the reservoir cap. If, regardless of the water level in the container, the position of the float does not change, then its position must be adjusted. The rubber seals are immediately inspected. If you correctly set the float to the required height, leakage problems will be eliminated.
Adjusting the ball valve (liquid flows through the overflow)
When liquid is poured out through the overflow, the conclusion suggests itself after inspecting the container of the tank that the correct operation of the ball valve is impaired. Its operation is adjusted by bending the float lever. Any liquid that has got inside the float must be poured out and the part must be put back in its place. The deformed part must be replaced.
The design of the ball valve has a rubber gasket, which can also cause failure. It wouldn't be a bad idea to check it out.
If the reason is in the ball valve itself, then no matter what model it is, it is recommended to make the float position lower. Adjustment is made with a plastic pin. Sometimes cleaning the faucet helps fix the problem. Or the last option: the part is replaced with a new one.
Problem between the cistern and the toilet platform
Where the tank is installed, water leaks onto the toilet platform in 2 cases:
- if the connection bolts have become loose or the gasket under the nut has become unusable. Water is drained from the tank. The water supply is cut off. Bolts and nuts are inspected for integrity and absence of rust. The degree of wear of the gasket is assessed. You may need a new set of fasteners to install it. Rubber gaskets are lubricated with sealant to enhance the tightness of the connections;
- when the gasket, which is responsible for sealing the joint between the tank and the toilet platform, has worn out, and the protection of earthenware parts from abrasion has decreased. The liquid flows into the gap that appears, which was formed when one of the contact parts shifted or as a result of abrasion of the gasket. The entire gasket is lubricated with sealant to enhance the adhesion of the tank to the toilet shelf. The connecting bolts should not be tightened too much. This leads to deformation of the elastic band. Its service life is reduced.
What to do to prevent the tank from overfilling and stop leaking
What to do if you want to prevent the problem from occurring? The following factors need to be kept in mind:
- Installation of the device is best left to professionals. They will install the toilet correctly and secure all the bolts straight, without bevels or stripping the threads.
- Do not apply strong pressure, displace or loosen it.
- Handle the lever and drain button carefully: do not pull, bend, or hit (this can lead to internal damage).
- Resolve minor problems that arise in a timely manner.
- Replace consumables (bolts and nuts, gaskets, float, bulb and other mechanisms) in a timely manner.
- Adjust the water supply to the tank (so that it is not excessive).
- Monitor changes in the tank and under the toilet lid (water deposits; increased cold water bills; the appearance of drops or condensation on the tank and near the toilet; other similar problems).
Repairing a leak in the cistern is quite doable. Most breakdowns occur with the internal mechanism of the tank.
The diagram shows the internal mechanism of the tank
Replacing any part occurs intuitively, because all components are visible and can be easily unscrewed and removed.
During repairs, it is necessary to shut off the water supply! If the essence of the problem is not clear or fixing it is impossible for you, you should immediately call a plumber. He will quickly identify the breakdown and fix it.
Sources:
- https://sovet-ingenera.com/santeh/unitaz/techet-unitaz-posle-smyva.html
- https://TrubaNet.ru/kanalizacionnye-truby/protekaet-bachok-unitaza.html
- https://vannayaa.ru/unitaz-bide/techet-unitaz-posle-smyva.html
- https://UnitazGid.ru/ustrojstvo-i-remont/unitaz-podtekaet-snizu-chto-delat.html
- https://kachestvolife.club/o-chistote/santehnika/chto-delat-esli-techet-unitaz-i-voda-postoyanno-stekaet-v-chashu
- https://PostWater.ru
- 1
Constant leakage
A small stream of water that constantly flows along the back wall of the toilet is a clear sign indicating the need for immediate repair of the system. If the water in the toilet does not flow very intensively, then at first you may not notice it. In this case, you should pay attention to an indirect sign, expressed in the form of rusty sediment on the toilet. Rust and plaque appear if the water supply is not equipped with filters that clean the water from various impurities.
The first step is to understand why water is flowing in the toilet. Of course, the toilet bowl and errors made during its installation are excluded - in this case, the problems would look completely different. Water can only flow due to a malfunction in the tank, and that’s what needs to be dealt with.
The technology for checking the tank consists of the following steps:
- First you need to remove the tank lid and carefully inspect its working elements - perhaps a “weak” area will be noticed even during a visual inspection;
- If the inspection was not enough, then you will have to completely disassemble the tank, and this process begins by shutting off the water main;
- Next you need to unscrew the drain button and remove the tank lid;
- After this, you can sequentially remove all internal mechanisms;
- If it is impossible to remove the flush mechanism, you will first have to dismantle the tank itself by unscrewing the fastening screws located under the toilet shelf.
This technology is relevant for any models of tanks, so it can always be used for repairs. However, before this you need to understand exactly why the toilet is leaking.