Where to start renovating a bathroom? It is considered a fairly common question today. After all, here you will encounter many difficulties: dismantling work, installing plumbing, tiling, installation of equipment. And the consequences of all the shortcomings can be disastrous, from flying tiles to flooding of neighbors below. Therefore, in order for such situations to pass us by, it is important to strictly follow the sequence of all actions when renovating a bathroom with your own hands.
Bathroom interior design
The design of the bathroom interior is done at the initial stage and requires special attention to every detail.
- Decide what building materials will be used for finishing. Typically, moisture-repellent products are used in this area; these can be tiles, plastic panels or porcelain stoneware.
- Inspect the plumbing fixtures for wear and tear and, if necessary, select a suitable replacement option.
- Take measurements of the bathroom to determine the free area of the room. This will allow you to draw up a detailed plan for the location of plumbing fixtures and other auxiliary equipment (bathtub, sink and household appliances).
Bathroom interior (video)
Important! When measuring a bathroom, you should take into account that after plastering the walls and finishing with facing material, the parameters of the room will decrease. This may affect the further placement of devices.
Installation of lockers. Step-by-step instruction
It is advisable to install cabinets in the toilet room. Here you can store various toilet cleaners, toilet paper, air fresheners and other household supplies. To install lockers you will need:
- Drill holes in the wall (if this is the fastening method).
- Hang cabinets (or place them on the floor).
- Adjust the location. The doors need to be easy to open. If they open with difficulty, this indicates a crooked installation.
If you plan not to buy a cabinet, but to assemble it yourself, then measurements are first taken, after which a sketch is drawn up. Then the materials and tools for installation are prepared and the guide discussed above is used.
Bathroom dismantling
Dismantling a bathroom involves the following types of work:
- Removing the door frame. It is recommended that this event be carried out first, since a free doorway will facilitate all further actions related to the renovation of the bathroom.
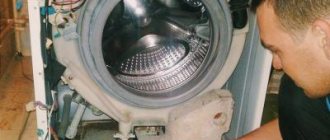
- Dismantling of plumbing. Make sure that the water supply and sewerage system are closed and begin dismantling the equipment. Even if the plumbing fixtures and all components do not require replacement, they must be removed and removed from the premises during repair work.
- Removal of the finishing coating. Using a hammer drill, remove ceramic tiles and loose plaster. Also, if there is a need to combine a bathroom and a toilet, you can dismantle the partition using a hammer drill.
Installation of sewer pipes and water supply. Step-by-step instruction
To install water supply and sewerage pipes, a wiring diagram is first developed. You can watch various video instructions available on the Internet. You can choose a ready-made project or create one yourself. The following are the instructions:
- The sketch is carefully worked out in full accordance with the dimensions of the room.
- Choose the method of placing pipes (hidden or open). Recently, mainly the first option has been considered, because it allows you to maintain the aesthetics of the room.
- They purchase materials.
- Installing pipes. If modern communications are used, there will be no problems with installation, since they are installed without the use of special tools. If these are old-style metal or plastic pipes, it is better to hire specialists.
Rough wall finishing
Rough finishing of the walls is done using plaster or moisture-resistant plasterboard. The second option is a more modern method and has a number of advantages:
- Firstly, moisture-resistant drywall interacts well with any finishing materials.
- Secondly, when finishing walls with plasterboard, a frame is created under which electrical wiring can be placed.
The disadvantage of using drywall is that it takes up a large amount of usable space in the room. And if you take into account the fact that the bathroom is not particularly rich in free space, then you should especially think about the use of this material.
Laying communications
What is she? Where to start repairing a toilet in a new building, when reconstruction is not needed, but only bringing the room back to normal? In this case, you will not need to prepare anything in advance, since the working surface is already suitable for finishing.
The first step is to connect water supply and sewerage, as well as electrical wiring to the toilet installation site. Without this, the bathroom simply will not be able to function. If you live in a panel house, which is most often built today, then the restroom will already have risers for hot and cold water. To minimize physical and financial costs, this is where it is best to install a distribution unit. To give the room a more aesthetic and attractive appearance, all pipes are hidden in a special box.
If you don’t know where to start renovating a toilet, then just follow the following sequence:
- The first step is to install the toilet and connect it to the drain riser. For this, a corrugated plastic pipe is usually used, laid at a slight angle.
- Next, the riser is connected directly to the sewer drain using the same pipe, which is connected at a slope of about two centimeters per linear meter. Clamps are used for fixation.
- A tee is inserted into the riser responsible for supplying cold water, through which water is supplied to the drain tank. If you want your bathroom to have a sink for washing hands, then immediately make separate outlets for hot and cold water. It is best to use hidden installation so that they are not visible.
- If the heating of water for the bathroom will be carried out using a water heater located in the toilet, then immediately make the piping to connect it.
- Electrical wiring should be laid exclusively in grooves. In this case, the cable is placed in a special corrugated box, which eliminates the possibility of mechanical damage and short circuit.
- The risers are hidden in special boxes, the frame of which can be made of a wooden beam impregnated with an antiseptic solution, or a metal profile. Then it is sheathed at the final stage of repair with finishing material, for example, clapboard.
This, in fact, is the entire sequence of repairs in the toilet, which occurs at the initial stage. Next, further work will be described in detail and tips will be given that will help you deal with everything much easier.
Leveling the floor in the bathroom
Leveling the floor in the bathroom is not a complicated process that can be done in several ways:
- Self-leveling screed. Ready-made dry mixture based on gypsum and cement is sold in any hardware store. No special skills are required to work with this material. It is enough to pour the prepared solution over the floor and spread it evenly using a roller.
- Cement screed. The most reliable and widespread method, where the main materials are water, sand and cement.
- Semi-dry screed. Based on a sand-cement mixture with the addition of fiber fiber components. A feature of semi-dry screed is the use of a minimum amount of water when preparing the consistency.
Important! The floor is leveled with a screed, and you should not rely on tile adhesive. After all, it is applied in a thin layer, so it will not correct unevenness on the surface.
What does “Budget Option” mean?
The budget option for renovation always puts cost savings first. Repair of economy class bathrooms and toilets is based on the following three pillars:
- Doing all the work yourself . The entire process can be easily completed independently, thus significantly reducing costs. But for overly complex work, it’s better to hire professionals.
- Economical materials . Today, stores are able to offer their customers an economical option for a wide variety of finishing materials. They are designed for buyers with different income levels and allow you to quickly make interesting, cheap bathroom renovations.
- Having your own tool . For such work, it is important to have your own tool for all procedures performed.
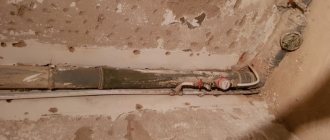
Waterproofing the bathroom floor
Waterproofing the bathroom floor is a necessary step. This material is applied in several stages:
- Before pouring the screed, the base of the floor is covered with a layer of waterproofing. This is necessary so that excess moisture from the solution does not leak to the neighbors below.
- To prevent water from penetrating through microcracks in the tile joints, the surface of the screed is also covered with a layer of waterproofing. This protection will prevent the formation of mold and mildew.
Waterproofing a bathroom floor (video)
In the bathroom, impregnating waterproofing is usually used, which is used to treat the floor and the lower part of the wall.
Toilet installation. Step-by-step instruction
Experts do not recommend installing the toilet yourself, especially if it is a complex wall-mounted plumbing device. To do this, it is better to hire specialists who are well versed in the matter, as well as use professional tools. If you have to install it yourself, follow the instructions:
- Preparing the toilet and materials
- Removing an old toilet
- Assembling the toilet structure in the right place
- Connection to sewerage
- Water connection
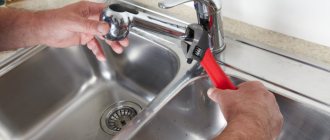
Installation of water supply and sewerage networks
Installation of water supply and sewerage networks is carried out after rough finishing of the walls and leveling of the floor. This work requires certain knowledge, and if you are not confident in your abilities, you should use the services of masters.
But in any case, whether you carry out the installation yourself or use the services of specialists, you must adhere to a number of rules:
- Don't skimp on pipes and components. For water supply, it is better to purchase pipes made of cross-linked polyethylene. They can be bent during installation, which reduces the number of butt joints. Particular attention should be paid to this if the water supply system will be covered with finishing.
- Install a fine and coarse filter. Thanks to them, all impurities from large and small particles will be captured. This will extend the service life of all plumbing elements, and purified water will flow from the tap.
- Make sure that the crimping of the pipes is done efficiently. To do this, test the assembled system under high water pressure. This procedure is necessary to identify weak points in pipe joints.
- Provide access to pipes. No one is immune from leaks in the water supply system, even if you use the highest quality material. Therefore, in order not to dismantle the finishing coating in an emergency, it is necessary to make special plumbing hatches. Thanks to them, you will always have access to pipeline joints.
Installing a box on sewer pipes in a toilet. Hiding the pipes
To install the box, you can use ready-made options on the construction market, or make it yourself. If you plan to work independently, you must:
- Draw up a project, take measurements and draw a sketch.
- Buy the required amount of materials.
- Assemble the box. Tools may be required, but fasteners are a must.
Next, you need to install the box and secure it to the wall. If you plan to install a wall-hung toilet, then you will not need to hide the pipes separately; in this case, the tank and other plumbing communications will be initially closed behind the wall.
If you purchase a box, you need to buy a model that fits the size, then mount it on the wall.
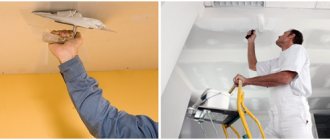
Installation of electrical wiring in the bathroom
Installation of electrical wiring in the bathroom is carried out before the finishing of the room is completed. To do this, mark the locations of sockets and electrical wiring with a marker. After that, using a hammer drill, we make grooves in the marked places where the cable will be laid in the future.
Since the bathroom contains high humidity, a number of rules should be followed during installation of electrical wiring:
- All electrical appliances and sockets must be provided with grounding.
- Connecting sockets and lighting elements should be done after completion of the repair.
- The entire electrical wiring system, including switches and sockets, must be protected from moisture.
Installing sockets in the bathroom (video)
Important! Do not install sockets close to faucets or the floor. These are the most unsafe places to place batteries in the bathroom.
Price issue
If you have read this far, then you are no longer worried about starting a toilet renovation. However, we still need to talk in detail about how much it will cost to decorate the interior of a restroom. It’s worth noting right away that by doing everything yourself, you save a decent amount of money, but you will still have to spend money, since these days construction and finishing materials are quite expensive.
To get accurate numbers, it is best to go to the store in person and do all the calculations yourself, since prices can vary greatly depending on the region. In addition, 30 percent should be added to the calculations obtained, which will go to cover rejection and possible additional costs. By the way, if you have been planning to update your bathroom for a long time, but did not know where to start renovating the toilet, then it is better to immediately decide how much money it will take and whether you can afford it.
The table below will make this task a little easier for you.
| Material | Quantity | Price in rubles |
| Waterproofing mastic | 5 kg | 1500 |
| Tile adhesive | 25 kg | 340 |
| Grout | 5 kg | 410 |
| Antiseptic primer | 5 l | 500 |
| Tile | Square meter | 50-600 |
| Floor tiles | Square meter | 300-2800 |
| Screed mixture | 25 kg | 300-780 |
| Drywall | 1 panel | 200-500 |
| Accessories for drywall | Set | 30-80 |
| Wooden beam | 6 m | 90-220 |
| Lining | Square meter | 160-260 |
| Corrugated pipe | 1 meter | 125-200 |
| Metal-plastic pipe | 1 meter | 70-120 |
| Compression fittings | 1 piece | 250-500 |
| Universal mixer | 1 piece | 1400-2500 |
In addition to all of the above, you will also need to purchase new plumbing equipment. It is very difficult to determine prices for it, since everything here depends on the individual preferences of each person. You can purchase both a budget option and luxury plumbing fixtures from world-famous brands. When choosing a toilet and sink, you should start from your real financial capabilities. If you used inexpensive tiles for tiling the room, then there is simply no point in having a European toilet. It’s better to do everything in unison so that everything in the interior harmonizes well with each other.
Finishing the bathroom
The final finishing of the bathroom is carried out in a certain sequence, in compliance with certain rules:
- First of all, we prime the walls and floor with a special solution, and make sure that all surfaces are even and smooth.
- We install floor tiles. Make sure that the seams are filled with glue efficiently without any voids formed. For the bathroom floor, it is recommended to use tiles based on porcelain stoneware or with a rough surface. This material does not slip and is less dangerous for injury.
- We carry out the finishing of walls and ceilings with selected materials.
Important! In the bathroom it is strictly forbidden to use gypsum mixtures as a roughing compound. If moisture penetrates between the tile joints, the plastered surface will absorb it and swell. As a result, the tile will fly off.
Repair of toilet walls. Tiles, PVC and MDF panels. Step-by-step instruction
You need to repair the walls according to almost the same instructions as the floor. You should:
- Clean the walls down to the ground.
- Level the surface. To do this, you can no longer use cement mortar, but ready-made plaster compositions. It is advisable to make a perfectly flat surface.
- Prepare the base for finishing.
Further actions depend on which finish was chosen. If you plan to lay tiles, then you should buy tile adhesive. It is most convenient to work with him. But you can also use cement mortar.
For plastic or MDF panels you need to make a lath. It is made of wood or metal. It is advisable to measure the room, since individual panels will probably need to be cut. Laying the panels is convenient; there are special grooves. After installing the first panel, all subsequent panels are placed in the grooves. Also, after the work is completed, it is necessary to secure the corners.
DIY bath installation
Even a novice master can do the installation of a bathtub with his own hands. The main thing is that when installing the bathtub, it is necessary to monitor the level; it should be positioned strictly horizontally without distortions, since the bottom of the bathtub is initially cast at an angle towards the drain.
The joint between the wall and the bathtub is sealed with silicone sealant, then the bowl is filled with water. After the seam has hardened, the liquid must be drained. Thanks to such actions, the joint will be airtight, and will deform when the bath sags again under the weight of water.
At this point, the main stages of bathroom renovation are completed. The final steps are to provide the room with all the necessary accessories and electrical appliances, as well as install the doors.
DIY bathtub installation (video)
Preparing the premises
Let's look at this in more detail. So, where to start renovating your toilet and bathroom? First of all, you need to understand that in the vast majority of apartments the restroom has a very small area. As a rule, it is 1.2 x 0.85 meters. Such dimensions greatly limit the possibilities, so you need to immediately decide on an interior design project.
Carefully assess the condition of the room. What exactly does it need - cosmetic repairs or complete reconstruction. If the second option, then you need to start by dismantling the old finish.
In this case, everything happens in the following sequence:
- We disconnect the toilet from the communications, unscrew the fixing bolts and take it out.
- We assess the condition of the pipes. If it is deplorable, then we will also dismantle them.
- Most often, the walls in the toilet are tiled, so we remove them and then clean the work surface using a hammer drill and a special nozzle.
- If you want to carry out quality repairs, it is recommended to immediately start replacing the wiring. We remove the electrical cable from the groove and cut it.
It is worth noting that in some apartments the toilet is combined with a bathroom, so they are constantly damp, which creates ideal conditions for the growth of fungus and mold. To prevent this, you need to treat the walls with special antiseptic agents.
We have described the preparatory stage in detail, so now we can consider the further sequence of repairs in the toilet. Floors, walls, and ceilings require an individual approach, so below we will look at each of them in more detail.
Where do you get ideas?
If we are talking exclusively about ideas, look at as many photos as possible. Before starting repairs, it is advisable to imagine the final result as accurately as possible. Although some of them will definitely change. If your toilet is ready for renovation, you can use the following plan.
- Deciding on wall decoration (plastic panels, PVC, wallpaper or tiles)
- Choosing how to hide the pipes
- Deciding whether a closet is needed and where it will be located
- Choosing a toilet
- We look at the trends in decoration of the current year
These are the main steps. Read about each of them with photo examples here - use the sign for quick navigation. And now - cool ideas as such, so that you can pick up something interesting and useful.
Where to begin
Define the goal:
- It is necessary to determine the goals of the work in advance and decide what to change and what to leave the same. For example, there was a decision to update the bathtub.
- To do this, it is not at all necessary to get rid of the old one and buy a new one. In most cases, it will be enough to just change the acrylic coating.
- If the bathroom is too small and there is no room for a bathtub, a shower stall will help save space. However, not all people will be satisfied with such a replacement.
- In pursuit of a piece of free space, combined bathrooms are often renovated.
Make an estimate:
- The most necessary thing - an estimate - is needed so that the money for work does not run out at the most unexpected moment. The estimate displays all upcoming expenses.
- It is important to buy materials with a reserve in case of unforeseen situations (defective copies, goods damaged during delivery, etc.).
Set deadlines:
- There are some nuances when planning the completion date of repairs.
- If this date does not come soon, then you need to decide in advance how the waste will be collected and where the materials will be located.
- It will not be superfluous to decide on the advisability of installing the container and its location.
Hire a designer or plan it yourself
Renovating is often intimidating, especially at first. Especially for the first time. Therefore, in order to think through everything as much as possible and protect themselves from mistakes and failures, some seek the help of a professional.
A good designer, when developing an interior project, helps to create and visualize the final goal that the client strives for.
In addition, the designer:
- Will pay great attention to every element, thus ensuring long-lasting results and a well-balanced bathroom design that is sure to meet your wishes and expectations.
- It will help you find solutions that potential buyers of your apartment will like if you want to sell it.
- Will save your time.
- Will help you decide on the choice of various design elements.
If you have a sense of taste, have free time and know how to generate various interesting ideas, then you may well try your hand at design.