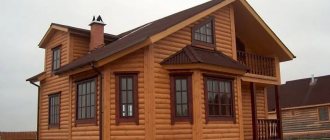
During the construction of private houses, many mistakes are made, due to which the walls become cold in winter, and funds for heating have to be lost. Installing proper insulation helps solve the issue. For installation, you need to know how to insulate the walls of a house from the inside and select the necessary materials.
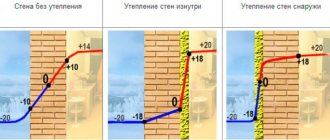
Insulation can be placed both outside and inside the house. The home will become much more comfortable: about 30% more heat will be retained in the room, which would have gone outside.
Before starting work, you should familiarize yourself with certain disadvantages of insulation inside the house:
- After installing insulation, the walls stop receiving heat from the home. Increases the likelihood of cracks appearing.
- Many insulation materials contribute to the accumulation of condensation.
- The free space at home is decreasing.
- It will not be possible to insulate the ceiling, so a cold bridge will remain.
Due to the listed disadvantages, it is recommended to use insulation inside the house when it is not possible to implement other options.
Why do you need waterproofing of the walls of your house and building?
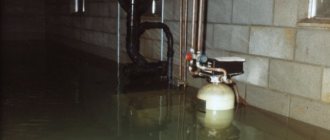
In the absence of properly done horizontal and vertical waterproofing of walls, all walls of a house or building that are below level zero (ground level) will be exposed to water and aggressive environments, which will ultimately lead to their destruction, as well as to the penetration of water and moisture into premises located underground, for example, a basement or basement. It doesn’t matter at all what kind of walls we are talking about - concrete walls or brick, all these substances absorb moisture and water. Waterproofing and horizontal protection of the walls outside the house is very important even in the absence of groundwater during the construction of the building, since even in the absence of groundwater the soil absorbs moisture from melting snow or heavy rain. Wet soil releases this moisture into concrete or brick, which in turn absorbs it very well and transfers it inside the basement, basement and any other room.
Destruction occurs for several reasons:
- The impact of an aggressive environment on concrete and brick - there are various impurities in ground and other water that can affect these materials and subsequently lead to their destruction.
- Temperature difference - water is absorbed into concrete and brick walls. In winter it freezes and in spring it thaws, thereby destroying the foundations, forming microcracks and voids.
Lack of proper waterproofing of the external walls of the room can subsequently lead to:
- Leaks in the basement and basement
- Formation of cracks
- Mold and mildew hazardous to human health
- Wet walls and damage to finishes
Features of internal insulation
It is clear that insulating a brick house from the inside is not the best solution. However, you should resort to it if:
- The building is an architectural monument and the appearance of its facade should not be changed.
- The walls of an apartment in a multi-story building freeze. According to current standards, it is forbidden to install structures that change the appearance of the building.
- The buildings are located close to each other, which makes it impossible to carry out work on insulating the external walls.
- Exterior brick houses made of expensive facing bricks are a pity to cover with new finishing, and laying a new outer layer of decorative brick after installing the insulation requires additional serious financial investments.
The disadvantages of insulating internal brick walls include the reduction of space in the room due to the installation of insulation and a base for finishing. The thickness of the insulating “pie” is usually at least 10 cm.
When installing thermal insulation inside the house, it is important to remember that insulating the internal surfaces of brick walls is fraught with the formation of condensation, which should not be allowed.
Horizontal and vertical waterproofing of external walls
The walls of a building below level zero must be protected using both horizontal and vertical insulation devices.
Horizontal waterproofing - designed to protect the building from water penetration from below, especially when it comes to high groundwater.
Important: Horizontal protection is needed not only when groundwater is high, since the soil around a house or building is in any case saturated with moisture from rain and high water, which in turn negatively affects the foundation of the building and its walls.
Vertical waterproofing - its device is designed to protect the external walls of the basement from water falling on the walls from the side vertically. We are talking about groundwater and rainfall. The soil around the building is saturated with moisture and releases it into the foundation and walls of the basement or basement, thereby negatively affecting them.
You can read more about vertical and horizontal waterproofing in the following articles:
- Horizontal waterproofing of the foundation: Device technology and materials needed for this
- Vertical waterproofing: materials and methods of its construction
Folk remedies
To combat mold, folk remedies and chemical compounds are often used:
- bleach;
- borax;
- ammonia;
- hydrogen peroxide;
- creosote;
Let's take a closer look:
- Bleach is suitable for treating tiles, wood, glass, and bathtubs. It is necessary to dilute it in a ratio of 1:10. Before use, pour it into a spray bottle and work with gloves and a respirator. There is no need to rinse off after treatment. Bleach can bleach the surface, so be careful with expensive things.
- Bleach destroys all types of fungus and mold spores.
- Apply borax to the surface in a ratio of 1 glass to 2.5 water. Suitable for application to walls.
- Vinegar – destroys all types of mold. Place in a spray bottle and apply to surfaces. Leave for an hour, then rinse with water and dry.
- Peroxide - a 3% solution is useful, which can be sprayed until the walls are completely saturated. Leave for 10 minutes, then clean off the mold along with it and rinse.
- Ammonia - diluted in a 1:1 ratio with water. We spray it and remove it along with the mold.
- You can use tea tree oil. You will need 1 teaspoon of oil per glass of water. Apply to the mold and leave.
- Homemade solution: trisodium phosphate 3 table. spoons and 100 ml. bleach, all this needs to be diluted in 4 liters of water or 2 tablespoons of acetic acid per 10 liters of water and half a kilogram of copper sulfate.
Waterproofing walls materials and methods
Today on the market there are many different methods of waterproofing, including walls. Each method of protecting a home from water comes with a large selection of waterproofing materials. Below are the most popular methods and materials for waterproofing work:
- Coating
- Pasting
- Welded roll
- Mounted roll or membrane
- Injection waterproofing
- Liquid
Coating waterproofing of walls
Read more about coating waterproofing
This type includes various mastics based on bitumen and polyurethane. The most popular coating materials are bitumen mastics from TechnoNIKOL. However, do not forget that waterproofing is not done for 1 day or even 1 year. Accordingly, you should not choose cheap bitumen compounds as the main waterproofing. In addition to cheap bitumen mastics from TechnoNIKOL, there are also a number of professional waterproofing compounds on the market such as FlexLock Pro or PolyFlex from the German manufacturer Hydro.
You can read more about bitumen waterproofing in the article – “Bitumen waterproofing: types, characteristics and device technology.”
Pasted waterproofing of walls
More details
Pasting materials include various bitumen-based membranes. Their main difference is that they are glued to the surface using a special adhesive base. Advantages:
- Low price
- Availability on the market
- Easy installation that you can do yourself
Flaws:
- Low quality of protection
- Short service life
- Low resistance to aggressive environments
- Presence of seams
Roll waterproofing of walls
More information about roll insulation
Roll waterproofing is supplied in rolls, which are stitched together on the surface of the walls. This type includes PVC membranes and built-up bitumen-based roll membranes. PVC membranes are sewn together with a special hairdryer and laid on the surface as a kind of carpet. The presence of seams and a complete lack of adhesion to the base of the walls makes these materials very unreliable. Fused membranes are connected to each other using hot fire (burners are used). The main disadvantages of these materials are the presence of seams (which is why these membranes must be applied in at least 2 layers), as well as the lack of 100% adhesion to the base (which creates voids and cavities).
You can read more about built-up and roll waterproofing in the following article - “Installation of roll waterproofing with detailed instructions for its installation.”
Injection waterproofing of walls
More details
In most cases, injection is used to carry out work from the inside. This is a very effective way to eliminate leaks and repairs, but it is also quite expensive. You can read more about this method in the continuation of this article.
Liquid waterproofing for walls
More details
Liquid waterproofing includes such premium compounds as liquid rubber and polyurea. Liquid rubber is a special material that forms an elastic, seamless membrane with 100% adhesion to the surface. This material is widely used for durable wall protection.
Important: When choosing waterproofing materials, do not forget one well-known proverb: “Good things don’t come cheap” - When buying a product, a person chooses: to take a cheap thing or a high-quality, reliable one that will last well and for a long time.
The best waterproofing of walls
If we are talking about the best waterproofing of walls, then it is best to choose materials with the following qualities:
- No seams – seams are the weakest point in any waterproofing coating.
- Adhesion to the base - good adhesion means that if a crack or hole forms in the protective coating, water will not be able to pass under it, stagnate and walk there.
- Service life - the material should not crumble in your hands after a year.
- Elasticity - the more elastic the material, the longer it will last since dynamics or soil shrinkage will not be able to destroy it (it will not crack or come apart at the seams).
All of the above qualities are met by materials such as Liquid rubber (for example FlexLock) and Polyurethane waterproofing .
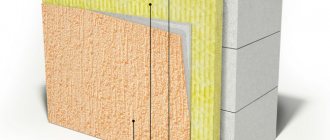
Choice of insulation
Each insulation material has special properties. To choose the right composition that has all the required parameters, it is worth familiarizing yourself with the features of each of them. One of the popular materials is extruded polystyrene foam. It is dense, has a thickness of 20-40 mm. It is attached to the wall using adhesive mixtures. Then the surface is treated with plaster, you can glue wallpaper directly on top.
Insulation using expanded polystyrene is carried out in the following sequence:
- the wall is leveled and treated with an antiseptic;
- the material is fixed with tile adhesive. To increase adhesion, you can apply the adhesive composition to the surface with a roller. Be sure to coat the entire surface to the edges;
- It is advisable not to use dowels - steam penetrates through them, leaving pores;
- after hardening, the seams are filled with silicone sealant to prevent steam penetration;
You can glue wallpaper on top of the fixed material. If finishing with plaster is required, reinforcement with fiberglass mesh using glue is necessary.
Fiberboards
This material is most often used for external wall insulation. Can also be used inside the home. Its advantages are good heat retention and noise absorption. During the production process, the products are treated with mixtures against insects and rodents. Temperature changes do not render the insulation unusable. To cut into pieces, you can use any suitable tools, there are no restrictions.
To secure fiberboard to the walls, nails longer than 3.5 cm are enough. It is advisable to drive them in in a checkerboard pattern. One sheet is pierced with approximately 16 nails. After additional treatment with plaster, you can cover the surface with wallpaper, lay wires, making the required channels. When using this material, there is a possibility of condensation.
Insulation with mineral wool and glass wool
Before insulation with mineral wool begins, mandatory installation of sheathing is required. The thermal insulation characteristics of the composition are high, it is easy to install, and has a long service life. It is important to secure the material between the boards so that there are not even the slightest gaps left. For more secure fastening, you can use dowels.
The composition is laid from the bottom of the walls, moving upward. To ensure a higher sealing density, the edges are pressed down and trampled. You need to lay it in an even layer, without kinks. You can do several layers. After installation, the vapor barrier layer is installed.
Might be interesting
Thermal insulation
Insulating the ceiling in a bathhouse - methods, materials, useful...
Thermal insulation
Tables of comparative characteristics of thermal insulation…
Thermal insulation
Why polyurethane foam insulation is the best...
Thermal insulation
Self-adhesive thermal insulation: how to choose and apply?
Glass wool must be laid using protective equipment. It crumbles, glass particles can damage the respiratory tract, so you need a respirator. It is important to install protective structures after laying the insulation. You can use fiberboard.
Ecowool insulation
The answer to the question whether it is possible to insulate a house from the inside and with what cannot be called unambiguous. The process is carried out in one sequence, but the selection of materials and wall features will be individual. Ecowool is a natural insulation material. It is made entirely of paper (cellulose). It contains antiprenes and boric acid, which are not capable of releasing harmful volatile compounds.
Advantages of the material:
- no restrictions on geometric dimensions;
- All cracks are closed, which ensures high sound insulation;
- the material has low thermal conductivity;
- does not rot due to antiprenes, is protected from pests by impregnation with boric acid;
- releases moisture well, dries quickly in case of waterlogging;
- the composition is not flammable.
Cons of ecowool:
- high price;
- relatively complex installation process.
Insulation with foil
When figuring out how and with what to insulate a house from the inside, it is important to analyze the pros and cons of each insulation. Such insulation materials have a number of advantages that are not available in other materials.
Among the positive qualities are:
- High degree of heat reflection. Up to 95% of thermal radiation is retained inside the house.
- Moisture is repelled because hydrophobic material.
- The installation process is simple and does not take much time.
- External influences do not affect the quality of the insulation.
- High degree of noise absorption.
- Ecological cleanliness. The composition does not contain impurities harmful to humans.
- Long service life. The foil does not corrode for a very long time.
- High elasticity. You can easily give the necessary shape to the insulation.
There are materials on sale that are covered with foil on one or both sides. There are no restrictions on use: you can insulate not only the walls, but also the ceiling and floor. To prevent heat from leaving the house when heating with radiators, polyethylene insulation is installed between them and the wall. It is important to leave about 2 cm of free space.
Comparison of insulation materials. Thermal conductivity table
| Izover | Rockwool | Expanded polystyrene | Ecowool | Foam concrete | Polystyrene concrete | Mineral wool | Expanded clay | MPB - basalt mats | |
| Thermal conductivity W/m°C | 0,048 | 0,045 | 0,039 | 0,038 | 0,18 | 0,13 | 0,038 | 0,18 | 0,045 |
| Required layer thickness | 253 mm | 233 mm | 200 mm | 200 mm | 550 mm | 300 mm | 200 mm | 950 mm | 240 mm |
| Condensate | Forms, needs a vapor barrier | Forms, needs a vapor barrier | Forms, needs a vapor barrier | Not formed | Forms, needs a vapor barrier | Forms, needs a vapor barrier | Not formed | Forms, needs a vapor barrier | |
| Load on structure (kg/m2) | 10,1 | 8,16 | 7,18 | 9 | 302,5 | 135 | 9,1 | 4,75 | 4,8 |
| Ecological cleanliness | Phenolic binder | Phenolic binder | Styrofoam granules | Wood fiber | Modifying additives | Styrofoam granules | Phenolic binder | Clay | Phenolic binder |
| Fire safety | Does not burn, but binders do burn, combustion products are toxic | Does not burn, but binders do burn, combustion products are toxic | At 80 degrees Celsius releases toxic substances | Inflammable, combustion products are harmless | Does not burn | Does not burn | Does not burn | Does not burn, but binders do burn, combustion products are toxic | |
| Biostability | Rodents won't start | Rodents won't start | Rodents won't start | Rodents won't start | Rodents won't start | Rodents won't start | Rodents won't start | Rodents won't start | Rodents won't start |
| Approximate cost per 1 m2 | 230 rub. | 490 rub. | 280 rub. | 235 rub. | 227 rub. | 1200 rub. | 430 rub. | 807 rub. | 350 rub. |
Waterproofing a wall from the inside
Waterproofing from the inside is done mainly as measures to eliminate leaks in the basement or repair walls when the insulation on the outside is broken or missing, when for some reason there is no access to them from the outside of the house.
When repairing walls from inside premises, the following technologies can be used:
- Bitumen-based coating materials (various mastics), weld-on roll products and PVC membranes. All these materials do not work with negative water pressure (from outside to inside); therefore, when installing them, they need to be pressed with a screed (if we are talking about horizontal insulation) - this method is not recommended when waterproofing from the inside.
- Materials that work against negative water pressure - these compounds work from the inside, when the water pressure goes from outside to inside the room and they do not need to be pressed with anything. One such composition is HydroPaz from the German manufacturer HYDRO.
- Injection materials are polyurethane and helium resins that are injected into or behind the body of the structure. This technology is used mainly when it comes to working from the inside.
Injection waterproofing of walls from the inside
Injection waterproofing is one of the most expensive and most reliable waterproofing methods used to protect walls from the inside of a building.
The injection insulation method is suitable for both brick walls and walls made of blocks or concrete (monolithic walls). When performing work using the injection method, holes are drilled in the wall into which packers are inserted (hollow tubes for carrying injection resin), an injection pump is connected to them, which under pressure delivers the composition into the thickness of the wall or beyond it. When injection resin or gel enters the thickness of the wall, it fills all existing voids, microcracks and pores, thereby making the walls waterproof. the method of injection behind the wall is called veil waterproofing and is used in exceptional cases.
You can read more about the injection waterproofing method in the following article – “Injection waterproofing.”
Specifications
To obtain a qualitative assessment of the properties of this material, it is necessary to evaluate its technical indicators. These include:
- Operating temperature range – from -50 to +120 degrees;
- Material density – 5-75 kg/m3;
- Daily water absorption by mass – 10.5-20%;
- Thermal conductivity – 0.028 –0.047 (W/m) *°C;
- Humidity (mass fraction) – 5-20%;
- The standard service life is 50 years. According to recent studies, it is not limited.
Tensile strength:
- For bending deformations – 0.1-0.25 kg/cm. sq.;
- For compression (at 10% linear deformation) – 0.07-0.5 kg/cm. sq.;
- Tensile – 0.05-0.08 kg/sq.cm;
Slab penoizol
Waterproofing brick and block walls
For waterproofing a wall made of blocks or bricks, essentially the same materials are suitable as for a regular monolithic wall made of concrete. The only caveat is the evenness of the surface on which the waterproofing will be applied. The waterproofing material must lie on a clean and even surface. Brick has many seams and in most cases they are caulked unevenly, which leads to the fact that the surface of the walls where the membrane is to be installed requires leveling with special compounds.
If we are talking about waterproofing a brick wall from the inside, then before injection, the wall is coated with a special non-shrinking compound so that the injection resin goes inside the walls and does not come out through the seams between the bricks.
You can read more about waterproofing a brick wall in the following article - “Waterproofing brick and masonry.”
How long does the coating last?
Different types of waterproofing have their own service life.
The cement mixture lasts no more than 15 years on the facade of a building with periodic watering, and indoors it will last up to 20 years. Some manufacturers claim that their mixtures are ready to be used outside buildings for 25 years.
Acrylic compositions are recommended for indoor use, where they are ready to last no more than 20 years.
Penetrating waterproofing is the most durable, as it lasts as long as a concrete base.
Polyethylene and fabric membranes are used for no more than 10-15 years, after which they need to be replaced.
Bituminous waterproofing materials are considered less durable. Depending on watering, they deteriorate within five years, but in some cases they last up to 10 years.
The use of waterproofing is necessary in all cases of presence of water and moisture. Depending on the amount of excess liquid that appears, simple and cheap materials (cement, acrylic, silicone) can be used, but with greater water content, more expensive penetrating concrete insulation should be used.
Waterproofing walls - how to properly perform the work and prepare the surface
The installation of a high-quality waterproofing coating begins with the correct choice of method and type of waterproofing coating and ends with its correct protection from damage when backfilling or installing subsequent layers (for example, insulation). Here are the main things you should pay attention to when installing a high-quality waterproofing coating:
- The right choice of materials - for each structure (foundation, walls, basement, basement, roof), situation (there is groundwater or not, work is being done from the inside or outside, etc..) there is its own best or at least suitable material. The wrong choice of waterproofing product will lead to a decrease in its service life or to future leaks.
- Surface preparation before waterproofing
- No 90 degree angles for the transition from the horizon to the vertical base (using a fillet or a special plinth).
- Prime the surface with a special primer to improve adhesion.
- Construction and application of waterproofing coating with precise adherence to technology
- Protecting the completed work - It is important not only to produce high-quality work, but also to protect it from further damage.
Installing waterproofing so that later there are no leaks in the room and nothing has to be redone is not an easy task. It is recommended to entrust this task to professionals - a large company whose specialization is waterproofing work.
Preparing the wall surface for waterproofing
Proper surface preparation is 50% of success when applying insulation. If the wall surface is prepared improperly, this will primarily affect the adhesion (adhesion) of the material to the wall, and therefore its reliability.
In order to properly prepare the walls, you need to follow these recommendations:
- Seal all large holes, cracks, seams and cavities with cement mortar or non-shrink sealants;
- Remove all sharp protrusions, ends of reinforcement and other protruding elements;
- Remove all elements extending from the surface;
- Clean the surface from dirt and dust using brushes with metal bristles, rags and pressurized water;
- Apply primer to the surface.
Technology of waterproofing work
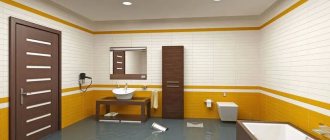
How to decorate the walls inside a house
Before starting work, it is necessary to determine the set of required measures based on the specific conditions of the object. Should be considered:
- groundwater depth;
- the amount of “swelling” after thawing of the soil;
- soil type and its homogeneity;
- features of building operation.
The cost of waterproofing is determined by:
- foundation dimensions;
- the range of protective measures taken;
- volume and quality of materials used.
In the simplest case, costs will be limited only to the purchase of bitumen. In more complex ones, several types of insulating materials and drainage will have to be used, which will make the final cost very significant.
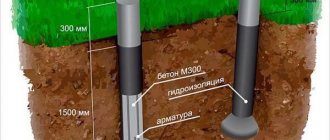
Drainage arrangement
The drainage system is equipped only in cases of strong impact of rain and groundwater on the construction site. It is intended for collection and subsequent removal of incoming water from the structure.
The process of creating drainage begins with digging a trench that covers the perimeter of the object, exceeding its dimensions by 0.7 meters or more. The depth of the trench is determined by the level of the water surface; a width of 0.3-0.4 meters is sufficient. It is also necessary to provide a slight slope towards water drainage.
The bottom of the trench and the walls to a height of about 0.9 meters from the base are lined with geotextiles. It is covered with gravel 50 mm from above. Drainage pipes with holes throughout the entire surface are laid on this surface. They should also have a slight slope for drainage and be discharged into a natural or artificial collector. Gravel is poured on top in a layer of up to 30 cm. After this, the soil is backfilled.
Wall waterproofing repair
Repair of wall waterproofing is necessary when, during the operation of a private home or commercial building, problems with water leaks and/or increased wall moisture, fungus or mold (due to wet walls) are discovered.
Important: If water leaks are found in your house, basement or basement, this means that the vertical or horizontal waterproofing of the foundation or external walls is missing or has become unusable. Waterproofing repairs are best done on the outside as this will solve the root of your problem.
If you want to solve the problem of leaks once and for all, then the best solution is to create a good barrier on the outside, so that water does not penetrate into the structure of concrete or brick and does not destroy it. If it is impossible to carry out repair work from the outside, you can do it from the inside using the technology described earlier.
Reasons not to do this
Before making a decision about insulating the base from the inside, you should take into account the fact that this option is acceptable only for buried types, in which the underground part creates the basement of the household.
In construction practice , there are several good reasons why carrying out such types of work is inappropriate :
- According to calculations of the thermal insulation “pie”, it has been proven that reinforced concrete structures will still freeze, even with an insulating layer laid.
- The foundation will not be protected from temperature changes, which will lead to its destruction.
- In accordance with calculations, the “dew point” will be established at the “insulation-foundation” boundary, which will require additional means to create a vapor-tight and ventilation layer in the heat-protective “pie”.
Thermal protection of the foundation from the inside is a necessary measure, used only when an external thermal protection device is installed ineffectively or is impossible for good reasons and when calculations have proven that its use will lead to the thermal efficiency of the house.
Do-it-yourself waterproofing of walls
If you wish, you can do all the waterproofing work yourself, without resorting to the services of specialists, with the exception of work associated with certain specialized equipment such as injection waterproofing and spraying liquid rubber. However, before you begin work to protect your home from water, it is recommended to carefully study the technology of work and gain relevant experience. You can study the technology of laying basic waterproofing materials from our partners from the TechnoNIKOL company. You can buy the necessary waterproofing and other building materials online from our partners - Construction Trading House “Petrovich” . By purchasing the goods you need in Petrovich, you not only save money but also time, since the company will deliver your online order to your location within 2 hours.
Video description
Polyurethane foam filling system, how it works in the “wall”.
Bricks with voids are also suitable for well masonry Source all-for-remont.ru
Such masonry is by no means a relic of the past, but a well-thought-out engineering solution that is still used to this day. First of all, it is a lightweight design, which requires much less building materials, and is also very convenient for creating thermal insulation for a building. The distance between two parallel walls is usually 125-130 mm, that is, half the length of one brick laid across the masonry.
Today, during the construction of buildings, it is impossible to fill such voids with slag - this is due to the fact that the consumption of solid fuel has sharply decreased - most boiler houses have switched to natural gas. Therefore, filling interwall voids with polyurethane foam in modern construction is most welcome. In addition, slag and ground beetles settle over time, turning into dust and their thermal insulation effect deteriorates. In such situations, there is also the possibility of pouring polyurethane foam, but first things first.
Equipment for pouring polyurethane foam
Equipment for filling polyurethane foam Source sprayer.com.ua
As you probably guessed, filling voids with polyurethane foam is done using industrial equipment - there is enough of it on sale, but it is usually bought by those who deal with insulation at a professional level. Let's look at these setups using the Reactor IPH as an example, although you may prefer any other model based on brand or power.
The Reactor IPH unit is used for foaming polyurethane and then pouring it into any voids. At the same time, the machine provides an accurate dosage of polyurethane foam and its supply at different speeds at the operator’s request. For a more precise understanding of the capabilities of models with this name, pay attention to the table below.
| Device brand | Reactor | |
| Modification | IPH-25 | IPH-40 |
| Pressure, Bar | 140 | 140 |
| Productivity maxi, kg/min | 9,5 | 9,2 |
| Heating power, kW | 9,0 | 15,3 |
| Heating of hoses | Yes | Yes |
Without such a kit, starting pouring is strictly prohibited Source vzsto.ru
When pouring polyurethane foam into voids, it is imperative to use a chemical protection suit - those who served in the army are familiar with such clothing. This kit includes:
- overalls with a hood for protection from dust, aerosols, chemicals, acid compounds and alkalis;
- panoramic mask (transparent plastic) with an anti-aerosol respirator;
- cap;
- shoe covers;
- gloves;
- mounting safety belt for working at height.
Are there differences for different types of bases?
Thermal insulation of the foundation from the outside meets all existing requirements of regulatory documents, its effectiveness has been confirmed in practice and, with the correct choice of insulation “pie,” it can provide 100% protection of the basement from heat loss and moisture penetration.
Internal foundation protection is used as a forced measure, its effectiveness is low, the degree of protection depends on the type of foundation. The highest level of protection is for a monolithic base ; in this case, all surfaces of the basement must be covered with thermal insulation: walls, base and ceiling. If you do this from the inside, the structure will remain without protection from moisture, cold and the effects of soil heaving.
A strip foundation has the lowest protection coefficient; it is protected with sheets of foam plastic and can be used for outdoor temperatures down to -20 C. You can learn more about how to properly make a strip foundation with your own hands here.