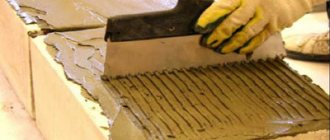
- Preparation of adhesive solution
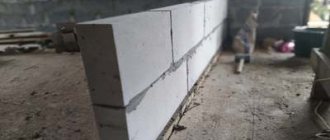
- Actions that violate the integrity of structures
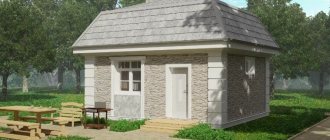
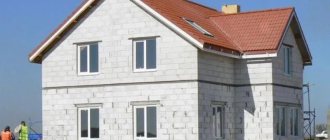
Having decided to build a house from aerated blocks or use this material for planning premises, many decide to carry out the work themselves. The reason is quite clear - by refusing the services of hired workers, the owner is trying to reduce the cost of building walls. In this case, instructions on how to correctly lay aerated concrete blocks with glue will be very helpful.
Composition of special glue
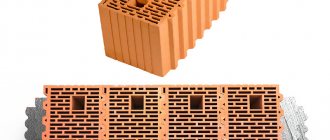
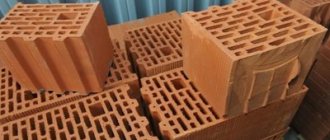
Adhesive for aerated concrete blocks contains the following components:
- High quality Portland cement.
- Fine grain sand.
- Polymer substances to improve properties.
- Auxiliary modifiers for better strength and other characteristics.
Previously, when aerated concrete blocks just began to be actively used, their laying was done using ordinary mortar. However, the concrete drew out the liquid very quickly, causing the strength to decrease significantly. When specialized adhesive for aerated concrete appeared, the situation changed for the better.
The special composition began to take up less space, and mixing became easier. But despite all this, the cost of the work has not increased, because the consumption of improved glue is much less.
The composition of the aerated concrete masonry adhesive ensures optimal fluidity for filling small pores, which makes it possible to fasten the blocks together with high quality. What’s also good is that manufacturers add various modifiers to the composition to improve quality.
Reference! Additional elements that are included in the glue reduce the thermal conductivity of the mixture. With a layer of 3 mm, heat loss through the connections is minimal.
However, for high-quality work, the blocks themselves must meet a number of requirements. For reliable fastening, their surface must be smooth. The glue layer itself is very thin, so it will not be possible to level the surface and hide visible defects.
Advantages and disadvantages
Adhesive for laying gas silicate blocks has high performance characteristics and is valued for its ease of use. Key advantages of the building material:
- increased level of adhesion and excellent plasticity indicators;
- resistance to moisture and low temperatures;
- non-shrinking adhesive material and high setting speed.
The product is of interest due to its budget price and economical consumption. Although the universal dry concentrate costs twice as much as a classic cement-sand mortar, the glue consumption for gas silicate blocks is 5 times less: the mass is applied with a minimum layer thickness not exceeding 2-3 mm. It also helps:
- increasing the strength of the structure, since the minimum thickness of the seams ensures the solidity of the structure;
- improving the thermal insulation of the building by reducing heat loss through the seams, since the effect of cold bridges is leveled.
Thanks to the minimum thickness of the seams, the laying of gas blocks turns out smooth and beautiful.
In addition, thanks to the minimum thickness of the seams, the laying of gas blocks turns out smooth and beautiful.
The presence of water-retaining components in the adhesive composition eliminates the formation of mold between aerated concrete blocks, which has a positive effect on the operational characteristics of the structure.
The disadvantages of adhesive for gas silicate include the demands on the evenness of the treated surface and high prices for products, although due to the cost-effectiveness of consumption, the high cost of the building material is offset.
Types of glue
Modifiers in the composition of adhesive for aerated concrete blocks give individual compositions unique properties, which allows them to be used in certain conditions. For laying blocks, there are 2 types of adhesive mixture - summer and winter. The last option is all-season; it has no restrictions for use in the warm season. As for summer, its use is permissible only at above-zero temperatures, which limits the scope of use.
Summer
The adhesive for summer blocks contains white cement. The finished seam practically does not stand out against the background of the gas block, which looks neat and aesthetically pleasing. This feature makes it possible to do without additional finishing. Representatives: MixMaster, Kreps.
The use of summer glue for blocks is permissible at a temperature of at least +4 degrees. At a minus value, crystallization occurs and the quality of the mixture deteriorates greatly.
Reference! When during construction there is a possibility that the temperature will drop below 4 degrees Celsius, winter glue should be used.
Winter
Winter glue already contains modifiers that prevent the liquid from freezing and increase the plasticity of the finished mixture. Can be used down to -15 degrees. The downside of the composition will be longer hardening, which prolongs the working time. After mixing, it can be used for several hours, but ordinary glue loses its properties after half an hour.
Winter adhesive for gas silicate and aerated concrete blocks cannot boast of aesthetics. After hardening, it becomes dark and differs significantly from the base material.
Reference! In winter, at sub-zero temperatures, glue consumption increases, but this is only a plus for the strength of the connection.
How to lay aerated concrete blocks - step-by-step instructions
Laying walls made of aerated concrete blocks is somewhat different from work carried out using sand mortars. The main rule that is observed during work is to apply the adhesive only to a carefully prepared surface of the block. It should be free of dust, ice and other foreign substances. The main stages of work consist of the following steps:
- inspection and cleaning of blocks,
- preparation of adhesive composition,
- applying the solution to the blocks,
- installation of blocks and their alignment,
- cleaning masonry from excess glue.
It is worth noting that preliminary moistening of aerated concrete blocks during work is not required. However, in hot weather it may be necessary to slow down and stabilize the hardening of the mortar. It is advisable to cover the finished masonry with a tarpaulin or burlap until the glue has completely set.
Proportions for preparing the solution
Features of preparing high-quality glue for blocks:
- You should read the instructions for the product, even if you have previously had experience working with it, because different manufacturers may have different properties and preparation methods.
- For 10 kg of mixture, take about 1.5-2.5 liters of liquid.
- First, water is poured into the container, then the powder is poured. If you do the opposite, lumps will form, and removing them will be problematic.
- For mixing, it is better to use a construction mixer, which is turned on at low speed.
- After obtaining the desired consistency, you need to wait a few minutes and then mix again.
Reference! After preparation, the mixture can be used within 30 minutes, for winter formulations - 2-3 hours. After this time, the properties of the solution begin to deteriorate.
The glue should be mixed in portions, because if it is not used at the specified time, a new solution will have to be prepared, which significantly increases consumption. At any time of the year, it is recommended to maintain the glue temperature at least +10 degrees.
Material consumption is individual for each individual brand. The air temperature during operation also matters. The average consumption is about 15-20 kg per meter. At the same time, some mixtures are used in significantly smaller quantities - up to 2 kg per meter. Consumption will depend not only on the characteristics of the adhesive, but also on the quality of the blocks themselves.
Reinforced concrete belt for supporting the roof truss system
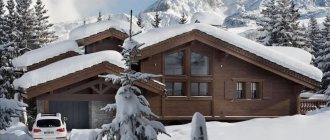
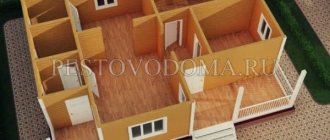
Approximately half of private houses are built with an attic. To increase the volume of attic rooms, a house structure with attic walls is often used, which are a continuation of the load-bearing walls of the house on the attic floor. The height of attic walls is usually in the range of 0.7 - 1.2 m.
The roof truss system of a house with an attic rests on attic walls. To ensure the stability of the attic walls of the attic when exposed to roof loads, along the top of all load-bearing walls
perform a monolithic reinforced concrete belt. The Mauerlat of the roof truss system of a private house rests on a monolithic belt of the attic wall.
| Monolithic reinforced concrete belt of the attic wall of the attic. The Mauerlat and roof truss system are attached to the belt |
The design of a monolithic belt for supporting a roof is in many ways similar to a monolithic belt at the floor level.
The height of the monolithic belt is not less than 15 cm. The minimum cross-sectional area of the monolithic belt is not less than 250 cm2. A monolithic belt is often made across the entire width of the outer wall if the wall is insulated from the outside. If the wall is without insulation, then on the outside there is space left for laying a layer of insulation, which eliminates the cold bridge through the concrete belt.
For a hipped roof, the belt along the outer walls is made a continuous ring, as in the figure. If the roof is gable, then in the belt you can leave gaps in the gable walls for installing windows.
The best manufacturers of adhesives
There are many companies that produce glue specifically for aerated concrete blocks. However, some manufacturers are the most popular, including Ceresit (Henkel), Knauf, Kolmiks, Volma, Prestige, Kreps.
Review of adhesives from well-known and trusted companies:
- Henkel. Produces materials under the Ceresit brand. Special glue is popular in many countries and there is no doubt about its quality. Ceresit ST 21 is used for laying blocks. The company produces winter and summer versions of the product. With a layer of 2 mm, the cost is approximately 17.5 kg.
- Colmix. Produces Stroy Moment SMK-10. Can be used for work in winter; the product contains auxiliary components that prevent freezing. Consumption - about 20 kg per meter.
- Volma. “Blok” adhesive is produced for cellular concrete. Consumption is about 1.4 kg per meter, which is very little for a 1 mm seam.
- Craps. KGB Kreps is being prepared specifically for blocks. For masonry you need a 2 mm seam. After mixing, you can use the solution for 4 hours. Suitable in conditions from -10 degrees.
- Prestige. Mixtures for foam concrete and aerated concrete are being prepared. The finished solution retains its quality for 3 hours. Seam thickness – 5 mm.
- Aerok. The plant prepares adhesive for various blocks. There are 2 composition options in the range, which allows you to use the manufacturer’s products in winter and summer at temperatures from -15 to +35 degrees. The layer is applied 3 mm thick. Consumption – 15-18 kg per meter.
- Eunice. In addition to laying aerated blocks, the composition can also be used for plastering. The product allows you to correct minor defects, chips, cracks.
To preserve the quality of the glue, it should be stored in an airtight container. In the room where the composition is located, the moisture level should not be higher than 70%. In winter, glue should be left in a heated room. Open packaging must be protected from moisture to prevent petrification. The diluted solution is not stored, it is suitable for use within 2-3 hours.
Ceresit
Ceresit ST 21 is an adhesive made specifically for silicate and lightweight concrete blocks. It has high quality indicators. Among the positive aspects are water resistance, frost resistance, and use indoors and outdoors. It adheres well to cellular concrete, providing additional thermal insulation.
The glue is produced in 25 kg bags. The composition contains polymer components, mineral fillers, and cement. Application temperature range – from -5 to +30 degrees.
Preliminary preparation of the surface is required - cleaning from dirt, eliminating chips and damage. You can level the base with the same glue from Ceresit. Each row of blocks should be carefully sanded using coarse sandpaper. Don't forget to remove dust.
Cooking features:
- The mixture is slowly poured into the liquid at room temperature.
- Mixing is done with a drill with an attachment or a mixer.
- The finished solution is infused for 5 minutes.
- Re-mixing is done.
- The solution can be used up within 2 hours.
Reference! The advantages of ST 21 glue will also be environmental friendliness and safety for humans.
Knauf
Knauf glue is one of the most popular building materials on the market. It is produced in packages of 15 and 30 kg. Knauf Perlfix is a mixture on gypsum with additional components. Suitable for various surfaces, including concrete, foam concrete, brick slabs. Can only be used indoors.
The product is made from environmentally friendly materials. The glue is safe for humans both during operation and after hardening. The company has a quality certificate for each product. At the same time, glue also has some disadvantages. The mixture takes a relatively long time to dry, which is due to its special composition. It will take a week to completely harden. During this time, the adhesion strength will increase.
Ivsil block
Another high-quality glue for blocks is Ivsil Block. It contains fractionated sand, cement and auxiliary polymers. Suitable for grooved and grooveless blocks. A distinctive feature will be increased plasticity. After application, it is possible to adjust the position within 10 minutes.
For masonry, a 2 mm layer of glue is required, which significantly saves its consumption. There are summer and winter versions of the mixture. A small layer of application also prevents freezing of the wall and the formation of cold bridges. After mixing, use within 3 hours.
Experts recommend choosing proven brands of glue for blocks that receive good reviews. When using, you must follow the instructions provided by the manufacturer.
Using glue for aerated concrete blocks (2 videos)
Adhesive for aerated concrete blocks (18 photos)
Common mistakes
Several categories of errors can be distinguished depending on the consequences that appear later.
Actions that violate the integrity of structures
Any miscalculations in the future increase the likelihood of cracks forming. In turn, they lead to a decrease in strength and collapse.
Here is a list of the main errors that are most often encountered in practice:
- The use of bricks to protect insulation together with expanded polystyrene.
- Mistakes associated with bandaging or mating. Creating flexible connections can be called a mistake.
- Armored belts are incorrectly positioned or absent altogether.
- Incorrect arrangement of the foundation, erroneous choice of soil or type of structure, use of different types of foundation in the same building.
- The structure of the trees located nearby was not taken into account.
- Lack of compaction and improper work with underlying layers.
Which leads to unnecessary labor and financial costs
It is because of the mistakes described above that owners have to spend much more money, while none of the expenses pay off. It also takes more time, although the final quality does not change in any way.
The use of ceramic bricks in the first rows is not able to correct mistakes made when arranging the foundation. You should not install reinforcement where it is not initially required.
Additional information about installation technologies
Already at the preliminary stages, the following actions are carried out so that the strength of the masonry becomes maximum:
- Preparation of the solution. A good composition requires special attention.
- Checking the foundation in all areas. It should remain as horizontal as possible throughout.
- Provide additional protection from moisture using bitumen mastic.
Roofing felt for waterproofing is not as effective, but in some situations it can replace analogues.
More detailed description of the technology
The acquired knowledge and skills help to create durable and smooth surfaces that have all the necessary characteristics.
The first element is laid or installed in the corner. Then they continue to move sequentially until the next turn. A thickened layer of mortar helps to cope with any possible defects in the foundation. The main thing is that the height of the corners is approximately the same. The deviation should not exceed 3 centimeters.
When used correctly, the approximate cord also creates the most even line possible. To achieve this effect and maintain it, you need to pull this cord with corner blocks, with the obligatory use of intermediate beacons. At this stage, building levels become indispensable assistants. A hacksaw is used when adjusting blocks when it comes to structures of increased complexity.
Reinforcement is required not only for the space under the windows, but also for rows with numbers divisible by five.
Laying with glue is carried out only in a certain temperature range, from -5 to +20-25 degrees. If the days are hot, the material can be slightly moistened while working. Protective awnings or films are necessary when precipitation is present. Then the seam and masonry will dry correctly.
A stainless steel bond is required when it is necessary to create areas where walls join together with internal partitions. As a result of this work, a seam appears, which can only be fixed with ordinary nails. It is recommended to add such components to each even row of masonry.
When construction is completed, natural shrinkage occurs, which takes up to several months.
About reinforcement
When reinforcing, several problems are solved during installation:
- Strengthening those areas where the masonry is weakened. This is mandatory for all types of openings.
- Providing additional protection for the building perimeter. It is especially important with an increased degree of ventilation and during shrinkage, in case of temperature changes.
- With vertical reinforcement, it becomes possible to combine the base with a monolithic frame. Such approaches are relevant for regions with increased ground displacement and hurricanes.
The frame is made of steel wire, usually everything is arranged in one layer. The reinforcement elements are located parallel to each other. It doesn’t matter whether it’s an apartment or another object.
You need to create two grooves using a wall chaser. Then they are soaked in water and filled halfway with glue. It is necessary to place it inside fittings with a standard size of 8 millimeters. Next, everything is filled to the brim with the binding composition. Using adhesives is not that difficult.
How to check the correctness of the masonry?
The evenness of those laid side by side is checked regularly while construction is underway. The same applies to the thickness of the adhesive layer, which is used for strengthening. Construction measurements require a minimum set of tools:
- Building level.
- Rule.
- Ruler.
During the inspection, the rule is leaned against a section of the wall that has already been erected. If everything is according to technology, then there will be a tight connection. A building level is placed on top of the stacked blocks. His readings should be enough to determine the horizontal line.
The site must be rebuilt if there are any deviations. Otherwise, the masonry will not be of high quality.
Before starting work, a foam container must be prepared. To do this, it is placed in a warm room for 10-12 hours. In warm weather, you can do without these steps.
It is recommended to apply several vertical strips of glue at once to ensure a better bond. If a gun is used, keep the cylinder in an inverted position. The nozzle, which looks like a truncated body, is located a centimeter from the surface of the block.
The thickness of the block itself determines exactly how many stripes are applied to the surface. The width of these strips themselves is 2-3 centimeters. The main thing is that they are not interrupted. Various modern technologies are used for installation.
Installation
After you have created the foundation, you need to lay waterproofing, usually roofing felt is used for this. The roofing felt is attached to the foundation using cement mortar, and the first row of gas silicate blocks is laid on the same mortar.
How to lay the first row on the solution
This work must be done efficiently, since if mistakes are made, this will negatively affect the quality of the future wall. They start laying blocks in the corners of the house, doing everything according to the guides. Pegs are buried in the ground, and a fishing line is pulled between them, which will help control the position of the blocks during laying.
The correctness of the masonry is checked with a level
Laying the second and subsequent rows
After you have laid the first row, you can begin to install the second and subsequent rows. Glue is applied to the surface of the first block, then the second block is laid on it. Next, glue is applied to the block from above and from the side, thus installing them.
Laying also begins from the corner, but it is necessary to ensure that the blocks are tied; this is done by half their size, like brickwork.
As the construction of the house progresses, the horizontality of the masonry is periodically checked using a level, and its verticality using a plumb line.
Reinforcement
To ensure the necessary strength of the building, it is necessary to carry out reinforcement through 3-4 rows. For this, a metal rod with a cross section of 8 mm is used.
After laying the row that will be reinforced, grooves for the rod are made in it; they can be made manually or mechanically.
After this, the grooves are moistened, filled with glue and metal rods are placed in them, excess glue is removed and the next row is laid.
When carrying out reinforcement at the corners of the building, it is necessary to make rounded grooves into which curved rods are laid.
Tips for choosing a tool
- To make sawing blocks easier, it is recommended to use a reciprocating saw for aerated concrete.
- It is not recommended to cut blocks using a conventional hand saw. Experts recommend the use of an alligator saw, the blade of which has pobedit tips. This tool ensures fast and high-quality sawing of blocks.
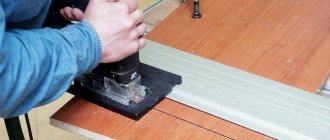
- To level the blocks you need to use a grinder. During work, dust protection must be used.
- Lifting of aerated concrete blocks should be carried out using a homemade diamond grip.
- To ensure convenience during construction, you need to move the blocks using a special device.
- To determine the longitudinal position of the block, it is recommended to use a building level, the length of which is at least 2 meters. The transverse measurement is carried out with a tool that has a shorter length.
- The material should be pressed onto the solution using a rubber mallet.
Types of floats for aerated concrete
According to the principle of operation, tools for grinding aerated concrete blocks are divided into two groups: manual and electric. The first type is used both in private housing construction and on large construction projects. Electric tools have not found widespread use due to their energy dependence, low return on investment and inconvenience of use. It is worth noting that by power tools we mean grinders and grinders, on which a circle of the required hardness is installed - for concrete. There are no specialized electric floats for aerated concrete yet.
But hand tools are not only used everywhere, but also have several variations:
- Grater-plane. It is a tool with rows of sharp metal teeth. Serves for rough grinding, removing chips, grinding off ridges and adjusting the height of gas blocks.
- Sandpaper grater. A device with sandpaper (sandpaper) with a grain size of 1 mm, marked 25-N...80-N. Used to smooth out uneven surfaces and remove dust. It is used during masonry, as well as before puttying and finishing aerated concrete.
Expert opinion Vitaly Kudryashov builder, aspiring author
Ask a Question
You can buy both types of graters separately or as a set. The cost of a grinding tool is from 200 rubles, a plane – from 800 rubles, and a kit will cost 1500-3000 rubles. You don’t have to spend money; you can quickly make the tool yourself.
Work aids
In addition to the main ones, a number of auxiliary tools are also used. They are not required to be used, but they greatly simplify construction work, speeding up the process.
The selection of auxiliary tools is carried out according to the same criteria as the main ones - quality of material, certificate and warranty from the manufacturer, labeling and instructions. Frequently used devices in this series include a spatula, level, square, cord and 2 types of hammers - a rubber mallet and a regular construction hammer.
Putty knife
To work with gas blocks, use a wide spatula with a long base and handle, as well as a device with teeth. The first type is often used with a trowel, and the second type applies the adhesive layer independently.
With a straight spatula it is easy to process the horizontal or vertical surface of the material in those places where the main tool does not reach the block. A notched trowel easily glides over the surface, filling all the pores of the product with glue. In this case, too thick an adhesive composition is not required.
Notched trowel for laying aerated concrete:
Level
This type of auxiliary tool, with a length from 40 to 80 cm, is found in several types:
- Mechanical. It is called bubbly (water) because it contains bubbles in the liquid that is inside the ruler. It has small dimensions.
- Electronic. Operates using a battery. Has a scale and ruler.
- Laser. Charges from mains or batteries. Is portable. It is considered the clearest and most accurate, in comparison with the previous two types. The ruler coincides with the beam that is formed by the laser.
The level helps to ensure that the surface is laid correctly and horizontally
This is important when laying the very first layer and positioning the corners
Mechanical level for gas blocks:
Square
This tool, made of high-quality metal or wood, helps to accurately cut blocks at right angles. Squares have a base and a ruler with a metric scale. Among them there are models with an inch scale.
Modern squares are produced with clamps
Cord
The construction cord allows you to check the evenness of not only horizontal, but also vertical masonry. The device of this row is secured with corner clamps or pegs. Using a cord, you can check that the walls being built are level, preventing distortions and asymmetry.
Pull the cord from the corners of the perimeter of the future building. This helps to carry out high-quality markings, which will need to be followed during the masonry line. The square is especially important for the first row of blocks with formed corners, from which the cord is pulled.
Hammer
When working with gas blocks, use a regular construction hammer, as well as a mallet - a rubber model of a hammer, for tapping the products while laying them. An ordinary iron hammer helps to level the vertical rows of walls, and a rubber hammer helps to tap the surface of the aerated block in order to release air from the adhesive bonded to the surface and provide better adhesion.
A rubber mallet will not cause any harm to the block being tapped, but will eliminate any unevenness. An ordinary hammer can also be used for installation and arrangement of walls after masonry
You need to work with it carefully so as not to destroy the walls
Rubber mallet for gas blocks:
How to prepare the previous row for laying the next one?
Before laying, each block is cleaned with a spatula and brushed. Before starting work, you need to prepare the surface of the previous row for it. If there are unevenness at the joints, or the row is not perfectly even, grind off all excess with a special plane. The teeth in this tool are directed in different directions and at different angles, thanks to which it leaves minimal streaks, but they will then need to be removed with a sanding board with abrasive. When working with a sanding board, you need to apply circular movements that leave round grooves - they will help the blocks adhere better to each other. All dust that forms after using the sanding board will need to be carefully swept away with a brush!
It is necessary to level the masonry with a plane and sanding board after installing each row. There will be no differences in the level of blocks - there will be no sources of high voltage that can lead to cracks on the walls.
Finishing
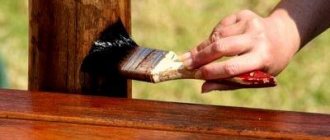
The peculiarity of an aerated concrete house is that this material strongly absorbs moisture and easily allows steam to pass through it. Therefore, proper finishing should not interfere with the removal of steam and prevent the walls from getting wet.
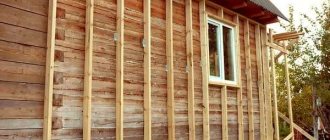
On the inside, materials that are poorly permeable to steam are most often used to reduce its penetration into the walls, and the room is ventilated through ventilation systems and windows. Exterior finishing should not prevent steam that has penetrated the walls from escaping, while at the same time protecting against atmospheric moisture.
For this reason, polymer heat insulators are not used for additional insulation of aerated concrete houses. The ideal material is mineral wool, which is installed behind the external frame sheathing or facing masonry. In both cases, it is necessary to take care of the ventilation of the facade, which occurs through ventilation gaps. You can read more about this in specialized articles on our website.
If the building is heated, under no circumstances should you install facing bricks close to the aerated concrete.