Full and partial replacement
According to standards, until 1991, the apartment panel had to have a power of 3.5 kW. In modern conditions, various electrical appliances are used, so power is no longer enough. There are two ways to change the electrical network.
Features and disadvantages of partial replacement
Replacing electrical wiring in a Khrushchev-era apartment guarantees safe and full use of all modern household appliances.
Complete replacement of hidden electrical wiring in a Khrushchev-era apartment is accompanied by noise, which can disturb the peace of neighbors. The labor-intensive work of removing cables from all walls is beyond the power of few owners. If the Soviet aluminum wire is in good condition, you can partially replace communications. During the process, it is important to consider the following points:
- a new 7 kW input circuit breaker is installed to protect against short circuits and blackouts in premises;
- sockets designed for a load of 10-15 A must be grounded;
- for laying, insulated copper wire is used with a current rating of 2 to 5 A per mm2.
Copper and aluminum are not galvanically compatible
The disadvantages of partial replacement include the electrochemical incompatibility of copper and aluminum wires and the mismatch between the cable cross-section and the power of modern household appliances. Often there is not enough space in small old boxes, and reconnecting brittle aluminum cables requires some skill.
Partially it is worth replacing only open lines.
When is a complete replacement required?
Old wiring cannot withstand the load of switched-on devices.
Major repairs with the dismantling of the floor covering and radical alteration of the walls include a complete replacement of communications. It is necessary to completely change the wiring in the following cases:
- When you turn on household appliances at once, a burning smell appears;
- sockets spark when appliances are turned on;
- Some outlets have no power;
- current leaks through the wall;
- wires break and become less flexible.
A complete replacement of electrical wiring is carried out once every 20-25 years.
Preparation for repair
Before you begin directly replacing the wires, you should draw up a detailed drawing of the new route, marking all the elements of the electrical system. It must be developed taking into account the convenient connection of all electrical appliances available on the household.
- Tip 1. Remember that equipment manufacturers do not recommend connecting powerful electrical appliances to the network through power strips. Separate sockets must be provided for an electric stove, boiler, air conditioner, etc.
- Tip 2. Each room must have at least two cable branches: for lighting fixtures and for sockets.
After drawing up a drawing plan, you can begin purchasing the necessary materials. In addition to the cable, you will need:
- boxes
- switches
- sockets
- rag tape
You should not use system elements that have already been used, since there is no guarantee that they have retained their original performance properties. Saving on small things can lead to problems in the future. A worn-out socket will certainly need replacement sooner or later, but if a short circuit accidentally occurs in it, the new wiring may also burn out.
To change internal electrical networks with your own hands, you will also need a set of tools, namely:
- phase indicator
- hammer drill
- pliers
- screwdrivers
- angle grinder (grinder)
- soldering iron
- terminal blocks
- knife
Having everything you need in hand, you can get to work.
Problems with old houses
The construction of Khrushchev-era apartment buildings took place between 1958 and 1985. within the framework of urbanization. The power lines in them differ depending on the series of buildings:
- Buildings from the 1963 period - places for the distribution box, gating, and connecting wires were left to the discretion of the electrician;
- Panel houses of 1965 - wire routing and hidden installation were carried out in the channels of panel slabs;
- High-rise buildings built in 1974 are classified as standard construction according to the requirements of the Unified Catalog of Construction Parts. Due to the poor quality of the channels in the slabs, the wiring was laid in niches under the floor of the upper floors, leading the cables through a through ceiling groove.
Typical locations of electrical wiring channels
In the 60s - 70s. We did not anticipate such a number of electrical appliances, so the network could withstand a maximum load of 3.5 kW. The total power of a modern kettle and iron is 4 kW.
The electrical wiring diagram in a Khrushchev two-room standard layout included several lamps, an iron, and a radio. Aluminum cable, popular during Khrushchev's time, also had disadvantages:
- broke over time with minor bending;
- required complete replacement once every 20 years;
- under voltage was subjected to electrocorrosion, which became the cause of fires.
In 1960-1980 It was customary to ground the power line according to a scheme with a solidly grounded neutral. At the end of the twentieth century, the TN-CS scheme was adopted in the Russian Federation, to which the Khrushchev buildings do not correspond.
Wire twists and uninsulated areas due to the branching method require a complete replacement of the aluminum cable with copper.
How to choose a cable?
The power of the electrical circuit inside the apartment must be sufficient to connect all devices. Replacement of wiring in Khrushchev is carried out taking into account this requirement. Only in this case can you be sure that in the future there will be no emergency situations due to network overload.
When preparing to install a new electrical wiring in a Khrushchev building with your own hands, first of all, you should correctly calculate the cross-section of the cable for laying the route. To do this you need:
- add up the power indicators of all major electrical appliances used in the household
- add an additional 100 watts to each device
- divide the resulting amount by 220
If the result is a number of 15 (or less), then a wire with a cross-section of 1.5 mm2 is sufficient for laying an internal electrical network. Otherwise, one of two things: either you need to choose a cable with a larger cross-section, or you will have to lay two (or three) wiring lines from the electrical panel.
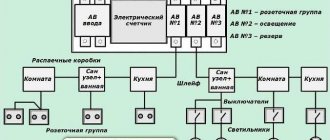
Where to start replacing electrical wiring
Structural diagram of the electrical wiring of the apartment
At the preparatory stage, a plan diagram of the new wiring in the two-room apartment is drawn up. It is agreed upon by BTI and Energosbyt. Preparation also includes:
- Visually inspect the line for visible damage.
- Drawing up a drawing of the electrical systems of the entire house.
- Purchase of consumables - sockets, cables, switches, boxes.
- Search for the necessary tools - a hammer drill, an angle grinder, an indicator, side cutters, a level, a flashlight, a mounting knife, pliers, a soldering iron, fabric insulating tape.
Buy wire with allowances after measuring the length of the route.
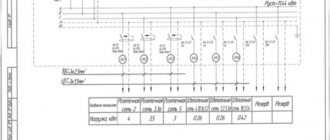
Power calculation
Approximate power of various electrical appliances
It is necessary to replace the electrician in such a way that failures and network overvoltages do not occur in the future. The line power is selected taking into account all electrical equipment and depends on the cable cross-section. You will need to make several calculations:
- Sum up the power of all equipment connected to the power grid.
- Add +100 W to each device.
- Divide the total by 220.
If the result is 12-15, it is permissible to use a cable with a cross-section of 1.5 mm2. This is enough for an apartment with a standard layout.
When there is a heavy load on the line, it is allowed to increase the cable cross-section and arrange communications using a two-wire or three-wire circuit.
When using thick wire there are risks of failure.
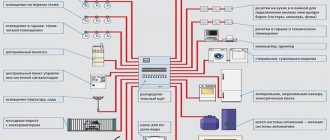
Apartment power supply diagram
Scheme of powering an apartment through an RCD.
In old houses, on each floor there is an electrical panel where the meter, packet switch, and circuit breakers are located. Therefore, when designing a wiring diagram in a two-room apartment, it is worth making an independent power and lighting circuit, planning the main and additional branches. The following connection options are allowed in Khrushchev buildings:
- Parallel - energy is supplied to the consumer from the power source via its own line. A three-core cable is connected to a single-phase device, and a five-core cable with wires of phases A, B, C, zero and ground is connected to a three-phase device. Such a scheme provides for the organization of each consumer’s own line and the installation of an individual RCD.
- Serial - a cable is pulled from one power source, and the consumer is connected to it at a certain distance. To implement the scheme, you will need a wire with a large cross-section and grooves in the walls. The energy source will be a generator producing a nominal 220 V. To save money, you can stretch the electrical cable from the panel to a specific consumer.
- Series-parallel - the circuit is used in most apartments. The distribution box is designed for consumers grouped by type (boiler, sockets, light) or location (kitchen, bedroom, bathroom).
A series-parallel connection is the best option for a budget-friendly complete replacement of the electrical network.
Lighting system wire cross-section
Surely, you yourself understand that lighting fixtures place the least amount of stress on apartment electrical wiring. Therefore, a wire cross-section of 1.5 mm2 is quite sufficient for a standard apartment in an apartment building. However, when laying the wiring, you should be absolutely sure that the total load of each lighting group does not exceed 3.5 kW. Due to the traditionally low load, all apartment lighting, as a rule, is reduced to one group, served by a 1.5 mm2 cable.
A wire cross-section of 1.5 mm2 is quite sufficient for wiring that supplies power to lighting fixtures
So, to summarize, I’ll just remind you of the bare numbers. Most often, the cross-section of wires in a city apartment is:
- input cable – 3×10 mm2 (single-phase network), 5×2.5 mm2 (three-phase network);
- electric stove (hob) – 3×6 mm2 (single-phase network), 5×2.5 mm2 (three-phase network);
- rosette groups – 3×2.5 mm2;
- lighting devices – 3×1.5 mm2.
However, I must emphasize the phrase “most often” that I used. If you initially plan to install very powerful devices in your apartment, then before laying the electrical wiring you should make the necessary calculations so as not to make a mistake in choosing cables of the required cross-section. The best option is to contact a professional electrician.
Features of installation in Khrushchev
The diagram of the selected wiring for installation in a Khrushchev-era standard two-room apartment is based on consumer groups. These include lighting devices, household and power sockets, a bathroom and a corridor. The arrangement is carried out using two technologies.
Hidden way
Appearance of the channel for wiring in the lower part of the ceiling junction box.
In brick or panel houses, wires can be laid in three ways:
- Inside the ceiling, the route from the switchboard goes vertically, runs along grooves or in a corrugation. Internal ceiling tiles already have channels from where you can run power cables to lamps, switches, and sockets. The wiring runs perpendicularly, without falling horizontally below 15 cm. Each distribution box has an individual automatic switch.
- Under plaster - wires are inserted into pre-drilled holes, fixed, and brought out to consumers. The lines are masked with a layer of plaster, which prevents them from being damaged by voltage fluctuations.
- Under the floor - the line is routed under the floor surface. Channel pipes are laid, which are then filled with solution. Lines for sockets and lighting are masked with a mounting box or pipe.
With a combined connection, pipes and cables are distributed at an acute angle. The routes are connected via a distribution box to the input panel.
Open way
Wiring in the baseboard
The open version is used when it is impossible to organize the electrical network in any other way. There are several methods:
- On the brackets - for sockets you need copper wires with a cross-section of 2.5 mm2, for lighting - 1.5 mm2. Metal strips are used as staples, fixing them so that the non-flammable part extends 1 cm beyond the line.
- In pipes, corrugated flexible products prevent surface leveling. The diameter of the pipe is equal to the total thickness of the conductors, multiplied by 2. Fastening is done with screws, clips, dowels and nails. Each element is removed from each other by 20-40 cm.
- The boxes contain a metal or plastic cable channel and the baseboard is equipped with a removable lid with a latch. The main difficulty of the work is the correct fastening with screws, dowels or staples. Sockets can be mounted directly onto the box.
If the apartment has a retro interior, the wires do not need to be masked.
Separate lines
For an electric stove, oven, instantaneous water heater, washing machine (if the power of its heating element is more than 3.0 kW), it is necessary to arrange separate lines from the distribution board. Each line in the apartment must be protected by its own machine.
The diagram should show the wire routes, locations of sockets, switches, their power, installation height from the floor level.
For cable routing, the installation locations of junction boxes are marked. The installation location of the consumed electricity meter is determined. In an apartment building, as a rule, utility panels are installed for this purpose on the staircase landings in the entrances.
For alarm systems, in addition to wire routes, installation locations for control panels and sensors are determined.
Practical advice. When dismantling old wiring, there is no need to rush to remove wires laid in pipes or voids; they can be used as a conductor for pulling new wiring.
What tools will you need?
Tool for installing electrical wiring
Self-replacement of electrical wiring is carried out using the following tools:
- perforator;
- concrete drill, concrete drill (16-20 mm), core drill (90-100 mm);
- chisel 25-30 mm;
- soldering iron 40 W;
- grinder with a disc for stone;
- screwdrivers;
- pliers;
- side cutters;
- phase indicator;
- tester;
- cord and level;
- flashlight;
- stationery knife;
- putty knife.
Before work, it is important to calculate the number of wires - measure the length from the shield to the connection point, taking into account protrusions, niches and corners.
Required materials
To perform wiring installation work yourself, you will need the following material:
- cable;
- protective disconnecting devices (automatic circuit breakers, RCDs);
- sockets, switches and distribution boxes;
- distribution board;
- insulating tape;
- connection terminals;
- various fasteners.
Instructions for replacing wiring
At the preparatory stage, it is necessary to conduct a visual inspection and check the quality of the connection. Further operations are performed according to an algorithm developed by professional electricians.
Blackout
Before starting work, it is necessary to turn off the power to the apartment.
To gain access to the system and not get electrocuted, you will need:
- Turn off the main circuit breaker from which the cables go to the apartment.
- Check for voltage.
- De-energize each wire, first checking it with a phase indicator.
- Test switches and sockets for voltage.
The old wiring can be left in place without damage.
Dismantling old wires
The electrical wiring is dismantled after the electricity is completely turned off. This can be clarified using a multimeter.
First, local dismantling is carried out from the distribution box under the ceiling. It is opened, the input cable is found and removed. If the wire does not stretch, it is cut further and then insulated. Further work is carried out in a similar way.
Surface preparation
Grooving walls for wiring
Wall grooving can be done horizontally or vertically.
- Marking the locations of socket boxes according to the drawings.
- Marking places for sockets with the ability to disguise the cord.
- Accurate determination of channel boundaries with a puncher.
- Manual alignment of holes with a chisel.
- Making an oblique cut with a grinder for an even position of the wire.
- Making holes in a brick wall using a crown attached to a hammer drill.
Crooked grooves often cause cable breaks and fires.
Line grounding
Grounding in an apartment
Installation of a protective line in houses built in the period 1960-1980. was not provided. To solve the question of where to get grounding in a Khrushchev building, you will need to make a grounding:
- Connect the ground contact in the socket to zero.
- Bring the structure onto the shield from the outside.
A connection in which the input circuit breaker turns on “zero” while the current protection is operating is prohibited by regulations.
Installation
Installation of a socket box
Installation of a new power line is carried out in stages:
- Installation of socket boxes on alabaster in holes.
- Cutting cables and corrugated pipes to the required length.
- Pulling the wire inside the corrugation on a flat surface.
- Laying the corrugation in the groove with the cable ends inserted into the socket box.
- Aligning the hole along the wall line.
- Putty the grooves in small sections, every 50 cm.
- Planting the second end of the corrugation onto the input panel.
- Treating the ends of the wires with paste, fastening them with a clamp and fixing them to the protection terminal of the shield.
Lead the apartment wiring into the panel suspended.
Grilling
It remains to consider the gating and laying of cables in a two-room apartment. The procedure must be carried out only in the horizontal or vertical direction. This will protect the electrical wiring from accidental damage when drilling holes in the wall or driving a nail, which is not uncommon in the household.
- The cable must be threaded into the corrugation in a convenient place for this (on the floor, perhaps in another room of the apartment), having previously cut off the required pieces of both.
- When laying a cable with corrugation in a groove, it is necessary to fix them in it with small volumes of alabaster at a distance of 50 cm.
- After threading the cable into the socket boxes, they are covered with alabaster flush with the wall. The grooves are sealed with plaster.
Now all that remains is to connect the contacts correctly, and the replacement of electrical wiring in the Khrushchev is completed. Here you just need to add that changing the electrical wiring diagram, as well as switching from aluminum to copper, is not some kind of whim or, especially, a tribute to fashion. These actions are an objective necessity for two-room apartments in old Soviet houses.
Preparatory work
Technical events
There may be situations where it is impossible to do without gating, which is most often due to the lack of decorative finishing or the inadmissibility of openly laying cable channels. Taking into account all the previously described inconveniences, the contractor must prepare for the upcoming work, which means fulfilling the following mandatory conditions:
- When carrying out preparatory activities, first of all, it is necessary to identify the routes along which the old and new electrical wiring will be laid;
- For these purposes, it is recommended to use special electronic devices capable of detecting e/m fields or metal objects hidden in the thickness of walls (one of them can be seen in the figure below);
Electrical wiring indicator
Based on the results of the study, it will be necessary to apply markings on the walls indicating the location of the passage;
Additional Information. You can do without electronic devices if you remember that, according to the PUE, grooves are always laid only vertically and horizontally.
- After opening the distribution boxes, you can see the horizontal and vertical lines along which the outlet wires run, and roughly estimate their direction (as the grooves are cut, it can be corrected);
- To dismantle the electrical wiring hidden in the walls, you will have to buy (rent) a wall chaser or an angle grinder (what these tools look like is shown in the figure below).
Standard wall chaser
In addition, you should prepare an old unnecessary container (a bucket, for example), used for removing sample waste from the apartment.
Important! Naturally, before starting the main work, you should relieve the tension from the entire apartment. Experts advise in this case to turn off not only the input circuit breakers, but also the linear circuit breakers.
Organizational events
Typical electrical wiring in a panel house, laid in grooves and walled up with concrete or alabaster, can only be replaced by opening them using a special cutting tool. When working with it, you must take the following protective actions:
- Remove all existing furniture and valuable household items from the room or cover with protective film;
- In summer, fully open windows and balcony doors;
- Prepare goggles, a respirator or mask to protect your eyes and respiratory organs;
- Put on a work uniform made of thick material and the same gloves;
- Keep children and pets away from this room.
In addition, it is advisable to spread old newspapers or sheets of thick paper on the floor throughout the room, and also prepare a spray bottle with clean water (you can periodically spray dusty air with it).
Where can I buy
You can resolve the issue as quickly as possible by visiting the nearest specialized store. The optimal option, in terms of price-quality ratio, remains purchasing from the AliExpress online store. Mandatory long waits for parcels from China are a thing of the past, because now many goods are in intermediate warehouses in destination countries: for example, when ordering, you can select the “Delivery from the Russian Federation” option:
| 3-pin waterproof distribution IP68 box | Distribution box, IP67 housing | Junction box, IP65 |
| 3-way distributor box, IP68 | Distribution box 2/3/4/5/6 way, IP68, 45A/450V | Mini junction box IP66, size 47*28*18mm |