Beginning of work
Do-it-yourself cabinet decoupage should begin with a thorough inspection of it. Be sure to pay attention to defects; they will need to be worked on separately and removed from the surface. The most convenient way would be to disassemble it, remove the doors and install updated fasteners. The inside of the cabinet is also inspected and processed. For fun, you can take photos before and after work, which you can later show to your friends and family.
Before decorating the cabinet, you need to sand off the old paintwork. This will help avoid detachment and unevenness in the future. A master class from famous carpenters advises covering the entire wooden surface with varnish so that subsequent shades of paint do not change their color as they are absorbed into the wood.
Protecting furniture from moisture
Welcome to bokovina.ru! Perhaps you are familiar with the situation when a kitchen set from water turns into a pile of firewood. The laminate becomes loose and loses its original shape. The cause of the damage must be eliminated and the damaged parts replaced; there is no other way to save the headset.
Risk area
And in order to prevent such a situation, it is important to follow simple steps during assembly. First of all, we protect the sink cabinet and the cabinet with the dish dryer; the modules are in direct contact with water. In the latter, it is advisable to install frame facades with grilles for air circulation.
The risk zone also includes cabinets with a dishwasher and washing machine. I recommend making the body of such modules from moisture-resistant material. If the situation does not allow this, then we will use a sanitary, transparent sealant. This is reliable protection from moisture in your kitchen.
Transparent sealant
Over more than 10 years of experience working with it, there was no way to doubt its reliability. But unfortunately, in stores there are both good and low-quality goods. In order to check the properties of the sealant, you need to leave a drop at room temperature for three hours.
If the drop has frozen well (has a rubber-like consistency), then you have purchased a quality product. If the drop does not retain its shape (leaves marks on the hands), then the hardening time will have to be increased to at least 12 hours.
Before assembling modules
Before assembling modules that fall into the risk zone, you should carefully coat with silicone all open ends on the parts. And then, while the sealant has not hardened, begin assembly. This way you can protect parts that are inaccessible to hands but accessible to water.
We pay attention to the design of the cabinet with a dish dryer. If it has aluminum slats, then everything is fine. If not, then under no circumstances should we make these parts from laminated chipboard, because they will be crushed beyond recognition. For these purposes, you need to use wooden planks.
Within walking distance of you, there is a service for calculating cabinet furniture.
Protecting the countertop from moisture
Let's move on to protecting the main part - the tabletop. Moisture-resistant countertops look great, but the manufacturer only provides a guarantee for a solid countertop. If you saw it, which you definitely have to do, then there is no guarantee that it will not swell from moisture.
Be sure to silicone the end of the table before attaching the connecting strip. And we don’t skimp on the silicone; we remove the excess with a damp cloth. Postforming (front rounded end) has a drip tray, which prevents water from getting onto the lower pedestals. There's nothing to worry about here.
The only thing I would recommend is that during installation, make a slight tilt of the tabletop in level not to the wall, but to the hostess. For spontaneous drainage of water from the table. And in order to completely prevent water penetration, I will tell you how I install the wall plinth on the countertop.
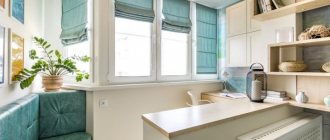
Surface decoration
There are many DIY ways to update your cabinets. The most popular, even today, is painting cabinet furniture. The decor of a sliding wardrobe or a standard version simply cannot do without painting, and bright colors will help the old product sparkle with new colors. In order for the paint to last a long time and look beautiful, you need to follow the rules:
- Preferably use acrylic paints;
- sand the surface well;
- eliminate in advance any imperfections that become visible after painting.
Stencil
At home it is very convenient to use stickers or a stencil. Geometric patterns or flowers will perfectly hide any surface imperfections and refresh the product. In addition, it will not take you much time, the main thing is to format the drawing correctly. The correct shapes of the stencils fit perfectly into modern designs and give the cabinet a modern look.
Every housewife has leftover rolls of wallpaper after finishing the premises. Don’t rush to get rid of them, because they can be an excellent assistant in decorating your wardrobe. Their main advantage is that they perfectly hide surface imperfections, because the paper can easily be applied to any curves. It is worth noting that decorating wallpaper with your own hands harmonizes perfectly with a wooden surface. This combination is modern and practical. In order for the surface of the wallpaper to last for a long time, experts advise covering it with varnish.
Decoupage
DIY decoupage of an old wardrobe has become very popular lately. You can use ordinary napkins or thin paper, the result will amaze anyone. A decorated surface, even with a simple ornament, will look very impressive and presentable. Such decorations are also covered with a layer of varnish upon completion of the work.
Fabric
You can also decorate the surface of furniture using fabric. Moreover, it is not necessary to look for the same type of material; patchwork patterns look no less beautiful and original. It is unlikely that it will be possible to completely cover the cabinets, since a large number of transitions and bends will not allow the fabric to align. But making bright inserts to hide imperfections will be very simple and quick. Each fabric is beautiful in its own way and can easily be matched to various interior styles.
Mosaic
Mosaic decorating any furniture looks expensive and impressive. Small details, whether glass or plastic, always look bright, attracting attention. Broken ceramics have become a real feature of modern interiors and many people make stunning patterns on their own. All you need is a mosaic and the glue with which it is attached. This option is suitable for living rooms, children's rooms and even the kitchen - it all depends on the choice of pattern.
Mirrors
You can decorate a sliding or platinum wardrobe with your own hands using a mirror. This reflective glass has the great feature of hiding imperfections on any surface. In addition, it is very convenient when there is a mirror on the cabinet, especially for women. Thus, you can save room space in small rooms. By adding a little imagination, you can design inserts or carved patterns.
Gilding
Don’t think that gold jewelry for an ordinary wardrobe can cost you a pretty penny. Now there are a large number of alternative options, such as gilding or foil. It is a pleasure to work with such material, as it fits perfectly on all patterns, leaving behind a bright golden glow. By decorating not the entire surface, you can create a beautiful design, which, for durability, will only need to be secured with varnish.
Slate coating
This coating has been known to everyone since school days. So why not translate it into modern furniture? Moreover, it is very convenient to leave notes and reminders for yourself. And for a children's room, this can be the best option for entertainment. You can make a slate cabinet with simple paint, which should be applied in two layers and wait until completely dry. There are also slate films for decorating the surface, but as practice shows, you need to know how to glue them.
Source: infomebli.ru
Photo restoration
Another option on how to transform an old cabinet is to use photographs or photo wallpaper. This can be done with the help of printing companies engaged in large-format printing: with their help, you can enlarge any photographs and decorate the surface of the case with them, turning it into a panel or collage.
Modern technologies make it possible to make large-sized and high-quality pictures on almost any surface.
Before gluing the photo to the cabinet, you need to clean the surface of the furniture from old paint and level it using sanding and a layer of primer. After this, you can start gluing up photos. It is also practiced to secure the new appearance of the cabinet by applying a layer of transparent varnish.
When applying a picture to glass or a mirror, the picture will be glossy, but on chipboard it will be matte, like a photograph printed on matte paper.
Review of beautiful cabinets, tips for choosing
Wardrobes are one of the most essential pieces of furniture in a home. Everyone strives to equip their home not only as rationally as possible, but also to choose furniture that will look as impressive as possible, without cluttering up the free space of the room. The developers offer a wide selection; anyone can purchase beautiful cabinets for their home. The variety of materials from which furniture is made is enormous, and the creativity of designers in the design of facades truly knows no bounds. Cabinets are produced in different shapes and sizes, using high-quality, environmentally friendly materials; the walls and doors are decorated with patterns, colors, glass and mirror inserts.
Preparing for work
Before you start decorating the wardrobe, you need to make minor repairs (if necessary) - replace loose hinges and fittings that have become unusable, remove rust from metal elements, strengthen the joints of parts with self-tapping screws. Then you need to remove the old paintwork from the product using a sanding machine or fine-grained sandpaper. If the furniture is not made of wood, then the surface must be treated with fat-dissolving agents, for example, dishwashing solution.
If the furniture has small cracks, dents, scratches or chips, they need to be removed with sandpaper. Large defects can be eliminated with your own hands using special furniture wax. It needs to be heated and applied to damaged areas. Very large defects should be covered with a primer, and then putty should be applied to them in thin layers. If you try to treat a large crack at one time, the putty will not adhere well and will crack quite quickly. When all the defects have been eliminated, all that remains is to coat the external and internal surfaces of the wardrobe with primer.
Decoupage method
Using the decoupage technique, even a novice craftsman can change the design of old furniture. To decorate an old wardrobe with your own hands, you will need napkins, printed images, magazine clippings, posters or any other materials with suitable designs. They can be glued to doors, walls and furniture shelves.
You need to start work by painting the product with acrylic paint and drying it completely. It should be remembered that if the furniture is polished, then acrylic paint will not adhere to the surface very well, but the situation can be corrected by repeated subsequent application of varnish.
Then the location of the pictures is determined, after which the pictures themselves are prepared. If the image is applied to a napkin, then you need to remove the white layers from it, leaving only the layer with the pattern. If the picture is paper, then the back side should be thinned as much as possible using sandpaper, and then soaked in water and laid out on a towel.
You need to apply PVA glue to the places where the images will be located, and then attach the pictures there. You can remove air bubbles under the paper using a sponge or roller. When the picture is completely dry, the wardrobe needs to be coated with several layers of varnish.
Treating furniture with crackle varnish
The design of antique wardrobes is especially popular now. You can update and artificially age furniture with your own hands; to implement this idea, crackle varnish is used, which creates chaotic cracks on the treated surface.
Craquelure can be single-phase or two-phase; the technologies for working with these two types of material have certain differences:
- Single phase varnish. The surface of the old wardrobe is painted with dark paint and dried, after which craquelure varnish is applied to it. It dries to the point where it sticks a little to your fingers, but does not stay on them. Then you can apply a layer of light paint, on which cracks will appear. Their size depends on the thickness of the crackle varnish layer. When the paint is completely dry, the furniture should be coated with acrylic varnish.
- Two-phase varnish. First, the first phase of varnish is applied to the prepared surface. When it dries to the point of adhesion, the second phase is applied and dried to the same state. After this, the formed cracks are rubbed with gold powder, bitumen or oil paint. Then the wardrobe is coated with acrylic varnish. Decoration is complete.
To successfully translate your ideas into reality, you need to work with varnish correctly, otherwise the effect will not be as expected. It is recommended to purchase liquid craquelure varnish, because the viscous material will not adhere well and will create unevenness. It is highly undesirable to shake the varnish before starting work, as air bubbles may form in it.
If you don’t have experience restoring furniture and you’re not sure that you can do it yourself correctly, then practice on a different surface in advance. A few hours before starting work on changing the design of the cabinet, do a wet cleaning of the room; this will reduce the risk of small debris and dust getting onto the drying surface. The room where you are going to update the cabinet should not be damp or cold.
Fabric decoration
You can change the design of a cabinet, cabinet or chest of drawers with your own hands using fabric. To do this, you need to prepare a piece of textured, dense cotton with a beautiful pattern, and then apply glue to the surface of the furniture and carefully apply the material. You can also place a thin layer of foam rubber under the fabric. The work should be done without haste to avoid the appearance of bulges and swellings under the fabric.
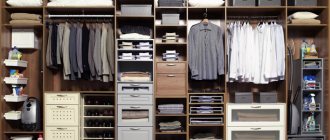
Options for corner shelves and beveled modules
Sliding wardrobes, as a rule, are made to be spacious; the depth of the sides of a standard cabinet depth varies between 600-700 mm. To visually make it smaller, use beveled corner shelves and various add-on modules. Which, however, are quite practical and functional.
There are a lot of design solutions for corner side shelves. They can be made of glass and chipboard, have a round and rectangular shape.
To design closed modules, both straight and radius facades are used. Most manufacturers of sliding systems also offer fittings that help produce hinged facades of the same design and design as sliding doors.
In hallways, the add-on module can be designed as an open hanger with shelves, a lower cabinet or a chest of drawers with a mirror.
For bedrooms, the design of classic wardrobes and side modules with hinged doors can be used.
Ideas for restoring an old cabinet with your own hands
Restoring old furniture is an interesting option to update interior elements and show your creativity. It is not necessary to go to a furniture store or factory and buy new furniture. By showing your imagination, you can give tables, chairs, and shelves an attractive look and a special twist. The simplest and most economical option for updating an old cabinet is to paint the furniture using decorative paints and varnishes.
You can also use wallpaper, decoupage, photo printing, photo wallpaper and decorative plaster for restoration. But which method should you choose?
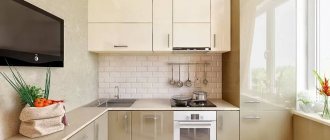
How to decorate kitchen furniture (42 photos): ideas and instructions
Beautiful furniture in the kitchen instantly improves your mood and becomes the main condition for preparing real culinary masterpieces and delicious morning coffee.
Famous designers advise how to decorate an old kitchen set with your own hands.
Decorating will easily refresh the interior and make the furniture unique and elegant.
Furniture decoration is a fascinating creativity accessible to everyone, an interesting process and an exclusive, spectacular result.
Budget restoration of products
The easiest and most inexpensive way to update a cabinet that has lost its attractiveness is to cover it with wallpaper or photo wallpaper. This decoration is suitable for the restoration of a wardrobe, wardrobe, chest of drawers and bedside tables, which are installed in dry rooms.
The most suitable are non-woven and vinyl wallpapers or photo wallpapers, which are sold in construction stores.
Pasting is performed partially or completely. How to update old furniture:
- The wallpaper used for restoration should differ in pattern from those that cover the walls in the room, but have a common style and color scheme;
- If the walls of the room are covered with light-colored canvases, choose bright wallpaper to update the old cabinet. When the interior has wallpaper with a pattern or design, the furniture is covered with plain wallpaper;
- Internal shelves and external facades can be decorated in different combinations. Additionally, new fittings are used. It is convenient to decorate furniture with self-adhesive wallpaper;
- To work you will need a brush, PVA glue, a construction knife, and decorative wallpaper. It is easier to glue paper sheets, but vinyl and non-woven fabrics are more durable;
- The product is measured, the wallpaper is cut into strips of the required length, the glue is evenly distributed over the surface, the wallpaper is glued, and the coating is carefully smoothed.
It is recommended to use wallpaper to treat old cabinets made of natural wood without polished elements or to finish the interior of a cabinet that does not have a varnished coating.
Before wallpapering, degrease the surfaces with alcohol, acetone or gasoline. Self-adhesive is applied to the cabinet elements and smoothed so that air bubbles do not form.
Decor the back wall of cabinets and shelves with wallpaper
If you initially think that the back of the furniture will be glued “on theme” only in the same places as the walls of the room, then nothing like that! Don't limit yourself to such a banal solution.
The back wall of the cabinet can be decorated with any wallpaper of a similar color. If it is not in stock, look at the shelves for sale in stores and hypermarkets. You need fewer rolls and you don't have to spend much. Geometric patterns look especially impressive and win-win when pasting back walls.
In a classic living room interior, you can choose wallpaper with luxurious Provence or Baroque motifs for covering the open back walls of furniture. This will add atmosphere and a touch of luxury to the overall style of the room.
Fun wallpaper will make the room more cute and cheerful. Especially if the room is on the shady side.
The use of bright and cheerful patterns is appropriate not only in cozy kitchens, but also in bedrooms and children's rooms, wherever you want to enliven the interior and add a good mood to yourself and your loved ones.
Sources
- https://AmiPlus.ru/zona-otdyha/zadnyaya-stenka-mebeli.html
- https://m-strana.ru/articles/zadnyaya-stenka-shkafa-material/
- https://made-box.ru/details/kreplenie-zadnej-stenki-shkafa.html
- https://NuclearFactor.ru/zapahi/zadnyaya-stenka-shkafa-iz-chego-2.html
- https://lkard-lk.ru/dom/iz-chego-sdelana-zadnyaya-stenka-shkafa-vidy-materialov-ih-plyusy-i-minusy
- https://dom-naveka.ru/dom-stroj/chem-obshit-zadnyuyu-stenku-shkafa.html
- https://mebeltorgspb.ru/shkafy/iz-kakogo-materiala-sdelana-zadnyaya-stenka-shkafa.html
- https://12-stuliev.ru/shkafy/zadnyaya-stenka-shkafa.html
- https://VegaMebell.ru/dizajn/krepezh-dlya-zadnej-stenki-shkafa.html
- https://dom.sibmama.ru/drevesn-plity.htm
Application of three-dimensional drawings
Decorative plaster and stencil painting are an interesting way to restore an old cabinet. This design will elevate the furniture and give the surfaces a voluminous decor.
Suitable for decorating not only wardrobes and chests of drawers, but also for restoring kitchen furniture (sideboard, cupboard).
The paint will reliably protect the products from temperature changes and moisture. For work, use decorative plaster, acrylic paint, varnish, a stencil with the desired pattern, a spatula, masking tape, sandpaper, and brushes. Painting a cabinet with your own hands requires following a precise work algorithm:
- The fittings are removed from the furniture.
- Remove the layer of old coating.
- Treat with sandpaper.
- Cracks and chips are repaired with putty.
- The stencil is secured with masking tape.
- Prepare the plaster according to the instructions.
- Apply the material with a flat spatula.
- The stencil is removed and the pattern is corrected with a knife.
- After drying, the drawing is sanded with sandpaper.
- Paint is applied to the renewed base.
- To consolidate the effect, coat with varnish.
The same method is used to paint an old cabinet using a stencil, but without decorative plaster. Against the background of patterns, fittings painted in gold or silver look impressive.
To obtain a contrasting pattern, the product is coated with white paint. After the layer has dried, attach a stencil and spray it with spray paint (shake first) of the desired shade - the decorative coating is ready, and the furniture takes on an interesting appearance.
To ensure that the paint evenly covers the furniture and does not peel off, cabinets, bedside tables, chests of drawers, and wardrobes are prepared for painting by removing dust, dirt, and greasy stains.
Any shade can be used as a base background, but the design looks most expressive when the stenciled cabinet is painted white.
Kitchen table decoration
The decoration of the tables is varied.
Oriental style table
Oriental style pattern for the table
We will paint the old table black and glue on gold patterns: gold leaf - thin gold leaf. We can buy it in all stores for professional artists or for handicrafts. And the price of such a rich restoration will please us.
Updating chipboard cabinets
Furniture made from particle boards loses its attractiveness over time, no matter how carefully it is used. You can return your products to their beautiful appearance and add fresh colors to the interior by painting old chipboard cabinets.
It should be taken into account that chipboard does not absorb paint well, since the furniture is covered with a moisture-repellent laminated layer.
In addition, if the condition of the cabinet fastening elements is unsatisfactory, it is recommended to replace the fittings and further strengthen them. How to paint an old chipboard cabinet:
- All removable elements are removed from the furniture so that an empty frame is left for painting.
- Using coarse sandpaper, remove the layer of old paint (if any) and varnish.
- The surfaces must be rubbed carefully so as not to damage the base. The cabinet is swept with a dry rag to remove dust.
- Corners, edges, joints and protruding elements are treated with fine-grained sandpaper.
- Water-based acrylic paint is a better option than painting chipboard. The color scheme is chosen according to your taste.
- Before painting, a chipboard cabinet must be primed so that the paint is less absorbed into the material.
- The primer is applied in a thin, even layer and the composition is allowed to dry - usually acrylic primers dry in no more than 12 hours.
- Apply several layers of paint with a roller or brush (preferably a brush), each time drying the coating before painting.
- When the furniture is painted to securely fix the coating, after complete drying, the chipboard cabinet is treated with varnish, and the product is assembled using new fittings.
When painting furniture, choose only high-quality tools that do not leave lint on the painted surface. The more layers of paint are applied, the richer the color of the decorative coating will be. You need to repaint with a brush in one direction - from top to bottom, apply the paint with a roller in a cross-shaped motion.
On video: detailed instructions for updating an old chipboard cabinet.
Source: gidpokraske.ru
When adjustment is needed
The problem of sagging or asymmetry of furniture doors can arise when transporting furniture or careless handling. Even a simple rearrangement of furniture can affect the position of the closet doors, especially when it comes to massive wardrobes. If the furniture is new, the doors will need to be adjusted during the assembly process. If the doors are loose or improperly secured, there will be a squeaking sound when opening and closing, which will lead to scratches over time, and the door may simply fall off. By spending a little time, you can give the cabinet a neat aesthetic appearance; just study the design of the fastening mechanisms and stock up on suitable tools.
If cabinet doors are not secured correctly or are loose, they may need to be adjusted