All things tend to wear out over time. It is for this reason that every few years we renovate the apartment, re-sticking old wallpaper, changing flooring and baseboards, and rearranging sockets. But all these actions are only cosmetic. In the case of a major renovation or moving from an old apartment to a new one, there is much more work, some of which are recommended to be completed. These include replacing wiring. Today we will talk about how to replace old wiring.
Calculations and diagram
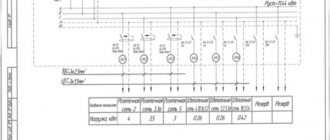
Single-line diagram according to GOST
First, you need to draw a wiring diagram for your apartment . To do this, you don’t need to be an engineer, because you don’t need a complicated linear diagram according to GOST. It is enough to draw a schematic drawing by hand. An electrical wiring diagram is needed in order to correctly distribute the cable throughout the apartment, and calculate its approximate amount, as well as determine the load on each future line.
Electrical wiring diagram
Draw where you will have sockets and switches. At the same time, take into account what household electrical appliances you will include in them, how many and what kind of lamps you will use.
It is not recommended to hang more than 8-10 sockets on one line. Since all sockets in the line are pass-through, with each subsequent socket there is a possibility of weakening the contact. Especially do not make many sockets on one busy line, for example in the kitchen; it is better not to save money and extend two lines to the kitchen.
Determine the required number of lines and the expected load on them. It is better to divide the lines into zones, for example: kitchen sockets, corridor sockets, bathroom sockets, room 1 sockets, lighting, etc.
Differences between similar buildings
The wiring diagram in a panel house is somewhat different from the wiring in a block or brick building. It is imperative to remember these differences when installing a new wire to replace the old one, so as not to lead to a fire. This type of house is built from reinforced concrete floors, which can be of 2 types - floors and walls, they have different configurations. Most often, they can be made from blocks consisting of steel reinforcement poured in concrete.
Partitions are made of gypsum boards, wood or pressed sawdust. New wiring cannot be laid in such walls - this is a fire hazard that is best avoided. Gouging is prohibited, and the thickness of the wall does not imply hidden electrics.
Cable selection
In order for electrical appliances to operate without overloading the network, the cable of each line must be of the appropriate cross-section. And if there are several consumers on the same line (for example, to the kitchen) (and there will be), then it is necessary to calculate their total power and leave a margin of “strength” for the cable , that is, select the required cross-section (wire thickness). The power of all household appliances is always indicated by the manufacturer. For example: an incandescent lamp is 40W, and a hob is 6000W, etc.
In order not to bother with calculations, follow one simple rule. — For outlet lines, use a copper cable with a cross-section of 2.5 sq. mm, for all lighting 1.5 sq. mm, and for a hob or instantaneous water heater 4 sq. mm - and everything will be fine!
| Wire cross-section (sq.mm) | Current (A) | Power, W) | Machine denomination |
| 1,5 | 15 | 3300 | 16 |
| 2,5 | 21 | 4600 | 20 |
| 4 | 27 | 5900 | 25 |
| 6 | 34 | 7400 | 32 |
Each device (consumer) has its own declared maximum power, measured in Watts.
Simplified power formula
The cable must be three-core (phase, neutral, ground). Zero is always blue, ground is yellow or yellow-green, phase is any other color . If you change the wiring, do not skimp on the material - always take a cable with a third core (with grounding), because all modern devices have an additional protective terminal, and automatic protection works only using grounding .
To replace electrical wiring, it is best to use a VVG-ng cable. You can, of course, use NYM or PVS, but the advantages of the VVG cable over others are obvious. Firstly, VVG does not need to be crimped with sleeves (soft ones need to be crimped). And secondly, it is smaller and flat, which allows you to make smaller grooves, and it is possible to insert the cable into a thin slot (3mm for a three-core cable with a cross-section of 1.5mm)
Uncrimped wire with sleeve
Always take only cable in accordance with GOST! For example, an excellent cable is the Gostov VVG ng cable. This is a very important point in preparing to replace the wiring! You can save on automation or sockets (they can always be replaced), but don’t skimp on the cable - get a good one.
Marking
Determine at what height the sockets and switches will be located; the easiest way is to measure the lines of sockets and switches from the ceiling, because the floors in apartments are most often crooked. For example, if the height from floor to ceiling after renovation will be 250 cm, and you want to raise the sockets by 30 cm, measure 220 cm from the ceiling. If there are several sockets and switches in one group, draw a horizontal line along the level and place a mark every 7 cm (socket box size 71mm), the same applies to vertical groups.
For lovers of standards, so that it is “like everyone else” or “how they do it” - remember, they do not exist! There are requirements for children's institutions, kindergartens and schools, where sockets and switches are installed at a height of at least 160 cm . Everything else, especially in your home, you can do as you please. For example, some make sockets in window slopes or even in the floor.
Side of the law
From the point of view of legislative acts, if the owner of the apartment independently trenched the wall and this caused cracks, deformations and other damage to the supporting structures, he is held responsible for these damages. All repairs carried out by the management or maintenance organization of the house will be carried out at the expense of the culprit.
When cutting grooves in partitions by third-party specialists hired by the owner, damage to the structures will be compensated at the expense of the performers or the employing organization
Standards for wall gating
The main regulatory document regulating the gating process is SNiP 3.05.06-85. According to it, the channels cut into the wall must meet the following requirements:
- Horizontal grooves should have a depth of no more than 25 mm, a width of no more than 20 mm, and a length of no more than 300 mm. In this case, the distance from the channel made in the concrete to the floor slab should not be less than 150 mm.
- Vertical grooves, unlike horizontal ones, can be of any size. A few restrictions for them are compliance with the following distances: 100 mm - to window openings and corners, at least 400 mm to gas pipelines.
It is also not allowed to lay these channels in concrete structures that damage the reinforcement frame or mortgages.
Preparing for gating
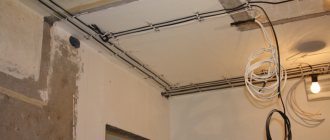
Typically, wiring in apartments is carried out either on the floor or on the ceiling. There are other options, such as laying cables under baseboards or ducts.
Lighting lines, in any case, are laid behind a suspended or suspended ceiling; if these are not planned, then the ceiling needs to be chipped. And since it is strictly forbidden to ditch , you need to apply a layer of plaster to the ceiling, which will allow you to hide the cable without damaging the monolith. We strongly do not recommend ditching the ceiling yourself, since you need to know the technology for correct gating so that the whole house doesn’t collapse someday.
In cases where plastering of the ceiling is not planned, experienced craftsmen find voids in the monolith slab with the old cable, and tighten a new one in its place.
Using a 70mm or 68mm concrete crown (attachment for a hammer drill), holes for the socket boxes are drilled. Using a wall chaser or grinder, grooves are cut out for laying the cable. The grooves in the walls must be strictly vertical and not horizontal or diagonal. The lines from the sockets to the panel are laid in the floor screed or along the ceiling.
If the ceilings are not wooden, then according to the PUE (electrician's bible), cable laying without corrugation is allowed! There is also no need for a corrugated floor screed; the most important thing is a high-quality cable with good insulation in accordance with GOST! Save on corrugation; if you don’t have drywall or wood (or other flammable materials), then you don’t need corrugation!
A detailed description of the correct cutting of holes for socket boxes. Why can you lay cable without corrugation?
The need to replace electrical wiring in panel houses
At one time, Khrushchev buildings were considered progressive housing. After the long construction of apartment buildings of the Stalin era, the speed of their construction seemed simply fantastic. The level of provision of public amenities has become much higher. The projects required the supply of apartments with cold water, sewerage and centralized heating. Wood stoves were replaced by gas stoves and water heaters. No matter how skeptical people may speak about that era today, it was in those years that most people, having moved from communal apartments, received separate apartments.
The panel house is assembled at the construction site from ready-made blocks
But times have changed. And today there are different requirements for housing, often incompatible with the buildings of those years. More powerful household appliances appeared in apartments, and this became the main reason for the revision of electrification standards. The use of aluminum wires (and this is what all wiring was like) is prohibited according to modern standards, this is due to an increased level of danger.
According to statistics from the Ministry of Emergency Situations, in residential premises equipped with aluminum wiring, fires caused by short circuits in electrical networks are 55 times more likely.
Wires made of aluminum cannot withstand long-term stress. The properties of this material are such that the service life of the wiring is limited to 25 years. When exposed to air, aluminum gradually oxidizes, and the conductivity of electric current decreases. As a result, resistance increases and the wires begin to heat up (and sometimes melt). This leads, at best, to damage to the power line, and at worst, to short circuits.
In some cases, you can only get by by replacing and moving the switches. Find out how to do this in our material: .
Grilling
Before you start dabbling, it is highly advisable that the walls and ceilings be plastered with a leveling layer of plaster. Firstly, you will not have further problems with the final installation of sockets, since all the sockets will be flush with the wall, and not recessed into it (which happens when they are installed before the walls are plastered). And secondly, gating will occur much faster, since in some places it will not be necessary to saw the monolith.
Check in advance the places where you will be trenching so as not to touch communications, such as old wiring and plumbing pipes. If you cannot determine where the old wiring goes, call an electrician , or simply disconnect it in the switchboard (if you are going to change it all). For ease of work, make yourself a temporary carrier (extension).
The hole for the socket boxes is drilled to the full depth of the crown. To quickly drill a hole in concrete, mark a circle with a crown, then drill the maximum possible number of holes around the circumference with any drill, no less than the depth of the crown. After which, the cutting with a crown will go noticeably faster, one might say – it will go like clockwork. If it gets on the reinforcement, it is best to use another crown; in extreme cases, you can knock it off with a spatula. It’s better to use a hammer drill for help (don’t forget about neighbors and the police).
How to replace old wiring with new one
The main rule when carrying out such work is to do everything according to plan, to perform all actions in strict sequence. Otherwise, you may find that there are not enough or, on the contrary, too many of the necessary materials, the wire is laid in the wrong place, or the cable is connected incorrectly. To properly replace the wiring in an old house, follow a certain system:
- Determine the scope of work and draw up a diagram.
- Calculate how many materials you will need and purchase them.
- Prepare the necessary tools.
- Remove completely or cut off the old wiring.
- Mark the new wiring.
- Mount it.
- Check how everything works.
This will be a general plan of work to replace the old wiring. Now let's go through each point in detail.
Working with a wall chaser or grinder
Grooves for laying cables go from the socket box to the floor or ceiling. You need to lower the groove down so that the cable lies quietly in the screed and does not stick out in the corner, so you need to know the thickness of the future screed, the same with ceilings. It is best to have a wall chaser with a vacuum cleaner for these tasks, but in extreme cases you can get by with a grinder and a diamond disc for stone. In the case of an angle grinder, take care of your health, wear a respirator and goggles. Close all windows and doors to prevent dust from entering adjacent rooms.
Electrical work in an apartment on the secondary market
The condition of the electrical wiring is of fundamental importance
First of all, it is important from a fire safety point of view. Worn or damaged wiring can cause a fire, which can lead to serious consequences.
In addition, poor-quality wires will cause power outages. This will cause rapid wear and breakdown of electrical equipment. Therefore, major renovations of apartments on the secondary market require a mandatory replacement of electrical equipment. After all, if you ignore this task, you will have to remove finishing materials from the walls to get to the old wiring. Accordingly, it is recommended to take care of its quality from the very beginning.
Tags: machine, ampere, sconce, view, house, , grounding, replacement, sign, cable, like, computer, design, installation, power, neutral, nominal, lighting, connection, principle, check, wire, project, start-up, vacuum cleaner, , work, calculation, repair, socket, row, light, lamp, network, system, resistance, circuit, ten, type, current, installation, shield, electricity, power tool
Cabling
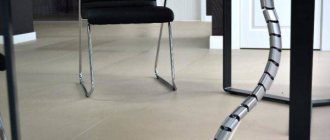
Laying the cable on the floor is not difficult; it is enough to hold it to the floor in any way so that it does not float up when they make the screed. Usually they lay the cable along the walls (at a distance of 10-15 cm from the wall) so that later they know exactly where the cable goes.
It is worth noting that it is better not to lay cables under doorways! To lay the cable along the floor, it is better to make through holes between the rooms. Otherwise, there is a possibility of damaging the cable when installing the interior thresholds.
Laying the cable in the groove is also not particularly difficult. You can secure the cable in the groove using dowel clamps or ordinary alabaster (construction plaster). Alabaster hardens quickly, so it is also convenient to use for installing socket boxes. But before you smear the grooves with it, you need to remove dust from them and moisten them with water.
If the cable is securely fastened in the groove and does not stick out anywhere, the grooves can be covered with ordinary plaster mixture; this will save a lot of time.
How to install socket boxes correctly is written in detail here
What fundamentally affects the price
First of all, the way the work is performed. The price will be completely different if it is necessary to install the entire apartment in panels or part of the installation will be carried out in the ceiling or SDK floor.
- Running wires in the ceiling or floor will also significantly speed up and reduce the cost of installation.
- If you are a fan of molding, installing crown molding is an option.
- The price can be reduced to 1/3 of the cost of the design.
You can still choose a modern industrial style, but you save a little here, since all installation elements are several times more expensive than usual and the demand for accuracy and dimensions increases.
What also determines the price is the manual for the ceiling lights. If it is impossible to route cables through ceiling cavities because they are clogged, it is necessary to make grooves for cable routes. It is not known in advance whether there is room in the cavity. Processing grooves in ceiling panels is an expensive and responsible job.
About junction boxes
Junction boxes (or distribution boxes) are necessary for switching (connecting) wires in them and branching lines, for example, for a switch.
Today, professional electricians will tell you that there is no need to install junction boxes in existing apartments ! They can play a cruel joke on your wiring. In the event of a short circuit, tearing, flooded neighbors, etc., you will need access to this very junction box. It’s easy to give up junction boxes - do all the switching in the socket boxes! To do this, you need DEEP socket boxes , in which all switching for lighting will take place. Typically, deep socket boxes are made for light switches, but if switching is needed to branch out socket lines, then deep socket boxes are also installed under the sockets.
Oxidation of wire connections
When plastering, a huge amount of water is used. And if the electrician is done before, then moisture may well reach the junctions of the copper cable cores in the socket boxes. Subsequently, this will lead to oxidation and destruction of contacts, and may result in their burnout.
There are many ways to seal the junction box to prevent moisture and wet solution from getting there, but not all of them help.
The cheapest and most accessible is sealing with ordinary masking tape.
Another simple method is to make end caps from cardboard boxes. Take a crown to match the diameter of the socket box and cut yourself as many covers as necessary.
In this case, it is better to insert 2 pieces at once into the socket box itself. You can also make such plugs from sandwich panels.
Electrical panel installation
The most budget option is to install all the circuit breakers on the staircase in a common panel, where your old circuit breakers and meter are already located. To do this, it is necessary to route all the cables into the access panel. If you want a shield in your apartment, then you need to choose a suitable place for it.
Built-in or overhead shield is up to you. The built-in one looks more aesthetically pleasing, but the overhead one is easier to install. All lines from the apartment go to the panel, and from it one thick cable goes to the entrance panel, the cross-section of such a cable must be at least 6 mm, that is, a three-core cable, for example VVG 3 * 6.
Lighting. How do you know when it’s time to change everything?
It is necessary to pay attention to lighting fixtures: old chandeliers, sconces, lamps. The weak point of old lighting devices is the cartridges! Over time, the plastic of the cartridges dries out and bursts, the contacts overheat and oxidize, hence all the ensuing problems. Often, due to such sockets, light bulbs explode, or the base is left inside the socket. Replacing sockets in old chandeliers is not a cheap pleasure, as it is a very painstaking job and requires quite a lot of time. It is often easier and cheaper to buy a new lighting fixture.
Cartridge
Be careful with electric current! Don't have the funds to completely replace the wiring? - Do it at least partially. Any improvement in wiring is additional insurance for your safety, which significantly reduces the likelihood of any problems with wiring and will significantly reduce energy costs.
Installation of circuit breakers
Each individual line is equipped with its own circuit breaker, with a rating depending on the cable cross-section. According to the rules, you cannot insert more than two lines into one machine; if you are trying to power more than three lines from one machine, you must install a special branching bus.
Today there are many ways to protect electrical wiring, even at the household level. The most necessary condition is the installation of circuit breakers for protection against overloads and short-circuit currents (conventional single-pole circuit breakers). It is also recommended to install an additional residual current device - RCD (current leakage protection).
It is best to install RCDs on the lines of high-risk areas: wet rooms, children's rooms. There is no need to install one common RCD for the entire apartment! They install one common RCD only for the purpose of saving. The consequences of such savings are a complex diagnosis of a fault in the event of a leak, + the entire apartment is left without light when it is triggered. On some lines, for example, lighting or street lines, an RCD is not installed.
Installing additional types of protection is already a luxury: thermal relay (protection from cable heating), lightning protection, stabilizer or protection against voltage surges (saves from 380V), fire alarm, etc.
Shield assembly
One of the most crucial moments is assembling the shield. If you are using a soft cable, then before inserting the wire into the machine, it must be crimped (to increase the contact area). Only phase wires are inserted into single-module machines (phase marking L - can be any color except blue and yellow), all others (zero N blue, ground PEN yellow-green) are inserted into their busbars. When using RCDs or difavtomats (automatic and RCD “in one bottle”), the neutral wire is inserted into its groove (marked N - neutral, blue. The common phase connects all the machines to each other, for this, instead of jumpers made of wires, it is better and more reliable to use special combs.
For all connections in the switchboard, it is very important to use wires of the appropriate cross-section, that is, it is best to separate the phases and neutrals across the circuit breakers using a cable with a cross-section of 4 sq. mm or 6 sq. mm. Also, after tightening all the cables and combs in the machines, it is necessary to check the reliability of their clamping. Since it often happens that the wire simply does not fit into the clamp, or does not hold well in it.
Safety regulations
When carrying out electrical installation work, the following safety precautions must be observed:
- Always disconnect the room from power before starting installation;
- use a tool with insulation of at least 1 kW;
- use a dielectric mat and safety glasses;
- lay the cable only vertically and horizontally;
- do not directly connect aluminum and copper conductors;
- if possible, avoid twisting in favor of pads;
- use cables and sockets that match the power of the consumers.
These rules are simple, but people’s lives and the safety of their property depend on their implementation.