Modern homes are increasingly equipped with heated floors. After all, the availability of this heating method increases while maintaining high efficiency. Despite the simplicity of the design of heated floors, they can be called the most optimal option for heating a house or for additional heating.
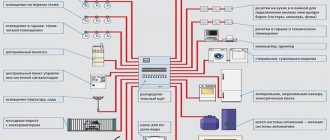
Connecting a heated floor to electricity
Heated floors can be of two main types by design: water and electric. Let's look at how an electric heated floor works and is connected.
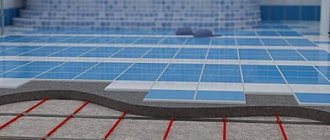
The principle of operation of warm electric floors is simple: they convert electrical energy into thermal energy due to the resistance of the conductors. At the same time, the screed or tile warms up. It is these materials that are able to evenly distribute heat over the entire area and release it into the environment.
Serial connection of a rod heated floor
Heated floors powered by electricity have a fairly simple design and consist of the following main parts:
- heating element (depending on the type, it may be a cable or a mat);
- temperature sensor;
- thermostat.
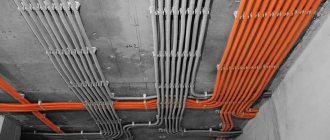
The structure of a floor heated with electric cables
Many people think that laying a heated floor and connecting it to electricity is difficult. In fact, in its essence, this type of heated floor resembles ordinary wiring, which is laid in layers of screed or under tiles. For full operation, a regular outlet with 220 V alternating current is sufficient.
The connection diagram itself does not cause any difficulties - it does not even require special knowledge. But be sure to remember when working that this is an electric current, which, if handled incorrectly, can greatly harm a person, even leading to death. To prevent this from happening, you must strictly follow a number of rules when choosing and connecting.
Which wires are not suitable?
There are product options that are strictly prohibited from being used for laying electrical networks, even in the most extreme cases. These include the following types of products.
Product #1 - PVS wire
Copper connection element having a PVC sheath and insulation. It has a stranded design with 2-5 conductors with a cross-section of 0.75-10 sq. mm.
The wire, designed for a voltage rating of 0.38 kW, can be used to connect household electrical appliances to the power grid and for making extension cords.
PVA is not suitable for laying wiring for the following reasons:
- It has a multi-wire core structure, so it requires tinning and soldering to connect the ends, which requires a lot of time and a lot of experience.
- The product creates a fire hazard: the wire strands cause the cable to heat up more, causing the insulation to wear out faster, which can lead to a short circuit.
- PVA cannot be laid in a bundle, whereas almost all cable models are suitable for this. Due to the fact that the wiring lines must be at a certain distance from each other, you will have to make grooves in the wall for each of them.
Thus, even the low price of such wires cannot compensate for the high installation costs, and the quality of the installed electrical network will not be too high.
Product #2 - SHVVP, PVVP wires
Cords or cables having single or multi-wire copper cores can be used to connect household appliances and electrical equipment.
However, they are not suitable for fixed electrical communications because these products do not have non-combustible insulation.
Although a flat cord with polyvinyl chloride sheaths (SHVVP) is not recommended for laying electrical networks, it is quite suitable for organizing low-current lighting up to 24V, namely for laying wiring from a transformer to LEDs
In addition, the service life of SHVVP and VPPV is quite short, and the multi-core design requires processing of the ends and soldering during installation.
It is also worth mentioning PUNP (universal flat wire), which was banned for laying electrical networks in apartments back in 2007.
This outdated product has poor insulation and low power, making it unable to withstand modern loads
Features of installing an electric floor
Laying an electric heated floor directly depends on the characteristics of the selected elements.
Cable technology
This option is a system where a cable laid according to a specific pattern is used as a heating element.
Principle of work:
The location for installing the thermostat is determined in advance. To install it, remove 30–40 cm from the level of the future flooring. Installation can be done in various ways, but the hidden option is most preferable; it allows you to recess all the wires and the sensor into the wall. Due to the fact that installation is often carried out along the reinforcing layer, the mounting tape is attached to it. Fixation is carried out in increments of 50 to 90–100 cm. It is mandatory to make a distance from the wall of 10 cm, and in places where furniture is located – 30–50 cm. If there are radiators and heating pipes in the room, then it is necessary to measure at least 15 cm from them cm.
The heating cable is connected to the power element, the connection is hidden in a special coupling. After this, the power cable is connected to the thermostat. Heating fragments are distributed over the surface. To do this, use a pre-compiled diagram taking into account the manufacturer’s recommendations.
It is important to maintain the correct bends; they should be smooth, without creases. The cable is fixed on the mounting tape; additionally, it can be secured to the fittings
It must be taken into account that there must be a distance of more than 80 mm between the turns of the elements. Temperature sensors are attached to selected locations. The correctness and functionality of all connections is checked. The operating procedure of temperature sensors and thermostats is assessed using the data sheets supplied by the manufacturer, which reflect the parameters and errors.
Installation of such a system requires strict adherence to the drawn up diagram and connection order.
The installation diagram of electric heated floors may change as the number of circuits increases, as well as depending on the type of connection (two and three phase)
Laying heating mats
The technology of laying heated floors on heating mats is a simpler procedure that does not require precise cable placement. This is due to the fact that they are already fixed into a single structure, which must be correctly spread on the surface.
Installation features: rolls of mesh are rolled out on a prepared base; to rotate the cells, they are carefully trimmed so as not to damage the cable. If it is necessary to bypass an obstacle, the mesh is cut off and the heating elements are placed at the required distance from each other. The thermostat is connected and the system is checked.
Mats, compared to other electrical systems, are considered one of the most convenient arrangement options
It is the mats that make it possible to fill the screed with a minimum thickness, which significantly reduces the height of the floor.
Infrared heaters are of good quality and can be quickly installed, but they are not suitable for every room and floor covering.
Preparing the base
Work on installing heated floors is classified as “clean”, therefore, before installation, the walls should be cleaned and plastered, and cracks should be repaired. But after such work, the surface is covered with dirt, and even hardened tubercles of concrete mortar.
According to the technology of laying heated floors and their installation, the base for infrared systems must be smooth and clean, so all this dirt should be removed. Hardened pieces of concrete can be removed with a spatula or a special compound. After this, the surface must be moistened and all debris must be swept away with a broom.
If there are deep cracks, they are sealed with cement mortar. If there are large differences in the floor surface, you can pour a thin layer of screed to get a level base.
Laying thermal insulation
The function of a thermal insulation product is to minimize heat loss.
A heat-reflecting substrate 3-4 mm thick is laid. It is better to take a product with a foil surface that should face the ceiling. The canvases are held together with tape and attached to the base.
As thermal insulation, you can use foam sheets in combination with foil.
Installing a thermostat
Before installing the heating film, you need to install a thermostat. It is mounted on the wall, at a distance of at least 30 cm from the floor.
Before cleaning the base, a recess is made in the wall for the thermostat, and grooves are made for the wires from it to the floor.
Laying heating elements
The IR film is laid according to plan (it does not spread under furniture), at a distance of 5 cm from the walls. Lay the canvas with copper strips down. One cannot allow one canvas to overlap another. Fixation is carried out using construction tape.
If necessary, the film can be cut along the lines there.
Connection
The process of connecting infrared film consists of several stages:
- A temperature sensor is connected - it is placed in a corrugated pipe, which is located in a recess made in the heat-insulating material (its average width is up to 1 cm). The wiring from the sensor, also placed in a corrugation, is pulled along the grooves made in the wall to the thermostat and connected to it. The sensor is placed at a distance of 50 - 70 cm from the wall with the thermostat installed, and is attached with tape. The device must not rise above the thermal insulation material.
The film is connected - for this, the terminals that are included in the floor kit are used. At the edge of the film, the insulation is removed from the wire. It is rolled up and inserted into the terminal, the clamp is fixed with pliers. Then the junction is isolated with bitumen tape. To prevent the terminals from rising up in the structure, recesses are also made for them in the thermal insulation.
The terminal itself is installed with one side on the copper strip, the second should be located on the inside of the film. The contact between the clamp and the product is also insulated.
The thermostat is connected - that is, connected to an electrical power source.
After this, the system must be checked for functionality. If all strips heat normally and there is no short circuit anywhere, then you can proceed to laying the floor covering. But before this, the device is covered with a polyethylene protective film, which will protect it from accidental ingress of water.
Heating cable type
In light of rapidly developing technologies, it is impossible to say with complete certainty how many types of heating cables exist. We will look at three types of the most common cables.
Single-core, resistive cable
. It is a shielded single-core wire with high resistivity. The cable heats up no more than +65 degrees, provided all technical connection requirements are met. Requires the mandatory use of a thermostat (thermostat), which regulates the temperature of the floor as a whole and prevents the cable from overheating and failing. Connects to power at both ends, so the beginning and end of the cable must be located at the same point.
When purchasing an installation kit, the heating section is designed in length for the required power, connected to the cold connecting wire for connection to the thermostat. When designing heating sections yourself (the Chinese brothers sell the cable separately, by the meter), the cable length is calculated according to Ohm's law. The power (flowing current*voltage) dissipated by the cable in this case should not exceed the recommended one. That is, the manufacturer indicates the power of a meter of cable; all that remains is to calculate the length so that the current through the section corresponds to the power.
Two-core, resistive cable
. The principle of operation is identical to the single-core one, with the difference that the cold connecting cable is connected on one side.
Both types require a temperature sensor and thermostat for switching. Without a thermostat, the cable may overheat and quickly fail. The power per linear meter ranges from 10 to 20 watts, depending on the manufacturer and model. The thickness of the resistive cable can also vary between different manufacturers, on average about 5 mm.
Self-regulating cable
. The heating element of this type of cable is located between the conductive cores along the entire length. The heating medium is based on a positive temperature coefficient (PTC) semiconductor. The more the cable and its surroundings warm up, the less heat it emits. Thus, the wire “fries” the cold floor more strongly and “barely warms” the already warmed one. A distinctive feature of this type is the availability of models with a power of up to 60+ watts per linear meter. The power is initial when the floor is cold; when heated, the power drops.
One of the main advantages of such a product is faster heating of a cold floor due to its higher power. This cable can be installed without a thermostat. However, installing a thermostat significantly saves energy.
This product is usually an order of magnitude more expensive than resistive heaters. It is more often used for heating pipes than for heated floors.
Common Mistakes
How to install electric floors correctly with your own hands - this question often arises for beginners who want to do this heating at home.
The main mistake is installing floors under large furniture. Underneath, the surface is not cooled, which leads to overheating and then failure of the system.
You cannot bend the cable either, as this will disrupt the functioning of the device. When laying cable mats, cutting the wire is unacceptable, so you should correctly calculate the size of the heated area.
A common mistake when constructing electric floors is inappropriate control of the insulation resistance during installation. The indicator should not exceed that specified by the manufacturer by more than 10%.
When using a film heated floor, it may stop heating if the film is damaged. Its current-carrying parts must be properly insulated, otherwise electric current will leak and the system will eventually shut down.
If we talk about the temperature sensor, then you should not pour it into the screed. In case of breakdown, replacement will be difficult. It is placed in a corrugated pipe.
Table of approximate power of electrical appliances
To independently calculate power consumption, the voltage value and source strength are important.
Power indicators (P) in this case are calculated by multiplying the current strength with the mains voltage indicator.
Average power of the most common energy-dependent household appliances
| Device | Power, kWt) |
| Water heating equipment | 1,2-1,5 |
| DVD player | 0,3 |
| Pump equipment | 0,25 |
| Video recorder | 0,04 |
| Grill | 1,2-2,0 |
| Halogen light source | 0,1 |
| Drill | 0,15-0,8 |
| Razor | 7.0 W |
| CD player | 7.0 W |
| Mobile phone charger | 0,025 |
| Oven | 1,0-2,0 |
| Air conditioner | 1,0-3,0 |
| Record player | 0,01-0,03 |
| Game console | 0,01-0,03 |
| Coffee maker | 0,6-1,5 |
| Incandescent lamp | 0,02-0,25 |
| Fluorescent gas-discharge light sources | 0,25-0,6 |
| Freezer | 0,7 |
| Microwave | 1,5-2,0 |
| Table fan | 0,042 |
| Music Center | 0,05-0,5 |
| Heater | 1,0-2,4 |
| Laptop | 0,08 |
| Personal Computer | 0,28-0,75 |
| Soldering iron | 0,025-0,12 |
| Vacuum cleaner | 0,4-2,0 |
| Printer | 0,35 |
| Scanner | 0,015-0,1 |
| Mixer | 0,18 |
| Heat fan | 1,5 |
| Washing machine | 4,0 |
| Iron | 0,25-2,0 |
| Toaster | 0,6-1,5 |
| Hairdryer | 1,0 |
| Fax | 0,6 |
| TV | 0,07-0,2 |
| Fridge | 0,15-0,6 |
| Electric jigsaw | 0,4-0,8 |
| Electric heater | 0,2 |
| Electric kettle | 1,0-2,5 |
| Electric stove | 1,1-6,0 |
| Energy saving light source | 0,08-0,1 |
Approximate power indicators of a volatile device are represented by the product of current and voltage, so the standard simple formula P = I × V is used for calculations.
Some brands of power cables
VVG. A power cable with multi-core copper wires, sealed and durable PVC insulation, is laid to connect distribution boards over the air on cables, along walls, underground and cable ducts in various structures. It is very flexible and suitable for routes with a lot of turns and bends.
AVVG. This is practically the same cable as VVG, but the letter “A” means that the conductors are made of aluminum wire; without the letter, the default means that the wires are copper.
AVVG cable structure with solid current-carrying cores
Two letters “B” mean that each core and outer sheath are covered with a vinyl layer of insulation, “G” - the bare cable does not have additional armored protection.
Specifications:
| Brand | Number of cores | Section, mm2 |
| AVVG | 1…4 (round) | 1,5… 240 |
| AVVG | 3-4 (sector) | 70… 240 |
AVK. The cable has a coaxial design, in the center there is a monolithic aluminum core, then an insulating vinyl layer, which is shielded by thin aluminum wires arranged in a row around the diameter along the entire length. The outer shell is made of durable sealed plastic.
AVK cable structure
The cable is very practical; it can be laid from overhead lines with voltages up to 380V, underground from substations to distribution boards of buildings. One of its main advantages is considered to eliminate the possibility of unauthorized connection on uncontrolled sections of the route.
SIP-4. A special feature of this cable is its self-supporting design, which allows the cable to be placed on overhead lines without cable suspension.
Colored marking stripes on the insulation of SIP cable cores
This quality makes it universal; it can be laid along the walls of buildings, underground and cable ducts, in rooms with high humidity. It has reliable sealed PVC insulation on each wire with a multi-core structure.
Main parameters of SIP-4:
| Number and cross-section of cores, mm2 | outer Ø mm | SIP cable weight, kg/km |
| 1x16 | 7.5 | 70 |
| 1x25 | 8.5 | 100 |
| 2x16 | 15.5 | 140 |
| 2x25 | 17.5 | 200 |
| 3x16 | 16.5 | 205 |
| 3x25 | 18.5 | 290 |
| 4x16 | 18.5 | 280 |
| 4x25 | 21.0 | 395 |
For the supply from the overhead line to the control panel of a residential building, 3x16 or 4x16 cables are usually used; the number of wires in the cable and the cross-section are quite sufficient for the power consumed in domestic conditions.
AVBbShv/VBBShv. The design feature of this cable is the presence of an armored layer; two steel tapes are wound onto the surface of the cable so that the top one covers the gaps between the turns of the bottom tape. The cable is fully armored, in addition there is PVC insulation on each core and a common sheath.
Cable structure AVBbShv/VBBShv
Explanation of markings:
- A - aluminum conductors can be monolithic or twisted from individual wires; the absence of this letter by default implies a copper alloy of wires.
- B – vinyl insulation of wires;
- BB – armored steel belts;
- Shv – PVC hose as an outer insulating sheath.
- Shv ng - may indicate that the insulation is made of non-combustible materials.
The cable structure can have from 1 to 5 cores of the same or different cross-sections; usually the yellow-green or neutral blue ground wire is made of a smaller diameter. To connect private houses, do not use cables with a wire cross-section of more than 16mm2. At industrial facilities, the cross-section can reach 300 mm2 or more.
Specifications:
| Number of cores, mm2 | Cable outer diameter, mm | Weight of 1 km cable, kg | |||
| AVBbShv | AVBbShv ng | ||||
| ~ 660 V | ~1000 V | ~660 V | ~1000 V | ~660 V | ~1000 V |
| 3x4 | 15.5 | 17 | 380 | 435 | 395 | 450 |
| 3x6 | 16.5 | 18 | 435 | 495 | 450 | 510 |
| 3x10 | 19.0 | 19.5 | 575 | 595 | 595 | 615 |
| 3x16 | 21.5 | 22.0 | 720 | 744 | 745 | 770 |
| 3x25 | 25 | 25.5 | 955 | 980 | 985 | 1010 |
| 3x35 | 27.0 | 27.5 | 1135 | 1160 | 1170 | 1200 |
| 3x50 | 30.5 | 31.0 | 1445 | 1480 | 1490 | 1525 |
| 3x4+1x2.5 | 16.5 | — | 420 | — | 435 | — |
| 3x6+1x2.5 | 17.5 | — | 490 | — | 505 | — |
| 3x6+1x4 | 17.5 | 19.0 | 370 | 555 | 390 | 570 |
| 3x10+1x4 | 30 | — | 675 | — | 695 |
A cable with armored protection can be laid in an environment with high humidity and underground, but this does not exclude the possibility of using it in other more favorable conditions.
Forged swing metal gates
Forged structures are decorations for barriers made of metal. Despite the huge number of models of modern devices that provide unimpeded entry into the territory of a personal plot, it is the swing design that is in high demand and deserved trust of owners of private houses located within the city or beyond.
Swing gates
It is swing structures that are installed in most cases. Such devices can be:
- Completely transparent, made from individual rods bent into an intricate pattern.
- Partially or completely deaf, not allowing strangers to see what is behind the openwork fence.
Advantages and disadvantages
To achieve this goal, craftsmen create structures in two ways:
- cold forging;
- hot.
Cold forging Hot forging
The main advantages of forged gate leaves are a high level of strength and resistance to mechanical damage. During the work, specialists carry out calculations with particular accuracy of the level of load on the supporting structure
It is also important that such products:
- universal;
- exclusive;
- can have any shape;
- compatible with all building materials that were used in the construction of the fence.
However, there are also certain disadvantages that make you think about the extent of the need for work related to the installation and installation of openwork gates. Among them:
- Heavy weight.
- The need for careful preparation and high-quality installation of supports that will have to withstand significant weight.
Despite all the existing difficulties, installing gates attracts many homeowners due to the opportunity to create various compositions, decorate the entrance to the territory not only with simple drawings, but also with complex ornaments, equip the structure with automation, install video surveillance and an intercom system.
Pros and cons of this installation
You should not lay a cable in the floor without knowing all the intricacies of this process. And you should start with the advantages of hidden electrical wiring:
- High degree of electrical safety. The floor covering (floorboard, laminate, linoleum) will become the dielectric that will prevent the spread of potential in the event of a cable breakdown. This means that a person will not be shocked by electric current even if he stands in the place under which the cable passes.
- Less spending. High-quality wiring will require less cable, which will provide significant savings.
- Ease of operation. The most difficult stage will be pouring the concrete floor. When installing electrical wiring, you need to insert the cable into the corrugation and simply lay it on the floor. Many electricians do not even attach the corrugation to the concrete base.
But in addition to its advantages, any work also has its disadvantages. The disadvantages of installing cable wiring under the floor include:
- The complexity of identifying and eliminating the malfunction. If the cable breaks down, you will have to lay a new line or dismantle the floor surface.
- Additional expenses for pouring a new floor if dismantling is required. Also included in the category of additional investments is the consumption of corrugation, without which the cable cannot be laid in the floor.
Scarecrow
If you need to scare away birds, you should make a device from compact discs. They need to be secured to a hoop and attached to the board.
Features of electric “warm floor” with cable
In order not to seem unfounded, in this section of the publication we will try to convince the reader that electric cable “warm floors” have many advantages over water ones.
In this article we will not describe the fundamental advantages of all floor surface heating systems. This approach really shows maximum efficiency, comfort for residents when moving on the floor, and optimal distribution of air temperatures along the height of the room. All this is characteristic of both water and electrical systems approximately equally. But, it would seem, from the point of view of operating costs, the water system looks more economical, and it would be preferred...
However, if we look at the problem “from different angles”, the picture will not be so clear-cut.
- Let's start with the degree of complexity of the project. Here it is even difficult to compare, since the installation of pipe circuits with their ties to the collectors and to the adjusting mixing units is incomparably more difficult than laying a heating cable.
- Equipment for a water-heated floor will require a lot of space. The control of the electrical system is a compact unit, comparable in size to a conventional switch.
The difference is striking - a bulky mixing and manifold cabinet or a compact thermostat installed in a regular socket.
- Water “warm floor” is often impossible in principle in multi-storey buildings. In any case, this will have to be clarified, and if agreed, a project must be drawn up with strictly specified conditions for connecting to the heating network, then approved, agreed upon, etc. For the electrical system, it is only necessary that the total power consumption in the apartment does not go beyond what is permitted. And so - everything is in the hands of the owners, without any approvals or other bureaucratic procedures. From this point of view, electric “warm floors” are completely universal.
- Whatever one may say, coolant pipes walled up in the floor remain a potential threat of leakage. Albeit with a very low probability, but still...
An accident on a water-heated floor is an infrequent problem, but if it does happen, then eliminating the consequences turns into a very large-scale undertaking.
- Electrical systems are much simpler and more sensitive to control.
- It is easy to start an electric heated floor at any time, for example, when a series of cool days suddenly began in the summer, and the rooms became uncomfortable. Not everyone will decide to run a bulky water heating system with a connected “warm floor” in such circumstances. Yes, and it will not be operational right away.
The only “minus” that immediately comes to mind is the considerable cost of electricity. But this is not a “sentence” at all. With proper installation, reasonable operation, and effective thermal insulation of a house or apartment, nothing frightening awaits the owners. And especially if an electric “warm floor,” as is often practiced, is not created to replace the general heating system, but only to increase the level of comfort in individual areas of the apartment or even in individual areas of the rooms.
Operating principle of ETP
In the case of heating wire and mats, the conductor is heated under the influence of the electric current flowing in it. The wire heats the screed, which in turn heats the finish coating. Heating occurs by convection.
In the case of using infrared film, heating occurs by thermal radiation of the carbon layer, which occurs under the influence of electric current. This radiation heats the finish coating and objects located close enough to the floor. They heat the air in the room by convection.
Temperature regulation is carried out using a temperature sensor and a thermostat through which the heated floor is connected.
Selecting a thermostat
When choosing and subsequently installing a thermostat for an electric floor, it is recommended to give preference to: programmable thermostats operating according to an energy-saving scheme, the presence of self-diagnosis functions, provide for the existing power limit and install a special magnetic starter, provide for the presence of a remote floor temperature sensor.
The connecting wires to the thermostat are connected with conductors of different colors. Temperature regulators are rated for a current of 16A. It has been noted that with the correct choice of thermostat, electricity consumption can be reduced by 50 percent. Significant savings in material resources for those who installed the heated floor with their own hands!