Intercom access control systems are installed on almost every entrance door. They allow you to restrict access to the entrance of unwanted persons and recognize the guest before opening the door. Such systems reduce the number of burglaries and other illegal and vandal actions. After reading this article, you will become familiar with the types of these devices and learn how to connect an intercom with a video surveillance function to a general access control system.
How to connect to a video intercom at the entrance via telephone
When geolocation is enabled, the application displays the status of family access participants with the application installed and sends a notification. You can also view your movement history in the “Users” section.
The notification is displayed on the smartphone screen and duplicated in the “Events” section.
Application users receive various push notifications (for example, special offers or payment reminders), which are also stored in the event list.
To invite a user using a QR code, you need to click on the “Add user” button in the “Users” menu. The prospective participant needs to download and install the application, then scan the code using the “Accept invitation” function available in the left menu.
The function is suitable for those users who, for example, rent out apartments. You can also use family access to protect elderly relatives who live separately from scammers. Just connect their address in the application and monitor calls to the intercom.
Management of an unlimited number of addresses is available provided that the user is the owner of the account for only one address, and has only guest rights in the rest.
1. Download the application and enter your phone number. After that, select an address or add a new one
2. Log in using your phone number: enter the confirmation code from SMS. You can also check out other registration methods
3. Don't forget to configure the application and provide the necessary permissions
Source
How to make video surveillance from old gadgets
Translated by SaorY for mozgochiny.ru
to all brain friends ! Today we give new life to unused gadgets and PC accessories, namely, we create with our own hands .
If your webcam, PC speakers, monitor, smartphone have begun to gather dust uselessly in the pantry, then it’s time to revive them and make a video surveillance system connected to the cloud, that is, with a wide range of “Internet” capabilities: IP stream, storage of photos and videos in cloud, automatic emails, etc. And also a sound notification about movement and automatic activation when an object approaches, that is, brain trick .
Step 1: Required Parts
• Smartphone (Raspberry Pi)• Power supply for a smartphone• Speakers for a PC• TV monitor with a composite input and powered by a power supply• RCA audio/video cable with 3.5 mm plugs• webcam compatible with a smartphone• three adapters « mom mom"
• 1 channel relay 5V relay for microcontroller (PIC ARM AVR DSP)
The webcam is directly connected to the USB port of the smartphone through a drilled hole in the wall, and to reduce costs, the entire homemade product is connected to the local network.
Step 2: Action algorithm
When the motion sensor is triggered, the brain maker performs the following actions:
• the monitor turns on • a sound alert is sent • a message with a photo is sent to my public IP
• a message is sent with an IP stream, which can be played using the application (for iOS on AcePlayer
The chronology of pictures and videos is saved in Gmail, and if the public IP changes, the system sends a letter with the updated IP.
Step 3: Settings
First, create two Gmail accounts: one for jpeg files, the second for mpeg files. On the smartphone (RasPI) we enable access to the graphical interface: $ sudo raspi-config
and enable the option, set the monitor as the main graphical interface, and reboot the smartphone.
We configure message sending - download the tar file: $ wget https://caspian.dotconf.net/menu/Software/SendEmail/sendEmail-v1.56.tar.gz Unpack: $ tar -zxvf sendEmail-v1.56.tar.gz Copy the corrected one patch: $ sudo cp -a sendEmail-v1.56/sendEmail /usr/local/bin Make it executable:
$ chmod +x /usr/local/bin/sendEmail
Install TLS support for Gmail:$ sudo apt-get install libnet-ssleay-perl libio-socket-ssl-perlAfter installation, change as follows:$ sudo nano /usr/share/perl5/IO/Socket/SSL.pmUsing Ctrl-W find a line with the following fragment:m{(!?)(?:(SSL(?:v2|v3|v23|v2/3))|(TLSv1[12]?))$}iand replace it with:m{( !?)(?:(SSL(?:v2|v3|v23|v2/3))|(TLSv1[12]?))}i
save and exit.
We try to send an email with the command line: $ sendEmail -ftu “OBJECT” -m “MESSAGE TEXT” -xuxp YOURPASSWORD -o tls=yes -s smtp.gmail.com:587
Install the Chromium browser: $ sudo apt-get install chromium-browser We switch the browser autostart to full screen mode: $ sudo nano /etc/xdg/lxsession/LXDE-pi/autostart If you don’t have NOOBS, then: sudo nano /etc/xdg/lxsession/ LXDE/autostart#@lxpanel —profile LXDE#@pcmanfm —desktop —profile LXDE#@xscreensaver -no-splash# auto run the [email protected] s [email protected] [email protected] s [email protected] —kiosk —enable -kiosk-mode —enabled —touch-events —touch-events-ui —disable-ipv6 —allow-file-access-from-files —disable-java —disable-restore-session-state —disable-sync —disable-translate --disk-cache-size=1 --media-cache-size=1 https://localhost:YOURWEBCAMPORT
Let's reboot.
Installing MP3 player: $ sudo apt-get install mpg123
Installing the motion detector:$ sudo apt-get install motionChanging the configuration file:$ sudo nano /etc/motion/motion.
conf I changed the following parameters:#start asdaemondaemon on# Rotate imagerotate 90 (my webcam is 270° rotated)# Image widthwidth 640 (check your webcam resolution)# Image heightheight 480 (check your webcam resolution)# Maximum number of framesframerate 2# Thresholdthreshold 15000 # Picture frames must contain motionminimum_motion_frames 2# Specifies the number of pre-capturedpre_capture 5# Codec to used by ffmpeg for the video compressionffmpeg_video_codec mpeg4# The mini-http server listenswebcam_port 8080 (selected your preferred port)# TCP/IP port for the http server to listen oncontrol_port 8081 (select different port by webcam port)# Restrict webcam connections to localhost onlywebcam_localhost off# Command to be executed when an event starts.on_event_start mpg123 -m —gain 70 /home/pi/testsound.mp3 ;# Command to be executed when a picture (.ppm|.jpg) is saved (default: none)on_picture_save sendEmail -ft [email protected] -u “Motion detected!” -m "https://"`curl -s checkip.dyndns.org|sed -e 's/.*Current IP Address: //' -e 's/ /sys/class/gpio/gpio22/directionsudo echo " 1" > /sys/class/gpio/gpio22/value
Save and exit.
In the home directory, create the following script: $ nano monitor.sh And add: #!/bin/bashsudo echo “0” > /sys/class/gpio/gpio22/valuesleep 40sudo echo “1” > /sys/class/gpio/gpio22/ value
Save and exit.
Using this brainscript, after changing the motion configuration as shown below, when the motion sensor is triggered, the monitor turns on for 40 seconds, then it turns off. You can change the "sleep" value as you wish.
Changing the motion configuration: $ sudo nano /etc/motion/motion.conf And the lines: # Command to be executed when an event starts.on_event_start mpg123 -m —gain 30 /home/pi/testsound.mp3 ;Changes like this: on_event_start bash / home/pi/monitor.sh & mpg123 -m —gain 70 /home/pi/testsound.
mp3 ;Change “—gain” to a higher value.
We save and exit.
Step 6:
I connected computer speakers to my smartphone, which when I’m at home notify me if someone has come with the sound of a “Geiger counter”, and scare away uninvited guests with the “barking of a Neapolitan mastiff” when I’m not at home.
Save your audio tracks in your home directory under the name testsound.mp3
Step 7: Browser
from your homemade can be viewed in the browser by simply entering the URL: https://RASPBERRYPI_IP_ADDRESS:YOURWEBCAMPORT
To view on a tablet, you need to do the same steps.
If you want to view the video stream not through your local network, then you need to open the port on your modem. I cannot say exactly how this is done, since it depends on the modification of your modem, everything is individual. But by opening the port on your modem, the stream can be viewed through a browser by entering: https://YOUR_PUBLIC_IP:YOURWEBCAMPORT
My modem supports the NOIP DNS service, and as soon as I registered it, I was immediately able to access my DIY via the Internet by simply typing the domain name that was given when registering NOIP:
https://YOURNOIPDOMAIN:YOURWEBCAMPORT
Step 8: Intercom on Android
Opening the modem port allows you to view the camera feed via your smartphones. For this feature on iOS, I can use two apps available on the App Store for free.
The first is Cu4GE, the settings of which are shown in the first photo, and the second is Monitor Bee, the settings of which are shown in the second photo. And for Android there is a simple Mjpeviewer application. In all applications you just need to enter URL:PORT and viewing will be available.
Step 9: Finally
By following the steps of this brain guide , I think you are convinced that everything is not so difficult.
Now good luck with your homemade projects !
Everything that was once analog can become digital
In our previous articles we have already compared analog and digital technologies. In particular, we looked at IP telephony, IP television and IP video surveillance, and it must be said that these are not the last “IP representatives” of modern devices. Thus, opening the intercom from your phone no longer seems impossible.
IP intercoms are a convenient access system for both private and apartment buildings. They differ from conventional intercoms primarily in their integration with the home network. The connection to the router occurs via a standard twisted pair cable or via Wi-Fi if the device supports wireless communication, and communication between the components of the IP intercom occurs via the SIP protocol. This scheme is very similar to connecting digital video surveillance and telephony, and with some additional options, the intercom can work as an alarm and security system, which is more like an access control system than just a device that opens the front door.
Connecting the intercom to the Internet provides the opportunity to use the rich functionality that interests most users:
Main types of cables
Video intercoms can use different types of connecting cables. The type of specific cable for a video intercom is determined by the area of application. Typically, video intercom wires can be used for the following purposes:
- Transmission of video signal from the camera to the subscriber device;
- Supply voltage to the electronic lock.
Coaxial cable type RK-75
RK-75 - Coaxial cable for connecting a video intercom with a copper central conductor
The main type of cable used to transmit an analog signal is coaxial cable. It has an asymmetrical design consisting of the following components:
- Central conductor;
- Insulating layer;
- Shielding braid;
- External insulation.
The central conductor through which the signal is transmitted is made of copper wire and can be single-core or multi-core. Next comes a layer of insulating polymer, which protects the cable from negative climatic factors. It can be polypropylene or polyethylene foam. For installation, it is more convenient to use cables for video intercoms with a protective sheath made of foamed polyethylene, since they allow bends of small radii.
The shielding braid is made of specially woven wire and a layer of aluminum foil. It performs the function of a screen and must be connected to a grounding point, otherwise it will simply work in the reverse order, namely, attract interference like an antenna. Coaxial cable is available in various sizes and is characterized by certain electrical parameters:
- Transmitted frequency band;
- Attenuation coefficient;
- Wave resistance.
Imported RG-59 coaxial cable
Since the frequency band in cables used for video intercoms is not a determining value, it is permissible to use any cable that is suitable in terms of physical characteristics. The magnitude of the attenuation coefficient affects only long distances. A cable with a resistance of 75 Ohms is used to connect the video camera and the base unit. This is the main parameter that you need to focus on when choosing a cable. The maximum length of the coaxial cable line should not exceed 100 meters. The most commonly used cable is the domestically produced cable RK-75-6-12 or its foreign analogues – RG-6 and RG-59. RK-75-6-12 stands for as follows: radio frequency coaxial cable 75 Ohm, insulation diameter 6 mm, 1 – normal heat resistance (up to 125°C), 2 – development number.
Combined cable KVK
Connection diagram for a video intercom in a country house
If the video intercom has an analog design, and the calling panel is installed on the external gate of a country house, then a separate DC voltage line is required to power the video camera. In order to reduce costs and ease of installation, such systems use a combined intercom cable with a camera. It consists of a typical coaxial cable with a characteristic impedance of 75 Ohms and a two-wire line for supplying voltage. Such a cable is designated as follows: KVK-2PV(PP)-2x0.5 (0.75) where:
- KVK – combined video surveillance cable;
- 2 – radio frequency cable type RK-75;
- P – insulating layer of foamed polyethylene;
- B – external insulation made of polyvinyl chloride;
- P – external insulation made of light-stabilized polyethylene;
- 2 – two stranded wires, cross section 0.5 mm.
The electrical parameters of such a cable are determined by the parameters of RK-75.
Combined KVK cable
The cable for connecting a video intercom with polyvinyl chloride insulation (B) is intended for indoor use, and the cable with polyethylene coating (P) withstands any climatic conditions and is used for outdoor installation. It can be laid in the ground, but with the obligatory use of a metal or plastic sleeve. The overhead line can be laid with a KVK-Pt cable, the design of which includes a steel cable for fastening.
Twisted pair cable
This type of cable is widely used in digital devices. Structurally, it consists of several lines, each of which consists of two single-core wires (pair) twisted together with a certain pitch. Cables with multicore conductors are less commonly used. The number of such pairs in a cable is usually a multiple of two and can be different. The cable is called “twisted pair” (twisted pair-TP) and has the following modifications:
- UTP – unshielded cable;
- FTP – cable where all pairs are protected by a common screen;
- STP – cable where each pair is placed in a separate shield;
- SFTP is a cable where shielded pairs are additionally placed in a common shield.
Twisted pair cable
The cable for the intercom with a UTP type camera is marked as follows: FTP Cat.5-4x2x0.5. A cable with a common shield, category five, consisting of four pairs of conductors with a diameter of 0.5 mm. The category indicates the data transfer speed. In this case, this value is 100 Mbit/s. A digital signal via such a cable can be transmitted over a distance of up to 300-500 meters. External cable insulation can be made of various materials:
- PVC – polyvinyl chloride;
- PP – polypropylene;
- PE – polyethylene.
A cable with a PVC sheath is used for installation work indoors, and a cable with polypropylene and polyethylene insulation can be used for outdoor work.
ShVEP cable
To connect outdoor calling panels in video intercoms, a ShVEP cable is often used. It is used to transmit video signals, supply power to the camera, and control the electronic lock. It consists of several stranded wires, one of which is placed in a shielding braid. The cable is produced with conductors of the same diameter. ShVEP 4x0.12 consists of four stranded wires. This cable is designed for outdoor installation and allows video signal transmission over a distance of up to 60 meters. An electronic lock for a video intercom can be connected using an insulated stranded wire ShVVP-2x0.75 mm.
Connecting an IP intercom to an entrance coordinate system
If the entire system in the house is digital, then the question of connecting an IP intercom to a smartphone is clear. But what if you live in an apartment building where the common intercom line is analog? How to convert a coordinate intercom to IP? For such purposes, various companies produce special adapters (converters, interface modules) that will allow you to install an IP video intercom instead of a regular handset.
Things to consider before purchasing an adapter:
How to connect an IP intercom via an interface unit:
The conversion of an analog intercom to IP ends here. Next, everything is as we described above - download the application to your device and you can control the intercom from your phone, tablet or computer.
Making a USB extension cable:
I took an 18-meter piece of twisted pair cable and terminated it with dismountable female and male USB plugs purchased at a radio store.
Important point! I connected the blue pair of network cable conductors to D+ and D-. Why blue? – All four twisted pairs of the cable cores have different lay pitches. This is clearly visible if you remove the overall sheath of 10 - 15 centimeters from the UTP network cable. So, the USB extension cable worked perfectly if the D+ and D- signals were sent through the blue or green pair of wires. If we put D+ and D- on the orange pair, then the USB extension cable did not work at all. The brown pair worked intermittently. Probably, the laying pitch of the blue and green pair of cores is ideal for the passage of a high-frequency USB signal (resonance, impedance, characteristic impedance, etc.).
Pitfalls of IP intercom
A few words about the advantages and disadvantages of digital technologies in the video intercom environment. Advantages: huge functionality, remote access, integration with other systems and open infrastructure.
There are not many disadvantages, but they are quite significant and can affect the final choice.
We have prepared a special video about the protection of IP intercoms:
If you have questions on the topic, leave them in the comments to the video on Youtube - we will definitely answer them.
Source
Types of intercom systems
Today in Russia two types of intercom systems are used - audio intercoms and video intercoms. In addition, devices may differ in the number of subscribers that can be connected to the device. Below we will look at each communication option in more detail to understand their advantages and disadvantages.
Audio intercoms
Audio intercoms are good old systems that are installed in almost all modern homes. The device consists of the following structural blocks:
- External panel with dial . The device provides communication using the “one to many” model, and to call an apartment you need to dial the number of the corresponding apartment on the dial (other persons will not hear the conversation). The device is equipped with both an audio receiver and an audio transmitter - this allows people to fully communicate.
- Receiver block with tube . It is installed inside each apartment, and negotiations are carried out via audio communication using a handset. The device is also equipped with a special button - if a person wants to launch a person from the street, the person presses the button, which leads to the unlocking of the lock on the door.
- In addition, the audio intercom includes additional devices . These are an electromagnetic bell (locks the door), a rammer (automatically closes the door when a person enters), key devices (brought to the panel with a dial to open the door) and others. The individual components of the system are connected to each other (including the panel and the receiver unit) using wires.
An audio intercom is a simple, inexpensive device that has a simple operating principle, rarely breaks down and provides a high degree of protection. However, it does not allow you to see the person who enters the house. Therefore, an intruder can use tricks to get into the house. For example, he may introduce himself as a policeman or a neighbor from the top floor, but due to the lack of a video signal, it will be impossible to identify such a person.
Access video intercoms
Access video intercoms
Access intercoms are usually designed as an auxiliary device that is connected in addition to the main intercom. The connection is carried out on one (only at the entrance to the apartment) or two levels (at the entrance to the apartment and at the entrance to the entrance). The video intercom includes the following elements:
- Audiovisual call unit with integrated camera. Installed at the entrance to the apartment instead of a regular bell. With the help of this system, a person from an apartment can see exactly who is trying to get into his apartment. Video communication is one-way, but audio communication is two-way. This allows for full-fledged negotiations - while the person in the apartment remains completely incognito.
- Audiovisual signal receiver unit. It is a stand-alone panel that is installed in the apartment instead of a receiver unit with an audio intercom handset. Connects to the call block, which allows you to see and hear the person who wants to get into the apartment.
- Interface module (adapter). An interface module is a small device that allows you to assemble disparate elements of the system together (audio intercom, video call, electric lock control system). Without this element, a full-fledged video protection system will not work.
Note! The adapter is purchased separately and must be compatible with audio and video intercoms. Some audio intercoms are equipped with a built-in interface module.
By number of users
In addition, intercoms may differ in the number of users, communication between whom it can provide. There are two main categories of devices:
- Devices operating according to the “one-to-one” . In this case, communication is provided between two parties - between people on the street and people indoors. Devices of this type have a very simple design and are usually installed in private homes.
- Devices operating according to the one-to-many . In this case, communication is provided between the “street” and all subscribers who are connected to the system. When a person on the street wants to get in touch, he dials the desired channel (usually an apartment number). Devices of this type are more difficult to operate, but they can be installed on multi-story buildings.
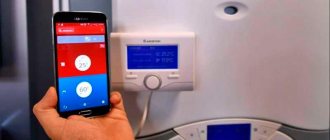
Open the door from your phone in the app
Open the mobile application and click on the green key button. The door is open! There is a widget, let's configure it:
Touch and hold an area of free space on the screen,
In the menu that appears, click on the “Widgets” icon
Touch and hold our app widget,
The main screen images will appear,
Move the widget to the desired screen and release your finger.
Now, to open the door, just click on the widget icon.
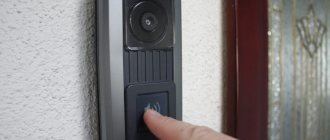
Video peephole installation
Correct installation of the camera will provide a good overview and protect the device from falling out. Many people do not know how to install a video peephole themselves. First you need to pull out the old optical model. A modern device will be installed in this hole. If the door did not have an optical peephole, then you need to make a corresponding hole. It is best to use an electric drill here.
The most difficult stage of installation is the location of the peephole. The lens should not be obscured by door elements. In addition, the peephole should be fixed as much as possible. Most often, the size of a homemade structure is much smaller than the prepared hole in the door. After installing the homemade device, you need to move on to running the cable. It supplies electricity and broadcasts video.
Proper cable routing is very important at this stage. It should not be damaged when opening and closing the door.
It is also important that the cord does not interfere with the passage.
Conclusion
Making a video eye with your own hands is not difficult. The device will help residents control the situation on the landing and near the front door. Broadcasting from the device is available even at a remote distance. In order for a homemade device to function similarly to factory models, you need to perform the installation correctly. In addition, the creator will be able to repair the video peephole himself if necessary. The skills acquired while creating the device will help you carry out repair work with ease.
How to use the “My Home” application for intercom
How to login to the application
If I forgot my password
If you have forgotten the password associated with the agreement, you can recover it:
How to find out the contract number
You can look at the agreement number in the documents that you signed when handing over the keys. If you cannot find these papers, call 209-00-00 or write to the online chat.
What can you do to ensure that the whole family can use the app?
If you are the owner of the contract, go to the “Users” screen in the application
Then click on the “+” icon at the top or bottom of the screen (depending on the operating system)
1 way
Invite a family member to “accept the invitation” in the app and read the QR code on the open page of your phone.
Method 2
Tap "invite via SMS," then select a family member's number from your phone's contact list.
How to install a widget for an intercom
Using the widget, you can open the intercom door directly from your mobile screen. You don't even need to log into the app.
To install the widget, you need to download and log into the application. Make sure that the intercom at the address you need appears in the application. After that, go to the widgets window on your mobile phone. The widget window is located in different places on different models.
Look at the video on how to install the “My Home” widget on different platforms:
How to download a video from an archive
Go to the website video.2090000.ru from your PC, enter the agreement number and password. Download the required fragment.
Source
The difference between a video eye and a conventional optical eye
The electronic version has many more advantages:
- To find out who is standing at the door, you don’t have to go up to it and look through the peephole. To do this, just look at the display, which can be located anywhere in the apartment.
- Modern cameras have very good resolution and special infrared illumination. Therefore, even in poor lighting conditions, the person on the other side of the door will be clearly visible, and his face can be identified without difficulty.
- Video cameras can have a higher viewing angle – up to 180 degrees. Thanks to this, you can see a person if he is standing to the side of the camera or even trying to be unnoticed, pressed against the door.
- Video eyes work autonomously. That is, even if the lights are turned off in the apartment, power will flow to the device - this can be a built-in battery or removable batteries.
- The camera records what is captured on a medium – a memory card installed in it.
And two key advantages of do-it-yourself eyes are savings and the ability to shoot around the clock.
We recommend to buy
Scheme for connecting an apartment video intercom to a common entrance
Video intercoms have become common household amenities designed to improve comfort. Demand is growing - supply is expanding.
Sometimes it is difficult to figure out without an expert how to connect a video intercom to an entrance intercom. It is necessary to learn the intricacies of connecting to the network and comply with installation requirements. A new connection, as well as replacement of the kit, is made in accordance with the instructions.
What is a system for combining an apartment video intercom with a general one?
Apartment and entrance intercom can be combined and synchronized operation can be established. Two problems are solved at once.
Before purchasing, you need to know the model of the intercom at the entrance. Video equipment is selected for the initially combined equipment, which allows the use of several calling panels and video cameras.
Recommendations
To protect yourself as much as possible from uninvited guests, follow these tips:
- Only let people you know into the entrance. If a person introduces himself as a government official (for example, a police officer), ask him to show his identification when he arrives at your entrance.
- Many video systems allow you to record video or take photos. If a stranger comes to you, do not open the door for him, but be sure to take a photo/video in case you contact the police.
- If possible, try to negotiate with your neighbors to install a shared video system on the floor. This will save a lot of money and improve the security of the entrance.
Existing disadvantages
Despite the large number of advantages that intercoms with a GSM module have, they also have disadvantages:
The cost of some models from renowned manufacturers can reach up to several thousand rubles. You will also have to pay quite a significant amount for installation of devices.
For the most part, such intercoms are set up quite simply. But there are some models whose setup causes significant difficulties.
For example, this is different from Kenwei products. Products of this brand are very functional, their build quality is at a high level. However, all changes to the settings are made via SMS messages, which is not always convenient.