HomeHomeHeatingDo-it-yourself heat pump: options for making a refrigerator and air conditioner, step-by-step guides
The owners of country houses have always been sensitive to the issue of hot water supply and heating.
Installing a gas, electric or diesel boiler makes it possible to heat a country house and supply it with hot water and heat, but nowadays there are alternatives to the heating we are used to.
One such alternative is a heat pump. This is quite an expensive pleasure, but you can make it yourself. We'll talk about how to do this in this article.
- 2 Using an old refrigerator
- 3 Use of air conditioner
Instructions for assembling a pump from an old refrigerator
Before you start assembling the unit, decide on its type and operation scheme. On the drawing, indicate the exact dimensions of the device, the distances between the elements and the connection points of the nodes.
The second step in assembling the pump is to remove the compressor from the old refrigerator, which will pump water and refrigerant through the pipeline. The main element of the heating system must be in good working order. If it was previously repaired, then it is unknown whether the assembled equipment will work.
To assemble and install the heat pump, purchase the following parts:
- sealed stainless steel container with a volume of at least 120 l;
- copper pipes of various diameters (3 pcs.);
- plastic tank, volume – 90 l;
- metal-plastic pipes;
- L-shaped brackets (length – 30 cm). With their help, the compressor is attached to the wall.
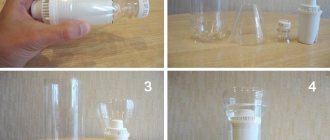
Next, assemble the condenser, which is located at the back of the refrigerator:
- cut the steel container in half with a grinder;
- place a coil in one part;
- Using a welding machine, weld the container. A durable frame will allow you to retain heat well and withstand high temperatures;
- In order for the condenser to act as a heat exchanger, wind a copper tube around the tank and secure its ends with slats.
The plastic tank will serve as an evaporator. Also install a coil on it and attach it to the wall with brackets.
After preparing the main components, select a thermostatic valve. Remove it from the same device as the capacitor, or buy a similar one. This will make it easy to combine system elements with each other.
Fasten all pump elements together and connect the heat exchanger to the system with PVC pipes.
DIY manufacturing algorithm
Rules for manufacturing the unit:
- Decide on the source from which the heating circuit will operate. In areas with a harsh climate, it is recommended to use sources located underground; in regions with a warm climate, energy can be obtained from the air.
- Calculate the power of the unit. It depends on the quality of insulation of the house. If the building is not sheathed with insulation, then the recommended power of the device is 70 W/m2. Only such a unit will create a comfortable microclimate inside the building. For houses insulated with modern materials, a power of 45 W/m2 is suitable. A building insulated using a special technology does not use a powerful unit. It is recommended to use a power of 25 W/m2. If the power is increased, the temperature inside the room will be too high.
- Prepare basic and additional equipment.
- Install the components and assemble the system. After that, connect it to the source.
Also useful for repairs:
- Foam sphere houses
- Samsung TV does not turn on, indicator light is red
- Idle air control device
Using an old refrigerator
Refrigerator heat pump device
So, to assemble a heating system in a country house, you need to have a heat pump.
Today, such units are not cheap, this is explained by high technical characteristics and painstaking work on their assembly. But, if you wish, you can assemble the heat pump yourself.
You can build a simple heat pump from a household refrigerator. The peculiarity of the technique is that it has two main components of a heat pump - a condenser and a compressor. This will significantly speed up the assembly of the heat pump with your own hands.
So, assembling a pump from an old refrigerator is as follows:
Capacitor assembly. The element is made in the form of a coil. In refrigerators it is most often installed at the back. This well-known grille is the condenser through which heat is transferred from the refrigerant. The capacitor is installed in a container that is highly durable and can withstand high temperatures. To avoid damaging the coil during installation, experts recommend cutting the container and installing a capacitor in it. After this, the container is welded. Next, a compressor is attached to the container. It is almost impossible to make a unit at home. Therefore, it is better to take it from an old refrigerator
At the same time, you should pay attention to ensure that it is in good condition. You can use a regular plastic barrel as an evaporator. After all elements of the system are ready, they are connected to each other. Plastic pipes are used to connect the unit to the heating system.
Thus, you can build a heat pump from an old household refrigerator. If you need to pump freon into the system, you need to call a specialist. This work can only be done with the help of special equipment.
The first channel will let air into the freezer, and the second will release it. In this case, physical processes occur that cause the capacitor to heat up.
You can read about Igor Savostyanov’s Henk System heat pumps here.
Types of heat pumps for home heating
There are compression and absorption heat pumps. Installations of the first type are the most common, and this is the type of heat pump that can be assembled from a refrigerator or an old air conditioner using a ready-made compressor.
You will also need an expander, evaporator, and condenser. For the operation of absorption units, an absorbent refrigerant is required.
Heat pumps are most often assembled from units of air conditioners and refrigerators. Such homemade designs are simple, effective, and if the master has the skills to do such work, they can be made in just a few days
Depending on the type of heat source, installations can be air, geothermal, or using secondary heat (for example, waste water, etc.). One or two different coolants are used in the input and output circuits, and depending on this, the following types of equipment are distinguished:
- "air-to-air";
- "water-water";
- "water-air";
- "air-water";
- "ground-water";
- "ice-water".
A system can only be efficient if it consumes less energy than it produces. This difference is called the conversion factor. It depends on many factors, but the most significant is the temperature of the coolant in the input and output circuits. The greater the difference, the better the system works.
Image gallery Photos from The source of heat is air from the street. The units are connected to water heating systems. They are able to work effectively as long as the outside air temperature is above -25 degrees. The water temperature in the heating system can reach 63 degrees
The equipment is designed to heat buildings using water resources. It is installed in areas located near natural bodies of water. Horizontal heat pumps of this type take energy from the bottom layers of water, and vertical ones are designed to extract heat from underground and groundwater
Professional installation of a geothermal pump is an expensive service, but the cost is recouped through low operating costs. The installations are characterized by increased reliability and safety. They are weather-sensitive and designed for connection to low-temperature heating systems, which include heated floors
The installations generate heat while freezing water. By turning 100-200 liters of water into ice, you can get enough energy to heat a medium-sized house for 1 hour. For the system to function, solar collectors and a tank with a large amount of clean water are needed.
Air-to-water heat pump
Block diagram for multiple heat pumps
Geothermal heat pump for home
Ice-water heat pump
There are no reliable formulas for calculating the performance of heat pumps, because... their work depends on many factors.
When you assemble a heating system yourself, you cannot expect it to be as efficient as industrially produced equipment, but it is quite enough to create an economical additional heating system.
Manufacturing and installation
The pump is manufactured according to the following algorithm:
- the compressor is mounted on the wall;
- a coil is made from pipes (to make it, you need to wrap the pipes around a container of a suitable shape);
- the tank is cut in half, a coil is placed inside it and brewed;
- several holes are left in the container through which the coil pipes are led out;
- to make the evaporator, a plastic barrel is used, identical in size to the tank, and internal circuit pipes are inserted into it;
- PVC pipes (installation diagrams for warm water floors in the apartment) are installed, transporting heated water;
- It is not recommended to fill the unit with freon yourself; it is better to entrust this action to a specialist.
The cost of work in different regions of our country can vary dramatically. In addition, the cost of operation and the pump depend on its type and heating system.
- In St. Petersburg, installation of a heat pump, regardless of its type, will cost the Customer from 35,000.00 rubles;
- In Moscow, installation organizations, regardless of the type of heat pump, are ready to perform turnkey work for an amount over 45,000.00 rubles;
- In Krasnodar, installation of a heat pump will cost from 40,000.00 rubles.
- If we talk about the installation of heating systems using heat pumps, then the average prices for a set of works, taking into account the cost of equipment, are as follows:
READ MORE: Motoblock Patriot Ural TOP-3 rating of the best models of 2020, distinctive characteristics of the device, instruction manual and customer reviews
A) Installation of geothermal domestic heat pumps:
- Power – 4-5 kW (50 – 100 m²) – from 130,000.00 to 280,000.00 rubles;
- Power – 6-7 kW (80 – 120 m²) – from 138,000.00 to 300,000.00 rubles;
- Power – 8-9 kW (100 – 160 m²) – from 160,000.00 to 350,000.00 rubles;
- Power – 10-11 kW (130 – 200 m²) – from 170,000.00 to 400,000.00 rubles;
- Power – 12-13 kW (150 – 230 m²) – from 180,000.00 to 440,000.00 rubles;
- Power – 14-17 kW (180 – 300 m²) – from 210,000.00 to 520,000.00 rubles.
B) Installation cost of air source heat pumps:
- Power up to 6.0 kW (50 – 100 m²) – from 110,000.00 to 215,000.00 rubles;
- Power up to 9.0 kW (80 – 120 m²) – from 115,000.00 to 220,000.00 rubles;
- Power up to 12.0 kW (100 – 160 m²) – from 120,000.00 to 225,000.00 rubles;
- Power up to 14.0 kW (130 – 200 m²) – from 127,000.00 to 245,000.00 rubles;
- Power up to 16.0 kW (150 – 230 m²) – from 130,000.00 to 250,000.00 rubles;
- Power up to 18.0 kW (180 – 300 m²) – from 135,000.00 to 255,000.00 rubles.
Refrigerator pump
Heat pump from a refrigerator
The main part of the system is the compressor. It is better to buy it ready-made in the store or use what is available from the refrigerator or air conditioner. All other components - evaporator, condenser, pipeline - can be assembled yourself. Such a device will consume energy only for compression and heat transfer, while generating 5 times more.
Some craftsmen went further and made a heat pump from a refrigerator, placing radiators inside it, heated by the heat of the earth. A positive temperature is constantly maintained inside, which forces the refrigerator to constantly work, heating the radiator located behind it. Using a native radiator, they make a heat exchanger out of it (or make a homemade one), and take away the heat it generates.
The efficiency of such a heat pump is more suitable for demonstrating the operation of the device, since its efficiency is very low. In addition, the refrigerator is not designed for this operating mode and can quickly fail.
Characteristics
Most thrifty owners want to save money on heating and water supply for a private home. A heat pump is suitable for such purposes.
It is quite possible to build it yourself, while saving a lot of money - a factory-made device is very expensive.
Properties and device
The device has an external and internal circuit along which the coolant moves. Components of a standard device: a heat pump, a device for intake and a device for heat distribution. The circuit from the inside consists of a mains-powered compressor, an evaporator, a throttle valve, and a condenser. The device also uses fans, a pipe system, and geothermal probes.
Advantages of the heat pump:
- does not emit any harmful substances, absolutely environmentally friendly;
- there are no costs for the purchase and delivery of fuel (electricity is spent only on moving freon);
- no need for additional communications;
- absolutely fire- and explosion-proof;
- full heating in winter and air conditioning in summer;
- A self-built heat pump is an autonomous design that requires minimal control effort.
Types of pumps
There are different types of heat pumps, but they are all based on the principle of producing heat or cold by separating thermal energy and transferring it. Only one TN Frenette is different. The cavitation method of obtaining thermal energy using a hydrodynamic generator is a type of heat pump.
The thermal energy that is used to heat the building is a consequence of energy conversion carried out using a heat pump. Moreover, they obtain heat without burning fuel, but by cooling the external environment and releasing thermal energy indoors, that is, in this case, the law of conservation of energy is observed: how much thermal energy is taken from the external environment, the same amount is released inside the building. Most of these household devices use heat from the sun, which is accumulated by the surface of the earth, water or air.
Therefore, according to the type of primary circuit, all structures can be divided into air, ground and water.
Based on the type of coolant (W - water, G - soil) in the circuits, pumps can be divided into eight types:
- B—B;
- G-V;
- G—air;
- air—B;
- air—air;
- To the air;
- refrigerant—B;
- refrigerant - air.
They can also use the heat of the exhaust air, heating the supply air, that is, operate in recovery mode.
Air-to-air
The principle of operation of a heat pump is similar to that used in an air conditioner in heating mode, but has the only difference. The heater is set to heating, and the air conditioner is set to reduce the temperature in the room.
The principle of operation of the B-B installation is as follows: the air, even at low temperatures, has a certain amount of energy. Only at absolute zero is there no thermal energy. Most HPs are capable of receiving heat at a temperature of –15 °C. Currently, some manufacturers produce stations that retain heat extraction at –30 °C. Heat is collected through the evaporation of freon, which circulates through the internal circuit. For this purpose, an evaporator is used in which the refrigerant is converted from liquid to gaseous state. This absorbs heat.
The next block, which is located in the B-V heating system, is the compressor, which converts freon from a gaseous state into a liquid. This generates heat. The efficiency of the V-V installation directly depends on the ambient temperature. The lower it is, the lower the station’s productivity.
Air-water
Air-to-water HP is the most universal model. It is very effective in the warm season, but in the cold season the performance drops significantly. Simple installation is an advantage of the system. Suitable equipment can be installed anywhere. The heat that is removed from the room in the form of gas or smoke can be reused.
A water heat pump takes heat from groundwater, which is pumped through the evaporator. Such a pump is distinguished by good efficiency and increased stability: efficiency is the result of significant heat transfer from water.
Of course, to use an installation of this type, there must be sufficient groundwater in the area. It is advisable that the water is no deeper than 30 meters.
Water-water
With such a system, an easily evaporating liquid, such as freon, circulates in the internal circuit. The indoor circuit can be water pipes, registers or radiators filled with water.
Any body of water with a sufficiently large amount of water can act as an external contour. This could be a river, lake or pond. In this case, the coolant takes heat from the external circuit and transfers it to the internal circuit.
Geothermal
The HP uses the stored thermal energy of the earth as a heat source. Such pumps are considered the most efficient because the ground temperature remains constant throughout the year.
These systems are divided into horizontal and vertical. But this method requires a fairly large area for horizontal pipes, and for vertical systems it is necessary to perform significant excavation work.
Prices for different types of heat pumps
Heat pump
Types of heat exchangers
In the designation of the type of heat exchanger of a heat pump, the first indicator determines the method of constructing the external circuit of the heat supply system, and the second - the design of the internal circuit.
"Water - water"
In heat exchangers of this type, heat is taken from water bodies (well, river, lake, etc.), solar energy or other objects. A coolant—water or another liquid—circulates in the primary circuit. Circulation is carried out by creating pressure through the installation of a pump.
The circuit can be closed or open; which option to choose is determined by the type of coolant. In the heat pump, in the internal circuit, freon circulates, which, receiving energy from the external circuit, evaporates, enters the condenser, where it transfers the resulting heat to the consumer’s coolant.
"Water - air"
In heat exchangers of this type, the energy collected in the external circuit, in which liquid (water or other energy carrier) circulates, enters the heat exchangers of the heat pump, where it is transferred to the indoor air.
"Air - air"
In this type of heat exchanger, the external circuit is located on the outside of the building; it is the evaporator in this pump design. The heat from the outside air heats the refrigerant, which evaporates. Then, passing through the compressor, it is compressed and supplied to the indoor unit - a condenser, which is located inside the building. The condenser gives off heat to the air inside the room in which it is located, and the refrigerant is again supplied to the evaporator.
"Air - water"
In this type of heat exchanger, thermal energy is taken from the outside air. The air enters the compressor, where its temperature rises under the influence of pressure, after which it enters the heat exchanger. In the heat exchanger, the supplied air is condensed and energy is transferred to the energy carrier of the consumer’s heating system.
"Earth - Water"
Heat exchangers of this type are based on receiving energy from the earth and transferring it to consumers. Brine (antifreeze) circulates in a closed external circuit located below the freezing level. Circulation is carried out by installing a pump. The brine enters the heat pump's condenser, where it transfers the resulting energy to the refrigerant, which in turn transfers it to the consumer's heating system by condensation in the pump's heat exchanger.
"Earth - Air"
In heat exchangers of this type, the thermal energy obtained by the brine circulating in the external circuit, which is located under the surface of the earth, is transferred in the heat exchanger chambers to the air inside the room.
How to make a unit from a refrigerator
A refrigerator is one of the most suitable units for creating a heat pump. This is explained by the fact that the device comes with a compressor.
Preparation of diagrams and drawings
Before starting to build the device, choose the location of the source. Then a well or trench is dug to install the pipes.
The design of the unit is the same for any heat source. The device circuit is ordered from a professional or chosen on the Internet. A drawing is made on its basis. It indicates all distances, node points and dimensions.
Selection of necessary parts
The main part that ensures the operation of the structure is the compressor. If it fails in the refrigerator, a new device is purchased. Such devices are sold by specialists specializing in refrigerator repair. Repairing an old compressor is not recommended.
In addition to the compressor, prepare:
- thermal control valve;
- L-shaped brackets, 30 cm in size;
- a sealed container made of stainless steel with a volume of at least 120 liters;
- plastic container, volume 90 liters;
- copper pipes of different diameters in the amount of 3 pieces;
- several metal-plastic pipes;
- grinder for cutting materials;
- welding machine for connecting pipes;
- standard set of tools.
Installation of system components
- Use a grinder to cut the metal tank into two equal parts.
- Make a coil from a copper pipe. To do this, screw the pipe onto the cylindrical formwork in a spiral, without applying much effort, and remove it.
- Securely fix the coil in one of the tank halves.
- Weld the parts of the metal tank to each other and make threaded holes in the tank.
- Wind a copper pipe onto a steel tank with a volume of 120 liters and secure the ends with slats.
- Connect plumbing transitions to the terminals.
- Wind a coil onto a plastic tank and secure the ends with slats.
- Hang the plastic tank, which serves as an evaporator in the heating system, on the wall using brackets.
After this, assemble the system according to the prepared diagram and pour freon inside. It is recommended to approach the choice of fluid responsibly, otherwise big problems will arise when filling it and during operation of the system. Experts advise using the composition of the brand R 422 or R 22.
Connection to the intake device
When the system is ready, it is connected to the intake device:
- For devices operating on the “water-soil” principle, the collector is immersed in the ground, where the temperature is above +1 °C. Pipes are installed at the same level.
- For devices operating on the water-to-water principle, the collector and pipes are immersed in the center of the heat source.
- Air powered units are installed outside the building.
Making a geothermal installation
While the previous option gives approximately double the savings, even a household ground loop gives a COP of about 3 (three kilowatts of heat per 1 kW of electricity consumed). True, financial costs and labor costs will also increase significantly.
Although many examples of how to assemble such devices have been published on the Internet, there are no universal instructions with drawings. We offer a working version, assembled and tested by a real DIY home enthusiast, although many things will have to be invented and modified yourself - it is difficult to fit all the information about heat pumps into one publication.
Calculation of the soil circuit and pump heat exchangers
Following your own guidelines, let's start the geothermal pump calculations with vertical U-shaped probes placed in the wells. You need to know the total length of the outer circumference, then the depth and number of vertical shafts.
For example, input: A single-family house with thermal insulation, 80 m² and a ceiling height of 2.8 m, located in the center of the village, is heated. We will not calculate the thermal load; we will determine the heat requirement by area, taking into account thermal insulation - 7 kW.
If desired, you can build a horizontal collector, but then you will have to allocate more space for excavations.
Important explanation. Engineering calculations for heat pumps are complex and require a high level of knowledge, and there are entire books on the topic. In this article we present simplified calculations from the practical experience of builders and amateur craftsmen.
The intensity of heat exchange between the soil and the circulating antifreeze liquid depends on the type of soil:
- For 1 linear meter of a vertical probe immersed in groundwater, 80 W of heat is consumed;
- on rocky soils the heat release will be about 70 W/m;
- Moisture-saturated clay soils produce about 50 W/m of collector;
- Dry stones - 20 W/m.
Link. The vertical probe consists of 2 loops of pipes lowered to the bottom of the pit and concreted.
An example of calculating the length of a pipe. To extract the required 7 kW of thermal energy from wet clay soil, divide 7000 W by 50 W/m, the total depth of the probe will be 140 meters. Now the pipe passes through 20-meter holes, which you can drill yourself. A total of 7 wells with 2 heat exchange circuits for a total pipe length of 7 x 20 x 4 = 560 m.
The next step is to calculate the heat exchange area of the evaporator and condenser. Various online sources and forums provide different calculation formulas, most of which are incorrect. We hesitate to recommend such methods and mislead you, but we will offer you a smart option:
- Contact any reputed plate heat exchanger manufacturer like Alfa Laval, Kaori, Anvitek, etc. You can go to the official website of the brand.
- Fill out the heat exchanger selection form or contact the manager by phone and request a selection, indicating parameters (for example, frost protection, freon), inlet and outlet temperatures and thermal load.
- The specialist will make the necessary calculations and suggest a suitable heat exchanger model. Among its features we find the main one - the exchange zone.
Plate devices are very effective, but expensive (200-500 euros). It is cheaper to assemble a shell-and-tube heat exchanger from copper pipes with an outer diameter of 9.5 or 12.7 mm. Multiply the manufacturer's value by the safety factor of 1.1 and divide by the circumference of the pipe to get the square meter.
The stainless steel plate heat exchanger is an ideal evaporator, it is efficient and takes up little space. The problem is the high price of the product.
Example. The heat exchange area in the proposed device was 0.9 m². Choosing a ½" copper pipe with a diameter of 12.7 mm, we calculate the circumference in meters: 12.7 x 3.14 / 1000 ≈ 0.04 m. The total circumference is calculated as follows: 0.9 x 1.1 / 0.04 m ≈ 25 m.
Equipment and materials
It is proposed to build the future heat pump on the basis of a branched outdoor unit of appropriate power (indicated on the plate). Why is it better to use a used air conditioner:
- the device is already equipped with all components - compressor, throttle valve, reservoir and starting electrics;
- Homemade heat exchangers can be placed in the body of a refrigeration appliance;
- has convenient service ports for refilling freon.
Attention. Experienced users choose their equipment separately - compressor, expansion valve, controller, etc. If they have experience and knowledge, this approach is only welcome.
It is impractical to mount a VT on the base of an old refrigerator - the capacity of the device is too small. At best, you can squeeze up to 1 kW of heat out of them, which is enough to heat one small room.
In addition to the external split block, the following materials will be required:
- HDPE pipe Ø20 mm - for the ground loop;
- Polyethylene fittings for assembling the manifold and connecting to heat exchangers;
- circulation pumps - 2 pcs;
- pressure gauges, thermometers;
- high-quality water pipe or HDPE pipe with a diameter of 25-32 mm for the evaporator and condenser jacket;
- copper pipes Ø9.5-12.7 mm with a wall thickness of at least 1 mm;
- insulation of pipelines and refrigerant lines;
- kit for sealing heating cables laid inside water pipes (needed to seal the ends of copper pipes).
Set of seals for sealed entry of copper pipes
External coolant - sea water or antifreeze for heating - ethylene glycol. You will also need a supply of freon, the brand of which is indicated on the nameplate of the split system.
Assembling the heat exchange block
Before proceeding with installation, disassemble the outdoor unit - remove all covers, remove the fan and the large standard cooler. Disconnect the reversing valve control coil unless you plan to use the pump as a coolant. Temperature and pressure sensors must be retained.
Basic VT assembly procedure:
- Make a condenser and evaporator by inserting a copper tube of the calculated length into the center of the hose. Install tees at the ends to connect the grounding and heating circuits, seal the protruding copper pipes with a special kit for heating cables.
- Using a piece of Ø150–250 mm plastic pipe as a core, wind improvised two-pipe loops and position the ends as shown in the video below.
- Install and secure both shell-and-tube heat exchangers in place of the original radiator and solder the copper tubes to the corresponding outlets. Hot heat exchanger - the condenser is best connected to the service connections.
- Install factory sensors to measure coolant temperature. Insulate exposed pipe sections and the heat exchangers themselves.
- Install thermometers and meters on water lines.
Tip. If the main unit will be installed outdoors, measures must be taken to prevent the oil in the compressor from freezing. Purchase and installation of an electric winter pan heater kit.
Another way to build an evaporator can be found on thematic forums - a copper tube is rolled up and then inserted into a closed container (tank or barrel). This option is quite reasonable when there are a large number of coils, when the computational heat exchanger simply does not fit into the air conditioner housing.
Construction of the soil contour
At this stage, simple but labor-intensive excavation work is carried out and probes are inserted into the holes. The last operation can be done manually or using a drill. The distance between adjacent openings is at least 5 m. Further work procedure:
- Dig a shallow trench between the holes to lay the supply pipes.
- Place 2 loops of polyethylene pipe in each hole and fill the holes with concrete.
- Bring the pipes to the connection point and install a common manifold with HDPE fittings.
- Insulate pipes laid in the ground and cover them with earth.
The photo on the left shows the insertion of the probe into the plastic casing, and the photo on the right shows the laying of wires in the trench.
Important note. Before concreting and backfilling, check the tightness of the circuit. For example, we connect an air compressor to the manifold, pump up the pressure to 3-4 bar and leave it for several hours.
Refer to the diagram below when connecting the wires. Bends with taps are necessary to fill the installation with brine or ethylene glycol. Lay two main pipes from the collector to the heat pump and connect to the “cold” heat exchanger - the evaporator.
Vents should be installed at the highest points of both water circuits, not shown in the diagram.
Do not forget to install the pump unit responsible for the circulation of the liquid, the direction of flow is towards the freon in the evaporator. The refrigerants flowing through the condenser and evaporator must move relative to each other. Watch the video on how to properly fill cold side pipes:
In the same way, the condenser is connected to the underfloor heating system. Due to the low supply temperature there is no need to install a mixing unit with a three-way valve. If it is necessary to combine TH with other heat sources (solar collectors, boilers), a buffer storage tank with multiple outputs should be used.
Refueling and starting the system
Once the unit is installed and connected to the power source, it is important to charge the system with refrigerant. Here is the trap: it is not known how much freon needs to be charged, since the volume of the main circuit has increased significantly due to the installation of an improvised evaporator condenser.
This problem is solved by the pressurization method by measuring the pressure and superheat temperature at the inlet to the compressor (freon is supplied there in a gaseous state). See the instructions below for detailed instructions on how to pour using the temperature method.
The second part of the video shows how to charge the system with R22 refrigerant depending on the pressure and superheat temperature of the refrigerant:
Once charging is complete, turn both circulation pumps to first speed and start the compressor. Check the temperature of the brine and internal coolant using thermometers. During the warm-up phase, the refrigerant piping may freeze and then melt.
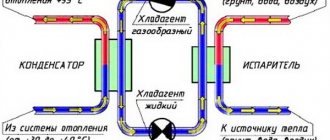
Operating principle of heat pumps
The operating principle of a device for heating a house is based on the fact that a substance (refrigerant) can give off thermal energy or take it away during a change of state. This idea is the basis for the functioning of the refrigerator (because of this, the back wall of the device is hot).
Thermal pump for heating functions as follows:
- The incoming agent is cooled by 5 degrees in the evaporation section based on the energy from the coolant.
- The cooled agent enters the compressor, which, as a result of operation, compresses and heats it.
- The already hot gas enters the heat exchange compartment, in which it transfers its own heat to the heating system.
- The condensed refrigerant is returned to the start of the cycle.
Device
A heat pump for heating a house consists of several main circuit elements:
- a coolant circuit that transfers energy from the heat source;
- a circuit with freon, which periodically evaporates, taking thermal energy from the first circuit, and again settles as condensate, transferring heat to the third;
- a circuit where a liquid circulates, carrying heat for heating.
Operating a thermopump for heating a home is profitable from a financial point of view. The reason for this is that the device does not require high power (accordingly, the electricity consumption is no more than that of a standard household appliance), but it produces 4 times more heat compared to the electricity consumed.
There is also no need to create a separate wiring line to connect the pump.
Advantages and disadvantages
Before deciding whether to use a heat pump or not, you should familiarize yourself with the advantages and disadvantages of its operation. The main advantages of a heat pump include:
- low electricity consumption for heating the house;
- no need for regular inspection and maintenance, which makes the cost of operating a heat pump for heating minimal;
- Installation in any location is allowed. The pump can work with thermal energy sources such as air, soil and water. Therefore, it becomes possible to install it almost anywhere where it is planned to build a house. And in conditions of remoteness from the gas main, the device is the most suitable heating method. Even if there is no electricity, the compressor can operate using a gasoline or diesel drive;
- The house is heated automatically. There is no need to add fuel or carry out other manipulations, as, for example, in the case of boiler equipment;
- absence of environmental pollution with harmful gases and substances. All refrigerants used are completely safe and environmentally friendly;
- fire safety. Home occupants will never be at risk of explosion or damage due to heat pump overheating;
- possibility of operation even in cold winter conditions (down to -15 degrees);
- A quality heat pump for heating a home can last up to 50 years. Compressor replacement is required only once every 20 years.
Watch the video pros and cons
Like any device, heat pumps have certain disadvantages:
- If the ambient temperature drops below 15 degrees, the pump will not be able to operate. In this case, installation of a second heat source will be required. At very low temperatures, the boiler, generator or electric heater turns on;
- High cost of equipment. It will cost approximately 350,000-700,000 rubles, and the same amount will have to be spent on creating a geothermal station and installing the device. Additional installation work is not required only for a heat pump using air as a heat source;
- It is best to install a heat pump in combination with heated floors or fan convectors, however, in old buildings, redevelopment and possibly even major repairs will be required, which will entail additional time and money. If a private house is built from scratch, there is no such problem;
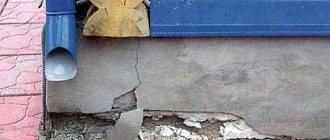
- When the heat pump operates, the temperature of the soil located around the coolant pipeline decreases. This causes the death of some microorganisms involved in the functioning of the environment. Thus, some damage to the environment is still caused, but it is significantly less than the damage from gas or oil production.
Principle of operation
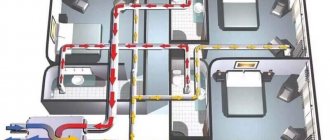
All the space around us is energy - we just need to be able to use it. For a heat pump, the ambient temperature must be greater than 1C°. Here it should be said that even the ground in winter under snow or at some depth retains heat. The operation of a geothermal or any other heat pump is based on transporting heat from its source using a coolant to the heating circuit of the house.
Scheme of the device operation point by point:
- a heat carrier (water, soil, air) fills the pipeline located under the ground and heats it;
- then the coolant is transported to the heat exchanger (evaporator) with subsequent heat transfer to the internal circuit;
- in the external circuit there is a refrigerant - a liquid with a low boiling point under low pressure. For example, freon, water with alcohol, glycol mixture. Inside the evaporator, this substance is heated and becomes a gas;
- The refrigerant gas is sent to the compressor, compressed under high pressure and heated;
- hot gas enters the condenser and there its thermal energy passes to the coolant of the home heating system;
- The cycle ends with the transformation of the refrigerant into liquid, and due to heat loss, it returns back to the system.
The same principle is used for refrigerators, so home heat pumps can be used like air conditioners to cool a room. Simply put, a heat pump is a refrigerator with reverse action: instead of cold, heat is generated.
Features of heat pumps
To obtain thermal energy, HP does not use energy carriers, and therefore does not harm the environment. Such an installation produces more thermal energy than it consumes electricity.
Principle of operation
The operation of HP is based on the principle of heat transfer from a colder source to a warmer one. That is, it makes colder things even colder, and warmer things even warmer. This means that the idea of a perpetual motion machine is not incorporated here, because in total the amount of heat remains unchanged, and electricity is spent only on the separation and transfer of heat.
Results
Undoubtedly, the cost of a heat pump from an air conditioner is several times lower than ready-made factory options, even those made in China. But there are a lot of nuances here: you need to take care of the source and amount of heat supplied, correctly calculate the length of the heat exchangers (coils), install automation, ensure guaranteed power, etc. But if you are able to solve these problems, then it is undoubtedly beneficial. Let us give you some advice: in the first year it is very advisable to have backup heating, and it is better to carry out tests and trial runs in the summer, so that there is time to finalize the unit before the start of the heating season.