To create a high-quality utility network, you need an accurate calculation and layout of functional components. A specialized program for designing electrical wiring in a house simplifies calculations and preparation of design documentation. To choose the best option, you need to study the features of thematic software and application technology.
Why do you need a wiring diagram in an apartment?
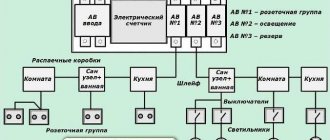
The project is created on the basis of the approved technical specifications. The diagram indicates:
- placement of cable lines;
- installation locations of switches and sockets;
- connection points for lamps and other consumers.
When preparing drawings, the layout of the premises is taken into account.
In the calculation part, the parameters of the cable that correspond to the power consumption are determined. The detailed diagram simplifies the installation of electrical wiring. This document will be useful for compiling a list of necessary purchases. Accurate calculations will help you meet current safety regulations.
Composition of a professional design project
Design includes not only choosing the style of interior decoration, selecting finishing materials, decorative elements, furniture and appliances that are suitable in color and technical characteristics. The package of documents may also include other data, for example, a diagram of the redevelopment of internal premises or an electrical plan in a design project. These documents affect the design characteristics of the object and its engineering communications, therefore they must be coordinated with state control authorities.
The composition of the design documentation directly depends on the requirements and desires of the customer, on how the house or other structure is seen by users. Professional designers can create a design project of any complexity and content that will fully comply with modern legislation.
Benefits of Programming Various Wiring Diagrams
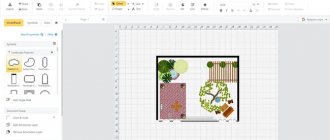
The use of specialized software eliminates the difficult drawing process. Actions are performed in an intuitive graphical editor interface. If necessary, use the reference section with a detailed description of typical operations.
The drawn diagram can be adjusted. Each wiring is clearly visible when the image is enlarged. It is allowed to use color marking of lines and to supplement the plan with notes.
An error in independent calculation can cause a short circuit or other emergency situation. Incorrect calculation of cable length is accompanied by additional costs of time and money. The automated process eliminates such problems. Even when working with complex formulas, the results are displayed on the computer screen immediately after entering the initial values.
Abstraction
It’s easy and simple to let the wire in a certain gap randomly twist into bizarre rings. This scheme will create the effect of a picture and a focal point.
To do this, you will need a regular black cable and, preferably, a light, plain wall.
The method looks natural in a modern interior without vintage chairs and carved handles.
- If a randomly twisted wire on the wall looks more like a mess than a work of art, make it easier and draw some simple geometric shapes.
- The technology is based on a combination of straight and curved lines.
- For example, the initial straight line smoothly bends upward, twists into a spiral, descends in an arc, forms a loop and hides in a straight line behind the furniture.
Program capabilities
Using specialized software, the following tasks are solved:
- calculate the parameters of the power supply system with voltage losses over long sections of the route;
- specify the cross-section of suitable conductors and other parameters of cable products;
- compile a list of consumables and other functional components.
The wiring diagram is created taking into account the needs of future users. Lamps, sockets, switches are installed in convenient places.
3-gang switches
Yes, three-button switches exist in some collections. But this is still rather rare, the vast majority have 1 or 2 keys in one socket. So by default, if the collection of switches is not precisely defined in advance, it is necessary to designate standard 1 and 2-gang switches.
After all, the builders will make the socket boxes just as they are drawn, and then they will have to add them. This is the first thing. And secondly, the distribution of lamps among switch keys is better if it is thought out by a designer, not an electrician. Look how strange the 5-key switch is:
An example of working in the free program "Electrician"
To study the capabilities in detail, the software is downloaded and installed on a PC. The total size of installation files is 12 MB. The developer offers this product free of charge with a request to make a voluntary transfer.
Using this program, the following calculations are performed:
- power consumption (cross-sectional area of the conductor) in a single- or three-phase current network;
- voltage losses at individual points in the circuit;
- heating of conductive parts;
- grounding;
- protective devices.
And the most important!
LIVING ROOM _
CORRIDOR _ _
TE RR A S A
153, total, today
Did you find the article useful? You can express your gratitude to the author on this page.
Related posts:
- Fun Conventions in Design Projects There's an interesting thing about how different designers are in...
- Momentary switches ABB Zenit About momentary switches In the Smart Home system, if...
- What a designer needs to know about a Smart Home I’ll tell you what a designer should take into account and...
- Is the switch inside the bathroom or outside? There is no rule that says switches should be placed inside the bathroom...
- Types of switches in a Smart Home There are quite a lot of types of switches on the market, so sometimes confusion occurs...
- Errors in designing projects in AutoCad Another article from the “painful” series, although I’m trying...
- Turn off all the lights with one button Many people closely associate the function “turning off all the lights with one button”...
Calculation of wire cross-section
Designing wiring in any apartment is impossible without calculating the wire cross-section. The stable operation of all circuit elements depends on it. The cross-section of the wire is determined taking into account the load on the electrical wiring that will be exerted by the electrical appliances in the house.
| Copper conductors of wires and cables | ||||
| Cross-section of current-carrying conductor, mm. | Voltage, 220 V | Voltage, 380 V | ||
| current, A | power, kWt | current, A | power, kWt | |
| 1,5 | 19 | 4,1 | 16 | 10,5 |
| 2,5 | 27 | 5,9 | 25 | 16,5 |
| 4 | 38 | 8,3 | 30 | 19,8 |
| 6 | 46 | 10,1 | 40 | 26,4 |
| 10 | 70 | 15,4 | 50 | 33,0 |
| 16 | 85 | 18,7 | 75 | 49,5 |
| 25 | 115 | 25,3 | 90 | 59,4 |
| 35 | 135 | 29,7 | 115 | 75,9 |
| 50 | 175 | 38,5 | 145 | 95,7 |
| 70 | 215 | 47,3 | 180 | 118,8 |
| 95 | 260 | 57,2 | 220 | 145,2 |
| 120 | 300 | 66,0 | 260 | 171,6 |
| Aluminum conductors of wires and cables | ||||
| Cross-section of current-carrying conductor, mm. | Voltage, 220 V | Voltage, 380 V | ||
| current, A | power, kWt | current, A | power, kWt | |
| 2,5 | 20 | 4,4 | 19 | 12,5 |
| 4 | 28 | 6,1 | 23 | 15,1 |
| 6 | 36 | 7,9 | 30 | 19,8 |
| 10 | 50 | 11,0 | 39 | 25,7 |
| 16 | 60 | 13,2 | 55 | 36,3 |
| 25 | 85 | 18,7 | 70 | 46,2 |
| 35 | 100 | 22,0 | 85 | 56,1 |
| 50 | 135 | 29,7 | 110 | 72,6 |
| 70 | 165 | 36,3 | 140 | 92,4 |
| 95 | 200 | 44,0 | 170 | 112,2 |
| 120 | 230 | 50,6 | 200 | 132,0 |
Those who like to do everything in their home with their own hands should remember that incorrect calculation of this parameter can lead to a fire. A wire with a reduced cross-sectional area will overheat, and as a result a short circuit may occur. An overestimated area will lead to unjustified expenses.
Another important point is the cross-section of the input cable that goes from the meter to the house. It cannot be calculated using the standard method. To calculate it, it is necessary to take into account the following indicators:
- electrical characteristics of the equipment that will be used in the house;
- method of conducting this cable (open or closed);
- length of all electrical wiring;
- type of insulation and material used;
- the number of cores in the input cable itself.
In order not to do the calculations yourself, not to engage in design, not to draw diagrams and lists on paper, you can make the task easier by entering the data into the Electrician program and it will give you an accurate and quick result.
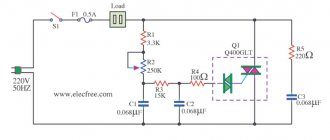
Open the required section in the program and enter all the characteristics in the dialog box. Don't be alarmed, at first glance the program seems complicated and confusing. But the time spent is worth it.
We enter the type of current into the section, write standard 220 V. Next, we mark all the necessary parameters, material - copper, type of wire laying. Then we fill in the fields of the required coefficients, the length of the wire and the power required for the room.
After filling out the lines, click “Calculation by I/P”. The program itself will calculate and display the result of the required section. In the same way, you can calculate the required number of lighting fixtures for the entire room.
In addition to all the necessary calculations, the Electrician program is also designed to draw the diagrams necessary for the correct and safe connection of electrical wiring in the house.
Download older stable versions
Click on + to show the links.
+ version 0.61
- Sources - platform-independent
- AppImage
- Installer - Windows 10
- Version Ready to use - Windows 10
- Fedora / RHEL / CentOS packages kindly provided by Remi Collet
+ version 0.6
- Sources - platform-independent
- AppImage
- Installer - Windows XP / Vista
- Version Ready to use - Windows XP / Vista
- Installer - Windows 10
- Version Ready to use - Windows 10
- Packages Debian /ubuntu /etc…
- Fedora / RHEL / CentOS packages kindly provided by Remi Collet
- Package MacOS (10.7 to 10.10) kindly provided by Yoann
+ version 0.5
- Sources - platform-independent
- AppImage
- Installer - Windows XP / Vista
- Version Ready to use - Windows XP / Vista
- Installer - Windows 10
- Version Ready to use - Windows 10
- Packages Debian /ubuntu /etc…
- Fedora / RHEL / CentOS packages kindly provided by Remi Collet
- Package MacOS (10.7 to 10.10) kindly provided by Yoann
+ version 0.4
- Sources - platform-independent
- Installer - Windows XP / Vista / Seven
- Version Ready to use - Windows XP / Vista / Seven
- Packages Debian /ubuntu /etc…
- Slackware: x86_64 package kindly provided by David
- Fedora / RHEL / CentOS packages kindly provided by Remi Collet
- Package MacOS (10.7 to 10.10) kindly provided by Yoann
+ version 0.3
- Sources - platform-independent
- Installer-Windows XP/Vista/Seven
- Version Ready to use - Windows XP / Vista / Seven
- QElectroTech is packaged for Debian — please consult the dedicated wiki page
- Slackware: x86_64 package kindly provided by David
- Gentoo: Gentoo ebuild kindly provided by mrbit
- OS/2: package kindly provided by Elbert from the NL
- Fedora packages kindly provided by Remi Collet
- Fedora et Enterprise Linux backports packages kindly provided by Remi Collet
- Archlinux AUR packages kindly provided by Chipsterjulien
- Mageia Mageia Cauldron packages
- Opensuse Opensuse packages
+ version 0.22
- Sources - platform-independent
- Slackware 13 packages (built from slacky.eu's SlackBuild
- Fedora packages kindly provided by Remi Collet
- This version of QElectroTech is available in Gentoo (Thanks to Markos `Hwoarang' Chandras).
- This version of QElectroTech is available in (Thanks to trem).
+ version 0.21
- Sources - platform-independent
- Slackware 13 packages: i486 and SlackBuild by slacky.eu
- Fedora packages kindly provided by Remi Collet
- This version of QElectroTech is available in Gentoo (Thanks to Markos `Hwoarang' Chandras).
+ version 0.2
- Sources - platform-independent
- This version of QElectroTech is available in Debian (Thanks to Laurent `scorpio810′ Trinques and Denis `narcan' Briand).
- This version of QElectroTech is available in (Thanks to trem).
- This version of QElectroTech is available in Gentoo (Thanks to Markos `Hwoarang' Chandras, Davide Pesavento and Diego E. `Flameeyes' Pettenò).
- Fedora packages kindly provided by Remi Collet:
- Fedora >= 10 packages: QElectroTech is available in the Fedora repositories. To install it:yum install qelectrotech
- Fedora >= 8 packages: Whatever your architecture: get the elements collection RPM
- Fedora 9 packages: i386 x86_64 ppc ppc64
- Fedora 8 packages: i386 x86_64
+ version 0.11
- Sources - platform-independent
- This version of QElectroTech is available in the “contrib” section of Mandriva 2009.1.
- Fedora packages kindly provided by Remi Collet:
- Fedora 10 packages: i386 x86_64 ppc ppc64
- Fedora 9 packages: i386 x86_64 ppc ppc64
- Fedora 8 packages: i386 x86_64 ppc ppc64
+ version 0.1
- Fedora packages kindly provided by Remi Collet:
- Fedora 9 packages: i386 x86_64 ppc
- Fedora 8 packages: i386 x86_64 ppc
- Fedora 7 packages: i386 x86_64 ppc
- Fedora Core 6 packages: i386 x86_64 ppc