Unlike traditional floor-mounted plumbing fixtures, the height of a wall-hung toilet can be adjusted to a minimum of 20 cm. The main criterion for correctly determining this size is familiarity and ease of use. GOST standards, construction standards SP and SNiP regulate the installation height of sinks, shower trays, bidets and other plumbing fixtures with the exception of toilets.
SNiP Residential buildings on distance standards
The rules contained in the regulatory document are mandatory for the construction of any type of building - industrial, public, medical, educational and residential. However, there is an unspoken opinion that owners of premises in residential buildings and private buildings can deviate from the dictated standards if they themselves carry out their maintenance and operation.
Basically, such a retreat is made by the owners of premises with bathrooms, combined or frankly small. If the toilet is spacious enough, it is better to adhere to the established rules in order to use special rooms with convenience and safety:
- to the front (front) wall or wall with a door, if we are talking about a small toilet, the minimum distance is 53 cm. This is enough to not feel tightness in the knee joint;
- the maximum required distance from the frontal plane located in front of the seated person is 76 cm;
- the maximum distance from the front does not particularly need to be regulated, and if possible, the functional zone for a person can be more than a meter;
- from the middle axis of the toilet to the side wall, the established minimum is 40 cm. In some sources it is defined as 38 cm;
- the optimal distance from the central axis of the toilet is 45 cm. This is enough for comfortable operation of the plumbing fixture. But no one forbids installing at a greater distance, if the parameters of the allocated room allow it;
- in a separate toilet, the distance between the toilet and the wall on the left in standard buildings is usually equal to the distance to the wall on the right side;
- The location of the toilet in the toilet room is usually the center of the room, because the sewer pipe is supplied here. This also determines the position of the remaining toilets on the riser on the floors above and below;
- The second option for placing plumbing equipment is closer to the back wall. This does not make it possible to equip some kind of shelves or rack, but it is typical for the minimum dimensions of the toilet in apartments of standard construction, where the bathroom is separate;
- The toilet stall in Soviet-era houses was built according to size, when the central placement provided the necessary distances to the side wall and front surface with the entrance door located in it.
When arranging a shared bathroom, there are certain conditions that must be observed. These are standards for the distance of the toilet from other interior items that should be adhered to, even minimally.
But this is not a suitable option if the dimensions of one of the family members do not correspond to the average figures for which the building codes and standards are calculated.
Flashing
Of all the firmware for the HP P410, it makes sense to pay attention to two: version 3.52 has a full-fledged BIOS with the ability to configure arrays before loading the operating system, but does not support modern hard drives with a capacity of more than 4 TB. Version 6.64, the latest available, supports large hard drives, but like everything after version 5.0, does not have a built-in BIOS, which is why many motherboards with this controller do not go through the POST process and freeze at boot. ASUS Prime J3355I-C has a compatibility mode that allows you to ignore expansion card BIOSes when booting. By turning it on, we will be able to boot from a hard drive connected to the motherboard or from a flash drive, but we will only see the array from under the OS. You can boot the operating system from the HP P410 only with firmware up to version 3.52, or if you have an HP server.
The HP P410 controller can be configured through the HP Array Configuration Utility (ACU) software from under Windows, so if possible, it is better to install Windows 7 or 10 on a flash drive or temporary hard drive and configure RAID from a nice graphical interface. Almost all versions of Linux, including OpenMediaVault, support a command line configuration utility interface (hpacucli), but a normal graphical interface for the controller is only available on Windows.
The default read/write cache ratio is set to 25/75%. Let's level it to 50/50%, and that's it for setting up the disk pool.
Recommendations you need
Let us allow ourselves to give the reader some advice on the installation and selection of the plumbing fixture that interests us.
Choice
Like floor-mounted, wall-hung toilets can be made from various materials. Let's try to evaluate them.
Polished stainless steel is virtually dirt-free due to its smooth surface. If deposits still remain on it, they can be easily removed using any household chemical.
Why does stainless steel occupy a much smaller market share than competing solutions?
- Pair of breech type metal plumbing fixtures. It has become familiar as anti-vandal equipment for public restrooms and evokes corresponding associations among many potential clients.
- In addition, the price of stainless steel toilets is much higher than that of ceramic analogues, and starts from approximately 20,000 rubles.
Glass is not much inferior to stainless steel in practicality; but viewing through the translucent walls what remains on the walls of the bowl below the water level is a rather dubious pleasure.
The main disadvantage of polymer concrete is its limited resistance to aggressive cleaning scratches and cleaning agents. Removing lime deposits and urinary stone from it without disturbing the appearance of the surface is not an easy task.
The main value of sanitaryware is its low cost. It is precisely on this basis that it is the undoubted favorite of the plumbing market. The downside is that its large-porous surface actively collects dirt and quite often lacks cleaning.
Finally, the material that is optimal in terms of functionality and cost combination is porcelain. The walls of the toilet will remain white as snow for a long time; If the need for cleaning does arise, you can safely use acidic and alkaline preparations.
Installation
Are there any subtleties to installing a wall-hung toilet yourself?
The installation stages themselves are comprehensively outlined in the accompanying documentation:
- The placement of the installation frame is marked by level or plumb.
- It is anchored to the wall and/or floor.
- Water is supplied to the tank, and a sewer pipe is supplied to the location of the toilet flare.
- The hole in the tank for the drain button is closed with a special membrane or simple polyethylene, after which the communications and installation are hidden behind a false wall. In most cases, it is laid out from moisture-resistant plasterboard over a galvanized profile and laid out with tiles.
- Once the tiles have firmly set, the toilet is hung on the studs of the installation, and a flush button is installed in the tank. A damper gasket is needed between the wall and the toilet to distribute the load on the tile and prevent chips from occurring.
By the way: in the absence of a gasket, silicone sealant can play its role.
There are a couple of nuances here:
- It is better to place the tiles away from the drain button, so that the seams are located symmetrically relative to the center of the button. Asymmetry does not look very careful.
- The smaller the sewerage drain to the riser, the less likely it is to become clogged. Do not forget about the slope: for pipes with a diameter of 90 and 110 mm used for hidden installation, it is equal to 2 cm per linear meter.
- It is better to collect the sewerage using sealant. The instructions are due to the fact that rubber seals can lose elasticity over time and allow leaks.
- Forget about flexible eyeliners. Water is supplied to the tank by a solid pipe. The service life of a braided rubber hose rarely exceeds 5 years.
- Despite the fact that the tank fittings in most cases allow you to shut off the water through the service hatch behind the drain button, it is better to provide the supply to the tank with a valve and leave a hatch in the false wall to access it.
Dimensions of installations from different manufacturers
The market today offers a wide variety of models. However, it is always better to make a choice in favor of proven and proven manufacturers. Some of these are the following companies.
Geberit
Popular among customers due to its ability to produce products that can be installed even in particularly difficult cases (for example, when pipes are close together). Also, a distinctive feature of such installations is a special seamless tank, which significantly reduces the risk of leakage or breakage.
The dimensions of these systems are most often concentrated within the following framework: width - 50 cm, depth - 12 cm, and adjustable height - from 82 cm to 112 cm. Moreover, the volume of the drain tank here can even reach the usual 6-9 liters. The price of such an installation varies from 16 thousand to 36 thousand rubles. But you need to understand that the cost of the toilet itself is not included in this amount.
Grohe
The quality of the products of this German manufacturer is beyond doubt. All products are made of durable metals and treated with a special anti-corrosion compound. The uniqueness also lies in the fact that the kit always includes all the components necessary for installation; there is no need to buy anything additional (as sometimes happens with devices from other companies).
Standard dimensions are limited to: width – 50 cm, depth – 23 cm, height – up to 113 cm. In this case, the tank size can also be suitable for 6–9 liters. By the way, in this system water can be supplied to any part of the structure.
The choice of installation is one of the primary issues that arises when deciding to install a wall-hung toilet in your home. Therefore, it must be taken with great seriousness. Now that you are familiar with the basic terms and standards, you can make the right purchase.
Installation of wall hung toilets
How to install a wall-mounted toilet so that the system works properly and does not cause any complaints? The first step you need to take when starting to install a wall-hung toilet with your own hands. There will be installation of a steel frame, called installation. Using dowels, the installation is attached to the wall and floor surface. A 110 mm sewer pipe and water supply must be connected to the place where the toilet will be located. The installation of toilet bowls must be carried out in compliance with horizontal and vertical levels. The installation process itself is quite simple: the design includes special rods and studs that allow you to attach the frame to the wall.
The height of the bowl is adjusted taking into account the height of the residents who will most often use the toilet, so the selection of this indicator should be done in a practical way. As a rule, the installation height of the toilet from the floor is about 40 cm. Further installation of the wall-mounted toilet involves connecting the water supply to the flush cistern. It is advisable to use reliable pipes that can last much longer than flexible hoses. When installing the liner, it is necessary to close the valve located in the tank.
The next step is to connect the toilet outlet to the sewer, for which you will need a corrugation (read: “How to install a corrugation on a toilet correctly”). To check the functionality of the system, the bowl must be placed on the installation and drained. There is no need to securely fasten the bowl, since its final installation is done last. The installed frame is covered with pre-purchased plasterboard, which is attached directly to the frame and to the wall.
To make the correct cuts on drywall, you should use the instructions for the attachment: it usually contains a diagram that greatly facilitates the process of creating technological holes. When the frame is installed and covered with plasterboard, you can begin cladding, for which ceramic tiles are used. When choosing a tile, you need to take into account its aesthetic qualities and the planned interior of the bathroom. The installation of the wall-hung toilet is complete and it can now perform its functions.
Advantages and disadvantages
The advantages of toilet models with horizontal (parallel to the floor) outlet include the following features and factors:
- fits even where previously there was a toilet with an oblique type outlet (that is, there is versatility);
- it is possible to connect not only to a horizontal sewer pipe, but also directly to a vertical riser using adapters;
- mounted close to the wall without taking up extra space;
- low cost;
- wide model range.
There are also many disadvantages:
- attachment of the installation site to one of the walls of the room - the one where the sewer pipeline passes;
- relative complexity of installation, especially in terms of connecting the outlet to the sewer;
- careful sealing of the connection points between the outlet and the sewer main, the need to monitor for leaks during the first time after installation;
- Possibility of clogging of the outlet channel.
No splashing
Water splashes very often interfere with the comfortable use of the toilet, not to mention the fact that this phenomenon is very unhygienic. Toilet manufacturers offer a variety of solutions to this problem. Toilet models with an anti-splash system are one of the relatively new engineering developments.
“Anti-splash” is a design feature of the toilet, which is designed to compensate for splashes that occur during its operation. Labeling about the presence of this system often deceives the buyer. To determine the presence of “anti-splash” yourself, look into the bowl of the toilet model you like. To suppress water movement, the drain hole should be very narrow and located as low as possible. Also make sure that the drain hole is offset from the center and that the water level in it is low enough. The drain hole should be surrounded by a special rim. If all these factors are present, then you have a toilet model equipped with an anti-splash system.
Height of installation of the toilet from the floor
According to statistics, a person spends almost 2 years of his life on the toilet. In order for him to feel comfortable during this period, hundreds of models of these devices were invented. These can be structures consisting of a cistern and bowl, drainage systems, or hanging models.
Toilets - types and sizes
– console type. Hanging models are becoming more and more popular every year. This is due, first of all, to their miniature size. Outwardly, such a device seems much smaller, because the drain barrel is installed in the wall, and only the thicket is visible to the eye. If we are talking about a block installation, then during installation it is walled up in the main wall; as for a frame installation, it is built under a plasterboard panel. A wall-hung toilet with installation is practically no different in size from a floor-mounted one.
Standard dimensions of the hanging device:
– width – 30-40 cm
– the height of the wall-hung toilet is 50-60 cm (this means the height of the bowl itself).
There are models with increased length - up to 700 mm. If the structure is made of porcelain, its weight can reach 25 kg, if made of earthenware - up to 27 kg.
– compact toilets. Today this is the most popular variety, consisting of a bowl and a flush barrel, as well as the necessary fittings. The bowl is located on a special leg that rests on the floor. The barrel can be mounted separately (on the wall or to an installation system) or placed on a solid-cast shelf with a bowl. Such models are extremely easy to install, but are more demanding to maintain, since you have to wash not only the bowl, but also the leg, barrel and communication system.
– width – up to 38 cm,
– length – up to 67.5 cm,
– the height of the compact toilet from the floor together with the tank is up to 80 cm,
– seat height – up to 40 cm.
The weight of the device depends on the material from which it is made. The porcelain model will weigh up to 28 kg, the earthenware model - up to 31 kg.
– corner toilets. Designed for rooms of non-standard shape, where it is impossible to install a conventional model. The dimensions of such devices are as follows:
– width – up to 36 cm,
– length – up to 76 cm,
– height including barrels – up to 81.5 cm,
– seat height – 40 cm.
- children's model. Used in houses with several bathrooms. Dimensions of the hanging type device are 33 x 54 x 30 cm, floor-standing options are 31.5 x 51 x 69 cm. Dimensions include the tank.
Installation of a wall-hung toilet
It makes sense to install a floor-standing model only where there is no possibility of hidden wall-mounted installation of pipelines. In all other cases, you can install a suspended model.
To install a hanging device, you will need an outlet for the riser and connection components, studs, Teflon tape, a flexible hose with an angle valve (needed to connect the flush tank and the water supply pipe).
Installation stages
The presence of an installation system greatly simplifies the installation process, since all that is required is to hang it on the studs and tighten the nuts on them. But before you begin installation, you need to determine the installation height of the toilet from the floor. Hanging models should be mounted so that their top is located at a distance of 40 cm from the floor covering, and at the bottom - 5 cm from the floor surface. You can check the installation height of suspended equipment by adjusting the installation system. For children, you can install the equipment lower, for tall people - a little higher.
So, the equipment is hung on 2 studs, which are wrapped in an installation frame. Next, use the nuts to turn the studs until they stop. After the distance from the cut of the pipe in the wall to the surface of the tile is determined, the waste and water supply pipes are cut.
We connect the toilet to the pipes, then the final tightening of the nuts on the studs is carried out. The hooks are inserted from below and from the side with the bent part into the holes in the lower and upper parts of the lid. The lid is turned over, a hook is inserted into the holes, and nuts are screwed from below.
We are installing a drain button. Considering the fact that today there are a huge number of models of flush buttons, during installation you should follow the instructions and charters. Before proceeding with the installation of the button, open the water supply tap and insert the cables located inside the drain tank into the hole on the button. We check the functionality of the design and snap the button.
Some personal impressions
We don't have the most important thing - we don't have hard drives to make a full comparison of hardware RAID and software ZFS. But it’s impossible to resist the first tests, and the ancient WD Velociraptor 150 GB was installed in the system, which was tested in assembly with HP P410 / Openmediavault / EXT4 and LSI 9240-8i / FreeNAS / ZFS, and at the same time I compared it with Synology home storage DS1511+, where 5 HDDs are installed at 7200 RPM 1 Tb.
In general, simply copying a 50 GB directory with games from HDD to NAS in the case of the OMV setup gives a constant 112 MB/s, on Synology it jumps from 110 to 80 MB/s, on the FreeNAS setup it jumps from 90 to 2 MB/s. But full testing can be carried out when normal hard drives are installed in the NAS.
Advantages and disadvantages
In general, the installation has the following advantages:
- beautiful appearance, accordingly, this is reflected in the overall design of the room;
- convenient to clean the room;
- takes up little space;
- good sound insulation;
- Warranty period – from 10 years.
The Geberit brand has many obvious advantages. The main ones are: ease of maintenance of the equipment, as well as the use of structures made of high-quality and reliable materials.
Here are a number of advantages of the installation from the manufacturer Geberit, namely:
- the structure is made of steel;
- toilets are tested - they are loaded with a load of up to 500 kg;
- the tank is made of HDPE, it is a one-piece, seamless tank;
- the unit is 100 percent sealed;
- the flush elbow is welded three times;
- functional units have comfortable access;
- spare parts will be supplied under warranty for 25 years;
- The device is easy to install.
It is worth noting such negative aspects in using the installation as:
- high price;
- complex installation;
- it is difficult to immediately understand that there is a leak, since all hoses are covered with false panels;
- legal component - utility services do not allow closing the riser, so you have to get the approval of these services so that there are no problems in the future.
HBA or RAID?
There are two types of disk controllers - Host Bus Adapter (HBA) and RAID. The first is an interface board that has several combined external and internal SAS/SATA ports.
A RAID controller differs from an HBA in that it can perform checksum calculations (XOR), which are the basis of the most popular types of arrays - RAID 5 and RAID 6. Previously, these calculations were considered very resource-intensive, so powerful RISC processors were installed on RAID controllers to calculate XOR. Today, the trend is completely opposite - all complex operations are taken over by the computer CPU and, as practice shows, even a dead first generation Intel Atom can easily cope with RAID 5/6 checksum calculations at the software level, let alone processors such as Intel Xeon or Xeon D. Controllers that have a built-in processor (they are also called an XOR processor) are usually called “hardware RAID”, “honest RAID” or “real RAID”. Controllers that rely on the CPU to calculate XOR are referred to as "soft RAID", "fake RAID" or "host RAID".
On the floor or above the floor
In advertising brochures talking about the advantages of wall-hung toilets, the following main points are given:
- Hanging plumbing does not interfere with cleaning, leaving the entire floor area accessible.
- It makes a compact toilet spacious, allowing you to save space due to the tank.
- It allows you to completely hide communications, thereby improving the appearance of the bathroom.
Let's try to find out how much truth there is in marketers' statements.
Free floor
The statement is true without any qualifications. Installation - the frame to which the toilet is attached is hidden behind a false wall, leaving the entire floor area accessible.
This indicates that in your bathroom there will no longer be black and damp places under the tank, that the base of the toilet bowl will not really interfere with cleaning, and to change the tiles you will not need to dismantle it. In addition: the vacated floor will give more scope to your imagination when choosing a flooring pattern.
Compactness
Console plumbing will indeed make the room more spacious, but only visually. The dimensions of a wall-hung toilet with a concealed cistern and installation are at least no smaller than the floor structure: due to the thickness of the false wall, they are likely to be larger.
Visual space will be associated with the highlights of a person’s perception of the size of the room. They are unconsciously assessed by the area of two planes - the floor and the ceiling. Because the floor in our case is not cluttered, the toilet, regardless of the actual reduction in floor area, will begin to seem less cramped.
Hidden communications
Yes, they really will be completely hidden. In addition to the toilet bowl, only the flush button will remain visible. Yes, it will be beautiful, but defiantly impractical.
You see, dear reader, the creator of this article, over a decade of working as a plumber, became convinced that every structure certainly lacks repair, be it a water supply system, a sewer system, a drain tank or a valve. Making communications difficult to access is guaranteed to create difficulties for yourself in the future. Even if it happens in 10 or 20 years.
In addition: in a compact municipal apartment, the back wall of the toilet, which in most cases is hidden by a false wall along with the installation, is decorated with sewerage and water supply risers. In addition, if you are not too lazy to first replace them with durable polymer or metal-polymer pipes, who can guarantee that they will not be damaged during a pressure surge? Or, as an option, there will be no need to replace a section of the riser in the ceiling (which more than happens)?
Conclusions? Anyone can make them for themselves. Let's put it this way: the author never once had the thought of choosing something other than the classic floor design.
Compatible with non-HP hardware
There are four main questions before purchasing:
- will the HP controller work in a non-HP motherboard?
- will it work with non-HP drives?
- will it support SATA-600 drives?
- will it support drives larger than 2TB?
There is only one answer to the first three questions - yes! Vendor-to-component binding is ensured by the server BIOS, not the components, so the HP P410 will work in Asus, Gigabyte, MSI motherboards with WD, Hitachi, Toshiba and Seagate hard drives and others. SATA-600 drives are backward compatible with SATA-300, so there's nothing to worry about here. For compatibility with hard drives larger than 2 TB, you may need to update the firmware to version 5.0 or higher, the most recent version of which (6.64) is located at.
The HP P410 controller is based on the PMC PM8011 processor, this is a Raid-on-Chip from PMC-Sierra, which, together with Adaptec, is now part of the Microsemi holding. There is no information about this chip in the public domain, and besides Hewlett Packard servers, it is not used anywhere else, but its closest analogue, PMC PM8013, was installed on Adaptec 6805 controllers. The PMC PM8011 processor is very hot, so its heatsink is covered with a heat shield on top, which can be remove it to improve cooling from the system fan of the case, or you can leave it so that the RAID controller does not melt the vibration insulation applied to the case wall in the first part of the article.
If the previous owner bought and activated the corresponding license before you, then you will have support for RAID 6, but you can’t count on such luck, and the sixth RAID is not particularly needed for arrays containing less than 20 disks.
The Capacitor backup module consists of two 35 Farad capacitors with a nominal voltage of 2.7 V connected in series, giving a total capacitance of 17 Farads. The capacitors in the backup power module are considered eternal, and you don’t have to think about their resource, just as you don’t have to think much about the resource of FBWC flash memory: it is used only during a power outage, which happens very rarely, and many of these flash chips are I spent my whole life never knowing what a record was.
How to choose a stove for a summer house
The most convenient stoves for cottages made of cast iron are considered to be convector options. However, choosing one oven from the entire huge range of convection ovens is not as easy as the others.
- Water-heated furnace - the best furnaces and schemes with a water circuit. Tips for choosing and do-it-yourself installation features (95 photos)
- Exhaust furnace - installation, selection and necessary equipment for exhaust furnaces (85 photos and videos)
- Ceramic kiln - review of the best models and tips for using them at home (130 photos)
To make the right choice, you need to determine several different parameters.
In addition, you need to pay attention to the size and purpose of the stove
Another selection rule is to determine the additional functions that the stove should have. For example, the presence of an oven or hob. Thus, choosing a cast iron stove for your home or cottage is not at all difficult.
No splashing
Water splashes very often interfere with the comfortable use of the toilet, not to mention the fact that this phenomenon is very unhygienic. Toilet manufacturers offer a variety of solutions to this problem. Toilet models with an anti-splash system are one of the relatively new engineering developments.
“Anti-splash” is a design feature of the toilet, which is designed to compensate for splashes that occur during its operation. Labeling about the presence of this system often deceives the buyer. To determine the presence of “anti-splash” yourself, look into the bowl of the toilet model you like. To suppress water movement, the drain hole should be very narrow and located as low as possible. Also make sure that the drain hole is offset from the center and that the water level in it is low enough. The drain hole should be surrounded by a special rim. If all these factors are present, then you have a toilet model equipped with an anti-splash system.
How to choose?
There is no strictly defined standard for the dimensions of installation frames. In each specific case, the choice is made taking into account the dimensions and design features of the toilet room. If you have enough free space, you can think about installing larger structures, including even a bidet.
If there is a solid wall in the room, it is worth considering block models of installation frames. It is often necessary to equip a non-standard room in limited space. In such cases, experts recommend studying the dimensions of corner structures.
It turns out that choosing a box for subsequent installation of plumbing must take into account not only personal preferences. In this case, we are also talking about the installation and connection features of all products. So, for example, the installation dimensions for a built-in toilet are selected taking into account the distance from the bowl to the wall or pieces of furniture. This value must be at least 60 cm, otherwise using the toilet will be uncomfortable, since your feet will rest against the mentioned obstacles.
Standard systems are suitable for equipping larger rooms. In such cases, the bowl is installed 18-20 cm from the box. And it is recommended to maintain the distance mentioned above on all sides of the plumbing fixture.
Before purchasing and starting installation, you should carefully study the plan of the toilet or bathroom. This will allow you to choose the most convenient and most suitable place for the plumbing and its dimensions
It is worth paying special attention to the following points
- With standard installation of the frame near the walls of the toilet room, you can choose both block and frame models. Their sizes are selected taking into account the dimensions of the plumbing and the room.
- If you need to install a plumbing system in a small room, in the attic or under a window, then you should consider small-sized models. Their height should not exceed 85 cm.
- For installation of plumbing fixtures on both sides of the duct, installations with appropriate fasteners (double-sided) and dimensions are provided.
- When equipping premises in which it is necessary to install several wall-hung toilets at once, special installations are chosen. We are talking about linear structures with a height of 115 cm.
The vast majority of frames are rectangular in shape. At the same time, they should be selected taking into account the commensurability of the parameters of the product itself and the niche. In cases where the box is larger, the voids are usually filled with materials that have soundproofing properties.
The standard dimensions of built-in toilet models are as follows:
- height – from 35 to 45 cm;
- depth – from 50 to 60 cm;
- width – from 30 to 40 cm.
Although the parameters given are standard, they may vary.
It should be remembered that now manufacturing companies offer more than a wide range of models. We can talk about special children's toilets, as well as products with enlarged bowls. In addition, plumbing fixtures are produced for people with disabilities and heavy weight. Naturally, all these factors will determine the choice of installation structures and their dimensions.
In addition to all of the above, you should take into account the size of the cistern. In the vast majority of cases, the thickness of hanging plastic devices is 9.5 cm and their width is 0.5 m
The height of such tanks, as a rule, is slightly higher than the similar parameters of conventional models. This size varies from 55 to 60 cm.
When choosing a frame for installing built-in plumbing, you need to remember the design features of various types of systems. Thus, frame options have a depth of 15-30 cm (more often we are talking about the minimum parameter). The height of such models can be from 85 to 140 cm, and their maximum width is 60 cm.
The following dimensions must also be taken into account:
- the center of the sewer pipe is located 22 cm from the level of the floor covering;
- The distance between mounting holes is 18 to 23 cm.
The minimum dimensions of block installations are, as a rule, identical to the similar parameters of frame structures. Their depth can be from 10 to 15 cm, and their height can be up to 1 meter. It is also necessary to consider the possibility of separate installation of the built-in cistern and toilet bowl. The latter in such cases is not attached to a niche, but directly to the wall.
For more information about the installation for the toilet, see the video below.
Non-standard situations
Research has shown that the squatting process, where the hips are lower than the knees, is better for natural bowel movements. If a person suffers from constipation, you can install the wall-mounted model a little lower, so that when using the toilet, your hips drop just below your knees.
For information on what height to install a wall-hung toilet, see the following video.
Selecting a location
The standard installation of a wall-hung toilet with installation is done near a niche with communications. If the tank does not fit into it, the pipes inside must be moved to the sides.
The mounted tank and installation are often covered with a false wall.
The marking is done in advance. A line is drawn on the wall that coincides with the central axis of the device, and the distance from the frame to the wall is measured (standard - 13.5 mm). The location of the toilet cistern is marked. The installation is aligned to the building level, after which marks are made for installation holes at the mounting points.
Installation diagram
Fastening suspended plumbing fixtures is a reason for a separate detailed article. With floor-standing models everything is much simpler. Toilet bowls are placed on special glue (for example, “heavy duty” in yellow tubes) or attached to bolts with holes drilled in the floor. This process is shown schematically below.
To make sanitaryware comfortable to use, the distance to the toilet door must be at least 60 centimeters , the recommended space to the walls is 35 cm .
Frame
The installation scheme for a wall-hung toilet provides for a separate and hidden placement of the tank and fixation of the bowl on a steel frame (installation), which, in turn, is attached to the floor and main wall. The installation is installed after the water pipes have been laid and brought out. High-quality installation of a wall-hung toilet primarily depends on the correct installation of the frame.
The installation is leveled.
- The height of the wall-hung toilet from the floor may be greater if family members are tall. The remaining parameters are selected according to the instructions.
- The frame is attached to the floor and wall with anchor bolts so that the structure is stationary. If necessary, additional fastening is made, which the instructions may not provide for.
- After assembling the structure, the tank with communications is sealed with plasterboard or decorative panels. The material should be moisture resistant.
- The bowl is attached to special pins at the last stage of installation.
Types of structures
Block design
Based on the design options, there are 3 types of installations. Each option has its pros and cons.
Block installation. To install it, you need to prepare a niche in the wall. It is either constructed additionally or hollowed out in an existing wall. In the latter case, space is saved significantly. The structure is secured frontally with anchor bolts and then covered with a false panel.
Frame installation. The tank and pipes are mounted on a welded steel frame, which is securely attached to the wall and floor using various holders and studs. The height of the structure is adjustable within 20 cm due to retractable legs. Such a product can be either straight or angular, but its price is higher than the block version. And it can be attached either to a load-bearing wall or to a light partition, because the main load falls not on the wall fastenings, but on the legs of the structure.
Monoblock. Such products are expensive, but they do not require installing a box. The system is already hidden in the casing. This model is presented in the line of the manufacturer Geberit. However, the price is much higher - more than 50 thousand rubles.
According to the type of installation, installations are:
- Standard – approximate dimensions: 50×12×112 (width×depth×height).
- Low - used where the layout provides for restrictions, for example, when the toilet is installed next to a window (in a private house) or there is a niche above the fixture that is not planned to be covered with a box. As a rule, the length does not exceed 82 cm.
- Double-sided - used to secure two plumbing fixtures on opposite sides.
- Corner - if you need to install the toilet in a corner, you can fix the regular front model using special fasteners.
Flush buttons also differ in appearance:
- dual-mode - allow you to drain the full volume of water or only half the tank;
- with a “flush-stop” system - when you press the button again, the water drainage stops;
- non-contact – react to the presence/absence of a person near the toilet.
Recommendations you need
Let us allow ourselves to give the reader some advice on the installation and selection of the plumbing fixture that interests us.
Choice
Like floor-mounted, wall-hung toilets can be made from various materials. Let's try to evaluate them.
Polished stainless steel is virtually dirt-free due to its smooth surface. If deposits still remain on it, they can be easily removed using any household chemical.
Why does stainless steel occupy a much smaller market share than competing solutions?
Two circumstances:
- Pair of breech type metal plumbing fixtures. It has become familiar as anti-vandal equipment for public restrooms and evokes corresponding associations among many potential clients.
- In addition, the price of stainless steel toilets is much higher than that of ceramic analogues, and starts from approximately 20,000 rubles.
Glass is not much inferior to stainless steel in practicality; but viewing through the translucent walls what remains on the walls of the bowl below the water level is a rather dubious pleasure.
The main disadvantage of polymer concrete is its limited resistance to aggressive cleaning scratches and cleaning agents. Removing lime deposits and urinary stone from it without disturbing the appearance of the surface is not an easy task.
The main value of sanitaryware is its low cost. It is precisely on this basis that it is the undoubted favorite of the plumbing market. The downside is that its large-porous surface actively collects dirt and quite often lacks cleaning.
Finally, the material that is optimal in terms of functionality and cost combination is porcelain. The walls of the toilet will remain white as snow for a long time; If the need for cleaning does arise, you can safely use acidic and alkaline preparations.
Installation
Are there any subtleties to installing a wall-hung toilet yourself?
The installation stages themselves are comprehensively outlined in the accompanying documentation:
- The placement of the installation frame is marked by level or plumb.
- It is anchored to the wall and/or floor.
- Water is supplied to the tank, and a sewer pipe is supplied to the location of the toilet flare.
- The hole in the tank for the drain button is closed with a special membrane or simple polyethylene, after which the communications and installation are hidden behind a false wall. In most cases, it is laid out from moisture-resistant plasterboard over a galvanized profile and laid out with tiles.
- Once the tiles have firmly set, the toilet is hung on the studs of the installation, and a flush button is installed in the tank. A damper gasket is needed between the wall and the toilet to distribute the load on the tile and prevent chips from occurring.
There are a couple of nuances here:
- It is better to place the tiles away from the drain button, so that the seams are located symmetrically relative to the center of the button. Asymmetry does not look very careful.
- The smaller the sewerage outlet to the riser, the less likely it is to become clogged. Do not forget about the slope: for pipes with a diameter of 90 and 110 mm used for hidden installation, it is equal to 2 cm per linear meter.
- It is better to collect the sewerage using sealant. The instructions are due to the fact that rubber seals can lose elasticity over time and allow leaks.
- Forget about flexible eyeliners. Water is supplied to the tank by a solid pipe. The service life of a braided rubber hose rarely exceeds 5 years.
- Despite the fact that the tank fittings in most cases allow you to shut off the water through the service hatch behind the drain button, it is better to provide the supply to the tank with a valve and leave a hatch in the false wall to access it.
ZFS or Btrfs?
Trends in recent years have led to the fact that the operating system itself creates a disk array at the file system level. The best example of this is ZFS, a file system that has on-the-fly data deduplication and compression capabilities. For its operation, it is highly desirable that the operating system kernel has direct access to each disk to monitor the status of bad blocks, monitor SMART and implement all its scaling and fault tolerance functions
In fact, in this mode the controller simply works as a SAS/SATA interface, so it doesn’t matter what functions it has, whether it has a cache or any other “chips” - everything that is needed will be done by the operating system
At the same time, ZFS is not a 100% fault-tolerant solution, and a whole army of hardware RAID fans believe that it is better to use simpler, non-resource-intensive file systems, such as Btrfs or EXT4, and entrust work with disks to a full-fledged RAID controller. This solution has one significant drawback - not every operating system allows you to monitor the parameters of disks in a RAID array, much less warn about a failed hard drive.
The ZFS file system is used by default in the FreeNAS operating system, as well as in the Proxmox hypervisor, and for these cases an HBA controller with direct disk access mode is required. Hardware RAID can be used for the Openmediavault NAS shell or for the VMware ESXi hypervisor.
Total: choose a RAID controller for OpenMediaVault or HBA for FreeNAS.
Exceptions to the rules
There are exceptions to the norms that determine the optimal location of the toilet. Their presence is determined by the technical characteristics of the room.
The reason for this may be: insufficient free space, the location of communications or the personal desire of the owner.
Violation of technical regulations for the location of a toilet is not a violation of the provisions of any law if this sanitary point is located in a non-state institution or outside a special purpose facility: hospital, kindergarten, school, military unit and the like. The owner of the premises is free to determine the location of the bathroom.
Standards
Height standards are specified in approved technical regulations. The height parameter is based on the distance from the floor to the upper plane of the seat. The thickness of the toilet seat is not taken into account in these GOSTs, since their different models may have different dimensions from each other.
The final height parameter is influenced by the characteristics of the installation site. The location of the bell of the nodal cross of the riser determines the quality of drainage of the contents of the toilet bowl. The combination of the level of the outlet bell and the inlet of the cross is the determining factor. The outlet hole should be at least 10 cm higher than the inlet hole. If they are located at the same level, the drainage will occur less intensively, which will lead to blockages. If the inlet is higher than the outlet, high-quality drainage will not occur.
If necessary, the lack of difference in the height of the holes can be compensated for by raising the toilet using available means. A step is installed or the general floor level is raised. The use of this solution affects the final height of the toilet. If a step was made located under the support, the distance from the floor to the plane of the seat will be greater than from the top of the step to the same point. This will reduce ease of use. The edge of its seat will put pressure on the inside of the knees of the person using the device, which will create noticeable discomfort.
In some cases , the optimal height of the device is achieved by partially lowering the riser cross below the finished floor level and partially raising the level of the latter. This allows you to achieve a certain compromise in the displacement of the toilet along the vertical axis.
GOST 30493 standards determine the standard height:
- for adults 40-43 cm;
- for children 33-37 cm.
On the floor or above the floor
In advertising brochures talking about the advantages of wall-hung toilets, the following main points are given:
- Hanging plumbing does not interfere with cleaning, leaving the entire floor area accessible.
- It makes a compact toilet spacious, allowing you to save space due to the tank.
- It allows you to completely hide communications, thereby improving the appearance of the bathroom.
Let's try to find out how much truth there is in marketers' statements.
Free floor
The statement is true without any qualifications. Installation - the frame to which the toilet is attached is hidden behind a false wall, leaving the entire floor area accessible.
This indicates that in your bathroom there will no longer be black and damp places under the tank, that the base of the toilet bowl will not really interfere with cleaning, and to change the tiles you will not need to dismantle it. In addition: the vacated floor will give more scope to your imagination when choosing a flooring pattern.
Compactness
Console plumbing will indeed make the room more spacious, but only visually. The dimensions of a wall-hung toilet with a concealed cistern and installation are at least no smaller than the floor structure: due to the thickness of the false wall, they are likely to be larger.
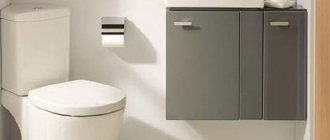
See: the back wall of the toilet room will move forward by about 20 centimeters, thereby depriving you of the opportunity to use the space behind the toilet for shelves or a small cabinet.
Visual space will be associated with the highlights of a person’s perception of the size of the room. They are unconsciously assessed by the area of two planes - the floor and the ceiling. Because the floor in our case is not cluttered, the toilet, regardless of the actual reduction in floor area, will begin to seem less cramped.
By the way: mezzanines also visually make the room smaller. If you want to use part of the space in a small bathroom to store rarely used items, it is better to build a flat cabinet that spans the entire wall and equip it with mirrored doors.
Hidden communications
Yes, they really will be completely hidden. In addition to the toilet bowl, only the flush button will remain visible. Yes, it will be beautiful, but defiantly impractical.
You see, dear reader, the creator of this article, over a decade of working as a plumber, became convinced that every structure certainly lacks repair, be it a water supply system, a sewer system, a drain tank or a valve. Making communications difficult to access is guaranteed to create difficulties for yourself in the future. Even if it happens in 10 or 20 years.
In addition: in a compact municipal apartment, the back wall of the toilet, which in most cases is hidden by a false wall along with the installation, is decorated with sewerage and water supply risers. In addition, if you are not too lazy to first replace them with durable polymer or metal-polymer pipes, who can guarantee that they will not be damaged during a pressure surge? Or, as an option, there will be no need to replace a section of the riser in the ceiling (which more than happens)?
Conclusions? Anyone can make them for themselves. Let's put it this way: the author never once had the thought of choosing something other than the classic floor design.
Flashing process:
During the flashing process, we can even remove the built-in BIOS from the board, because we won’t have to boot from the HBA adapter - FreeNAS works great from a flash drive.
- We install the LSI 9240-8i into the motherboard and boot from a USB flash drive. If the controller's BIOS complains that it does not see the disks, enable the Compatibility Support Mode in the motherboard's UEFI and disable booting from storage controllers.
- At the DOS command line enter:
- megarec -writesbr 0 sbrempty.bin
- megarec -cleanflash 0
- Reboot the computer and boot from the flash drive again
- sas2flsh -o -f 2118it.bin -b mptsas2.rom OR sas2flsh -o -f 2118it.bin if we do not need BIOS on the controller
- sas2flsh -o -sasadd 500605bxxxxxxxxx (x= SAS identifier characters)
- Reboot - done!
Now, instead of a RAID controller, we have a regular HBA, the same as on the motherboard, and after loading Windows, we see the hard drive connected to it in the same way as if we had connected the HDD directly to the motherboard.
Just in case, here are the commands for flashing back to the 9240-8i with RAID support:
- Megarec -cleanflash 0
- Megarec -writesbr 0 sbrm1015.bin
- Reboot
- Megarec -m0flash 0 0061_lsi.rom
After flashing the LSISAS2008 processor does not heat up at all, since it does not perform any calculations and you don’t even have to worry about ventilation in a cramped case. If in the future we upgrade the motherboard and choose a server board with 8 SAS/SATA ports, then by reconnecting the hard drives to the motherboard, we will not lose our data - ZFS will automatically rebuild the array, and the free slot can be used, for example, for outputting external interface ports.