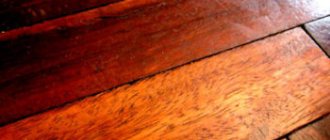
Laminate is a very popular flooring. It has a wide selection of textures and colors. It also has excellent wear resistance. But over time, even on such a floor covering, various defects can form.
The most common damages are:
- Crevices;
- If there is high humidity in the room or liquid is frequently spilled on the floor, this leads to swelling of the floor covering;
- With careless use or careless movement of furniture, scratches of varying depths very often appear;
- Under mechanical stress or prolonged pressure, chips or dented areas may occur;
The gaps in the coating should not be ignored. Over time, they most often lead to complete deformation of the entire laminate. Also, moisture penetrates through them into the inner layers of the product, which leads to swelling. If you do not take any action, then after some time you may need to completely replace the entire floor covering.
Regardless of whether the damage is severe or not, it will spoil the entire appearance of the flooring.
You can get rid of almost all defects that appear on the surface of the laminate yourself.
There are several ways to get rid of defects that have appeared.
How to seal cracks in laminate flooring
There are several ways.
When choosing a method, they are guided by the following rule: the greater the damage, the denser the composition should be. Repair pastes are produced in a wide range of shades; choose a tone as close as possible to the color of the floor covering. The product is sold in building materials stores, instructions are included.
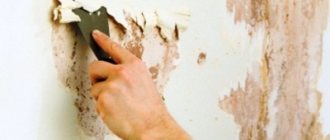
The composition is easy to use. The main thing is to clean the work surface from debris and dirt. Otherwise, there will be no strong adhesion of the paste to the board. Before starting work and after cleaning the surface, apply masking tape along the edges of the crack. This will prevent the repair compound from getting onto the outside of the board. Apply the paste, smooth it out with a spatula and wait until it dries. Then remove the tape and wipe off any remaining product with a thick cloth.
Wood putty is used to repair laminate flooring. It is used in the same way as a paste. Putty is less plastic and does not tolerate vibrations well. It should not be used on those areas of the floor that experience regular dynamic loads. The composition is convenient for repairing laminate flooring near the wall and cannot be used on the aisle.
Plastic waterproof material for finishing seams. Intended for use as a preventive agent. The sealant can be applied a few weeks after laying the laminate. The composition is well suited if you need to cover up cracks, or for repairing minor mechanical damage (scratches, chips).
Option 4. Colored grout
Used for cosmetic repairs - filling small cavities. Colored grout is easier to apply than other products, but it can only remove small cracks.
The composition is waterproof and has increased ductility.
Self-repair of laminate flooring: we find out the causes of problems and eliminate them
Repairing chips and scratches
Repairing laminate flooring without dismantling the floor is not always possible
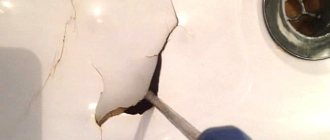
The laminate repair kit is a micro-soldering iron that runs on batteries. They turn it on and wait until it warms up. Then, with a sting, little by little wax crayons of several shades are melted. The resulting mass is applied with a slight influx onto the scratch. After the wax has hardened, remove the excess with a special or regular plastic spatula. If there is a trace of wax left on the surface, wipe it off with a microfiber cloth. Any other cloth will do, microfiber just doesn’t leave marks. It is important that the rag is dry and clean.
Melt the wax with the tip of a soldering iron and apply it to the scratch.
Removing excess wax with plastic
If there is no repair kit
No need to have a repair kit
Why laminate flooring creaks when you walk and how to deal with it
Another cause of squeaks may be debris that was not removed during installation. But then the noise is more like a crackling sound. There is no way to get rid of this problem without sorting it out. Just take it apart, vacuum it and put it back again.
Oddly enough, the cause of squeaks may be an unsuccessfully chosen substrate. No one ever complained about the traffic jam. Yes, it is expensive, but even inexpensive laminate does not creak. This was established experimentally. A cork backing and foamed polyethylene were placed under the same coating. It squeaks with polyethylene, but not with cork. So draw your conclusions.
The cause of laminate flooring squeaking when walking may be an unsuccessful design of locks or imperfect geometry. Both problems are common with inexpensive laminated boards. This category is also characterized by non-ideal geometry, which can also cause squeaking. And also the fact that they laid a covering that had not been left in the room for a long time.
- universal grease type WD;
- any other silicone lubricant;
- special silicone for laminate.
In principle, it doesn’t matter which one you choose. It is important that the lubricant is of high quality. The cleaner it is, the longer it won’t creak, so we don’t save money. WD lubricant is convenient because it has a very thin spout, which is convenient for applying the composition “on target.” Silicone for laminate joints is often sold in a regular tube. In this form it is very inconvenient to use: the neck is too wide, most of the expensive composition is wasted. After drying, the excess is removed. In general, see for yourself. Not only quality characteristics are important, but also the release form. Since it’s too wasteful to simply spend an expensive composition.
- We find places that, when pressed, produce a creaking sound.
- Apply grease to the seams. Fill over the seams. Silicone is fluid and will seep into the seams on its own.
- We wait 5-10 minutes.
- Take a soft cloth and wipe off the residue.
- Remove stains on the surface using a microfiber cloth.
After applying silicone grease, be careful - the coating becomes very slippery. You can wash off the composition with water and laminate detergent. That's all. The creaking should stop for a while. To eliminate it completely, you need to disassemble the covering, level the base so that the boards lie and do not sag and lay a good substrate.
Sometimes the laminate plays under your feet and not everyone likes this feeling. The reasons are, in principle, the same: uneven base, violation of laying technology, incorrect choice of substrate.
In order to repair laminate flooring due to deflections, you need to level the base. But, in principle, small unevenness can be compensated by a dense substrate. These can be polystyrene foam mats or cork. You need to look at the costs, what will cost less or the time that you can devote to solving the problem. Leveling will take more time, but less money (possibly). Replacing the underlayment is faster, but possibly more expensive.
The opposite situation may also be true. Laminate flooring springs underfoot if the underlay is too thick. Sometimes “for warmth” they put two layers of backing and it turns out to be too soft. When loaded, the laminate sag precisely because the base is too soft. In this case, you need to remove the excess thickness of the substrate and do not tighten it. In this case, the load on the locks is also high, which may be the reason that the laminate will come apart at the seams.
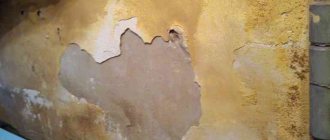
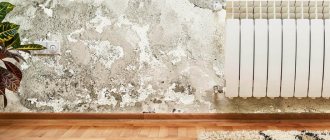
Laminate flooring can swell for several reasons. The most likely: high humidity, violations of installation technology or lack of space for expansion. It is better to start checking with high humidity. The absence of obvious signs of flooding does not always guarantee that water is not leaking anywhere. Sometimes she digs in. There are no puddles, but there is high humidity and it causes the laminate to swell at the joints.
If the laminate is swollen, we will carefully examine everything. We go around batteries, pipes, radiators with paper napkins. Let's see if it's leaking from under the balcony door or window. There are no traces of moisture anywhere - we will investigate further. If we find a source of moisture, we disassemble the coating, eliminate the leak, and dry the coating. By the way, drying may take several weeks. How to check if the base is dry? Place a piece of paper overnight and cover with a jar. If the sheet remains dry, great. You can reinstall the laminate. Wet - dry further.
After a thorough check in all possible places, no signs of high humidity were found. Let's move on. We need to remove the baseboards. If the laminate is laid correctly around the perimeter, there should be a gap of about 10 mm between the edge of the covering and the wall. If there is no gap or it is smaller, this is the reason that the laminate has risen at the joints. Treatment is to trim along the perimeter to ensure a technological gap.
If there are pipes in the room, check if there is a gap around them. There is often a “clamp” here too, which prevents the laminate from moving. We make sure that there are no dowels installed closely anywhere. At the same time, check whether all the wedges were removed after installation - they must be removed. How to repair laminate flooring in this case is probably clear. We remove the wedges and create gaps around the perimeter of the walls, around pipes, dowels and other fasteners.
Does the laminate lift at the joints after installation? He has nowhere to expand
Door frames and thresholds
If the laminate has become a house, then you need to disassemble the baseboards and check the gap
What to do if water gets under the laminate
When wet, the laminate sags at the edges. Each board becomes like a boat. After all, it is based on pressed cellulose, and in fact it is cardboard. The base, absorbing moisture, swells and increases in size. The surface is covered with a hard film, which does not expand when exposed to water. So we have the boat effect. The worst thing is that once it dries, the shape usually does not return. The edges still remain raised. Not to the same extent as it was, but not evenly.
If water gets under the laminate, there are two ways out. Just wait until the floor dries and hope for a miracle. The second is to take it apart, put it in a stack, pressing it down with something heavy. Wait until it dries in this position. In both cases the chance of use is very small, but there are no other ways.
How to repair cracks in parquet flooring
The appearance of cracks in laminated parquet can be due to various reasons:
- The initial choice is low-quality parquet. A cheap board or lining can lead to defects from temperature fluctuations or loads;
- Slats from different manufacturers may differ in size or shape of the locks. This incompatibility significantly affects the connection, which over time can weaken or stop fastening. When trying to join such lamellas, small gaps may occur.
- The most popular reason is installation on an uneven surface. Defects are not immediately detected, since the substrate softens and cushions for some time. But over time, it becomes denser and stops shock-absorbing, and the panels diverge.
Gaps between boards are not just a cosmetic defect. Their presence can deform the entire coating. Due to the fact that the protective film is broken and free access to the internal structure of the board is opened, without moisture-proof impregnation, the insides quickly become wet and deform along with the surface of the laminate.
Sealing cracks is carried out in several ways, depending on the number of cracks and sizes
How to eliminate cracks. If a gap forms due to unevenness of the base, it is necessary to replace the substrate. At the location of the defect, one or two boards are dismantled and the old substrate is carefully cut out. Unevenness of the substrate is eliminated, and wrinkles are removed. If the volume of the damaged substrate is large, then the entire lining should be replaced.
No less important information on the topic: Chips on the parquet
Not everyone knows that the durability and quality of the coating is, first of all, the merit of proper preparation and installation, as well as wisely chosen auxiliary material. There are many options to choose from:
- environmentally friendly and durable cork;
- polypropylene;
- polystyrene foam (for increased load);
- coniferous substrate, with good ventilation;
- on a foil base;
- polyethylene film;
- combined.
It is difficult to answer unequivocally which type of substrate is better. This depends on the conditions in which the coating is laid: humidity, subfloor (concrete or board), horizontal floor, etc.
Replacing the underlay will help eliminate the cause of the uneven floor.In cases where a radical method of replacing the substrate is not required, you can get by with cosmetic repairs. The cracks must be sealed to prevent liquid from getting inside. To do this, you can use a special putty paste, the procedure is as follows:
- It is necessary to remove debris and dust from the crack,
- tape around the edges,
- choose the color and apply putty,
- level with a spatula and dry,
- then remove the tape and wipe with a damp cloth.
You can do cosmetic repairs to scratches on laminated parquet yourself
How to remove or disguise cracks
After finding out the causes of damage to the laminate, you can safely begin to choose a method for eliminating them. The first situation to consider is the most common, namely, after a couple of months, gaps between the laminate panels became noticeable on the floor. What to do in this case?
There are several ways to solve the problem. Each option differs in its effectiveness, but has differences in the complexity of the process:
- If it turns out that the cracks arose due to an uneven base, then you can do something drastic and level the floor.
- To do this, it will be necessary to disassemble the laminate and remove the backing, which has probably already become worn out and cannot be reused. Next you need to level the floor under the laminate. To ensure quick leveling, you can use a self-leveling mixture. After it dries, a new substrate is laid on top and the laminate is re-laid.
Note. This method is only suitable if the panels were not coated with special glue or sealant during initial installation.
If there is no opportunity or desire for global work, you can use a partial solution, but you will still have to dismantle the laminate. Next, a denser underlay is immediately laid under the laminate and the floor covering is installed. This will only bear fruit in case of minor unevenness.
Ways to eliminate laminate swelling
First of all you need to:
- dismantle the floor plinth;
- determine the areas of the laminate that abut the wall;
- trim them while maintaining 20 mm gaps.
If swelling of the laminate occurs due to moisture in the base, the laminate must be disassembled and dried in a dry place. After the coating has dried, it is put back together.
If there is a significant volume of liquid, the laminate is lifted and the space under the floor is checked for the presence of water. It is necessary to dry not only the lamellas themselves, but also the substrate. After this, the coating can be reassembled. Usually such actions are enough to save him.
Preventing the formation of laminate defects is much easier than eliminating them.
Damage to the laminate
Damage classification
High-quality laminate itself is a durable material that withstands mechanical stress well. But in some situations, especially if mistakes were made when laying the floor or operating conditions were violated, the laminate cannot withstand and fails.
Among the most common damage to laminate flooring are:
- Gaps between laminate planks;
- Swelling of the laminate in conditions of high humidity;
- Scratches;
- Chips, holes and other damage caused by mechanical impact.
But whatever the defect, even the smallest scratch spoils the appearance of the entire floor covering (as can be seen in the photograph). For this reason, the faster and better the damage that occurs is repaired, the better it will be.
Helpful information. The majority of cracks and scratches can be easily repaired on your own
But before doing this, it is important to find out why the defect occurred and then decide on the method of repairing the laminate
Items in cart: 0 . There is currently 1 item in your cart.
It often happens that the gap between the laminate (parquet board, cork) and the wall is too large. Generally speaking, this is a serious mistake by the craftsman who laid the floor. Not a single instruction specifies a gap between the wall and the floating floor of more than 1.5 cm, and even that is set as a limitation under specific conditions. Most often in instructions such numbers are “8-15mm”. Moreover, you need to focus on the average value of 10mm. If the installers did not violate the conditions regarding the permissible installation length (up to 8-12 m), then a gap of more than 12 mm is not needed. We have not seen a single object that would require a thermal gap of more than 10mm. And all the arguments of the builders “to breathe” are nothing more than their enormous incompetence in trivial matters.
How to remove minor scratches and abrasions
Shallow damage is hidden using simple-to-use products. In this case, you only need to level the surface. If the problem of how to repair a chip on a laminate is being solved, consider products based on fatty components and special polishes. This method is suitable for cases where furniture or other large heavy objects were moved across the floor. Polishes are also used to eliminate the consequences of constantly opening the door when it fits tightly to the floor covering.
Olive oil
This product helps restore the coating by polishing. Before repairing chips on the laminate, the floor is prepared
It needs to be washed, and it is important to remove all contaminants, including fatty components. For this reason, shampoo is added to the container with water.
After washing the floor with this solution, the area to be restored is additionally cleaned of shampoo residues. To do this, use water without additives.
Before starting to restore the coating, you need to dry the surface. If the humidity in the room is high and the drying process needs to be accelerated, use a hair dryer or other heat source. You can wipe the surface with a lint-free cloth.
Polish
When all the floors in the house are covered with laminate, it is recommended to purchase a special product. Polish is a composition that is designed specifically to protect such floor coverings. It has all the necessary properties that are important to protect the material: moisture resistance, resistance to stress. Laminate polish is available in the form of mastic, solution and aerosol.
The liquid substance is added to water and used to wash the floor. When the product is applied to a damaged surface, it is recommended to polish the area. After finishing the work, the properties of the laminate improve: it is protected from mechanical loads and its attractiveness increases.
Mastic is a silicone composition. It is more effective compared to a liquid product. Laminate repair paste is applied to the scratch and rubbed; excess substance must be removed immediately. Thanks to this product, the laminate acquires shine, so it is recommended to treat the entire surface so that the coating looks attractive and individual shiny spots do not catch the eye.
The principle of action of an aerosol is similar to that of a concentrated liquid: the product is sprayed over the surface; When the suspension settles on the floor, polishing begins. To do this, use natural material, for example, a hand towel is suitable (use an old thing).
Using WD 40
This is a universal lubricant that is used to solve various problems (removing rust from parts, protecting against dust, etc.); This product is also suitable for restoring the coating. The lubricant is supplied in a bottle; The kit includes a nozzle with a minimum cross-section, which helps to apply the substance to hard-to-reach areas.
Operating principle: polish is sprayed over the laminate, then treated with a rag made from natural material until the scratch disappears. There is no need to rinse off the product. A brush can be used to clean the treated surface. The advantage of this product is the ability to protect the laminate from dust and other contaminants. Treated surfaces remain attractive for a long time.
How to prevent the problem from occurring
To avoid having to restore the floor again in the future, you should adhere to the rules for its operation:
- use care and cleaning materials intended for laminate flooring;
- Do not use abrasive cleaning products; wipe off dust with a soft cloth;
- laminate does not tolerate constant exposure to water, so when cleaning the cloth should only be slightly moistened;
- do not use acids or alkalis;
- in areas where the load is increased, it is necessary to place mats;
- heavy objects are placed on soft pads;
- Furniture on wheels should be used whenever possible.
Even if all the rules are followed, small scratches will appear; they must be removed immediately using simple means that are intended for minor damage.
Laminate design and features of its operation
It is, in principle, possible to renew laminate flooring, but some nuances of the work must be observed.
Before you paint laminate flooring, you should take a closer look at what it is and how it differs structurally from parquet flooring.
Laminate floorboards, despite their similarity to parquet, have little in common with them. Their main difference is the material from which they are made.
If natural wood is used in the production of parquet boards and bars, then various composite materials are widely used in the production of laminated slats.
A classic laminated board consists of 4 layers, bonded together using polymer-based adhesives.
Features of operation
Due to this design of the laminate, if its top layer is damaged, all underlying layers are inevitably at risk, so damage to the protective surface should be considered not only as a decorative defect that worsens the appearance of laminate flooring.
Violation of the protective layer can cause “failure” of the entire floorboard - moisture and chemical components of cleaning agents penetrating into the base of the lamella will lead to its deformation, delamination or fungal damage.
To avoid deformation of the floorboards, you should limit yourself to dry cleaning with a vacuum cleaner or broom.
But it is quite clear that dry cleaning will not be able to rid the floor surface of stubborn dirt.
Moreover, a floorboard devoid of a polymer film tends to absorb dirt, and this makes cleaning it using a dry method almost impossible.
In this regard, painting the laminate is necessary not only to restore its decorative qualities, but also to protect it from adverse external influences.
As a preventive measure against premature failure of the laminated coating, it is recommended to choose it in accordance with its resistance class.
For example, in rooms with increased load on the floors (hallway, kitchen, living room) you should use a higher class laminate. The table shows the classes of laminate flooring, their recommended area of application and approximate service life.
Preparing material for installation
Before laying the laminate, it should be kept in a horizontal position, in its original packaging, in the room that will be covered with the material. The holding time is at least two days .
This is how the material adapts to the temperature and humidity of the room.
Before installation, you should check the laminated boards for the presence (absence) of mechanical damage. Sizing should be checked. In addition, it is necessary to check the locking connections for damage.
An important condition for the correct installation of the coating is the preparation of the base: it is necessary to identify and eliminate differences and unevenness. If differences in the base exceed 5 mm, the floor is filled with a cement screed or self-leveling compound.
Causes of cracks in laminate flooring
Gaps appear when laying laminate flooring for several reasons. The main ones are:
- Humidity. This problem arises as a result of seasonal changes in humidity, when materials that contain wood expand and dry out (in summer it is humid and there is no heating, but there is rain, and in winter it is dry, but the heating season begins);
- leak. It can be very different: both flooding and regular leakage from flower pots, for example. Both of these lead first to a local, and soon to a complete change in the geometry of individual boards and the entire floor covering;
- locks. In most cases, the locks are not pressed during the installation process. Due to a poor connection, they begin to diverge. Is it possible to prevent such an outcome? Yes, by quality control method: all unpressed locks have small gaps initially;
- deformation gaps, or rather the absence of them. During the installation of lamellas, it is necessary to leave a deformation gap from ALL points of emphasis and obstacles. Otherwise, due to expansion, the floor will deform, expanding across the board, or it will develop waves due to expansion along the board.
DIY laminate restoration
The main causes of damage to laminate floors:
- poor-quality installation of lamellas;
- mechanical impacts from shoes;
- contact with sharp edges of objects;
- moving across the surface without backing of massive furniture;
- falling of heavy objects;
- spillage of aggressive or polluting liquids;
- plumbing or heating accidents;
- careless handling of fire.
Dents in the flooring
All defects can be divided into 3 groups:
- Minor damage and abrasions;
- Deep scratches, dents;
- Deformation or destruction of lamellas.
Eliminating the latter defects is more difficult, as it requires disassembling the coating and possessing certain knowledge and skills. In such cases, you cannot do without inviting specialists. Small abrasions can be easily removed using masking agents.
A mixture of sawdust and gypsum
A good option for repairing a chip is a composition of sawdust and gypsum. Both components are mixed with water in equal quantities to a homogeneous paste. A large chip can be preliminarily repaired with a tab, the role of which can be perfectly fulfilled by a wooden sliver of a certain size. The inserted wood chips are carefully covered and rubbed with a composition of sawdust and gypsum.
Instead of plaster, you can use PVA glue:
- sawdust is mixed with glue until a homogeneous mass is obtained;
- the mixture is applied to the chip;
- after complete drying, it is necessary to remove excess;
- level the repair site with putty matched to the color of the laminate;
- If desired, the laminate can be varnished.
Epoxy resin has two components: a resin and a hardener. They need to be mixed, following the proportions according to the instructions, until an elastic, homogeneous mass, using a drill with an attachment. Mixing must be carried out for at least 5 minutes at a temperature of at least 15 degrees. The resulting composition is evenly applied to the pre-treated chip.
Tips for repairing slats
In each specific case, the method of restoration and the amount of work that needs to be performed depends on the severity of the damage: the depth and area of the chip, crack or scratch. When carrying out work, you must adhere to the following recommendations:
- All repair work must be done as soon as a minor defect appears: this makes it easier to repair.
- Any composition for laminate restoration should be applied carefully, while capturing the edges of the damage.
- After finishing work, the laminate must be wiped with a damp cloth.
To further protect the laminate from damage, it can be coated with a layer of clear varnish.
High-quality laminate from well-known manufacturers is a rather expensive floor covering. Therefore, it must be treated with the utmost care. It is best to walk on such a floor in house slippers, do not move heavy furniture on it and do not drop heavy objects. In this case, the laminate will last the entire period declared by the manufacturer without breakdowns or complaints. Laminate, despite its high degree of resistance to stress and abrasion, is sometimes damaged
Most often this happens when careless handling of heavy objects or products whose edges are quite sharp. As a result, cracks, scratches, dents and chips form on the laminate
To eliminate them, improvised and special means are used.
What does the manufacturer write on the packaging?
Each manufacturer uses its own marking system for laminated panels. However, there is a unified system of symbols that both Russian and foreign laminate manufacturers must adhere to.
Regardless of the brand of coating, an important indicator of the service life of the coating is the designation on the packaging . This is a number that is inscribed either in a square or in a circle.
In addition, to designate an industrial premises, a drawing of a house is used: with a triangular roof for residential premises, a rectangular residential building for commercial premises, and the same rectangular house with a chimney for industrial premises. The abrasion class can be designated in ascending order AC3-AC 5.
- The drawn little men indicate the level of load: the more figures, the higher the wear resistance.
- Numbers from 31 to 33 indicate the class of coating, from 8 mm to 12 mm - the thickness of the board.
- The anti-slip symbol is indicated by an icon with a description: R9 – R13. The lower the number, the higher the anti-slip rating .
- The symbol with up arrows indicates the possibility of installing the covering on a heated floor system.
- The clock and styling element symbolize the possibility of quick styling. And if there is an icon with a roller, then this indicates the need to mount the coating on an adhesive base.
- The ECO icon symbolizes the environmental friendliness of the material.
- If there is a square icon with the letter E1, then this indicates the absence of harmful impurities in the composition of the board .
- Harmless use and environmental friendliness are indicated by CE marks.
- If the coating is moisture resistant, then it is marked with a sign in the form of one or several drops (in different interpretations).
- A symbol with a speaker, horn, or ear indicates the ability of the coating to absorb sound .
- A foot on the floor in the form of an icon indicates the thermal insulation properties of the material.
- UV resistance is indicated in the form of a sun.
- Light weight is indicated by a balloon.
- Shoes (boots or women's shoes with stiletto heels) indicate resistance to abrasion when wearing shoes.
- An animal's paw print also denotes increased abrasion resistance .
- Spilled products or a glass of drink indicate resistance to chemicals and liquids.
- The icon with a cigarette butt on the floor means that the surface of the coating is resistant to an accidentally dropped cigarette.
- The antistatic surface is indicated by a double arrow.
Each manufacturer's designation symbols may differ, but the understanding of the symbols should be reduced to a single designation system for the floor covering.
We restore mechanical damage
But cracks are not the only trouble that can happen. In addition, the laminate is exposed to stress, which results in scratches, holes and chips.
To eliminate such damage, you can use the following methods:
The easiest and fastest way is to use a repair compound specially designed for such purposes. The putty looks like a paste that matches the color of the laminate. For ease of use, according to the instructions, you need to apply the paste with a rubber spatula.
To repair deep cracks, you can use a mixture of crushed sawdust and gypsum. The same method can be used to cover the cracks between the laminate panels.
Advice! To save grout, a thin wooden spacer is placed in deep cracks, and the entire structure is covered with a repair compound on top.
A wax pencil specially designed for this purpose is perfect for repairing small scratches. This method is suitable if only the top layer of the coating is damaged; there is no need to be afraid of damage to the inner base and moisture.
Laminate repair pencilAdditionally, by studying the video with instructions, you can clearly see how the laminate is restored and given its original appearance. In order not to be confused about what to do when faced with a problem, it is better to study in advance the material on how to eliminate the damage that has occurred (holes, chips, crevices and cracks) and how to prevent this from happening (high-quality leveling of the base will help). As a result, we can conclude that repairing laminate flooring with your own hands is quite possible and only requires care and a little time.
Grouting cracks between parquet staves
Having prepared the putty, you can move on to solving the next question: how to seal the cracks with your own hands. To work, you will need a minimum of tools - several spatulas of different widths, sandpaper and a scraper. The last components can be replaced by a grinder. Before puttying, the parquet should be leveled by scraping or sanding. It is advisable to vacuum the cracks - the presence of dust will negatively affect the adhesion of the putty to the wood. The floor surface is wiped with a damp cloth.
Only cracks with a width of more than 2-5 mm need to be putty separately - a thick layer of putty will sag and crack when dried. Having previously filled and dried such cracks, the resulting defects are eliminated during subsequent grouting. As an option, in problem areas the parquet is caulked with slats of appropriate thickness, lubricating them with glue and recessing them 1-1.5 mm deeper than the parquet level.
Large gap between boards
General grouting is done using putty with the consistency of liquid sour cream, pouring it onto the surface of the parquet and rubbing it evenly with a spatula. To best seal the cracks in the parquet floor, the operation is repeated in each area several times, moving the tool in different directions. As consumption progresses, the putty is added, without allowing a significant reduction in the volume of the composition dispersed by the spatula.
Drying parquet treated with solvent-based fillers only takes a few hours. It is better to give water-soluble compounds a day to set, and only then proceed to final sanding of the floor surface. All additional information about the features of working with a specific type of putty can be obtained by carefully reading the manufacturer’s recommendations, and answers to the remaining questions can be easily found in thematic videos.
Floor sanding tool, small and handy
How to cover cracks in laminate flooring?
There are several answers to the question of how to remove cracks in laminate flooring. We will look at common methods that you can use yourself:
Damage in the laminate is dealt with using wood putty. This method can be used to seal a relatively small area of laminate flooring. The putty composition is applied using a spatula, and then, after the surface has completely dried, it is carefully sanded with sandpaper; A mixture of gypsum and sawdust will help remove cracks from the floor surface. The ratio of components is one to one
It is important to achieve an extremely thick consistency of the resulting composition. Coating is carried out as in the previous case, and then the surface of the damage is sanded with sandpaper; sealing laminate cracks is also done with sealant - grout
The process of applying the composition to the floor surface and final processing is also not much different from using wood putty. To achieve the visual effect of a complete coating, use a sealant that matches the shade of the laminate. But in this way only minor damage can be removed; If you go to a hardware store with a problem about how to remove cracks in laminate flooring, they will advise you to use repair paste. In this case, the coating adjacent to the crack, gap or other damage is carefully taped with masking tape so as not to unnecessarily stain the laminate strips. And only then, using a spatula, cover all the cracks;
Caulking the gap
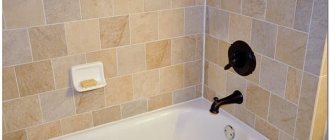
Joint between tiles and laminate
A combination of these materials is most often used:
- In the hallway and kitchen. Laminate is not damaged by water and its wear resistance increases.
- To divide a room into zones.
- In doorways.
There are several ways to join tiles and laminate:
Application of grout
Tile grout is applied at the junction of tiles and laminate. It can be bought at any hardware store. The grout color is chosen based on the colors of the floor coverings and the color scheme of the room. You can choose plain or contrasting shades.
Installing a cork compensator
For this, a strip of cork is used, which easily takes the desired shape. It can be used on smooth and wavy joints. The soft structure allows the cork to shrink and fill narrow areas.
Application of sealant
When sealing seams, a construction gun is used, with which the sealant from the tube is squeezed into the cracks between the tiles and the laminate. The components of the sealant protect the laminate by preventing moisture absorption.
The disadvantage of this method is that the sealant has only one color - brown. This color does not go well with all flooring shades.
How do gaps appear between individual laminate boards?
Installation of a laminated coating is not difficult, but even with proper and high-quality performance of all manipulations, cracks may appear on the laid laminate over time. Why does this happen? Here are some reasons:
- If the room has high humidity levels, the floor will deform over time, and gaps will appear between the individual planks.
- In the event of flooding by neighbors or spilling liquid, if it is not wiped up immediately, cracks may appear in the coating.
- If you do not “press” the locks during installation, this will result in loose contact of the individual laminate strips with each other.
- If special deformation gaps are not provided when laying the laminated coating, it will swell or cracks will appear. After all, this distance is specially created for further linear expansion of individual planks. This situation will not necessarily happen, but professionals still recommend cautioning yourself and not forgetting to create deformation gaps.
Deformation gaps
- Gaps also appear when laying laminate flooring because the planks are mounted on an uneven surface. And if the preparatory work to level the base is done poorly, discrepancies will form between the laminate boards during operation.
- If you saved money and used poor quality material, this could also cause deformations and gaps between the individual laminate flooring strips.
The most difficult method of eliminating a gap
If there is a large discrepancy between the individual planks, professionals recommend re-laying the floor. This is true for coatings that are laid on an uneven base. Under the current circumstances, there is no other choice but to re-install it.
Stages of re-laying the coating
- First, the planks are dismantled. They do this extremely carefully, because it is not necessary to buy new boards.
- The base is cleaned of dirt and treated with a primer.
- Using self-leveling mixtures, correct the base;
- After complete drying, a new substrate is laid. This is a must, the old one is no longer good;
- At the last stage, they begin laying the laminated planks.
Important! When installing laminate flooring, do not forget about deformation gaps. If the shape of individual boards is changed, this will ensure the normal appearance of the floor.
Now you know how to remove cracks in laminate flooring. But in this case, as in medical practice, it is better to prevent than to treat later. Therefore, let's figure out what to do to prevent gaps from appearing on the floor surface in the future.