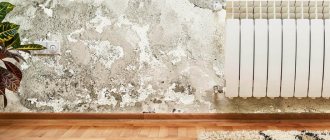
When renovating, it often becomes necessary to remove the old layer of plaster. It is impossible to do this by hand, without a special tool.
You need to carefully prepare for work, stock up on personal protective equipment, cover all objects and more.
To learn how to quickly and independently remove plaster from walls at home, read the article.
Preparation
Before you start removing a layer of plaster from the walls, you need to prepare. Regardless of the chosen method of dismantling the old coating, this process is always associated with the formation of a large amount of dust, which must be taken into account before starting work.
Preparation consists of the following steps:
The room is de-energized.- They twist sockets, switches, lamps, and a chandelier (it is removed if the plaster is to be removed from the ceiling). The resulting holes are covered with masking tape.
- Protect the floor covering from construction dust and dirt. If the layer of plaster is thick, it will fall in heavy pieces. Therefore, first, corrugated cardboard is laid on the floor, which is covered with plastic film on top.
- Window sills are covered with newspapers or thick fabric, pressing them with a weight so that they do not fall to the floor.
- Interior doors are covered with stretch film. When carrying out work, the gaps between the doors and the floor are sealed around the perimeter with masking tape. This will prevent dust from spreading throughout the apartment.
- Cover the windows with polyethylene, leaving a small hole to allow the room to be ventilated.
- They take out all the electronics so that dust that gets on them does not lead to damage. The remaining furniture in the room is covered with film.
You should not be lazy and ignore the preparatory stage, so that after completion of the work you do not have to painfully collect dust from all surfaces.
Universal methods
You can also use brick chips mixed with sunflower oil. It is rubbed into the bricks after laying and left to dry. Then the growths are removed with a stiff brush. You can take any chemical for a car, apply it to the wall, let it dry and rinse off with water under pressure. After any of these methods, you need to consolidate the result using a water repellent. It will protect the brick from moisture.
There are many cleaning methods, but if you combine different methods you can achieve high-quality results.
Cleanliness is important not only for everyday cleaning, but also when caring for building structures. Even the most durable brick will last longer and will delight people if it is properly cleaned. And in many cases, establishing basic order only allows you to reuse ceramic blocks.
How to remove old coating?
To remove plaster from the wall, you can use a percussion tool in the form of a chisel, hammer or hammer drill . If the plaster layer is thin, use a grinding or vibrating machine. In the absence of power tools. They resort to using a scraping spatula.
Chisel and hammer
You can get rid of a layer of plaster using available tools in the form of a chisel and a hammer. It’s easy to work with them, the main thing is to control the force of the blow. If you hit the chisel too hard, you will leave nicks on the wall that will have to be smoothed out.
Procedure:
- divide the walls into small fragments - to do this, lean the chisel against the wall vertically and hit it with a hammer;
- when the outline of the fragment is knocked out, the chisel is tilted at an angle of 45 degrees, inserted into the groove and tapped on it with a hammer;
- As the elements move away, the chisel is moved forward.
This method is suitable for removing plaster of medium to significant thickness.
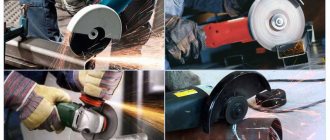
Grinder
It is best to use a grinding machine to remove decorative coatings that have been applied in a thin layer.
Mode of application:
- Choose an attachment in the form of a brush or coarse sandpaper.
- Put the device into operating mode and sand the coating.
- You need to control the work visually, continuing sanding until the base becomes visible.
Sanding produces a significant amount of dust, so whenever possible, use a tool with a built-in dust collector. If it is not there, the wall must be wetted before work begins.
Hammer
You can quickly cope with the task using a hammer drill. To do this, you will need a tool with attachments in the form of blades of different thicknesses.
Mode of application:
- the device is put into working condition;
- set the crushing mode on the hammer drill;
- lean it against the wall at an angle of 80 degrees;
- they pierce the plaster to the full depth, right to the very foundation, and make a groove;
- tilt the hammer drill at an angle of 40 degrees, insert it into the groove, knock down the plaster, moving in the desired direction.
A hammer drill is used to remove a thick layer of plaster.
Vibrating machine
A vibrating machine is great for removing thin layers of plaster. Its working surface is represented by abrasive materials of different grain sizes. The coating is removed by small but very frequent movements of sandpaper along the surface of the wall.
No special skills are needed to operate a grinding machine. It is enough to plug it into the network, attach it to the wall and systematically work it until the plaster is completely removed.
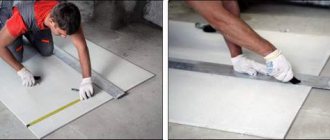
Roughing spatula
A scraper is an affordable tool for removing plaster. Working with it, you will be able to carefully clean the wall without damaging its base. A spatula is used to remove medium thickness coatings.
Mode of application:
- Using the corner of a spatula, make small notches over the entire area of the wall.
- Starting from the most convenient side, remove the plaster, gradually moving forward. Hold the tool at an angle of 30-45 degrees.
- Sometimes you can tap the handle of the spatula with a hammer to drive it deeper under the base.
The advantage of using a spatula is that the work will be carried out quietly and with a minimum amount of dust.
Prevention recommendations
Preventing efflorescence is much easier than dealing with it later. After all, they arise quite quickly and increase their localization. Eliminating them can take a lot of time, effort and money. In addition, there is no guarantee that white spots will not appear again after cleaning. Therefore, we determine in advance the possible factors that could spoil the brickwork.
- It is better to buy bricks from a manufacturer that has been proven over the years and by many customers. It’s definitely not worth saving on material. At the same time, it can be very difficult to distinguish a high-quality material for construction from one obtained with technological violations simply by appearance. Reviews and recommendations will help you find a good supplier.
- For construction, you need to dilute the solution as thick as possible and carry out construction work exclusively in dry weather. It is advisable to carry out construction only in the warm half of the year.
- If possible, there is no need to add special additives to the masonry mortar. It is better to try to dilute the mixture itself with clean water and high-quality coarse sand.
- If it is necessary to suspend work, unfinished parts of the building should be covered with film. It is advisable to bring them under the roof as soon as possible so that atmospheric moisture and precipitation do not get inside the material and saturate it.
- It is better not to dilute or dilute the solution again. Often when using old bricks, they are soaked in water. It is better not to do this, but to remove the remnants of old cement or mixture using mechanical force.
- Special additives are added to the working solution, which replace calcareous substances and give the binder greater plasticity to prevent the natural process of salt formation in the masonry and their subsequent release to the surface. This is an important preventive measure, since convenient and most accurate application creates the most correct and uniform load on each brick. Previously, egg yolks were used for this purpose. Modern industry offers ready-made solutions. These are microfoaming agents containing petroleum derivatives, fatty acids or organosilicon compounds.
To learn how to remove efflorescence, watch the following video.
Removal from the ceiling
Removing plaster from a ceiling is more difficult than removing plaster from a wall. A person will have to perform work in a position where his arms are always raised up. This requires more time and physical effort.
The choice of tool depends on the thickness and composition of the plaster applied to the ceiling, but there is one universal method to make the work easier.
To do this, you need to prepare a special solution that softens the coating. For 1 liter of water take 2 tablespoons of starch, which is mixed until completely dissolved. The resulting solution is used to treat the ceiling.
Under its influence, the plaster will become looser and it will be easier to remove it from the wall surface. After 15 minutes you can start cleaning. The work will go much faster.
If the layer is dense, then irrigation with starch solution can be repeated when the top soaked plaster is removed.
Cement mortar
This is the most popular composition that is most often used by professional builders in the process of laying bricks.
This prevalence is due to the ease of preparation of the mixture. Masonry cement mortars are divided into three groups:
- Skinny. They contain the least amount of binding components. Such compositions are characterized by weak ductility and strength. They quickly delaminate and crack. The only plus is the low cost of preparation.
- Fatty. They contain a normal amount of astringent components. These are durable and plastic compounds. However, they differ in their tendency to shrink during the hardening process. This leads to cracking.
- Optimal. Based on the name, such mixtures have the best characteristics. These are fairly thick solutions, without lumps that do not break.
You should pay particular attention to the brand of cement. The higher this indicator is, the more sand is added to the composition. Typically M300/400/500 cement is used. Based on the selected cement, the proportions of the mixture will differ.
Healthy! If you want to give the solution a darker shade, you can use M500 cement or add a little soot or graphite to the solution.
To make the composition more plastic, various plasticizers are added to it. Some save money and use soap and detergents, but it is better to give preference to specialized compounds - surfactants.
The process of preparing cement mixture
Let's say we decided to prepare a masonry mixture of grade M75 and take M500 cement as a basis:
- Pour 20 liters of water into a container or concrete mixer.
- Fill in 3 shovels (with a heap) of clean sifted sand.
- Add 1 shovel of cement (with the same heap as the sand).
- Turn on the concrete mixer for 3-5 minutes. If you mix by hand, this time increases.
- Pour the finished homogeneous mixture into a working container.
Features of removal depending on the type of building material
Depending on the type of plaster, the features of its removal from the wall differ:
- The cement coating adheres firmly to the surface and is difficult to knock off, even if the material was applied a long time ago. Its removal is started only when there are no other finishing options. For removal, use a breaking tool, for example, a hammer drill. The layer of cement plaster is most often thick.
Gypsum coating holds strong, but it is prone to cracking when impacted.
Therefore, a breaker tool is used to remove it. If the layer is thick, use a puncher, and if it is thin, use a spatula or chisel.- Decorative coating is most often applied in a thin layer. It does not hold as firmly as a cement-based mixture. Therefore, a grinding or vibrating machine is used to remove it.
- The clay coating must be removed. If you leave it on the wall, then the new decor, for example, wallpaper, will not stick firmly. This type of plaster is prone to breaking and peeling. Therefore, cleaning it will not be difficult. If the area is small, then you can use a roughing spatula or chisel for the work.
- The polymer coating holds firmly due to special additives in the composition. It is difficult to remove it by hand; it is better to use a grinding machine.
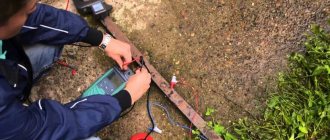
Finding weaknesses
The work of cleaning the wall needs to start somewhere. And it’s better to do this from the area where the coating has already been weakened. You can understand this by tapping the wall. Tap areas located at a distance of 30-40 centimeters from each other. In the case of a ringing sound, we are talking about good adhesion of the coating to the wall. Well, if the sound is dull, there are voids there, which will make the work easier. Also, wet spots or cracks can be a sign of weakness in a place.
Important! When cleaning a wall fragmentarily, it is necessary to remove not only the problem area, but also the surrounding finish at a distance of about forty centimeters.
Nuances of removal from different types of bases
Depending on the base on which the plaster is applied, the methods for removing it will differ:
- Tree. It is one of the softest and most pliable substrates, so it is better to use a grinding or vibrating machine to process it. The last option is preferable.
- Concrete. This base can withstand any processing, including crushing with a hammer drill.
- Brick. To remove the coating from a brick wall, it is not recommended to use a hammer drill, as it will either get into the seam or slide off the masonry. Therefore, it is better for a non-professional to give preference to a grinding machine and remove the thick layer manually.
- Drywall. Its integrity cannot be violated, so do not use a hammer or punch for the work. It is necessary to start stripping from the corner, carefully separating the exfoliated fragment. To do this, you can use a knife or screwdriver. When the coating gives way, they arm themselves with a scraper, which in appearance resembles a spatula, but its edge is sharpened more sharply. With its help, the plaster is removed by carefully pushing the tool under the coating.
Causes
Before you start fighting this annoying phenomenon, you should find out its causes. It is on them that further steps to eliminate white plaque will depend. The causes of efflorescence are divided into those independent of humans, as well as those caused by human activities (in particular, violation of brick making technology and the masonry process).
The following factors are considered the main cause of alkaline plaque on facades.
- The use of low-quality masonry mortar with a high content of alkalis, chemical additives and excess impurities leads to damage to the brick. Over time, it not only turns white. In deeper layers, scales begin to form, which leads to gradual destruction of the material under the influence of additional mechanical stress.
- Carrying out construction work in winter or rainy weather, especially with the use of various water-repellent and anti-frost additives, which also negatively affects the quality of the structure.
It also happens that efflorescence occurs due to non-compliance with the manufacturing technology of the material itself at the factory. For example, if instead of drying it in a special oven, it was simply air dried. Salts are contained in varying quantities in alumina itself, which is one of the main components in the manufacture of bricks. Its excess due to poor quality of raw materials, and in case of disruption of the production process, at the first serious moistening will lead to the release of salt to the outside.
Grayish-white plaque on the outer surface of walls is common and common. It occurs due to natural chemical and physical processes. Basically, water-soluble salts evaporate and are carried to the surface. Moisture moves through the capillary structure of the brick, washing away salts. Thus, where water comes to the surface, it evaporates, and impurities in the form of tiny crystals accumulate in spots.
Precipitation with a high content of various impurities and harmful substances in water can also damage the brick. This happens especially often in large industrial cities with poor ecology.
The least rare reason is improper storage conditions for bricks in the cold rainy season without protection directly on the ground. Also, moisture can get in from the soil, but this is only possible if the foundation layer is poorly waterproofed.
Personal protective equipment and safety precautions
In order not to harm your own health when carrying out work, you need to take care of safety precautions, compliance with which is impossible without personal protective equipment.
It is not enough to simply turn off the power to the room. It is necessary to study the wiring diagram so as not to damage it during dismantling.
Basic rules:
Construction glasses should be worn over the eyes, which fit tightly to the face and prevent fine dust from entering the mucous membranes;- protect the respiratory system with a respirator - it will catch dust, preventing it from entering the respiratory tract;
- clothes should have long sleeves - you need to work in pants made of thick material;
- protect your feet with hard boots so that heavy pieces of plaster cannot cause a bruise or fracture;
- If the plaster will be removed from the ceiling, it is necessary to use a hard hat.
Is it worth it?
We especially note that sometimes it is better to prevent many types of pollution. This will be much easier than having to worry about cleaning the brick later, because different types of brick have different properties, and all the methods described above are not suitable for each of these types (especially for fragile facing bricks). In addition, other cleaning methods will simply take up a lot of your time and effort, and in the case of sulfuric and hydrochloric acid, they can generally have a detrimental effect on your health if safety precautions are violated.
Therefore, it is better to use preventive measures in relation to the brickwork of your home. And then the new fresh colors with which your home will sparkle will personify the excellent taste and solidity of its owner.
How can construction waste be used?
After removing the plaster, a significant amount of debris is generated. About 15 kg of material and even more are removed from each square meter.
Tips to make your work easier:
- So that after completion of the work you do not have to spend several days cleaning, it is better to do it immediately, as dismantling proceeds.
- Do not fill bags to the top. Otherwise it will be impossible to lift them. In addition, heavy weight can cause the container to burst.
- A dustpan and broom are used to rake up debris. Do not use a vacuum cleaner, as the plaster can damage the equipment.
- To remove garbage, you need to hire a special car, since management companies are not obliged to deal with this procedure.
Plaster is not always a useless material. Even after being removed from the wall, it can be reused. It is used to fill the foundation for pouring a porch, to improve an area for parking a car, and to level garden paths. This is especially true for owners of country houses and dachas.
Clay plaster can be completely reused. Just soak it in water and mix thoroughly.
Gypsum coating is used as insulation in outbuildings. Lime plaster can be used to cover the soil in areas where weeds grow.
Mechanical cleaning method
If time permits, the issue of cleaning bricks can be solved by removing remaining cement mechanically. This option is suitable for any type of masonry material, but with one caveat. Only large and medium blots can be removed; this method is not suitable for jewelry work.
Let's take the most ordinary tools for work - a spatula, a metal brush, a trowel, a hammer and a chisel. We begin to chip off pieces of dried cement from the bricks. If the growths and stains are small, you can get by with a brush, spatula and trowel. In the case of large and massive pieces of the mixture, you will have to use “heavy artillery” - a hammer, chisel and chisel. You can use a hatchet as a little help, although it gets dull quickly.
It is advisable to strike along the surface of the brick so as not to leave marks. Once you have broken off large chunks of cement, you can begin sanding. For convenience, you can nail sandpaper to a wooden block on the side of the surface being treated.
Advice
. Don't forget to wet the brick surface with water. It perfectly softens the construction mixture, which makes the work much easier. Wet it generously, the masonry will absorb about five percent of the water, and the solution will come off much easier.
What not to do and why?
When removing plaster from a wall, do not do the following:
- You should not start repairs without personal protective equipment;
- It is unacceptable to remove a thin layer of plaster with a percussion tool;
- when working at heights, it is not recommended to use a stool or table; it is better to purchase a construction ladder - there is no need to place it close to the wall, since broken fragments will fly into your face;
- The power tool should not be left turned on for longer than 20-30 minutes - failure to comply with this recommendation will lead to its overheating and failure; the break should be at least half an hour so that the equipment has time to cool down.
Cement solvents
Cement mixture residues are easily removed using acid-containing solvents. They penetrate into the contaminants, destroying them from the inside, after which the softened solution is easily removed mechanically. Solvent cleaning is used to remove cement from ceramic bricks, but it cannot be used when cleaning sand-lime brickwork, since the latter is destroyed by acids. You can purchase acid for preparing a solvent at any construction supply store; you just need to carefully read the instructions for use, since different acids are diluted and used in different ways.
Battery acid is also used, which is diluted in water in a ratio of no more than one to ten. It is applied to the moistened brick and then left for 10-30 minutes. Further contamination can be easily removed by mechanical means.
Work is carried out only when using reliable protective equipment.
Helpful information
Tips for removing plaster from a wall:
Gypsum and lime coatings are susceptible to moisture, so it is recommended to moisten them generously with hot water before removing them. It will take about 20 minutes to soften, after which the work will go faster.- A thin layer of plaster is moistened using a spray bottle. If its thickness exceeds 6 cm, use a roller, rag or sponge.
- If you need to do the work quietly and with minimal dust formation, use a chisel and hammer, or a spatula.
- If the processing area is impressive, it is better to use a power tool.
- Garbage must be removed immediately so that it does not interfere with movement around the room and does not cause injury.
What are the cleaning methods?
Sometimes after construction work, the brickwork needs to be cleaned of paint, plaster, or the remains of concrete must be removed from it. There are several types of cleaning that allow you to wipe away dirt from the structure:
- mechanical - cleaning of sand-lime brick;
- washing with water;
- use of special solutions.
To clean a brick wall from foreign material, you need to prepare in advance the following tools:
- metal scraper, brush, spatula, chisel;
- bucket;
- drill with replaceable attachments;
- gauze mask or respirator;
- gloves.
From white plaque
The salts that the cement mortar contains penetrate the surface of the brick and cause the appearance of a white coating on the masonry. It occurs after heavy rainfall. This phenomenon is dangerous because it can destroy the top layer of materials: cracks and chips appear. You can wash a brick facade from this plaque with a special blasting - a highly concentrated substance that is diluted with water, maintaining a ratio of 1:10. After this, they proceed according to the following algorithm:
- The liquid is applied with a brush to the red brick.
- Leave for 20-30 minutes to absorb.
- Wash off with clean water. This type of cleaning of brick walls from efflorescence is considered the most effective.
Cleaning bricks from grout
To wash off contaminated areas from facing bricks without difficulty, it is better to do this on the first day. Then, for removal, the wall is wetted and the residue is removed with a spatula. Cleaning the facade in this way is quick and without harm to the material. If the grout on the surface of the decorative brick is ingrained, proceed according to the following scheme:
- Select a special blasting agent and dilute it according to the instructions.
- Apply to the surface and leave for the required time.
- Remove the residue with a spatula.
From plaster
A popular method of decorating brickwork is applying plaster. However, such a coating requires updating over time, and the old material must be completely removed before cleaning. Here's how to properly clean your walls:
- Remove all furnishings from the room.
- Close doors and windows tightly to prevent dust from entering other rooms.
- Use a chisel and hammer to remove cement from the brick.
- Wipe the surface from dust.
- Apply special varnish.
After completing the work, it is necessary to wash the facing brick from any remaining dust. The washing procedure must be performed in the direction from the top corner. There is also a special cleaner for cleaning walls from plaster, but it takes longer and does not guarantee complete removal of material residues. Decorative, three-dimensional plaster containing gypsum can also be placed on the surface of the masonry material.
From cement
After completing construction work, it is necessary to clean the brick facade from the remains of the cement-sand mixture
To choose how to clean the masonry, you need to pay attention to the degree of contamination of the structure. It is best to clean bricks from mortar in the first 24 hours after contamination.
There are two ways to clean a building:
- Mechanical option. Involves treating the surface with a metal brush or chisel.
- Chemical method. A brick cleaning agent containing hydrochloric or phosphoric acid is used. Sand-lime brick cannot be cleaned this way.
From different types of paint
Very often, painting is chosen as a decoration for brick walls. However, if you want to lighten the silicate material for the purpose of further renewal, the coloring material must be removed. The method of soaking with vinegar was popular, but after the advent of special solutions it is practically not used. Sandblasting is often used, but it damages the masonry, which may eventually require partial or complete dismantling of the structure. Therefore, it is better to work according to this scheme:
- Scrape off old material.
- Treat surfaces with a special solution against fungus.
- Apply cleaning solution.
- Remove any remaining paint. If the work is carried out indoors, it is better to stick paper on the walls and remove the material with it.
From clay in the form of a solution
Sometimes the brick is “set” on clay instead of cement. This prevents the products from cracking during operation. The building material must be bleached from the rock immediately. While the solution has not hardened, this can be done with a dry cloth made of natural fabric. However, if the rock has dried out, you need to act differently. Clay mortar masonry is tidied up using the same technique as when cleaning a cement-sand mixture.
Efflorescence-resistant materials
- Clinker brick
is a cladding material with high protective properties. It protects the walls of buildings from rain and snow, and is also particularly reliable and durable. If efflorescence does appear on clinker tiles, it is quite easy to remove it with plain water or weakly concentrated cleaning agents. After removal, the walls are treated with products containing silicones. - The fifth element is a facing brick of very good quality, but it costs much more than usual.
TOP 9 stores where I shop profitably
- Petrovich - construction-trading house
- InstrumTorg
- Leroy Merlin
- Stroylandia- Construction and finishing materials
- OBI - building materials and everything for the home
- Building yard
- Maxidom
- All Tools
- Garage Tools
TOP 7 for goods and furniture for the home:
- Brownie
- Furniture for home
- HomeX - everything for decoration
- Designer furniture
- Furniture and kitchens to order
- 220 Volt - Tools for home
- MVideo equipment for home
Categories
- Apartment design
- All about repairs
- Doors
- Window
- Ceiling
- Walls
- Plaster and putty
- Drywall
- Furniture
- Other about repairs
- Floor
- Leveling the floor
- Cement strainer
- Dry floor screed
- Semi-dry screed
- Self-leveling floor
- Flooring
- Warm floor
- Electric floor
- Water heated floor
- Floor coverings
- Tile
- Laminate
- Everything about plumbing
- Water pipes
- Bath, shower
- Faucets
- Toilet
- Heating
- Everything is electrical
- Wiring
- LED in everyday life
- Ventilation
- Construction materials
- Tools
- Materials
- Construction calculators
- Repair of a country house
- Miscellaneous articles
- Top review
- Question answer
- News
- Repair video
Anti-pollution vacuum cleaner on a brick wall
A vacuum cleaner is suitable for cleaning.
It’s worth mentioning right away that a regular vacuum cleaner is not suitable for this method. You will need a detergent here. This cleaning method will resemble the traditional one, only a vacuum cleaner in this case will replace the nylon brush. First, you will need to moisten the contaminated area, apply a paste of powder, salt and water to it, leaving it all for 15-20 minutes. After time, the dirty foam is removed using a vacuum cleaner.
For cleaning to be effective, two conditions must be taken into account:
- before using the vacuum cleaner, you will need to change into special clothes, since the work itself will be quite dirty;
- This cleaning method is not suitable for old brickwork, since jets of water will simply destroy it.