People often encounter problems such as gaps between the floor and the wall. They appear over time or as a result of the unscrupulous approach of finishers when renovating an apartment. Such spaces need to be eliminated as soon as possible. It’s worth asking in advance about how to seal the gaps between the floor and the wall. In addition to the fact that they spoil the appearance of the apartment, dampness and drafts penetrate into the house through the cracks. The presence of voids can contribute to the appearance of cockroaches. They penetrate through all sorts of cracks. How and with what can you eliminate the gap in the space between the wall and the floor? More on this later.
Installation of plastic plinth
Do-it-yourself installation of plastic skirting boards is done using the following tool:
- screwdriver
- hammer drill
- knife
- screwdriver
- hacksaw or grinder
- self-tapping screws
Installing a plastic plinth with a cable channel that has an internal insert allows you to hide the fastenings of the product, since the fastening elements, in particular the heads of screws or nails, are hidden under a decorative insert located in the center of the structure. Connections of skirting boards to each other in a straight line and in the corners are usually made using special adapters and internal and external corners. The middle insert is detached and the product is mounted using self-tapping screws or dowels to the wall. Then the artificial insert returns to its place, covering all the fasteners of the plastic plinth with cable channel .
Installation of a plastic plinth without plastic connectors and corners is not suggested by the manufacturer's instructions, but this method is one of the most popular, since with this installation not a single splice - connector, and not a single internal or external corner that could ruin the entire appearance - is invisible - however This is the most labor-intensive and at the same time most inconspicuous installation of plastic skirting boards. Standard connecting elements and corners stand out above the main surface of the product, differ in color and are striking against the general background.
First remove the insert and file both edges of the plinth at an angle of forty-five degrees. After fixing the plastic product to the vertical surface of the wall, an insert is built into it so that the middle is where the two plinth strips meet. The second insert must be cut in half (also at an angle of forty-five degrees) and inserted on both sides of the whole plank
When installing a plastic plinth, this method also involves sawing corners, both internal and external, at an angle of forty-five degrees, similar to cutting a wooden piece of product. Sawing flaws must be corrected with sandpaper; it is also possible to use a grinder with a round sanding disc.
Installing a plastic plinth with snaps comes down to simply snapping the profile into special locks that are pre-fixed to the wall. The latches are fixed using self-tapping screws at 50 cm intervals. Due to the protruding structure of the product and the peculiarity of its fastening to the latched locks, some free space is created. Telephone and television wires can be placed in this cavity. The installation order is as follows: first of all, lay the cables, and then fasten the plinth to the latches.
Installing a plastic plinth with your own hands to walls made of plasterboard, lining, wood, MDF, differs from installing a profile on brick or concrete walls. The plinth is attached to these walls using metal screws, which are screwed through plasterboard or MDF into a galvanized metal profile, or using special plasterboard dowels directly into the panel. Plastic plinths are attached to wooden walls using wood screws. A natural wooden profile rather than a plastic profile will look more harmonious with wooden walls.
Installing a plastic baseboard with glue.
Fixed using adhesives (most often “liquid nails”), the plastic product looks quite attractive. Installation will not be very difficult - you need to measure the required length, install plugs, couplings and corners. Fit all the parts, then spread with glue and press against the wall. Such installation of a plinth places quite high demands on the quality of the wall surface, and when dismantled, the profile loses its original appearance and becomes unusable. During installation, be careful not to stain the walls, floor or profile itself with glue.
Installing plastic skirting boards using self-tapping screws
, it does not look very aesthetically pleasing, but it is not demanding on the quality of the base, it is reliable and not expensive.
For installation, it is necessary to drill holes in the profile with a diameter of 2-3 millimeters, in increments of 400 - 500 mm. from each other. In these holes, using a knife or a large-diameter drill, you need to make conical recesses for the heads of the self-tapping screws
. Starting from the corner you like, and pressing the plinth against the wall, use a pencil or small marker to make marks through the holes. Using these marks, we drill holes in the wall with a hammer drill and install dowels. We connect the profile to the wall and carefully screw in the screws so as not to deform the plastic. It is better to install and mark one profile strip at a time. To mask contrasting screw heads, special plastic plugs are used, which are available in different colors. This installation of plastic plinth, despite its not very beautiful appearance, is the most common.
Household repair No. 1
Choose reliable craftsmen without intermediaries and save up to 40%!
- Fill out the application
- Receive offers with prices from masters
- Select performers by price and reviews
Post a task and find out prices
Each renovation involves creating a comfortable and cozy interior. To make the room look attractive, every little detail must be taken into account. Sometimes the aesthetic appearance of a room can be ruined by cables that have nowhere to hide. Modern manufacturers have invented an excellent solution - a plinth with a cable channel. This practical invention quickly gained immense popularity. Thanks to it, you can beautifully and neatly hide the cables of your phone, modem, or TV.
Types of skirting boards and features of their installation
Corners for plinths are a useful thing, but they are not always used, it all depends on the type of plinth:
- wooden - made from a single piece of wood, you can always choose a shade to match the color of the floor. As a rule, they do not have grooves for laying cables, but the wood looks great, and with proper treatment it will last for decades. They require particularly careful joining during installation; decorative corners are not installed on them, so the joints must be fitted just perfectly;
Angles obtained by carefully adjusting the planks
Note! In principle, you can order wooden corners for baseboards on the floor, but there is little point in this. With careful joining, the plinth will look no worse.
- veneered - a wooden base made from cheap types of wood is used, and the top is covered with veneer of valuable wood species. Considering the cost of exotic wood, this is a justifiable move. Special corners are also not used during their installation;
- plastic is the most common type nowadays. The plastic is absolutely insensitive to moisture, quite durable, and the richness of shades will allow you to choose the right one for any type of floor, even for an impressive-looking laminate. And corners for floor plinths will allow you to quickly design external and internal corners, as well as the joints of individual panels.
Plastic plinth will hide all secrets
Note! Most of these products are equipped with a groove for laying cables in it; after installation, this groove is closed with a special strip and becomes completely invisible.
Quantity calculation
Before choosing decorative slats, it would be a good idea to find out how many of them you will need. A preliminary calculation will help you decide on your budget. It will become clear what length of strips is best to take in order to reduce the number of trims to a minimum.
Let us have a room with the following parameters: 2 walls of 3 meters each and 2 walls of 4 meters . Let's find the general perimeter:
3+3+4+4=14 m.
Don't forget that there is a door in the room. The width of the opening together with the platbands is 0.8 m. Let’s find the final length:
14-0.8=13.2 m.
Trouble may arise during installation. You will need spare material. What if the trading center or store is already closed? This often happens during the holidays. Especially New Year's. What to do? Add 10 % to the footage:
13.2+10%=14.52 m.
Here it is, the final number. Let's take a standard plinth 2500 × 47 × 23 mm. We only need the first number since this is the length of the batten. Let's get the quantity:
14.52/2.5=5.8 pieces.
Round up. The final indicator is 6 units.
Features of installing skirting boards
In addition to the baseboard panels themselves, installation will require a number of additional elements, and the installation method largely depends on the design features. Also, during installation, you will have to solve non-standard problems, such as designing a rounded corner or installing a panel at an angle other than 90ᵒ.
What you will need for installation
The floor rectangular plinth looks especially impressive when using corners to design joints at the corners of walls. And if in the case of wood, adjacent panels are usually simply joined very precisely, then when using plastic panels, corners are used to mask the joints.
Where to begin
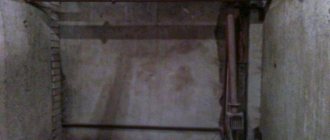
Before the procedure, I recommend dismantling the floor plank and studying the scope of work. The dimensions of the defects between the floor and the wall can be much larger than what is visible through the baseboard. The absence of a physical barrier will make the procedure easier.
I carefully lift the wallpaper at the bottom of the problem area. I wash away the whitewash and remove the old layer of enamel. I leave the area to dry or dry it with a fan. Upon completion of the work, I will glue the trim back, returning the surface to its original appearance.
If there are light objects in the room, I advise you to cover them with film or construction fabric. During the process, dust or splashes from solutions fly around the room. When using liquid compounds, do not protect the floor with paper, otherwise the substance will easily get wet.
In conclusion
The use of special corners for the plinth makes installation much easier and makes the joints simply perfect. A small drawback of such decorative elements is that only 90ᵒ angles can be found on sale, but a little ingenuity and “straight” hands will allow you to get around this limitation. The information provided will help, if necessary, to beautifully lay the plinth not only in the corners, but also along a curved surface.
In the video in this article you can find answers to questions about installing non-standard corners.
In the comments to the article you can always ask any question about the installation and selection of skirting boards.
What is the optimal size
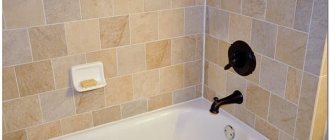
The manufacturer often indicates the dimensions of the maximum area possible for laying a particular coating. A gap is also established between parts of the coating if the area of the surface to be coated is larger than permissible. It is equal to at least 1.5 cm.
The width of the gap between the wall and the edge of the covering most often corresponds to the area. The optimal gap width is a distance of 1 cm. If the humidity in the room increases, the gap can be increased by 0.5 cm. If there is a gap between the pipe and the door latch, then the gap should also be about 1.5 cm.
IMPORTANT! If the room is more than 12 m in length and more than 8 m in width, then it is necessary to calculate the gap width at the rate of 15 mm per linear meter.
How to fix skirting boards
Probably each of us had to buy skirting boards. Modern skirting boards are beautiful and come in a variety of colors. It is these products that give the room a complete look. In this article you will learn how to cut a baseboard and install it yourself. In general, attaching a plinth is quite a difficult job, which requires knowledge of some of the subtleties and nuances of the procedure. Of course, you can entrust the process to professionals. However, if you put in a little effort, you will succeed.
K What types of skirting boards are there?
Installing skirting boards is the final stage of finishing the room. The aesthetic functions of the skirting board cannot be overestimated, because it levels the bottom lines of the wallpaper, and also makes a beautiful transition between the walls and the floor covering. Before installing the baseboard, you need to select it. Construction stores offer their customers a huge selection of skirting boards made from wood and plastic. But in any case, such products have one purpose - hiding and decorating the corners between the walls and the floor.
The difference between plastic and wooden skirting boards, first of all, lies in appearance. If your floor is covered with parquet, then, naturally, you should not try to imitate wood from plastic; you should immediately buy a wooden baseboard. If the walls are not particularly smooth, you should install plastic skirting boards, which can hide such imperfections due to their ability to bend. In addition, the plastic plinth includes a box through which you can pass a telephone cable.
Before installing the plinth, you need to choose a method for attaching it to the wall and learn how to cut the corners of the plinth. You can use liquid nails as a simple option, but in this case the walls should be as smooth as possible, otherwise such nails will be of no use. The most common solution is the hidden fastening of the skirting boards, since the next time the skirting board is repaired, it can be very easily removed and installed back.
Remedies
The choice of materials and technologies depends on the size of the hole. I advise you to check the dimensions of the defects using a ruler. The larger the gap, the stronger the fastening material and filler should be. I pre-degrease the surface with alcohol.
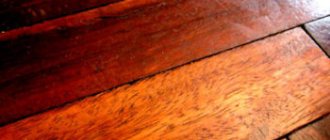
Narrow gaps
I recommend sealing gaps up to 3 cm with silicone or acrylic sealant. Plastic raw materials can be easily distributed through the spout into the lagging cavity. The product dries quickly and fixes the bar.
Small areas should be caulked with a pharmaceutical plaster bandage. I cut the tape to the required length, moisten it in water and fill the gap. The substance in the hands takes the required shape, allowing you to adjust the width and size of the “patch”. The element dries very quickly, so the next day I paint it in the desired color.
If you haven’t decided how to seal the gap between the floor and the wall under the baseboard, I advise you to take gypsum-based building materials. I mix alabaster putty with:
The ingredients are taken in a ratio of 1:4:1. I add water to the resulting composition and knead the viscous solution. Using a rubber spatula, I distribute the mixture deeply and evenly into the narrow gaps. The raw material dries quickly, does not crack and lasts a long time.
The gap between the baseboard and the wall should be foamed with polyurethane foam. When working, I moisten the surface a little by spraying the surface with a spray bottle. This technique will allow the material to be well fixed inside the structure.
I apply the raw material very carefully, remembering the ability of the substance to expand in air. I immediately remove accidental stains with a damp cloth. After polymerization, I cut out the beads with a construction knife and apply acrylic sealant on top.
Medium holes
If the size of the holes is within 3.5-6 cm, then the stability of the polyurethane foam will not be enough. Before caulking the middle cracks between the floor and the wall under the baseboard, you need to caulk the defect. Between the surfaces I compact jute or tow fibers, which I pre-soak in insecticide against insects. The material can be easily hammered into the hole with a hammer and a flathead screwdriver. I seal the seams with epoxy resin or silicone sealant.
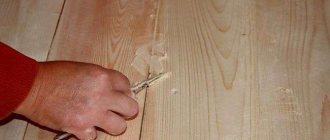
I recommend masking the gaps between the wooden baseboard and the floor with slats. I first process the side edges of the defect with a milling cutter, removing the old wood layer. I drive leveling dowels into the holes. I rub the cuts in the coating with sandpaper and protect them with glue.
Source
How to remove a connector on a baseboard
Installing PVC floor plinths does not require any special skills from a home craftsman, but achieving a good result will require some care. This article will help you avoid possible installation mistakes.
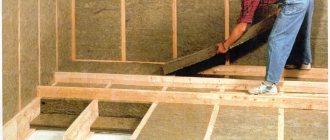
Installation of the floor plinth is carried out after completion of all basic finishing work. It is understood that the walls and ceilings will not be subjected to further processing (wallpaper, painting, etc.)
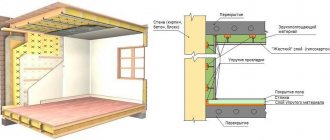
For installation, we will take one of the most common skirting boards from the “Smart flex” system. This plinth has soft rubber edges, allowing it to fit more tightly to the surface and thereby compensate for minor unevenness in the walls and floor. In addition, the baseboard has a cable channel where you can hide antennas and other wires. The length of the plinth is standard and is 2500 mm. There are skirting boards with and without ready-made holes for installation, this does not matter much because... in some places we will have to focus not on the finished holes, but on ensuring that the baseboard fits as smoothly as possible.
Preparing the Inserts
One of the indicators of a uniform laminated coating is to ensure an even gap between the wall and the coating. This is ensured by pegs of equal thickness. Experts most often use parts of the same laminated board that they are laying.
NOTE! You can also use plastic or metal inserts.
The pegs are placed vertically along the entire perimeter along the longitudinal part of the board - in the center of each element, in the transverse part - in the center of the width of each element.
What you need
Today there is a huge selection of skirting boards: ceiling and floor, made of wood, pvc, polyurethane, polystyrene, metal, plaster, with corners, moldings and decorative elements. And besides this, modern adhesive mixtures attached to glue, nails, putty, etc. with very reliable fixation. It happens that it is incredibly difficult to remove a profile, and you also want to avoid damaging the walls, floor, ceiling, and also not spoil the fillet, especially if it is expensive and needs to be re-glued.
If the baseboards are nailed or glued, you will need the following tools to remove them:
- chisel or screwdriver with a flattened end;
- mallet;
- scraper or small thin, flexible spatula;
- wooden wedges;
- crowbar, also known as a nail puller;
- shoemaker or stationery knife;
- hammer.
How to tear off baseboards
It must be said right away that the only task that does not cause any difficulties is how to remove the plastic baseboard. Typically, it is used to seal the joint between the wall and the floor covering, and screw nails onto the dowel. It is enough to remove the decorative strip, remove the wires from the cable channel, unscrew the screws, and after repair, simply install it in place.
To remove the PVC profile, just unscrew the screws
Stucco molding
It is better not to touch the plaster baguette. Sadly, it is extremely difficult to carefully remove stucco molding; it is dismantled if it is not suitable for the new interior; in other cases, it is better not to touch it. Try, of course, running a knife along the joints several times, each time trying to push the knife deeper. If the mixture on which the fillet is held crumbles, then there is a chance to slowly remove it. But more often than not, it’s impossible to tear off the stucco molding; it gets wet and is simply beaten off with a hammer and chisel.
Polystyrene and foam
Planks made of polystyrene and foam plastic are usually glued with special glue. Before removing the ceiling plinth made of these materials, direct a stream of warm air at it; after a while, the adhesive composition will soften. All that remains is to run a knife or thin spatula along the joint, pry up the profile, and carefully remove it.
Important: Try to dismantle the ceiling plinth made of polystyrene or foam plastic as carefully as possible: do not touch the front side with the decor, since when exposed to warm air, the material becomes soft and can be damaged even with minor mechanical stress.
Photo diagram of how to remove ceiling plinth
If fastened with screws or self-tapping screws
The heads of self-tapping screws or self-tapping screws are most often recessed into the wood, and you can find them by looking at the holes. In addition, the caps may stick out above the surface, making them even easier to find in this situation. In 3% of cases, the caps are closed with plastic plugs. As you understand, they are also noticeable.
To remove the baseboard you just need to unscrew the screws or self-tapping screws with a screwdriver. In some cases, screws are driven into baseboards. What should I do? A crowbar and the methods for dismantling the baseboard described above come to the rescue.
Difficult case
Wooden and polyurethane skirting boards are usually “set” on nails and adhesives that “you can’t tear off with your teeth,” and you will have to work hard to remove such a profile. Dismantling should begin from the door or from the corner.
Glue and putty of strong fixation
Ceiling and floor skirting boards made of polyurethane are removed using a thin spatula and a mallet. Run a sharp knife along the joint several times to create a small gap. Press the spatula from below, the handle should be almost close to the wall. Use a mallet to tap the handle so that the metal part of the spatula fits between the plank and the wall, as if cutting it off the wall.
Nails
Before removing the wooden floor plinth, use a knife to stitch the seams where the plinth joins the wall and floor; they are usually filled with several layers of paint or varnish. From the wall side, insert a chisel into the gap formed and drive it deeper with a hammer. Insert a wooden corner into the resulting gap. Repeat the operation after about a meter, gradually tearing off the die.
Tip: If the effort when working with a chisel is not enough, you should use a crowbar to remove the wooden fillet. Try not to tear the crowbar too much, so as not to break the profile.
Step-by-step photo instructions on how to remove the baseboard from the floor
If the profile does not give in, insert a chisel from below, as shown in the photo, and be sure to place a piece of wood under the lever so as not to spoil the coating. Tap with a hammer so that the blade goes in deeper and carefully remove the baseboard.
How to fill a small or medium void between the floor and the wall?
The question often arises about how to seal the gaps between the floor and the wall if the space is small. To fill a small gap, you need to have precision movements and dexterity. Soft materials are suitable for work. They must be flexible. It is important that the cavity filler has a high density.
The material at hand should be rolled into rolls of small diameter, which is not much larger than the size of the gap. The required filler is driven into the gap using a hammer. It is better to take a rubber construction hammer. It will help to smoothly fill the resulting void. It is necessary that the material is solid and there are no small parts. Usually cracks form in them.
If the cavity is very small and the tow will not fit into it, then a gypsum solution helps in this matter. It quickly fills all the cracks. The solution fills the space as much as possible. You can also treat the surface of walls with it.
To avoid staining surfaces near the work site, you can purchase self-adhesive construction fabric. When the cavity is clogged, you can begin to decorate the seam.
Ideally, after removing excess foam, a small depression remains. What do you do in this case? It is usually sealed with a thin layer of putty. Using a spatula, distribute the mass evenly. Plaster work is allowed. When the layer of mortar hardens, you will get an even seam. It can be covered with a plinth or the seam can be covered with wallpaper.
To fill large cracks, you must first fill them with suitable sized pieces of brick, aerated concrete, or expanded polystyrene. Then you need to fill the crack or gap with foam.
READ MORE: How to seal cracks in a wooden floor - effective ways to eliminate cracks and defects
Polyurethane foam is very convenient for sealing cracks
If the foam does come out, then the excess must be cut off with a knife.
Medium and small cracks are sealed with tow or felt, pre-treated with agents that do not allow various kinds of insects to enter them.
Then they are also filled with polyurethane foam.