Plaster is a very important element when building a house or renovating. This mixture does a huge number of important functions, for example:
- Thermal insulation. It closes microcracks through which cool air from the street passes.
- Improving the appearance of the wall. After plastering, the walls look smoothest.
In general, this consistency has many more functions that can be listed for a very long time.
But from time to time it happens that the plaster begins to collapse. This is quite a nasty problem. Fortunately, there are several ways to strengthen the surface.
How to strengthen plaster that is falling off walls
Plaster is a very important element when building a house or renovating. This mixture performs many important functions, for example:
- Thermal insulation. It closes microcracks through which cold air from the street passes.
- Improving the appearance of the wall. After plastering, the walls look smoother.
In general, this mixture has many more functions that can be listed for a very long time.
However, sometimes it happens that the plaster begins to collapse. This is a rather annoying problem. Fortunately, there are several methods to harden the surface.
I want, I can: Acceptable and strictly prohibited kitchen remodeling
There is often a balcony in the kitchen, and many people think that this will solve the problem of lack of space. However, it is important to know exactly: do you have a balcony or a loggia? It is not allowed to add a balcony to the living space, since the balcony floor slab is a separate structural element that will not withstand the load of insulated walls and the weight of winter glazing. Of course, no one will agree on an affirmative resolution to add a balcony. But if there is a loggia near the kitchen, then a legal association is possible.
Causes
First, you need to figure out the reasons why it crumbles. The reasons are errors when plastering the walls. Here are the most common ones:
- No primer. The presence of a primer is a prerequisite for plaster. Most people don't use primer because it prevents the wall from absorbing moisture. However, for such cases there is a special primer that improves adhesion and holds back salts. These salts come out of fresh concrete and over time reach the plaster, almost completely tearing it off.
- Violation of drying time. The plaster mixture dries from 7 to 28 days. Most people decide not to wait, but to apply the next coat ahead of time. Consequently, after some time it begins to fall off and crumble. The room where the mixture is drying should be well ventilated, this will speed up drying.
- Adding water to the mixture rather than slowly pouring the mixture into the water. Because of this, all sorts of lumps appear, which will greatly interfere with further work, since they are difficult to break. Consequently, the surface will be processed poorly, and this will provoke further destruction.
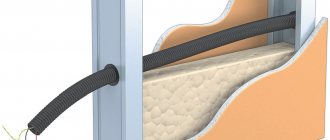
Wooden beam inside the profile
Another way is to place a wooden beam inside a metal profile. They are also secured with self-tapping screws every 200 mm. But first, make sure that the internal width of the profile and the bar match each other, and you want the bar to be slightly narrower. Watch for changes in the shape of the support - it should not deform or bend - this is necessary for the precise fit of the beam to the horizontal supports.
These two options are the results of improvisation by builders of past years, which have proven themselves well, but they are most often used only for constructing a frame around the doorway. To strengthen walls, proven methods are still recommended.
How to strengthen crumbling plaster
There are several ways to strengthen the surface:
- Use a deep penetration primer. A deep-penetrating primer designed for old and loose surfaces. Its particles penetrate deep into the plaster mixture and bind it. In addition, this material has an antiseptic effect. This method is the simplest and does not require much effort or money. Despite this, it is quite effective.
- This method is very radical. In most cases, plaster crumbles due to mistakes made during the work. In this case, you will have to completely tear it off and make a new one. It is best to leave this work to experienced craftsmen. Unlike the first method, when the material deteriorates due to age, nothing will help here as much as replacing the mixture.
Briefly about the main thing
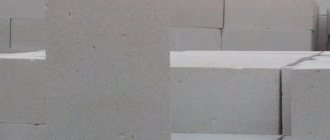
Gypsum for decorative stone is used in almost every modern design. This material is a budget and modernized version of conventional brick. It is lighter, easier to install and suitable for all types of surfaces. That is why when choosing an artificial surface, attention is paid to gypsum stone.
A large assortment allows you to choose the material for each room. But the types are very different from each other, so it is worth studying in detail the properties of each and comparing them with the technical characteristics of the room. You can do the installation yourself, but it is important to follow all the rules and strictly follow the instructions. Only then will gypsum tiles become an excellent addition to the interior of the house.
How to strengthen crumbling plaster - 2 simple ways
Plaster – the coating itself is quite durable. But over time or if technology is violated, its strength may be compromised. In such cases, the plaster begins to crumble, peel off, and unpleasant cracks and other defects appear on it. Of course, every homeowner wants to stop this process of destruction.
There are two ways to do this, quite simple:
- use a strengthening special impregnating composition;
- secure the collapsing surface with a reinforcing mesh followed by putty.
Choose one or the other option depending on the situation.
Apartment redevelopment
Any redevelopment of an apartment during renovation involves the construction of partitions - light walls that divide the interior space of the apartment into several separate rooms. Partitions must be securely fastened between the ceiling, walls and floor, have strength and good soundproofing properties. Redevelopment of an apartment can be carried out using partitions made of foam and cinder blocks, brick, as well as frame partitions covered with plywood, chipboard, dry plaster or hardboard.
Source
Strengthening impregnation for the plaster layer
Today you can buy wonderful impregnations , which are called “strengthening”. Their main purpose, as you might guess, is precisely to strengthen various surfaces. Including plaster.
These products can be purchased in plastic containers of various sizes. Use is simple: the product is poured into a more suitable container, and then applied to the plaster with a brush, roller or spray.
It may seem that saturating the plaster layer with some substance is not a sufficient measure. However, surprisingly, such compositions cope very well with the task. Some types of strengthening impregnations are capable of penetrating a layer of plaster (and even concrete) by more than 1-1.5 meters. All along the way, they bind microparticles of material and close the pores. The plaster strengthened by impregnation stops crumbling, existing cracks do not expand, and new ones do not form.
Related article: Attaching a water heater to a wooden wall
All that remains is to eliminate visible damage to the surface. You can see how to do this here.
Strengthening the plaster layer with reinforcement
If the plaster are complex, that is, the coating is quite damaged, it makes sense to use a reinforcing mesh.
It can be plastic, but if the damage is great, it is better to use metal and, if possible, stainless steel. Rust can break through even a significant layer of plaster. After this, instead of the problem of a weakened coating that needs strengthening, another problem will appear.
The reinforcing mesh is attached to the surface using nails or dowels (if it is metal) or with a solution (for plastic). After this, another layer of plaster is applied to it, not too thick. The main thing is to close the reinforcing mesh.
The grid should be a monolith. That is, to strengthen the plaster, you need to choose a solid mesh. Large pieces of reinforcing mesh are tied together with strong steel wire. If this condition is not met, the strengthening will not be sufficient.
Actually, these two methods of strengthening plaster can solve almost all possible problems. Most often, it will be enough to apply a strengthening impregnation. In the same case, when the plaster is in very poor condition, you will have to use a mesh.
Repair of plaster in separate places
Plaster is not an eternal thing. Owners of houses and apartments are faced with a problem when it begins to crack or fall off in places. What to do? We will look at the reasons for this phenomenon, as well as how to repair plaster walls in individual places and surface restoration technology.
Defects on the surface, causes and method of restoration There are a number of defects that are formed when the proportions of the components of the composition or the technology of its application are violated. The list is as follows:
- Formation of tubercles on the surface and swelling.
- Sedimentary cracks.
- Fresh plaster is peeling off the wall.
- Formation of cracks throughout the entire depth of the solution.
- Efflorescence, spots and stripes appear on the wall after the plaster layer has dried.
What is the reason for such defects? Bulges and bumps may appear if the limestone composition is unseasoned and has unslaked particles. How to repair lime plaster in this case? It is necessary to withstand the plaster until the lime is completely extinguished. The defects are exposed, abundantly moistened with water and filled with plaster mortar. All that remains is to wipe the surface.
Sedimentary cracks are formed when the composition is poorly mixed and when there is an excess of binder. Precise adherence to proportions and dosage in accordance with the packaging will help solve the problem. All that remains is to thoroughly mix the plaster and level the surface.
When the base has not been prepared, cleaned, rough, too dry and dusty, fresh plaster may flake off when applied. To solve this, you will need to pause work and start preparing the surface. The application technology is as follows: notches are made on the surface for better adhesion (or shingles are made), the wall is cleaned of dust and dirt. In addition, it is moistened with water. Then the mixture will not peel off, and repairs to the plaster and surfaces inside the building will not be needed for a long time.
If the problem is cracks throughout the entire thickness of the plaster layer, then there is exactly one reason - there is no reinforcing mesh between the wall and the plaster. The base material is not rigid and is not reinforced in any way. The technology for applying the mixture is that the subsequent finishing layer should be less durable than the previous one, that is, it contains less binder. To prevent the intermediate layers from drying out, they must be moistened with water and reinforced with mesh.
The last defect is spots and stripes. They most often appear on walls from the outside. The cause may be a very damp or wet surface. Especially when the plaster is applied after rain. The solution is to treat the dried walls and waterproof them to prevent moisture from being drawn up from the ground. Local repairs of plastered walls are performed differently. The technology is simple, but requires careful consideration.
Strengthening weak screeds with primer, liquid glass and silicate impregnations.
The reasons why the screed will be weak are different:
- Failure to maintain the proportions of water and cement.
- Old cement (with lumps).
- Increased clay content in sand.
- Improper preparation and care after installation when rapid dehydration conditions occur.
But if this happens, then something needs to be done about it - because with further finishing, difficulties are possible.
It is also impossible to leave it unchanged. Dust constantly forms on such a floor. The weak layer is easily destroyed by feet.
First way. Strengthening with primer.
The first thing most people come to is to strengthen it with a primer. The option is real, affordable and on everyone’s lips. But it rarely gives results:
A short comment on the video.
Judging by the nail test, the screed is quite suitable for tiling indoors. There are examples of a more deplorable state of the foundation, which they tried to strengthen with a primer:
For what reason did the tile bounce off the screed?
They tried to strengthen the loose screed with a primer. But primer, primer is different. Judging by the color and the resulting film, a concentrate primer was used in shock proportions. Or primed several times, allowing each layer to dry completely (as written on the canister). This gave a film on the surface. A tile with glue was attached to it. But under the film the same weak layer remained. The tile came off along it.
Alternatively, you need a deeply penetrating primer and pour it in buckets at a time. To consolidate a weak layer to a greater depth. Deep penetration primer (according to the manufacturers) has smaller particles and therefore can penetrate deeper without creating a film on the surface.
Strengthening the screed with a primer is difficult to come across as a recommended technology. This is the creativity of the masses. There is also a similar solution - strengthening with liquid glass.
Strengthening cement screed with silicates (liquid glass).
The idea of using liquid glass to repair weak surfaces did not come out of nowhere. Liquid glass has been used in construction for a long time:
- Additives to concrete and mortars to accelerate setting (1-15% by weight of cement).
- Production of fire-resistant paints, putties and putties with the addition of fillers (talc, marble dust, fine sand).
- Waterproofing of concrete and wooden structures.
- Fighting fungus and mold.
- In metallurgy, the roof of furnaces is laid out from fireclay bricks with a sodium silicate binder.
There are three main types (depending on composition) of liquid glass: potassium, sodium and lithium. They have different properties, which provide different benefits and different prices.
Sodium is more common. They use it to strengthen screeds in garages and basements:
You can experiment with this method. It’s useful to have at least some other people’s experience.
Below are the most interesting details of the use of liquid glass. It’s hard to call this quality material for drawing conclusions. But still:
One could call all this fuss with liquid glass a collective farm and forget about it, if not for such a detail as recommendations for strengthening loose screeds with silicates from many manufacturers of mixtures. One of them from “MAPEY”:
Important points in the video:
- The viscosity of the impregnation is more similar to a primer than to the liquid glass in jars that are used to strengthen garage floors.
- Impregnation must be applied continuously, preventing the top layer from forming a crust.
- Consumption can be significant, 3-4 liters per meter.
It is clear that the Prosfas strengthening primer does not consist of silicate alone. Therefore, its price differs from the price of liquid glass. If we compare the cost of strengthening a loose screed with silicate from “MAPEY” and ordinary liquid glass, taking into account its consumption and the similar consumption of liquid glass, the discrepancy will be significant:
Prosfas and liquid glass.
But Mapei is not the only company that prepares impregnations for concrete and screeds.
An entire industry has been created around this problem. Million dollar businesses have been built on a simple chemical reaction (Ca(OH)2 converts to CSH) between silicate in the impregnation and calcium hydroxide in concrete. The composition of the impregnation is not disclosed, except for the name of one of the silicates on the basis of which it was created.
Similar to different types of liquid glass, various strengthening impregnations based on potassium, sodium, magnesium and lithium have been created. An important difference between them is the size of the molecule. This determines how deeply the silicate can penetrate the screed:
Impregnations based on sodium silicates.
Here are selected examples of sodium impregnations. That's not all. New ones may appear that are cheaper and more efficient. Some are cutting production and leaving the market:
- Ashford Formula – Ashford Formula brand. Manufacturer Curecrete Chemical Co (USA). The country of origin may be different.
- Lithurin.
- Diamond Hard. Product of the American chemical concern EUCLID CHEMICAL.
- Liquid Hard from WRMeadows (USA). The manufacturer may be the Czech Republic.
All impregnations are similar in the method of application:
Apply so that the entire surface remains wet for 30-60 minutes. No puddles or drying out in certain areas. This is achieved using a soft whisk, redistributing the liquid throughout the screed. The excess is moved to adjacent areas and removed with a water vacuum cleaner.
Some impregnations are diluted with water (Lithurin I). Some have features - Ashford Formula is not effective on concrete grades below M 300 and on cement-sand screeds:
Strengthening impregnations based on lithium.
According to the American Concrete Institute (ACI Concrete Institute), lithium-based impregnations have a number of advantages:
- Increases the strength of concrete by more than 45% (sodium - 37%).
- Compacts concrete and completes chemical reaction within 7-14 days (use after 2 hours). For sodium it is 6-12 months.
- There is no need to rinse it with water.
- Penetrates 1-5 mm, forming a chemical reaction with the top layer.
Lithium based impregnations.
ULTRALIT HARD (1)
If you believe the prices and consumption (for 20 squares - 1 one liter), then impregnation of one square of concrete surface costs $0.05. Country of origin: Czech Republic (technology, most likely, USA).
The production of three varieties Ultralit Hard Standard, Ultralit Hard Premium, Ultralit Hard Extra has been launched.
Mapecrete LI Hardener (2)
Lithium-based liquid for new and old concrete floors from MAPEI.
$5.8 – impregnation of one square meter, at a consumption of 0.4 kg/m2 (the real price can only be found out at the time of purchase).
"Concria Super Hard" and "Concria Hard" (5)
Country of origin: USA. Based on the consumption of 1 liter per 10-20 m2, we obtain costs per square meter: $1.2-2.2. C2 Hard can be used on floors that have already been treated with other silicate impregnations and the surface of which has begun to dust and peel.
In addition to these two impregnations, others are produced for strengthening, for coloring, adding gloss....
SPEKTRIN LITHIUM (4) – made in Sweden / Ukraine. Lithium impregnation for concrete and stone (marble). Penetration depth is about 7 mm. Increased strength by up to 16%. Reduced water absorption by 3.3 times. Impregnation can be used in the food and pharmaceutical industries. Costs (cost of impregnation) per 1 square meter -1.5 $. Used for interior and exterior work on durable and dense concrete (M 300 and above):
Step-by-step instructions for eliminating defects
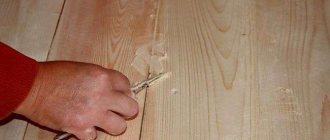
You can repair a wall with fallen pieces of plaster yourself. The work is not difficult. You just need to follow the instructions. Alternatively, you can completely remove the layer and apply a new one. But it is more profitable to plaster the damaged areas. It all starts with an inspection. It is important to identify areas that need repair. You will need a wooden mallet. You will have to lightly tap the wall. If a dull sound is heard, then the train has moved away.
Related article: How to install a triple socket in a wall
Then the sequence is as follows:
- After the inspection, you need to remove the old plaster. We do not touch the places where it holds well.
- Next, the seams are cleaned if it is brickwork. The surface is cleaned of debris and dust.
- A primer is applied to the wall. It is needed for better grip.
- After the surface has dried, the wall is slightly moistened and the solution is applied. If a large part of the wall has peeled off, you will have to use beacons and a rule. This is the only way the surface of the wall will be perfectly flat.
- For minor damage, the plaster is removed in the shape of a square or rectangle. The area is processed according to the previously described method, and the recess is filled with the prepared composition. It is important to adhere to the proportions so that the mixture has the correct consistency.
- Another restoration option is restoration with corks. In the right places, a hole is drilled to the base, primed, filled with mortar and plastered.
Note! For wooden walls, use limestone mortar. However, it is not suitable for wet surfaces. It is better to resort to a cement mixture. It is recommended to treat corners with gypsum plaster, as it sets faster.
Installation features
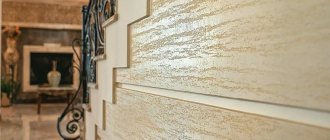
The quality of laying the future gypsum surface depends on each stage. Therefore, it is worth approaching installation work with all responsibility. Laying gypsum tiles requires careful preparation and well-formulated materials. Only in this case will the material be used for a long time. Let's look at each step separately.
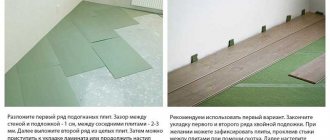
Laying tiles with your own hands Source sense-life.com
Restoration work
Plaster repair also involves removing stains from the wall surface. They appear during operation and can be caused by grease, soot or rust. It also happens that the stains formed before the finishing work. In this case, you will have to solve this problem before you start gluing wallpaper or laying tiles. Restoration work is as follows:
- For greasy stains, use a two percent hydrochloric acid solution. The entire surface with stains is treated with the composition until they disappear.
- As for rust stains, copper sulfate or a two percent solution of hydrochloric acid will help to deal with it.
- If the stains are deeply ingrained into the plaster and cannot be cleaned, then you will need to seal the area with dye or white.
Advice! Whatever surface you're cleaning, it's important to clear it of dirt and dust first. Only after this other manipulations are performed.
The restoration of the surface under the tiles requires special attention. The procedure is as follows:
- using a rubber mallet, tap the surface of the wall. This is the only way to identify a peeled or poorly fixed area;
- When the area is found, you need to knock harder so that the tile falls off. If it is not removed in this way, then you will have to act radically - break it. The process requires accuracy: the tile is broken from the center so that the adjacent one is not damaged;
- If after removal there is a strong layer of plaster left, then it is not necessary to knock it down. The new tile should be glued more securely using a special glue;
- when the plaster falls off, the area is cleaned, primed and plastered again. After drying, a new tile is glued.
Video description
This video shows the installation of decorative gypsum stone:
Step 3. Laying tiles
It is important to properly prepare the adhesive composition first. It should be mixed until a thick mass is formed. The glue is applied loosely to the place where the tiles will be laid. The material itself is pressed tightly against the wall and held for a few seconds. It is better to remove residues and excess glue immediately using a special sponge.
Laying gypsum tiles under brick begins from the bottom corner, gradually moving to the central part. It is better to immediately lay out the stones in even rows without gaps or gaps, so as not to cover them with grout later. After installation, you can paint the joints with paint to match the color of the material to restore the original appearance, matching the base material.
Step 4. Checking the general condition
After the installation of all the tiles has been completely completed, it is worth assessing the general condition of the gypsum material. It is important to monitor each joint so that the distance between the tiles is not too large. If necessary, go through the grout again. If everything was done correctly, the gypsum stone will last a long time.
Laying gypsum tiles Source krrot.net
Removing cracks
Removing cracks on the surface is much easier. Repair of plaster walls in this case consists of two stages: surface preparation and plastering. To begin with, the wall with cracks is cleaned of old facing material and dirt. After this, a primer is applied to the surface. When it dries, you can start cleaning it to give the wall a smooth finish.
Next, the plaster is mixed and applied to the surface in a thin layer. The composition is leveled using a spatula. If there are large cracks, it is better to strengthen the structure with reinforcing mesh. With it, the plaster layer will be much stronger and will not crack.
Useful tips
Before plastering work, you need to familiarize yourself with certain rules:
- Before hanging the mesh, you must first install two fasteners along the edge of the wall.
- Any plastered surface is secured with a primer.
- To get rid of scratches, just apply a thin layer of gypsum consistency.
- If the plaster has peeled off, you should use the same material that was applied earlier.
- All actions are carried out in stages. The order should not be disrupted.
- It is recommended to use fiberglass mounting mesh.
- The beacons should be quite strong and rigid and not bend when applying the solution.
- Be sure to carry out initial treatment of the wall (clean off dust, paint, old layer of plaster, fungus).
Indications for strengthening the plaster layer:
- The wall did not take the entire load, and construction of the upper floors was not completed.
- Finishing work is carried out using insulation.
- The system was built quite recently, so the shrinkage process is still ongoing.
When finishing the walls, you should use a special mesh. Old beacons are removed and new ones are installed. All work can be carried out independently without the help of a master. With any kind of work, it is important not to rush. Before completing the work, it is necessary to check whether all actions were carried out in the correct order. If applied correctly, you can get a decent result.
A solid foundation is the key to success
Before finishing, check the reliability of the old coating. In some cases, you will not have to completely remove the old layer, you will only need to repair it. How to clean plaster from a wall if the old one is cracked? Why can't you apply a new one right away? The base of the finish must be strong, otherwise the new coating will quickly fall off in pieces along with the old one.
Tap the surface of the masonry. If the sound is dull, it means that the layer is holding well and has not moved away from the brick wall. In places where the sound is loud, the finishing from the old masonry will have to be removed.
You will need the following tools to remove plaster:
- Wide spatula;
- An ax or any tool that has a V-shaped working surface;
- Hammer;
- Skins of different numbers;
- Spray bottle with water.
In addition to the tool, you need to buy materials:
We recommend a deep penetration acrylic or contact primer. Among the famous brands it is worth highlighting: Weber Veonit, Belinka, Lakra, Ceresit, Knauf. Price for 1 liter from 120 rub. The compositions have proven themselves to work well; user reviews of the coating are mostly positive.
Photos are enlarged, click!
Making your own primer
There are 3 recipes for preparing primers. All of them are easy to make with your own hands.
To improve adhesion
It can be applied to any glossy surface, for example, metal pipes, sheets of tin.
- Bring 1 liter of water to a boil in an enamel bowl, place 250 g of potassium alum.
- Pour 200 g of dry paint glue into a separate bowl and pour in 2 liters of water.
- Place the dish with glue on the stove, light the burner, add a grated piece of laundry soap (70%), mix thoroughly.
- Grind 2 kg of chalk to a dust state.
- After dissolving the soap, pour in 30 ml of drying oil and 2 kg of chalk powder and mix.
- If the primer is too thick, add water.
To increase strength
- Pour 7 liters of water into an enamel bucket or pan, place it on the stove, light the fire and wait for the water to boil.
- Rub 1 piece of laundry soap (65%) on a grater.
- Pour soap into boiling water and turn the heat to low. Continuously stir the mixture with a wooden spoon.
- After the soap has completely dissolved, pour in 500 ml of wood glue and add 100 g of copper sulfate.
- Mix the mixture thoroughly for half an hour. It is impossible for lumps to appear.
- Then strain the hot mixture through a sieve and cool.
This primer can be applied to walls made of concrete and brick.
Deep penetration
- Pour 1 liter of PVA glue into an enamel bowl, gradually add 8 liters of water, stirring until the mixture becomes homogeneous.
- Add 1 trowel of cement and mix thoroughly.
- Strain through gauze folded in 2 layers and prime the walls.
- The prepared mixture is immediately applied to the walls.
Six steps to the finish
Removal of plaster from the walls is carried out until the old finish leaves a layer that is firmly adhered to the masonry. All loose parts are removed. The work is painstaking and time-consuming, so we recommend being patient.
Below is a step-by-step instruction, following which a beginner can clean the walls of dilapidated finishes, and the video in the article will help you understand the work in more detail:
Before removing the old plaster, it is necessary to clean the surface of the old finishing coating. You can remove the paint using a wide spatula, after moistening the old composition with water. Since water is quickly absorbed and dries, the surface is constantly sprayed from a spray bottle. Readers ask how to remove plaster from a wall without dust or dirt. Use more water, so there will be less dust inside the room during work.
We take tools for removing plaster and walk along the masonry. Tap the brick surface with a hammer. In loose places, the plaster crumbles on its own; scrape off the remains with a spatula, after soaking them with water. In places where cracks form, tap more carefully. If the old layer is cracked, but the adhesion to the brick is tight, then widen the gap. To do this, tap its edges with a hammer and expand the hole with an ax.
If there are no cracks, but the layer of old finishing is too thick, then it is also better to remove it. A thick layer of old mortar will fall off due to moisture after you apply the new one.
- Third step.
Coat the cracks with two layers of primer and let them dry. We put new mortar inside and level it to the level of the wall. The remaining surfaces of the masonry are primed and covered with a thin layer of plaster.
After drying, we smooth the wall from minor defects using sandpaper. The sandpaper is taken first with large grains, gradually moving to the finest grains - polishing.
The finished walls are coated with two more layers of primer. The first layer must dry before applying the second. Each manufacturer's packaging indicates the primer consumption and drying time at different temperatures and humidity levels in the room.
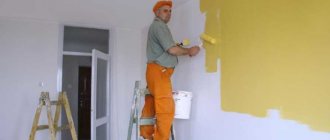
We apply the finishing coat on top of the primer: paint, wallpaper.
Composition of gypsum stone
This material contains gypsum for decorative stone. It is the main element in the composition. But besides this, other components are added to the working solution:
- marble chips;
- sand;
- different dyes;
- slaked lime;
- other additives that depend on the type of material.
Decorative products differ from each other in composition, therefore their level of strength and wear resistance is also different. Water purified from destructive impurities is also added to the solution. The resulting mixture is poured into molds and remains in them until completely hardened.