House drainage is a system whose function is to remove atmospheric and underground moisture from the foundation. You can very rarely do without it in areas with well-permeable soil, no flooding and low year-round groundwater levels.
In other cases, this system is necessary, as it protects the foundation and ground floor from rain, melt water and the rise of the primer, as well as from the destructive effect of soils prone to swelling when moistened and frozen. Thus, drainage will extend the life of the building and prevent the development of mold in the basement.
Types of drainage systems according to construction method
To create a system for removing excess moisture, you can use the services of specialists, or do all the work yourself. You just need to choose the right drainage, and there are several types. They differ in the complexity of arrangement, appearance and other parameters.
One of the most common classifications of drainage is based on how complex it is. In accordance with this parameter, there are 3 types of drainage systems .
- Open or surface drainage consists of one or more ravines. The depth of each is about 0.7 m and the width is 0.5 m. This option is the easiest to arrange, but externally it is unattractive.
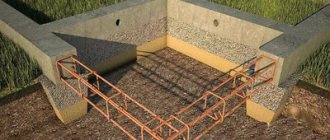
- The backfill or deep view looks much better. For this species, a trench is also first dug. Geotextile is laid in it, and then a drainage backfill is poured in, which will accumulate and remove excess moisture. For these purposes , broken brick, crushed stone, expanded clay , etc. The drainage layer is wrapped in geotextile and covered with soil. But such a system has one significant drawback: it can only be cleaned after opening.
- The most complex, but at the same time the most advanced system for draining water from a site is closed drainage. In the center of the backfill there is a drain, which is a perforated pipe. Water is collected in the pipeline and discharged by gravity into the drainage well.
It is the third method that has become traditional in recent years when creating a drainage system.
Typical errors
The desired result will not be achieved if one or more of the following shortcomings are allowed:
- no slope in the direction of the catchment basins;
- insufficient depth of pipes;
- using a drain diameter or perforation that is not suitable for a particular soil type;
- ignoring crushed stone bedding and installation of geotextiles;
- insufficient number of drainage elements;
- accelerated filling of the drainage well.
Classic drainage scheme around the house
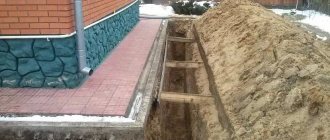
Most often, water drainage from the foundation is a system of drains surrounding the house, as well as inspection and drainage wells. Such drainage is arranged as follows:
- trenches are dug around the house the bottom of which has a slope of 5-10 mm per meter towards the lowest point of the site where the drainage basin will be installed;
- crushed stone or other drainage material onto the compacted bottom
- a drainage pipe is laid on top at a slope ;
- in places where drains form a right angle or several pipes intersect, inspection wells are installed ;
- the drains are covered with the same drainage material on top
- at the lowest point of the site , which is necessary for collecting water;
- All wells are backfilled.
It is recommended to insert pipes into the drainage well at a height of 0.15-0.20 m from the bottom, which will protect the check valve and the drainage pump, if installed, from silting.
This is a simplified description of the design of a peri-house drainage system. In reality, drainage can be wall or ring, it all depends on the characteristics of the soil and the private house itself.
Tools for work
Creating a drainage system with your own hands is not difficult if you know all the features of the site in advance. For work you will need:
- shovel;
- drill (if you need to create a drain well);
- level or laser level.
It is recommended to drill a well with the help of specialists. If this is not possible, you can dig it out yourself and strengthen the walls, for example, with tire covers. A level will be needed to create the correct slope.
Wall drainage
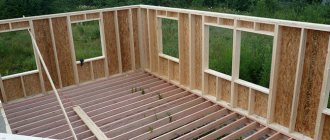
This water protection is used if the house has a basement and a ground floor.
Moreover, it should be carried out until the backfilling around the foundation of the house is completed. This measure will avoid additional financial costs for excavation work.
The wall system consists of inspection and collection tanks, as well as drains. The latter are laid around the building at a depth of at least 0.3-0.5 m from the floor level, but not deeper than the lower edge of the foundation. The slope in this case is also important to observe.
For reliability, it is recommended to create a half-meter moisture-proof around the foundation from compacted clay as much as possible, or cover the base of the house with geotextiles.
In some cases, to remove only atmospheric moisture, it is sufficient to use only an open type of wall drainage, which is a set of trays located in a ring near the house.
The gutters are covered with gratings on top.
Trench or ring system
This type of drainage is used to protect a house that is located on a site with sandy soils and does not have a base. The trench system is located at a distance of 3 to 12 meters from the house foundation; it is best to remove it at least 5 m from the building to avoid soil shrinkage, which will lead to the destruction of the foundation of the structure. When constructing such a drainage system from the foundation of buildings, all the same elements as in the classical system described above are used.
For additional protection a clay castle is also . In addition, the general rule is to install drains at a depth of 50 cm from the lowest point of the floor. The remaining parameters are determined in each specific case.
Alternative options for draining a summer cottage
Drainage at the dacha can be organized in various ways, some of which are quite simple and do not require significant labor costs. But in any case, abandoning the classic solutions using drainage pipes and channels, the effect of non-standard solutions will not appear immediately, but only after a significant period of time. This is due to the fact that a properly designed and installed system based on plastic pipes and trays actually only increases the rate of collection and disposal of groundwater, in other words, it accelerates natural and physical processes. Alternative options, in turn, will only change the conditions for the processes of penetration of groundwater into the soil.
Installation of wall foundation drainage around the house
Before you begin installing a near-house drainage system, you need to decide on its type, which depends on several parameters:
- types of soil;
- whether the building has a ground floor or basement;
- the origin of the water that needs to be drained.
The wall-mounted underground option is used in the presence of a base, high groundwater level and loamy and clayey soils. If it is necessary to protect the foundation of the house only from precipitation, then a surface system will be sufficient.
To protect a house located on sandy or sandy loamy soils with water and without a basement, ring (trench) drainage .
Having decided on the type of drainage, you can begin drawing up a diagram, designing the system and planning all the work. This stage allows you to eliminate all possible shortcomings, which are then expensive to correct.
For the plan , you need to decide on the lowest point on the site for installing a drainage well, which will be connected to the general ring of the system by a pipe.
How to design ventilation in a private house with your own hands? Installation and materials. We assemble an air dehumidifier with our own hands: diagram and principle of operation.
It is better to draw the diagram on graph paper or in a special program. The drawing should show:
- house, as well as adjacent buildings;
- trees and shrubs;
- places where drains pass, depending on the type of drainage chosen;
- inspection and drainage wells.
Inspection tanks are installed at the point where the pipe turns, for example, in the corners of the house, or every 30 m for a straight section of the pipe.
The plan should also record the depth of the pipes. This indicator depends not only on the bottom slab of the foundation and the height of the floor, but also on the level of soil freezing. The pipes must go deeper than the point of zero winter ground temperatures. It is important to write down the diameter of the drains, which affects the width of the trench, and the required slope.
It is better to entrust design to specialists. But you can purchase the necessary material and install the drainage system based on a competent plan yourself.
Blind area: meaning and installation
An additional element to protect the building from excess moisture is the blind area. It complements drainage. The blind area is the laying of waterproof material around the perimeter of the foundation, adjacent directly to the building.
The material should be positioned strictly at an outward angle to allow moisture to drain away. Thus, when water hits the blind area, it is immediately removed from the house. Contact of the foundation and walls with moisture will be minimal.
As a material suitable for the blind area, you can take asphalt, concrete, clay, stone, paving slabs. The first two are the most popular for blind areas and are used most often. This is due to the fact that they require less labor and capital investment. But such surfaces will not look very profitable. Paving slabs, stone and clay require more time and effort, but all work will be justified by a wonderful result and attractive appearance.
We talked about what drainage is, what types and types there are. They also gave advice on how to independently install various types of drainage. If you follow the technology, the process will go quickly and smoothly, and the result will definitely please you. Modern and high-quality drainage will protect your home from the negative effects of excess humidity, make it comfortable, and extend its service life.
How to properly make closed drainage around the house with your own hands
Such a device for protecting a house from water can be done independently even after the construction of the building is completed. First of all, you need to prepare working tools and all the necessary materials:
- two types of shovels (bayonet and shovel);
- spirit level for checking the slope;
- manual rammer;
- a device for removing excess soil from the site (stretcher or wheelbarrow);
- roulette;
- geotextiles;
- backfill for the moisture collection layer (crushed granite stone is best suited);
- sand;
- inspection and drainage wells;
- drainage pump;
- drains and fittings for connecting them to each other and to wells.
Pipes must be perforated. You can purchase ready-made drains, or make them yourself from an existing orange sewer pipe. Flexible products are not recommended. The diameter of the pipeline can be 70-150 mm. The material is preferably plastic with high strength and load-bearing walls. Moreover, the deeper the drains go, the higher this figure should be. You can take asbestos and ceramic products.
Some prefabricated drainage pipes are surrounded by additional filter material, such as coconut fiber.
A plastic inspection and drainage well is purchased ready-made or made independently from a large-diameter thick-walled plastic pipe. You will need to buy hatches for them.
After acquiring everything necessary, they begin taking measurements to mark the place where the drains and other elements of the drainage system will pass. They clear the area of debris and begin excavation and installation work. Let's look at how to properly lay a drainage pipe around the house:
- Dig trenches the required depth, and pits for wells in the right places. Their width should be at least 20 cm larger than the diameter of the pipeline. During excavation work it is necessary to monitor compliance with the slope using a spirit level.
- Prepare trenches and pits for wells. To do this, sand is poured to the bottom and compacted thoroughly. Do not forget to check compliance with the slope. The sand cushion should be 0.10 - 0.15 cm high. At high groundwater levels for plastic wells, in order to prevent them from floating, it is recommended to make a concrete base 10 cm thick, to which the container is attached during installation.
- Geotextiles are placed in the ditch so that the edges of the material extend beyond the upper boundaries of the trench.
- Laying on the bottom of the drainage pipe. The drains are connected to each other. In this case, sockets or special fittings can be used. The pipes are inserted into the inlets of the wells using rubber sealing rings.
- Pour a twenty-centimeter layer of crushed stone or other material onto the drains. Don't forget about the slope.
- Cover drains surrounded by crushed stone and geotextiles.
- Fall asleep drainage trenches layer of sand, 10-20 cm thick. Carefully compacted, and backfilled with soil on top. If the region is characterized by a large volume of precipitation, then stormwater system trays are installed on the sand above the drains.
- The wells are backfilled and closed with hatches.
The drainage system is ready.
Video on how to make a drainage system around the house with your own hands:
A few words about the plastic drainage well
In its simplest form, it can be a container for collecting water. At the junction with the inlet pipeline, a valve must be installed to prevent the reverse flow of water. It is good if the container has a large diameter, for example, 80-100 cm.
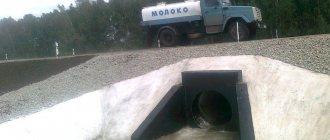
From the drainage well, you can lay a non-perforated discharge pipeline to a ravine, filtration well or reservoir. Water drainage from the collector can be done by gravity or by a drainage pump . Water from the well can be used for technical needs and irrigation.
How to save on utility costs? Read the article - installing a water meter yourself. Installing the meter is not at all difficult, instructions. Basic requirements for a chimney for a gas boiler, what to pay attention to. Details here.
Inspection well
An inspection well is necessary to provide access to the system and carry out repair and maintenance work. The easiest way is to purchase a ready-made element: it can be found in construction stores. You can also make a well yourself. To do this you will need a wide plastic pipe. Concrete rings are also suitable for creating, or you can make a solid concrete tank. The structure must easily accommodate the human hand for repairs or cleaning. The inspection well must have a lid.