Slate as a roofing covering is still found on old houses; it is used in the construction of auxiliary buildings. This is not the best roofing material compared to others, so homeowners would rather replace a deteriorating roofing material than repair a crack in a slate roof. But if there are few defects, and there is no possibility for large-scale reconstruction of the roof, you can use one of the methods proposed in the article to eliminate them.
It is easier to replace such a roof than to repair it Source kostromaremont.ru
The slate roof is leaking, what should I do?
At one time, when installing the roof of the extension, I ignored the recommendation to coat the slate nails with silicone. If only the old roof could do just fine without any sealants or gaskets and last 50 years without leaks. Therefore, the appearance of dampness and drops from the inside of the new roof during a rainstorm was an unpleasant surprise and made me think. I had the opportunity to compare two roofs: old and new.
In the old slate, the nails did not fit tightly to the surface and some stuck out almost a centimeter. The holes for these nails were clearly not drilled, but punched. From the attic side, in many places near the fastenings, holes of 8 - 10 mm were visible. And despite this, there were no leaks or dampness on the old roof during rain.
The new roof, with tightly driven nails and neatly drilled holes, became damp and leaked in heavy rain near the nails. Of course, there were no streams there, but nevertheless, 5-10 drops flowed from some of the nails.
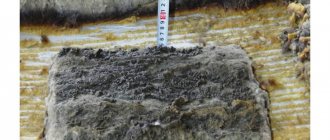
In my opinion, the answer to this phenomenon lies in the very surface of the slate sheet. Below is a photo of the surface of the old and new roofing material.
Surface of old slate
Corrugation on new slate
The old one has a smooth surface, and the new one has longitudinal corrugation. Its grooves are not deep: about a millimeter. And yet, it is precisely these risks that create leaks on nails. On a smooth surface, water immediately flows into the lower trays of the sheet and the entire surface flow during rain flows precisely along the bottom. Corrugation retains quite a large part of the water on the ridge. That is, the flow does not completely roll into the depression of the sheet and a certain volume slides along the top of the wave - this is what causes the flow.
There are several ways to combat this phenomenon:
• If slate has not yet been purchased, choose one that does not have surface corrugation. In this case, water will not leak out even when filling the sheets using old-fashioned methods.
• Drive slate nails into the sealant. Silicone sealants have proven themselves to be quite good, but we must remember that paint cannot be applied to silicone. That is, if you plan to paint the roof in the future, this point must be taken into account and not leave large stains of silicone
• Putty the grooves above the nail head. Water will come out of the grooves and flow into the trough part of the slate wave. The possibility of painting should also be taken into account and the putty material should be a weather-resistant material, because the roof is the heaviest surface in this regard.
How to fix such a roof
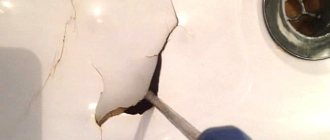
From the attic side, the nails were knocked out by 1.5 - 2 cm. From the outside, silicone sealant was applied under the protruding heads and the nails were driven back. This should completely plug the hole near the slate nail.
the nails were knocked out 1.5 - 2 cm from the attic side
silicone for nail heads
On the surface of the slate above the nail head, the groove marks were covered with an adhesive solution. This should draw water away from the crest of the slate sheet. The use of cement-based glue will not create problems during further painting of the roof.
slate groove putty
If painting is not planned, you can use silicone to putty the corrugations.
Replacement of corrugated roofing on an old house
Profiled sheets equipped with polymer protection can effectively withstand various aggressive influences.
They can be damaged under the following circumstances:
- In case of strong impacts, when heavy objects (large branches or tree trunks) fall on the roof.
- Due to improper installation.
- If walking on the surface of roofing sheets is allowed without following proper maintenance guidelines.
The consequence of such impacts on profiled sheets is the appearance of dents, holes, and damage to the protective layer, which provokes corrosion. In such cases, it is necessary to replace the roof by laying new sheets instead of damaged ones.
The first step is to review the nature of the damage. This will allow you to decide how to replace the roof on the house, to see the scale of the necessary repairs: will it be a local replacement of damaged areas of the roof, or its complete reconstruction. If it is necessary to carry out major work to completely replace the roof covering, you need to carefully inspect the entire rafter structure, thermal insulation and waterproofing. The fact is that these systems are often also damaged during holes in the corrugated sheet.
Next, they determine what exactly the dacha will be covered with after dismantling the worn-out cladding. Often, instead of profiled sheets, metal tiles are laid, which are distinguished by their visual appeal, low cost and ease of installation. It will be necessary to calculate the selected coating and prepare the truss structure for its installation.
Useful tips
Before moving directly to the topic of the article, namely, how to lay slate, I would like to give a few recommendations.
First, you should not paint slate after laying it on the roof. After applying the paint and varnish material, the coating will look good. But after a few days it will become covered with faded spots. It's all about the heterogeneous porosity of the material. In some places it will quickly absorb paint, in others slowly. Therefore, it is recommended to purchase painted slate, which is offered by manufacturers today.
Painting slate is uselessSource remontik.org
There are two painting technologies: pigment is added to the raw material mass, so the color is obtained throughout the entire thickness of the sheets, or the paint is applied to the surface of the finished product. For this purpose, special paints and varnishes are used that are well absorbed and do not fade in the sun. The first option is better, but it is correspondingly more expensive.
The second is installation of the sheathing. The number of sheathing elements depends on the angle of inclination of the roof slopes. But experts adhere to the golden rule - the slate must lie on at least four slats. In addition, the entire roofing system must be stable. Therefore, before putting slate on the roof, it is recommended to walk on it and try to loosen it.
Slate lathingSource www.stroimdom.com.ua
Third, how to fasten the slate and how to do it correctly. There is information on the Internet that it is optimal to fasten with self-tapping screws, for which holes are made in the slate covering using a drill. This information is for those who do not understand anything about roofing. This technology will take a very long time. Plus, there is no guarantee that the sheets will be firmly held by self-tapping screws. In addition, you will have to place either sealing washers under them, or fill the holes with silicone sealant.
Craftsmen use slate nails all the time. This is a guarantee of high quality. Of course, hammering such a nail is not easy, but not for them. You can learn how to use nails quickly, although you will have to ruin more than one sheet. Therefore, my advice is to try it on damaged or used material. Twenty to thirty holes punched and you'll be driving nails in like a real roofer.
Slate steel nailsSource hi.decorexpro.com
Fourth - how to properly lay slate on the roof. This refers to the arrangement of the sheets relative to each other. Like all roofing materials, slate is laid overlapping in one wave. To ensure that the joining point does not stand out from the total mass of laid material, manufacturers make the outer wave thinner. The product marking is applied to its upper surface. It is on this plane that the adjacent slate should lie, covering the inscription.
The marking on the slate is covered with an adjacent sheet. Source gid-str.ru
Methods for laying sheets
Since slate is a thick material, problems often arise precisely at the joints of the sheets. Therefore, masters use two methods:
- The longitudinal edges of the material of one row lie on the same line. To align the corners of the laid sheets, trim them. It is a complex method, so it is used if the task is to cover a roof of a small area.
- The longitudinal edges are shifted by one or two waves. This is an option - without cutting corners. The technology is as follows: one whole sheet is laid from the corner of the roof, the second one in the second top row is cut in half lengthwise, and one of its parts is laid so that the longitudinal outer line along the edge is even.
A few words about cutting corners. This is recorded in building codes as part of the technology. The bottom line is that the places where two sheets overlap look unsightly on the roof, because it is at the point of overlap that the thickness of the coating doubles. And if trimming is not done, then the corner of the fourth sheet will protrude greatly. Therefore, when installing the material, two corners are cut off and the roof plane is leveled.
It should be noted that this technology does not affect the performance characteristics of the roofing. Most likely, this is done to give the roof a presentable appearance.
Trimming slate cornersSource www.greengo.house
Cold welding of cracks
This method is only suitable for sealing narrow cracks on the surface of slate sheets. Large holes must be sealed with rolled materials. For sealing, cold welding on a bitumen base is used. This modern innovative material is characterized by excellent performance. After hardening, it becomes moderately hard and plastic, which allows it to easily compensate for thermal expansion of cracks and at the same time not lose its tightness.
Cold welding is easy to use, does not require special skills, and has high adhesion rates with all building materials. The seam is not afraid of temperature changes, direct contact with water and ultraviolet radiation. As for the cost, it is available to all consumers. Moreover, the welding consumption is insignificant, and the storage time is long. You can use welding at any time and not only for repairing a slate roof. Professionals strongly recommend that you always have cold welding at home; it will help eliminate many construction errors.
Cold welding "Skol" produced by "Remplast"
How to repair slate by welding? As always, surfaces must be thoroughly cleaned. Only in the case of welding there are some peculiarities. It is necessary to clean not only the surface of the sheets, but also the crack itself. It is highly advisable to remove all the smallest fragments, dust and dirt. The cleaner the cracking plane, the more reliable the leak will be sealed.
Practical advice. Bring a water bottle with you to the roof. The fact is that to prepare welding for use, you need to warm it up and warm it up with your hands. If your palms are not moistened with water, the bitumen will stick to them, which will make the work much more difficult. As soon as your hands dry out a little, immediately moisten them with a little water.
You will need a cold welder, a brush and a bottle of water.
Step 1: Find the crack and clean it of dust
The main attention should be paid to the crack itself, but a clean strip about one centimeter wide should also be prepared around the perimeter
You can remove dust with a brush
Step 2. Knead the weld with your hands, it should become soft. Depending on your diligence, kneading will take 3–5 minutes.
The material can be easily kneaded with two hands
Step 3. Roll the weld into a thin sausage. The diameter of the sausage should be slightly larger than the width of the crack. Do not prepare a large amount of material at once; it should not cool down before applying the patch.
Step 4: Press the sausage very firmly into the crack. If you have an assistant, great. Let him hold the weld emerging from the gap on the back side of the roof, this will help fill all the smallest pores with maximum density. The larger the area of contact between the weld and the surface of the crack, the more reliable the sealing.
The weld needs to be pressed into the crack
Step 5. As you fill the crack with mastic, spread the excess in a thin layer along the edges of the crack. At the same time, form a small mound to drain the flow of water. The less water gets into the crack, the more reliable the roof. You need to work with welding according to the principle of working with plasticine - do not rush and do not forget to periodically heat up the frozen material.
You need to work with welding according to the principle of working with plasticine
Practical advice. Choose dry and warm weather for repairs. If the slate is warm to the touch, great, the quality of adhesion will increase significantly.
Using cold welding to repair a slate roof is the fastest, easiest and most reliable method. As practice shows, tightness is maintained for 5–6 years.
Crack after repair
Dismantling asbestos-cement sheets without damage
In cases where sheets of old roofing material are suitable for subsequent use, the covering must be disassembled carefully. Dismantling a slate roof should also begin with the ridge element. Next, the sheets are removed in the order that is opposite to their installation.
In this case, the sequence of actions is as follows: the fasteners are carefully removed, and the removed element is carefully lowered to the ground.
The fasteners are simply removed when the roof was mounted on self-tapping screws. To unscrew them, use a wrench or screwdriver with an appropriate attachment. But this method is relevant when a relatively new roof needs to be dismantled.
To remove smooth nails, a nail puller is used, under the heel of which a board is placed to prevent the sheets from splitting under the action of a point load.
If the nail has gone right through the sheathing and its end is bent, it can be removed in one of two ways:
- from the inside of the rafter structure, you need to remove layers of steam, hydro and thermal insulation, bend the free part of the nail and tap it in the direction from bottom to top, then use a nail puller from the outside;
- bite off the nail head using a tool such as a mini bolt cutter, or cut it off with a grinder.
Protection of slate from biological corrosion
You will probably be offered a newfangled product in any hardware store. However, for the unpretentious, we recall a method known since Soviet times: to protect the roof from the appearance of vegetation, a five percent solution of iron sulfate is used. It is diluted in water in a ratio of 1:3 and applied as the first layer.
Next, a bitumen solution is prepared (1 part bitumen 3 parts solvent) or oil paint is applied.
Finally, we suggest watching a video that clearly demonstrates the process of cleaning and painting a slate roof:
For readers who have decided to re-roof, we suggest that you familiarize yourself with our material - metal roofing: dimensions and visual installation diagrams.
Safety precautions when removing slate from the roof
Dismantling the roof should be carried out observing certain safety measures
:
- dismantling a slate roof can only be done in dry weather, since it is very easy to slip and fall from the roof on old wet slate, especially when covered with lichen;
- before starting work, you should check the strength of the rafter structure and make sure that the roof will support the weight of the people working on it;
- To avoid contact of asbestos-cement particles, which are hazardous to health, on the skin, lungs and eyes, it is necessary to use gloves, thick clothing with buttoned cuffs and collar, a respirator and safety glasses. Gloves will also protect your hands from accidental cuts from sharp chips of slate sheets;
- Having removed a number of slate sheets, you need to immediately dismantle the waterproofing membrane or roofing felt in order to move along the sheathing without the risk of accidentally falling through;
shoes for working on the roof should have soft rubber soles - they slip less; it is important to strictly ensure that no one stands or walks in the place under the slope where the detachable slate sheet can slip - the weight of the roofing element exceeds 20 kg, and its fall even from a small height can cause very serious injury and even kill a person; to move along the roof, it is necessary to use boards with padded blocks (ladders) to distribute the weight of a person over a large area - otherwise the old roofing material will break underfoot. The ladders are equipped with hooks for hooking onto the ridge;
Be sure to use safety ropes that will protect you from injury if you fall from the roof. The rope must be securely fastened to the roof ridge.
It is recommended that the work be carried out by two or three people, but dismantling can be done alone if you follow certain technology
.
Details
Installation features
When carrying out installation work, it is recommended to take into account certain nuances and take into account the recommendations of certain experienced roofers. It turns out that it is best to use a colored type of slate for roofing, and its slope varies from 25 to 45 degrees
In this case, when the slopes are very steep, installation will be much more difficult, and moreover, the consumption of roofing products will greatly increase. When arranging the grating, special attention should be paid to the size of the asbestos cement sheets. It turns out that in order for the finished product to have a high level of strength, it is necessary to ensure that each slate sheet rests on the sheathing bars (at least 3 pieces). For example, if you plan to use sheets with a standard size of 1.75 * 1.13 meters, then when arranging the sheathing you should take a step of 0.7 meters. In this case, most experts recommend using a sparse type of lathing, as a result of which a rafter system can be used for fixation.
As practice has shown, very often the base surface cannot always be smooth; there are differences. In such a situation, it is recommended to use special gaskets during the installation process, which can be used to compensate for all unevenness and existing differences. Installation can be carried out with horizontal overlap using different methods:
- In one wave - use when the slope is very steep.
- In a couple of waves - perfect for a gentle slope, in this case the roof will be much more reliable, and moreover, the service life will be greatly increased.
To fix asbestos-cement sheets, nails are most often used, which may include sealing elements, tightening tapes and staples. To ensure that the installation is carried out correctly and the efforts made are not in vain, it is recommended, among other things, to know how to move on colored slate. In this case, most experts recommend using walking-type ladders for movement; for extreme cases, maximally soft shoes are perfect. Moving on the roof requires extreme caution, and this is due to the fact that the roofing material is very fragile and can be easily damaged. Asbestos-cement sheets should fit as tightly as possible not just to each other, but also to the sheathing.
No. 3. Types of paints for slate
Great, we've sorted out the material.
Now is the time to move on to how to choose paint for slate, what to look for and what to consider before purchasing? By and large, nothing complicated awaits you in this process, since the main things you will have to focus on are the type of paint, depending on the main active ingredient, as well as the manufacturer. It is these two components that are decisive, and therefore we will dwell on them in more detail.
So, first of all, as we have already found out, slate paints differ in the main active ingredient and are divided into four types:
Acrylic. Also known as water-based paints, they are widely used and are often used for painting slate. Mainly also because they endow it with positive properties, such as increasing the sliding characteristics of the surface. The latter, for example, is extremely practical in the situation with precipitation in general, since it flows off the roof much more easily without lingering there and without having a negative impact. Such protection from moisture simultaneously protects the slate from destruction, significantly extending its service life. The color palette of acrylic paints is varied, and you will surely find an option that suits you and your home. They also dry quite quickly.
Enamel. One of the best options for increasing the strength of slate and giving it reliable protection from atmospheric influences are paints of this type. One of the advantages of enamel paints is the formation of a coating that is similar in appearance to enamel, which is characterized by additional durability. If you don't want to repaint your slate for a fresh color anytime soon (which can vary depending on a variety of factors), then enamel paint is a great option because it contains pigments that protect it from fading.
Liquid plastic. In most cases, they are synthetic paints based on various polymers or bitumen, although some also claim that liquid plastic refers to acrylic construction paints. One way or another, these are modern paints, the advantages of which are good adhesion to the slate surface, durability and reliability. Another advantage is that they are quite affordable, but they also have disadvantages. Since these are synthetics, the composition of such paints is often replete with substances harmful to health, and moisture protection, in comparison with acrylic paints, may not be as reliable.
Rubber. The last type of paint, which is considered the most popular for use when painting slate, as it has a large number of advantages, eliminating the disadvantages of the previous types. Here you also have high elasticity, which allows the paint to stretch without damage, which is especially practical when microcracks appear on slate. However, it will take a lot of time before they appear, since rubber-based paints protect it well from all kinds of irritants. Separately, it is worth noting that it does not contain substances harmful to human health, and also has high fire safety and does not succumb to combustion.
Of course, to improve the performance characteristics of slate, many recommend using rubber paints, applying them in at least two layers. However, the final choice will still depend on your needs and budget. So, taking into account all the information received above, you can certainly choose the most suitable option for you without much difficulty.
Finding the cause of the leak
First of all, to understand where the water is coming from, you need to inspect the roof. It starts from the attic. The rafters are always inspected first. If damp spots or mold are found on them, this is not evidence that the leak is in that particular place. When moisture gets under the roof, it can spread and flow out in a completely different place.
After this, it is worth moving on to an external inspection of the roof. It should be done very carefully. First, the ridge is checked, then the areas near the attic windows, the junction of the metal roof aprons with the chimney. Most often, leaks form in those places where the roof connects to the pipe, so such areas should be as tight as possible. The waterproofing must be checked at this stage.
The roofing itself is checked for dents, bubbles, and cracks. This must be done as thoroughly as possible, because the damage to the roof can be very small. The valleys are carefully inspected and, if necessary, fallen leaves and other debris that could disrupt the normal operation of the drain are removed. The roof eaves, which may be damaged by gusts of wind, are also inspected.
Main characteristics and types of slate coating
Before proceeding directly to repairing a slate roof with your own hands, it is necessary to remind you what this coating is and what features it has.
Types of slate: 1-natural slate; 2-flat slate; 3-wavy slate of ordinary profile; 4-rubber slate; 5-ondulin; 6-nulin; 7-gutta; 8-euroslate ondura.
Asbestos slate is a fibrous, fairly dense roofing building material with a wavy shape. During its production, asbestos fibers, Portland cement and water are mixed in a certain ratio, placed in molds and dried. The result is wave-shaped sheets of the required size. It is the wavy shape that gives slate sheets additional strength, performing a reinforcing function that increases resistance to various (especially mechanical) influences.
The asbestos-cement slate itself is produced in several types:
- VO - in rectangular sheets - wavy regular;
- VU - wavy, reinforced;
- UV - unified wavy slate.
Most often, in individual housing construction, the last 2 of the above types of this roofing covering are used: for independent arrangement of the roof of the house itself, as well as for covering various outbuildings.
The main features of asbestos slate sheets used to cover the roof of individual housing construction:
DIY slate installation methods
- low thermal conductivity;
- good water resistance;
- non-flammability;
- resistance to elevated temperatures;
- sufficiently long period of use;
- low price and simple installation, which is often done independently;
- good maintainability - slate can be repaired independently.
Main factors influencing price
The main factors influencing how much slate for a roof costs are:
- manufacturing technology;
- performance characteristics and type of slate (depending on technology);
- pricing policy of the manufacturer, wholesalers and retailers.
The technological aspect has a major impact on how much slate roofing costs. The price of the most popular asbestos-cement slate models can range from 200 to 350 rubles per sheet. In addition, there are the following types of this roofing coating:
- natural or slate;
- fiber cement;
- polymer sand (bitumen slate “ondulin”);
- plastic (transparent, translucent and opaque);
- composite or ceramic plastic;
- metal made of galvanized iron or aluminum.
There are several types of slate, differing from each other not only in price, but also in characteristics. Source nl.decorexpro.com
The geometric parameters of the sheets also affect the cost of slate roofing. The price in this case will be higher for those sheets whose production requires more raw material per square meter. This is influenced in particular by the following parameters:
- shape (flat or wave);
- sheet thickness;
- height and number of waves.
Requirements for the rafter system for slate roofing
Due to the fact that slate sheets have a fairly large weight, reaching up to thirty-five kilograms, the coating made from them places a serious load on the rafter system. Based on this, the following requirements are imposed on its arrangement:
- ability to withstand the total weight of the roof;
- unfavorable precipitation;
- weight of the installation team.
The lumber used to make the structure is pre-conditioned in stacks. During the drying process, the beams bend; they should be laid with the convex part down for unhindered drainage of moisture. Knotted wood cannot be used; it will not withstand the load placed on it.
The smallest cross-section of lumber for arranging the rafter system is taken to be 5 cm * 18 cm, the sheathing for laying slate is made of 6 cm * 6 cm bars, and each sheet, when strengthened, must rest on at least two bars
The angle of inclination of the roof slope is of great operational importance: the smaller its value, the more often the beams should be located
A continuous sheathing is installed at the minimum permissible angle of inclination, since in this case it experiences maximum load. The ends of the nails used for fastening should not protrude outward from the wood; under no circumstances should they be bent so as not to limit the mobility of the structure. Over time, the components of the roof will be subject to shrinkage and displacement. The fasteners must be of high quality; slate roofing is subject to significant operational loads.
Let's sum it up
During the construction of the roof of a private house, mistakes can be made at every stage. In this case, the most critical defects lead to:
- lack of a project or performance of work without taking into account its requirements;
- ignoring building regulations when installing the roof;
- low-skilled and irresponsible construction team.
Therefore, in order to avoid most mistakes, you need to carefully select a team of roofers, study building regulations and constantly monitor the quality of work. In this case, the project can be either unique or standard - what matters is the professionalism of the calculations and decisions.
Types of slate damage
Slate is a fairly durable material, but it can also be damaged during use. Among the most common defects are cracks and holes caused by heavy objects falling onto the roof surface, such as branches. Cracking can result from improper installation, when the fasteners are tightened too tightly, and holes with a diameter larger than a couple of millimeters are not drilled beforehand. Chips of the material may appear due to improper transportation or lifting onto the roof, when moving on sheets without special shoes.
Often slate repairs are carried out in order to renew its surface, remove moss, and restore its attractive appearance. For this purpose, special paints are used, which also provide reliable protection that extends service life.
How to clean and transform a slate roof?
Before starting repair work, it is necessary to properly clean the surface of the slate roof from debris and dirt.
To do this, the coating is first examined to determine the cleaning method, but remember that you need to walk on the roof very carefully so as not to damage the slate sheets. It is advisable to use soft shoes for this, stepping only in those places where the sheathing slats are installed
You can clean your slate roof using car wash devices.
Cleaning is carried out with special brushes that help remove moss, dirt, and growths. Once the main debris, including branches and leaves, has been removed, the roof surface can be rinsed using plain water from a hose. We choose the weather so that the moisture quickly evaporates without accumulating in the depressions
During such cleaning, we remember that it is necessary to take precautions if there are large holes or cracks, since water can get inside the roof structure, damaging the insulation, the material of the rafter system
Next, we leave the roof to dry completely, after which we can begin painting it or carrying out other repair work.
Construction stages
Before starting construction work, you need to prepare the necessary materials and tools. In addition to the slate itself, you will need the following:
- timber for the rafter system, sheathing and counter-lattice;
- construction tape, glue and sealant;
- steam, heat and waterproofing roll materials;
- slate nails, self-tapping screws or special screws;
- fastening elements for a wooden frame (nails, screws or bolts);
- laser or water level;
- roulette;
- drill or screwdriver;
- hammer;
- grinder or hacksaw.
The selection of fasteners for installing slate sheets is carried out taking into account the material from which the roofing is made.
Slate roof structural elements are installed one at a time. It is most convenient to carry out roof insulation after installation of the roof covering:
- Rafter system . It is built from wooden beams, the thickness of which is selected individually, taking into account the slope of the roof, its size and other factors. Rafters can be installed using different types of fastenings: nails, bolted connections, etc. Bolts provide more reliable fixation, but their installation requires additional time for drilling holes. The rafter frame is attached to the mauerlat.
- Waterproofing. Moisture-proof coatings significantly increase the service life of wooden frame elements, protecting them from changes in temperature and humidity.
For this purpose, roll waterproofing is used. The waterproofing strips are fastened with a construction stapler along the roof, starting from the bottom. The strips are laid with an overlap of 10-15 cm. In the lower part (at the end of the eaves overhang), the waterproofing is glued to the drip, which serves to drain moisture that has fallen on the membrane into the gutters. - Counter-lattice. On top of the rafters, the waterproofing is fixed with counter battens. They will prevent the roofing material from tightly adhering to the waterproofing, which will contribute to a better level of roof ventilation and removal of moisture that forms on insulated roofs, while at the same time they act as a pressing element, which is necessary for waterproofing.
- Lathing. A sparse sheathing is laid under the slate with a step of 1-2 m between the boards.
- Slate. The sheets are laid with an overlap of at least 10 cm. If the overlap is too small, moisture will penetrate under the top sheets.
- Thermal insulation. The insulation is laid between the rafters, pressing it against the waterproofing and shifting each subsequent layer to the side relative to the previous one, so that cold bridges do not arise. The insulation is cut 2 - 3 cm wider than the width of the rafter span (the material should fit tightly, but not bend over).
- Vapor barrier. Rolls of vapor barrier material are placed on top of the heat insulator.
A conventional vapor barrier film is secured with staples using a construction stapler. The first strip of vapor barrier is attached at the ridge, and the subsequent strips are closer to the eaves, with an overlap, and are fixed in the same way as a waterproofing film, only carefully stretched, because There should be no sagging. The glued areas are reinforced with a pressure strip. It is very important to ensure a tight connection to surfaces. In areas adjacent to complex surfaces (chimneys, walls), glue must be used. The staples from the stapler are glued with tape. - Counter-lattice. It is mounted along the rafters and is made from smaller timber (section 50 mm). These bars will provide a longitudinal ventilation gap. It is possible to have a roofing pie with one ventilation gap, the top one, and the vapor barrier is always adjacent to the insulation.
- Inner lining . This part of the roofing structure is fixed with nails or fixed with long screws on the lower sides of the rafters.
Correct fitting and professional installation of slate - in the video:
Advantages of corrugated sheets
The professional sheet has the following advantages:
To replace the coating with your own hands, it is very important that the profiled sheet is light in weight, so it can be installed without outside help and the use of lifting equipment. An additional advantage of the material is its high rigidity with low thickness and weight. This is achieved through special profiles that serve as stiffeners
Such a coating will withstand the weight of snow loads, people and the effects of wind without sagging or deformation. Roofs made of corrugated sheets, depending on the type of this material used, can last up to half a century, which cannot be said about slate. But for the durability of such a roof, it is very important to follow the installation technology. The main advantage of the profiled sheet is its affordable price. Even those who do not have a large income can afford this material.
How to conduct a roof inspection?
First of all, you need to carefully inspect all areas of the roof. Asbestos-cement slabs may have small, unnoticeable cracks, chips, or larger-scale damage
Particular attention should be paid to the appearance of suspended or wall-mounted gutters, areas of slate contact with walls and attic windows, as well as the condition of ribs and ridges
Depending on the scale of the upcoming work, you can choose one of the repair options - eliminating minor defects, replacing slate slabs, or comprehensive roof repairs.
Literally two decades ago, during restoration work, a slate roof was first cleaned, then washed, thoroughly dried, primed with drying oil, and only then covered with fabric strips soaked in oil paint. Such repairs, despite all their labor intensity, extended the life of the roof by no more than four years.
Today, the latest building materials allow work to be completed quickly and provide a longer-term effect.
How to repair cracks in slate?
So, if the asbestos-cement slabs are intact, but cracks have spread along them, then you can get by with simple injections of a paste of high-grade cement, fluffed or crushed asbestos, PVA glue and water.
Asbestos and cement are mixed in a ratio of 3:2. From PVA glue and water, an adhesive mass is obtained, which contains equal parts of both substances. Asbestos, cement and liquid mass are mixed to form a homogeneous creamy paste. Before injecting damage, you should thoroughly clean the cracks with a stiff brush and wash the entire surface of the slabs being repaired with water. While the slate is drying, you can prepare a primer - PVA glue with water in a ratio of 1:3. After priming the slabs, the stage of eliminating cracks begins. They are coated well with paste, and when it dries, a secondary layer is applied.
For minor roof repairs, they often resort to another method - installing patches made of jute fabric or fiberglass impregnated with mastic. The size of the patch should extend beyond the edges of the damage by no less than 15 centimeters.
How to replace part of a slate roof?
Sometimes the roof requires more extensive repairs, especially when the chips on the slate slabs are significant. In this case, you need to dismantle and replace the entire sheet at once.
Rafters and wood sheathing that are under substandard slate slabs may become rotten. They also need to be replaced, if not completely, then at least only the rotten part.
Then, in order to avoid similar troubles in the future, the wooden parts of the roof are treated with an antiseptic against fungus and mold. A new slate slab is laid on the updated base and strengthened with nails placed on a washer and a roofing material gasket. The holes for the nails are drilled with a drill and should not be larger than 4-4.5 millimeters in diameter.
How to repair rafters under the roof?
Repairing the entire roof involves dismantling the slabs, carefully inspecting and discarding them, inspecting and restoring the rafters and roof base. Repair work also affects the attic space. It is cleared of accumulated debris and the condition of the floor covering is checked. Any damage found must be repaired.
Before re-laying the slate, you should first mark the laying areas. If the slabs are wavy, then they should overlap one another - 14 centimeters vertically and one wave horizontally.
After this, the roof repair reaches the finish line, and all that is required is to cover the gaps in the ridge and rib parts of the roof and other existing joints with concrete mortar.
As a result of timely and correctly carried out repair work, the slate roof must have high water and heat resistance and withstand significant wind and snow loads. Only regular cleaning and restoration work can extend the life of a slate roof and will allow you to get by with only minor repairs.
Is it possible to detect defects before they cause damage?
Yes, it is possible and even necessary. An annual inspection of the coating ensures timely detection of defects and their rapid elimination. Leaking roof - fungus and mold, high humidity, proliferation of microorganisms inside residential premises. All this will lead to rotting of the rafter structure, damage to furniture and decoration, and harm health. Therefore, if you discover that a slate roof is leaking, you need to find out how to fix it immediately. Then urgently carry out repairs.
What indicates a leak:
In order to carry out slate repairs in a timely manner, without allowing leaks to spoil the microclimate in the interior, it is recommended to check the attic space after each rain, and in the spring when the snow melts. If there are signs of leaks, there are also cracks, holes, chips, and surface destruction. It is necessary to climb onto the roof and assess the integrity of the coating. Smooth types of flooring are easier to work with—even minor damage is visible to the naked eye. It is more difficult to detect cracks and chips in corrugated slate, as well as to repair them. Therefore, when choosing the type of roofing sheets, you should pay attention to this aspect.
In 8 out of 10 cases, the roof is organized using corrugated sheets. The type of cracks on them can be different. It is he who determines how difficult slate repair will be, as well as what technologies to use. Types of cracks on “waves”:
A slate roof that has been used for a long time may also have holes. They are sealed according to the same principle as the cracks running at the bottom of the wave. Sealants, galvanized sheet iron and special patches are used.
How to repair a slate roof using foil?
A patch on the roof can be installed quickly and easily using aluminum foil, which you can even take from a chocolate bar. When the damaged element is dismantled and cleaned, a thin layer of specially selected glue is applied to the underside of the foil, which can glue the aluminum to the slate sheet. The corners of the produced patch should be rounded to prevent bending. If such a patch is needed in the place where the sheet is fastened to the roof, then, having repaired this damage with foil, screw the hole for fastening in another part of the slate surface.
Now we install the element back, do not forget, just like during the initial installation, to use a rubber gasket under the slate nail. Upon completion of the work, it is necessary to disguise the patch to match the color of the entire roof surface. The paint should be applied at a comfortable temperature in dry weather. It is best to paint the patch using the traditional method - with a roller or brush. For the best effect, two approaches should be made, and after the first layer, the repaired area must be thoroughly dried.
Preparatory moment
Before sealing the roof, prepare the damaged area:
- clear the slate of debris;
- thoroughly rinse the area of broken slate and degrease it. Gasoline is suitable for such purposes;
- if an ordinary crack has formed on the surface, stick fiberglass tape (serpyanka) along the entire length, extending it 5 cm in each direction from the crack (vertically);
- fill the cracks with raw rubber or caulk them. The fibrous material can be additionally treated with a hydrophobic composition.