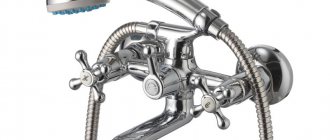
All plumbing equipment is connected to water pipes using rigid or flexible hoses. Rigid hoses are less preferable, as they require higher precision during selection and do not allow the device to be moved in any direction. You can connect a flexible line to a faucet or other plumbing device yourself.
Connecting the mixer with flexible hoses
How to connect a flexible hose to a faucet?
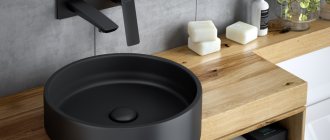
On the liner that came with the mixer, at the threaded end (MOK), which is screwed into the mixer, there are two rubber rings.
Is this enough to seal the connection or should I still wrap flax around the threads? The connection is a nut-MOK, where the MOK is the threaded part that is screwed into the mixer. Sincerely, Vladimir.
There is no need for any “additional seals.” The seal is achieved precisely by these “rubber rings”; flax/tape - they will only get in the way. Attention. When tightening “flexible hoses” and other things with a similar seal, in no case should you “pull to the point of stupidity”: something like “tighten by hand plus another quarter turn with a wrench” is enough. Otherwise, there is a danger of jamming or even tearing the rubber seal.
It’s been like this for 5 years now and it’s not dripping! Everything seals perfectly there - just check that the rings are in place and that they weren’t cut during assembly - when assembling it, I had to remove and turn the sink over so as not to twist it blindly!
General structure and principle of operation
Depending on the type, plumbing connections may vary slightly in design.
Its main components include:
- metal tube or rubber hose with braid;
- union nut with O-ring - used to tighten connections;
- fitting - a metal pipe that connects the tube and the mixer;
- nipple - is attached to the tube and has a movable connection with a union nut.
The fittings are located on both sides of the liner and are fixed to it by crimping using a crimp sleeve or welding. For connection, the fitting has an external thread and a rubber sealing washer.
For installation on a fitting with an external thread, a union nut is used, which, when tightened, provides a tight connection with the nipple at the end of the connection. An O-ring is also installed between the nipple and the union nut.
Since the nut rotates independently of the tube, the latter remains motionless when tightened. Therefore, installation must be done in the correct sequence.
Before purchasing, you need to accurately select the required standard size of connecting elements, and also check the compliance of all characteristics in the product data sheet
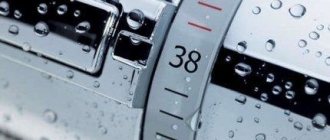
Depending on the type, the liner can withstand pressures of up to 50 Bar and temperatures of up to 150 °C, which is more than enough for a hot water supply system. Indeed, according to GOST, the working pressure in the water supply pipes of apartments should be 4 Bar.
I can’t screw the flexible hose into the faucet
We bought a mixer, everything is fine, but there is a problem. The connections where the hoses are twisted are located inside the faucet at a depth of about 4-5cm. The hoses can only be tightened by hand using the hose itself; no wrench can fit in there. I bought other hoses on the market with extended parts that screw into the mixer, but they are also not long enough. What to do? I'm tired of it. Of course, if you tighten it by hand, it won't leak, but that doesn't matter, there's more than 4 atmospheres there..
01/18/2012 at 11:15
and if instead of hoses you use nickel-plated tubes with a rigid liner, then you can tighten it stronger. and it will be more reliable
01/18/2012 at 11:18
I screwed the hoses before installing the mixer in place. remove the faucet (to tighten the nuts when installing the faucet, I used a socket wrench - a tube. If it is possible to remove the sink, it is better to remove it,
01/18/2012 at 11:28
Steh Of course, I removed and disassembled everything possible and the tap is in my hand, there is no way to tighten it.
01/18/2012 at 11:44
zalman I'm sorry, I've never seen such a design. if absolutely impossible, lubricate the threads with auto sealant to seal the connection
01/18/2012 at 15:54
For advice you need a photo of the mixer. as an option, the seller did not provide the connection pipes. Also, the installation procedure for the mixer should be described in the manual.
01/18/2012 at 16:01
werefish The manual was thrown out immediately. Photos are possible tomorrow. I bought the faucet from Leroy Merlin.
01/18/2012 at 18:21
If the product has a name and the eyeliner is standard, then after lubricating the rubber ring, you can tighten it by hand. I've seen this before. In principle, there are fits through a rubber ring, when nothing depends on the tightening force. Only fixation, but not tightness. Well, you can put it on anaerobic, but it won’t be understood.
01/18/2012 at 18:23
I have had such cases. I simply tightened the hoses by hand - as long as possible - and that’s all. There were no problems. The pressure, as it were, was 6-8 atm. But the taps were real (not for 1000 rubles)
01/18/2012 at 18:26
Hubert wrote: Take it back to them
They won’t take it without instructions - the complete set is broken!
but now there is something to talk about.
Question to topicstarter: is this actually a mixer? Is there a receipt left? what do they write?
01/18/2012 at 21:31 01/19/2012 at 20:47
I came across such an eyeliner, where two rubber rings are buried in the corresponding socket, nothing depends on how tightly it is twisted. Even if you turn it back a little, there will be no leakage. So screw it on by hand, everything will hold perfectly.
01/20/2012 at 06:26
YURI-G wrote: So screw it on by hand, everything will hold perfectly.
- 1 There is no need for tightening at all.
01/20/2012 at 22:44
but I still twisted the platypuses a little
01/20/2012 at 23:45
It just doesn't make much sense. The pressure is held by the rings, not the puff.
01/21/2012 at 08:12
There are often faucets where the instructions say that the hoses must be twisted by hand. Sometimes even in a categorical form - the use of the key is prohibited. The latter applies especially to the cheapest China, where the bushings for the hose are not molded into the body, but hang in the air, and their wall thickness is less than 1 mm. You screw them in by hand with the fear that they might burst. By the way, there were times when, when twisting, the thread of the hose broke off and remained in the mixer body. The problem occurs when replacing hoses that are located in the depths. If they are slightly stuck, you have to tinker. When a client purchases, I immediately dissuade them from these brands, especially if they are cheap.
Minuses
Whatever one may say, there are some downsides here.
We noted that installation is a controversial issue, so it should also be considered a disadvantage. It is quite problematic to perform it, since you are limited in moving the eyeliner. Actually, this creates another drawback - stationarity. The product does not bend, and does not lend itself to even slight deformation, which would allow for a more correct, aesthetic installation.
Otherwise, even experienced specialists do not find any serious shortcomings that could characterize rigid eyeliner.
The types of rigid eyeliner can be classified based on the materials from which they are made in our time. It consists of metal tubes. This metal, in turn, can be:
Which option is more reliable is up to you to decide. This largely depends on the manufacturer and his degree of responsibility for his own products. The most important thing is that the metal has anti-corrosion properties and is not a cheap fake. Unfortunately, some companies use ordinary ferrous metal, which rusts over time. And to hide this fact, they cover it with special paints and compounds. As a result, the tubes look like steel, copper or brass.
How to connect a kitchen faucet with deep hose mountings
I bought the OSGARD Brant 31073 mixer that I liked. At home I noticed that the seats for the hoses were located deep in the mixer body, in a tight cylindrical cavity at a depth of 4 cm. Braided rubber hoses were included in the kit. I tried to screw the bait in by hand. They screw in normally, but you need to tighten them further! You can’t push any tool through, you can’t twist the hose by the rubber. The instructions, if you can call it that, simply say this: connect and you will be happy. Am I not understanding something?! This is how the developers imagined it when designing such a deep landing. Tell me, smart people, how to screw in connecting hoses without tools?
09.10.2010 at 21:22
Yes, there is no need for special strength. Seal with a thin soft rubber band. Tighten the elastic band by hand and that's enough.
Installation of ball valves
Ball valve
The installation of metal-plastic water pipes in your apartment should begin with the installation of ball valves on the riser.
Select high-quality taps from well-known manufacturers with high operating pressure (for example, 60 atm) and operating temperature within 150˚C.
Installed ball valves
It is these taps that will allow you to successfully shut off the water supply when leaks occur, thereby protecting the room from flooding. The next element after the tap and in front of the water meter should be a filter for deep water purification. Then a fine filter, a pressure reducer, and a manifold for pipe distribution (if necessary) are installed. Cleaning filters are necessary to protect plumbing fixtures by trapping scale, sand and metal particles present in large quantities in risers.
The most common mistakes that are often made when installing flexible hoses
In appearance, the simplest and most ordinary, flexible eyeliner is in fact a capricious material that must be treated with due respect. And if you install it correctly, this method of connection will last a very long time, but any mistake will lead not only to damage to the liner, but also to an inevitable disaster with affected neighbors. Let's look into the nuances.
Read in the article
No, just don't fum!
Let's start with the fact that modern materials for sealing threaded connections, be it fum or a special thread, are not needed in this case. If you think that the fum needs to be wound in any case and it won’t get any worse, then you are mistaken. The thing is that initially any flexible wiring is already equipped with a standard seal, it’s not for nothing that they put it there. And if you wrap foreign material around the threads, it will not reach the end and will not press the seal as intended by the manufacturer.
There is strength - no need for intelligence
Let’s tighten it tighter and with effort! Many people think this way and make a big and sometimes irreparable mistake. Let's look at this process from the point of view of elementary logic. By tightening the nut, you press the sealing gasket against the sharp edges of the fitting - and, bad luck, they can push through or even tear the gasket. And then the same flood and angry neighbors on the doorstep await you.
Better one long than two short
A very common mistake that inexperienced craftsmen make. We didn’t pay enough attention to the measurements - we bought a hose that was shorter than necessary. And if you don’t want to buy a long one after that, they start tinkering, connecting several hoses into one. This is exactly the case when the stingy pays twice. But because any unnecessary connection is a risk. Yes, you can connect two flexible hoses with a barrel, but it can also fail, especially if it was born in the hands of Chinese craftsmen.
PHOTO: himki.praktika.online If you decide to connect, look for a bronze fitting, it will outlast your hoses by half a hundred years
Pull and pull, tear and drown
Flexible eyeliner is not a clothesline; it cannot be pulled. Constant force will loosen the connection and the connection will begin to leak. With the slightest impact, for example, you decide to move the sink just a centimeter, the stretched hose may even break - and here it is again, the trill of the doorbell under the thick finger of an evil neighbor.
It is equally dangerous to leave a hose with an excessive bend or, even more so, a twist. In this case, the liner may bend and the rubber inside will collapse.
If you didn’t look right away, don’t cry later
This is an axiom - before installing flexible wiring, check its completeness. Has the gasket fallen out, is the end fitting well crimped, are there any defects on the threads or braid.
And make yourself a simple rule: at least once every six months, find some time and, armed with a flashlight and a paper napkin, inspect your plumbing for digging and leaks. Then there will be no surprises.
Here's a problem. I bought far from the cheapest faucet for a washbasin, unpacked it, took out the included flexible hoses in the kit with the usual gesture and threw it away (the short ones), took out the longer ones purchased in advance, took the key for 11 and... it broke off abruptly. I’ve done this a hundred times before, everything was fine, but this time it turned out that the holes for screwing in these hoses are STRONGLY RECOVERED into the mixer body and it’s not possible to get a wrench to screw them in. I took the original hoses out of the trash can - they screw in even worse, because... They don’t even have a height difference for twisting. I tightened it with my HANDS as best I could, connected it to the valves, turned it on, it doesn’t seem to be leaking, but I still want to tighten it more securely, otherwise, if it leaks, I’ll get bored of disassembling the entire structure of the washbasin. And now there are actually two questions. 1) are there any special ones in nature? wrenches for screwing hoses into such clever faucets? 2) Why the hell make faucets like this, why not make these holes at the same level as the faucet mount with the washbasin (a rhetorical question, of course).
How to connect a dishwasher with your own hands
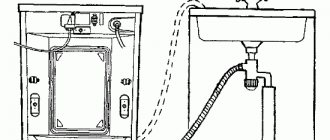
Connecting an automatic dishwasher yourself will save owners money and time. Before installing the dishwasher, read the instructions carefully. As a rule, a short step-by-step guide is included with all models from well-known brands. In most cases, the PMM will have to be installed in four stages:
- Build the dishwasher into the niche and securely fasten it there.
- Connect the 220 V network and install a socket in the wall next to the machine body.
- Connect the PMM to the water supply.
- Connect the unit to the sewer.
Connecting dishwashers to water supply and sewerage is not an easy task
Electrical supply
It’s good if, at a distance of up to 1 m from the PMM housing, there is a grounded socket in the wall, designed for a current consumption of 16 A. Then you don’t have to do any electrical wiring. Otherwise, you will have to call a specialist or supply electricity yourself.
The use of extension cords, tees and other similar options to connect the PMM to the electrical network is not allowed.
For wiring, use a copper cable with three cores, the cross-section of each of which must be at least 2 mm. At the entrance, in the distribution box or panel, the cable must be connected to a circuit breaker designed to operate at a current of 16 A.
In addition, it is advisable to connect an RCD to the cable line - a residual current device rated for a current of 16 A, with a leakage current of 30 mA (see photo).
Diagram of the correct power supply to the dishwasher
Connecting the dishwasher to the water supply
The best option is to connect to the sink faucet located next to the PMM. To do this, turn off the cold water supply and find the place where the flexible hose from the faucet is connected to the cold water supply pipe. At this point, loosen the fastening and unscrew the nut securing the connection of the flexible hose to the pipe, then remove the hose.
One of the options for installing a tee with a built-in shut-off valve for supplying water to an automatic dishwasher
At the connection point, install a tee, the leads of which are connected to the flexible hose of the mixer and the shut-off valve. Connect the coarse filter and the inlet hose for the PMM to the latter. Do not forget to first screw sealing fum tape onto the threads of all connections.
If you can't connect to the water supply under the sink, you may run into a nearby water pipe. For tapping into a metal pipe, it is best to use a crimp coupling. First, you need to drill a hole in the pipe to drain water.
Crimp coupling with outlet and shut-off valve
If the water pipe is made of metal-plastic, you need to cut a piece from it equal in length to the tee that will be installed. Then install a tee at the cut site, to which then connect the shut-off valve, filter and PMM inlet hose.
Tee in section of a metal-plastic pipe
I'm installing a mixer. It seems simple, but there are nuances
Here is a brass mix of Chinese origin. I bought it at an average price, but still did not install the original flexible hose; I replaced it with universal hoses with red and blue marks.
You can put everything together intuitively, but the assembly sequence is important, since due to unnecessary manipulations something gets scratched or, even worse, breaks.
I collect it in this order
Initially, I find a thin rubber sealing ring and push it into the groove from below on the mixer body (photo 2a). Here it fits tightly, but sometimes it falls out, then it is better to install it after screwing in the first flexible hose, but not later.
Now the hoses. As you can see from photo 2b, their nipples are different, which was done specifically for ease of tightening.
First I twist the hose with the short nipple and tighten it with a 10mm open-end wrench using the hexagon on the nipple. More interesting things to come!
If you immediately screw in the second hose, the two together will not fit through the mounting hole in the washbasin. Therefore, you need to cheat.
This set also includes a decorative ring-stand, also with an O-ring. I put them on a screwed hose and pull it down through the hole in the sink.
Next, I put a yellow tube with a thread, a nut and a seal on it from below onto the installed hose (visible in photo 3).
And only now I pass the second hose from below through all of the above and screw it into the mixer in the same way as the first. In the end, everything should look something like in photo 3.
Continuing, holding the faucet above the washbasin with one hand, with the other I screw in and tighten the yellow tube until it stops.
To keep the mixer in place, all you have to do is tighten the large nut on the yellow pipe using the available wrench. If there is no key, you should try to tighten it by hand, this also works well.
Also, before tightening the nut, you should correctly position the stand ring under the faucet on the washbasin.
Without any sealing material, I screw the hose nuts onto the taps and only tighten them a little with a wrench. If you overtighten, the end of the faucet will push through the rubber or silicone gasket inside the nut, which requires you to be very careful.
Areas of use of quick-release fittings
Quick-release connections are widely used for domestic needs, namely in watering work. The presence of such elements simplifies assembly, and there is no need to turn off the water. Quick connectors for hydraulic hoses allow you to connect hoses to pumps, sprinklers and other watering elements. They are also used for branching networks. For household needs, simple plastic products that are characterized by wide functionality are sufficient. They usually consist of several elements. Some fittings are equipped with a locking mechanism or an auto-stop option.
Quick release hose connectors work well with a variety of watering attachments. They also protect the hose from kinking. Products made of impact-resistant plastic with a galvanized coating are widely used. They are more convenient to use because they are less slippery.
Fittings are widely used in production shops when installing hydraulic systems. With their help, you can extend the flexible hose, allowing you to move the equipment to another location. There are also quick releases for pneumatic tools. Such fittings are made of impact-resistant steel with a protective corrosion layer. They are presented as whole specimens. When connecting them, the hose is inserted into the device. Inside it is captured by a carved springy bushing, which creates a tightness of the liner. To remove the hose, you must press down on the locking ring.
Various manufacturing materials allow the use of quick releases both in everyday life and in industry
Quick-release connections have found their application in the installation of special-purpose pipelines in the metallurgical, chemical and mining industries. They are often used in the construction of water, rail or road transport and the assembly of medical equipment.
The most common mistakes that are often made when installing flexible hoses
It would seem that there is nothing complicated here - I took a flexible eyeliner, screwed it on and it’s done! But in fact, not everything is as simple as it might seem at first glance. For flexible hoses, installation rules have also been written that must be followed. After all, if the installation is done incorrectly, the consequences can be very unpleasant!
Today I will talk about common mistakes that are made when installing flexible hoses, and also give some useful tips that will help prevent unpleasant consequences - leaks, breaks and other troubles.
Rewinding sealing material
I often see this picture when I come to another call! Some craftsmen, or even the owners themselves, before screwing on the nut, wrap fum tape or, even worse, a sealing thread around the thread!
This is absolutely not possible, since the nut of the flexible line has a sealing gasket, and an extraneous seal can prevent the nut from properly pressing the rubber band. Additional compaction is simply pointless!
Padding
You should not think that if you tighten the nut as tightly as possible, the connection will be reliable - no, this is a misconception! By tightening the nut as hard as you can, you will make the connection unreliable, since the gasket may be damaged by the metal edges of the fitting. This can happen immediately or after some time, at a time when you are not at home! And also, it might just be squeezed out.
You should tighten it gently, first pull it with your hand until it stops, and rub it with a key, literally one turn - in most cases this is enough!
Extension hose
If suddenly the line length is not enough, you can simply connect two hoses together using bronze barrels. But the rules prohibit this type of connection, although I never found a description that would say why this cannot be done.
I think that the gaskets may weaken over time, or, I have another thought, the service life of the flexible liner according to the passport is 10 years, but in practice they fail after about five years. But the barrel may not last that long and will collapse faster; I don’t think it’s worth telling what this could lead to!
Bend and stretch the hose
Another common mistake due to which the flexible liner fails prematurely! It is forbidden to twist or, even worse, install the hose under tension! In the first case, the hose can either bend, thereby impeding the passage of water, or, over time, loosen the nut, since it will constantly be under tension.
Tightening the flexible line also shortens its service life; in this case, it may simply break! The hose should be free, without unnecessary tension and kinks, then there will be no problems and the liner will last for many years!
Also, it is prohibited to install flexible hoses in places where there may be sub-zero temperatures. It is forbidden to throw things and heavy objects onto the liner, as well as lay them through walls and ceilings!
And that’s all for me, I hope you liked the article! By following these simple rules, you will extend the life of the flexible eyeliner and will be able to avoid unpleasant consequences. Thank you for your attention!
Connection features
So, step-by-step instructions on how to connect a dishwasher in stages:
- If you are installing a built-in PMM, then first you need to prepare a niche, which, as a rule, should be 60 cm wide, and for narrow models 45 cm. You can level the machine with the level of the cabinets by removing the tabletop and adjusting the legs of the lower cabinets. You also need to drill holes in the cabinet body for the drainage hose, water intake hose, and electrical wires.
- Installing a dishwasher under the hob is prohibited;
- The installation location is selected so that the length of the drainage hose does not exceed 1.5 meters. An increase in length up to 5 meters is allowed, but stable operation of the equipment in this case will be difficult to guarantee.
- The next step is connecting to electricity. Please note that the socket must be of the Euro type. You need to replace the socket if it does not meet the standards (but not the plug of the machine). Do not forget that we ensure safety when connecting, and the dishwasher has significant energy consumption. This determines the ban on the use of tees and extension cords. Installing a socket involves using a wire with a diameter of more than 2 mm. In addition, a 16A circuit breaker is additionally installed in the electrical panel. Grounding is also carried out using a 3-core wire, and it cannot be connected to pipes.
- Next is connecting the dishwasher to the water supply. To do this, the water is shut off, a tee is connected to the pipe, then a filter, a ball valve and a hen. All threaded joints are insulated with foam - it must be wound in at least 10 layers.
It is also necessary to install a coarse filter, as it will prevent sand and rust from the water pipe from getting inside the machine.
- As for connecting equipment to the sewer system, you can go the simple route by installing a siphon with an additional outlet and valve. In order to protect the device from water entering from the sewer pipe, you need to place the drain hose in a special way - at the point of exit into the sewer network, it is placed at a height of 600 mm along the wall, and then bent to ensure water flow.
- The final stage in connecting a dishwasher is checking the device for functionality. In this case, the machine is tested idle, controlling the rate of water flow, its heating, and operation in drying mode. The test is carried out without dishes, but with the obligatory addition of regenerating salt and detergents.
New hose in the mixer, how to tighten it?
My faucet's hose is screwed in quite deeply, and if it's screwed in, there's no way to grab it with anything mechanical to unscrew it ;( Yesterday I broke the fitting of the one that pulled and then I was able to unscrew the second one.
But how to load it back? for the hose? by hand?
In the instructions for the mixer it is written by hand and especially highlighted! yes I always did. but doubts gnawed at me, I couldn’t unscrew the torn eyeliner. until I broke one. but it broke somehow easily. like something hardened or silumin, I shook it and fell off, and then the thread was easily unscrewed with a screwdriver and a rubber band.
Drive a couple of these first. Where can I get them? Why google? I'll do that, my wife has already bought it. I'm in the galleys during the day 
I did this: You twist it with your hands. Next, you take the Knipex Cobra pliers, put the beak in there, and lightly tighten the folding just a little. Just to record.
Sealing there is an o-ring with rubber. There is no point in delaying.
Well, here's your answer. When they twisted it for the first time, they held it by the braid itself and probably twisted it, and then straightened it out. A normal thick eyeliner is not difficult to twist, the main thing is not to twist it too hard and not to break it.
They didn’t twist anything for me the first time and didn’t twist anything, this eyeliner generally hangs like a sloth.
And Initially, the Mixer was taken out of the box and its original container was already in it.
Collector distribution of water supply pipes
Most often, such wiring is installed where it is planned to hide pipes under plaster or decorative panels, run pipes underground, or embed them in a concrete floor screed.
The advantage of collector wiring is that each consumer (plumbing fixture) has its own separate line, which departs from the common collector. With such an isolation, you can close off a single point at any time without harming other devices. With this decoupling, the water is evenly distributed, so the pressure (pressure) at all points will be the same.
The only disadvantage of such a system is the price, which includes a significant amount of pipes and fittings, as well as manifolds (distribution manifolds) with shut-off valves.
The only disadvantage of such a system is the price, which includes a significant amount of pipes and fittings, as well as manifolds (distribution manifolds) with shut-off valves.
Collector water distribution - diagram.
The only disadvantage of such a system is the price, which includes a significant amount of pipes and fittings, as well as manifolds (distribution manifolds) with shut-off valves.
Hot and cold water collector with shut-off valves, water filters, copper pipe supply.
The most common mistakes when installing flexible hoses! How to extend the life of flexible eyeliner?
At first glance, an elementary process can result in catastrophic consequences, so there are clear rules for this too that need to be taken into account when installing flexible hoses. You can find out how to avoid breakthroughs, leaks and other problems by reading the article!
Rewinding the seal
Often, before screwing the nut onto the thread, fum tape or tow is wound. Under no circumstances should you engage in such bacchanalia, since the flexible hoses from the factory are always equipped with a rubberized seal, and additional sealing only interferes with the sealing of the connection.
Connection tightening
There is an opinion that the tighter we tighten the nut, the tighter and more reliable the joint will be - absolute nonsense. Excessive tightening of the nut does not make the connection reliable, because in this case the gasket breaks on the iron edges of the fitting.
If you tighten the connection too much, wait for a breakthrough: either immediately or when no one is in the room - this usually happens.
You need to tighten the connection gently, pulling it by hand until it stops, and then using a wrench no more than one turn of the nut - this will be enough for a tight seal.
Elongation
The rules prohibit connecting 2 hoses to each other for extension using barrels. This elongation will weaken the gaskets and cause premature failure of the connection.
It is also important that each flexible hose has a warranty from the manufacturer, usually for 3-5 years, but an additional “barrel” will not withstand such a period and there is a high risk of “getting” repairs for the neighbors below.
Kink and over-tension
Flexible wiring may not be completed until the end of the warranty period if the hose is twisted or installed under tension. Twisted connectors impede the passage of water and weaken the nut, constantly being under tension, and stretching the hose significantly increases the risk of normal rupture under pressure.
When installing, be sure to ensure that the hose is free and does not experience kinks or tension.
And as a bonus, a couple of rules:
- never install flexible hoses where sub-zero air temperatures may occur,
- never hang washed clothes, heavy objects or other objects that cause tension on the eyeliner,
- You should not lay flexible connections through walls and ceilings - eliminating leaks in such a system can be extremely difficult and expensive.
I hope these few paragraphs can significantly extend the life of your hoses! And they will save you from having to run around the house with a basin and scoop out water!
See also! How to install a faucet in a sink
The best brands
Among most manufacturers there are the most popular companies. These include German companies Grohe and ProFactor, which produce high-quality products. The products are durable, reliable, but expensive. There is a brand from Italy called Remer, which is a competitor to its German counterparts. You can find fakes from this company; they do not include all the components for the mixer.
Among domestic brands, ST Giant eyeliner from Santrade is distinguished. Reviews about this product are mixed. The company produces products at different prices. Products of low cost are of poor quality, hence the different opinions of consumers.
The Spanish brand Industrials Mateu has high product performance and always controls its quality. Products are manufactured according to international quality standards. The Turkish company Rispa, founded in China, has an affordable price and fairly good quality. The product can operate uninterruptedly for many years. Therefore, if you have a limited budget, you can buy products from this company.
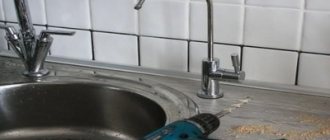
Unscrew the rusted screw
If you cannot remove a rusted screw, then use the following methods. For example, tap the threaded connection with a hammer, while placing a screwdriver on different sides. Due to this, microcracks appear at the points of contact of the threads, which greatly facilitate the removal of the screw. If you do not have enough strength to break the screw or the screwdriver turns in your hands while working, grab the flat part of the screw with a wrench. This type of leverage will increase the force transferred to the screw, making you more likely to move the screw.
In addition to this method, there are others. For example, use a blowtorch. It can be used to heat up a stubborn propeller and then cool it sharply with cold water. Due to such a sharp temperature difference, microcracks form in the screw along the threads. This method is not applicable to every part, because thermal expansion and contraction of the material will not allow it to be used further. In addition, a blowtorch will not always help you. Instead, you can use a soldering iron or an industrial hair dryer. With their help you can quickly solve the problem with small screws.