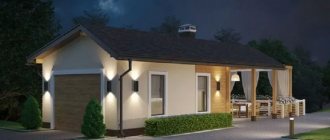
Rebuilding is always worse, more difficult and more hectic than building from scratch. Trying to fit into the existing narrow framework, the developer will be so exhausted both morally and physically that he is ready, following the example of the hero A. Mironov from the movie “The Adventures of Italians in Russia”, to take a suitcase with explosives from the nearest trash heap, throw it on the tired unfinished building, lie down, get up , dust yourself off and say with relief: “Seniors, in front of you is Nevsky Prospekt.” Today we will consider the option of rebuilding a bathhouse from a barn. Without fuss, explosions and in general, without any negative emotions. Let's read.
Other repair places
So, if the basic elements of the bath are clear, then the question remains open with the smaller details.
It would not be superfluous to make repairs, or rather replace all electrical wiring in the bathhouse. Older buildings used aluminum wiring. It would be better to lay copper wires.
If there are electric heating devices in the bathhouse, then the cross-sectional area of the wire should be about 4 mm². If the wiring is used only to power ordinary light bulbs, then thin copper wires with a cross-sectional area of 2.5 mm² will suffice.
Diagram of a brick stove for a bathhouse.
Often the reason for the presence of cold air in the bathhouse is an old window or door. These elements also need to be paid attention to when renovating a bathhouse. It is best to remove the old jambs and install new ones, while insulating them. You should do the same with windows.
Insulation can be done with polystyrene foam, if the gaps between the frame and the wall are large, or with polyurethane foam, if such gaps are small enough. Door jambs can be insulated in the same way.
As for repairing bath furniture, there are no difficulties at all. The best furniture for a bathhouse would be furniture made of wood. However, wooden objects have one serious drawback - in a damp room they very quickly become unusable.
Now there are many special liquids that protect wood from rotting. Having made new benches and shelves, it is necessary to saturate them with this substance. Ordinary pinotex or some kind of antiseptic would be ideal.
It is important to know! An important element of any bathhouse is the wastewater removal system.
In a bathhouse, as a rule, it consists of the floor itself and the drain hole. The floor slopes towards the drain pipe.
Very often, water stagnates on the floor surface precisely because of improper floor construction. In this case, the repair will involve laying a cement screed on the surface of the concrete floor, which will form a slope in the desired direction.
In addition, you need to clean the drain pipe. It often turns out that the drain pipe is simply not able to pass the amount of water consumed, which causes it to become clogged. In this case, it is recommended to replace the pipe with one that has a larger diameter.
At the entrance to the pipe, that is, inside the bathhouse, you need to install a mesh to prevent debris from getting inside the pipe. At the same time, it will be necessary to increase the volume of the drain well.
So, renovating a bathhouse is not difficult. It all depends on the scale of the repair. It is worth remembering that it is better to completely re-insulate an old bathhouse rather than filling up old holes.
If possible, it is recommended to completely replace the ceiling, floor, and roof. The same applies to the oven. Old stoves tended to emit large amounts of carbon dioxide, which, coupled with a clogged chimney, became dangerous to human life and health.
Today, metal stoves are becoming very popular, which can continue to be heated even during washing without harm to health. Therefore, repairing a bathhouse may include a complete replacement of the stove.
Video description
You can make a pouring floor like this:
Drains from the bathhouse cannot be poured into reservoirs - they contain detergents, this kills river inhabitants.
If the sauna is located inside the house, the wash room can be replaced with a regular bathroom.
Locker room and dressing room
If the sauna is located separately, then these rooms perform a vital function. They serve as an additional buffer that prevents cold air from the street from entering the steam room and washing room.
The design of the dressing room depends solely on the preferences of the owners. You can make this room strictly functional so that you can leave outdoor clothes in it and wait for the sauna to warm up. Or you can install a TV, sofas, tables and everything that comes to mind.
The dressing room can be decorated in any way you like Source pimpmyhouse.ru
If you make a sauna with your own hands in a private house, then a dressing room is not necessary. However, its presence is convenient - you can store bath accessories there and undress before the sauna.
If desired, the sauna can be equipped with a swimming pool, a home training room, or a relaxation room.
Bath floor
It is worth laying structural tiles on a concrete floor in a barn; the surface of such tiles is a little rough, as if a little abrasive. And it is almost impossible to slip on such tiles. It is also worth making grates from boards, which we will lay on top of the tiles for comfortable movement around the bathhouse, because wood does not heat up as much as tiles and will not burn your feet when walking.
Be sure to weigh the pros and cons and decide whether to install a water drain in the floor. If you want to take a steam bath with a park, then your DIY barn sauna will need to be thoroughly wiped with a dry cloth and ventilated.
Steam room materials
We recommend making a bathhouse from aspen boards, the thickness of which is at least 6 cm, and spruce beams. You should choose a dry tree, because dry wood retains its shape better and is much more durable than raw wood.
We construct the frame of our bathhouse from beams, it is not a complicated work at all, and then it is difficult to attach the frame to the floor. But this can be done with a little effort. We will carry out fastening by drilling aligned holes in the floor and beams, into which we will insert long screws, and do not forget to lay waterproofing between the floor and beams.
It is very important to install steam and waterproofing boards on the walls, which should be sheathed with boards. For these works, it is better to use aspen boards, having previously made grooves along the boards, which will serve for better adhesion of the boards to each other.
When driving nails, you should drive them as deep as possible into the wood, because the temperature in the steam room is high, and you can get burned by touching the hot head of an iron nail.
Input data
In our particular case, at the time of reconstruction of the barn premises, it was used for its intended purpose for 10 years: for keeping poultry, storing equipment, tools, spare parts, handling bales of hay and straw, as a firewood shed, and so on.
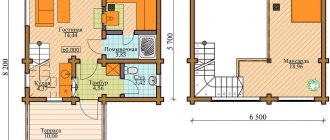
The barn building is:
- A rectangular room with dimensions of 4000x3000mm, assembled from softwood logs with a diameter of 150-160mm. Inside, 2/3 of the building has a partition made using frame-fill technology and equipped with a doorway. Ceiling height 2520mm;
- There is one entrance door, 700x1800 mm in size, one window opening, 600x800 mm in size, oriented to the west.
- The floors are wooden, rough, supported by wooden logs with a cross-section of 200-220mm. Approximately 25% of the floors have local damage.
- The roof is gable, has rafter overhangs 550 mm long to divert atmospheric precipitation beyond the perimeter of the base, the attic space has an adobe floor.
- The foundation is strip, monolithic, unreinforced, the back of the foundation base has a waterproofing coating based on modified bitumen. The root crowns at the junction of the plinth and the frame are in satisfactory condition; no traces of damage by fungi and borers were found.
- There are no communications leading to the barn.
At the location of the building lies fertile soil with a thickness of 200 mm; below it lies loam, turning into red clay with local inclusions of sandstone stone and outcrops of clay shale, at a depth of more than 250 cm from the surface.
sauna from an existing barn
Hello, dear pros. On the site there is a rickety frame barn 194 cm X 200 cm with a gable roof and a small attic. The outside frame is covered with clapboard, there are several homemade glass windows. There is no interior decoration. On the floor there is a board (rotten in places), the ceiling (and the floor of the attic at the same time) is a board. Covered with roofing felt. There are also two stoves without a set of pipes - one cylindrical potbelly stove approximately 40-50 cm high, and a smaller potbelly stove with a cooking surface in the shape of a rectangular parallelepiped. I was going to demolish the old barn anyway. And the idea arose to make a bathhouse or sauna out of it. Those. disassemble the barn, and assemble a bathhouse in a new place from existing spare parts (replacing rotten ones). I don’t know what kind of bathhouse, but it must have a shower. For the shower I plan to use two tanks - 50 liters. heated to 80 degrees Celsius and liters per hundred of cold water, mix them. I plan to build from an old barn in order to save money; I plan to drill several metal pipes welded underneath as a foundation. Will it work? How to turn a barn into a bathhouse? Should the water be drained separately, or should it flow through the floor onto the ground? In general, I’m interested in the most budget-friendly option for independent implementation with the obligatory use of one of the existing stoves (they need to be adapted somewhere)
I wouldn’t risk lighting a stove in such a barn, especially without pipes. Just take a shower. Both barrels go to the attic, from there they flow downwards by gravity. It is preferable to drain the drain outside, into a drainage well made of tires, but for this you will have to fence off something like a shower tray.
manliher wrote: I wouldn’t risk lighting a stove in such a barn, especially without pipes
Yes, I’ll buy more pipes, of course! The question is, is it possible to place a bathhouse or sauna with a shower in this barn? And which one? This barn will be too big for a shower alone.
If the super goal is to add a stove, then you can. Only when disassembling it turns out that 80% of the material is rotten, so it won’t work out on a budget.
manliher wrote: Only when disassembling it turns out that 80% of the material is rotten, so it won’t work out on a budget.
Well, the frame there is normal. Except for the bottom trim, probably. Cladding on the outside is also tolerable. The sheathing is also ok. More windows and a door. The question, of course, is whether the savings will be sufficient, because you need to buy additional interior finishing, thermal insulation, steam-waterproofing, and wood sheets of something to protect from the stove and pipes. Or give up and build a frame bathhouse from new materials, a little larger, according to some project available on the Internet? The savings when building from an old barn are as follows: you don’t need to carry long lengths and hire a truck. I can carry boards up to three meters in a passenger car. Now I’m counting the savings: it takes less than a cube of wood for the frame (without the bottom trim), the floor (if we take it for granted that all the boards are intact, but this is not the case), the ceiling and the sheathing, i.e. less than 5 thousand External lining, if you take 100 rubles per piece (2m), costs 8400. New. You can try to save money by giving it an original appearance and overlap an ordinary board 15 mm thick. If you make a quarter of the margin in width, you will end up with 0.15 cubic meters of wood on all four walls. Pennies. I calculated this for boards 2 meters long. Thus, the resulting savings range from 5,500 to approximately 13,900 rubles. Plus savings on the door (you can make it yourself, you’ll probably need a little more wood), hinges and windows (you can install regular glass yourself in a new bathhouse). I haven't counted the frame of the door frame yet. Plus the benefits of demolishing the barn, because... He's already fed up, he's blocking the area. So who the hell knows what to do. Or save money and try to fit it into less than 4 square meters. m. bathhouse with shower, or build a new one, 3 by 3 meters. Or order a truck and build from six-meter boards. 4 by 2, for example. Probably, we need to build a bathhouse from new materials. But I want to turn on the stove anyway. The question is, which of the two?
Features of reconstruction with an emphasis on savings
Due to the fact that the walls of our barn have been preserved in good condition, they can be used as a basis for interior decoration, and we will kill several birds with one stone:
- We will cover the dirty interior walls of the barn with a clean interior finish.
- We will somehow improve the thermal insulation qualities of the building.
- We will exclude the possibility of sweating of the “resin pockets” of the log house when exposed to high temperatures.
- Let's diversify the interior of the bathhouse in some way.
To save money, instead of linden or cedar lining, you can use aspen. Its wood generally meets the requirements we need, at a significantly lower cost per linear and square meter. We have already talked about the intricacies of finishing a bathhouse with various materials and, if desired, you can familiarize yourself with the presented arguments in order to choose the most suitable options for yourself.
The door to the steam room and, at the same time, the washing compartment are subject to increased requirements. Therefore, it is rational to make it from tongue-and-groove floor boards. In our particular case, the parameters of the door leaf are as follows: 1700x700x45mm, with a Z-shaped tie, which prevents sagging and divergence of the leaf. The threshold height is 80mm, which should prevent cold air from being drawn in. A compensation gap of 4 mm is left around the perimeter of the opening. The door is hung on corrosion-resistant aluminum hinges with a galvanized axle on polyamide liners. The opening is outward, without any locks or latches. In our case, it is better to dismantle the clay padding of the attic floor. On the one hand, this will relieve the load on the floors, on the other, it will make the attic space more attractive in terms of use as a technical area. Thermal insulation can be made with basalt wool slabs laid in the gaps of a load-bearing frame made from a 50x50mm bar, with a pitch of 700mm. The insulation is properly waterproofed with a film and the finished floor is laid on top of it, supported by the frame. It can be close, or it can be “scattered”. Depending on how often and for what purpose the attic will be used. And, of course, taking into account the financial component.
By the way! If, however, the issue of saving is still in the foreground, then Finnish experience can be used. The floor of the attic, instead of clay packing, is covered with sawdust and shavings, pre-treated with a fire retardant compound, as part of fire safety.
The pipe from the sauna stove can be routed in two ways: through the roof or outside, along the wall. We talked about the advantages and disadvantages of both methods in our article on chimneys. Now we just note that the internal penetration must be equipped with reliable fireproof shells with expanded clay backfill. The external chimney can either be made from sandwich pipes, or a metal pipe can be equipped with a device for collecting and discharging condensate.
Making a roof
The roof is made in the same way as the walls. Roof assembly:
- Frame made of pine boards 50x80.
- Filling with mineral wool.
- Thermal insulation layer made of aluminum foil.
The process of insulating the roof The second photo shows the outlet - air must circulate around the heat source (stove). Therefore, below under the stove I will also make a hole for air flow.
Flow hole in the furnace area
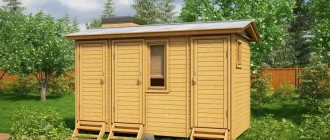
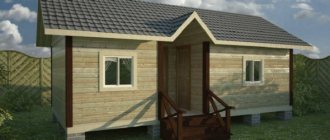
How to build a bathhouse from a barn with your own hands
If you are the happy owner of a summer house or a private house with a small plot, then you can set up a bathhouse in an old barn. It will give the whole family good health and wonderful relaxation after a hard day at work. Also, if the need and desire arise, you can make good money by setting an hourly wage and letting your neighbors, acquaintances and other people steam there.
We will equip an old barn, which we do not use, with a concrete floor as a steam room. The barn can be built from wood, brick, foam block or shell.
Are planning
We will allocate a considerable area of the barn for the steam room, approximately 6 square meters. m, this will be a small steam room; when calculating, take into account that there should be at least 2 sq. m per visitor. m. If you have a small family, then 6 sq. m will be enough for you, but if you plan to make money in the future using a steam room, then the area will accordingly be needed more.
Don’t forget to plan in advance the location and number of shelves, and determine the most advantageous place for the stove; the convenience of staying in your bathhouse from an old barn, which you will make with your own hands, depends on the layout.
We provide electricity to the bathhouse
To illuminate your bath, you will need a special double-insulated cable and a lamp that is resistant to high temperatures. The switch should not be ordinary, but moisture-resistant, it should be located at the entrance to the steam room, as required by fire safety rules.
The wiring should be deepened into the walls so that the cable does not interfere, and then the bathhouse will look better and neater.
Additions:
- all boards used for lining the bathhouse must be made from deciduous trees;
- do not skimp on wiring materials, cables, lamps, switches and sockets. Buy high-quality and moisture-resistant ones, because the life and health of your family and guests who will visit your steam room depend on it;
- lamps must be made of heat-resistant glass, since the temperature in the bathhouse sometimes rises above 100 °C;
- Many people like to plunge into a cool pool after a hot bathhouse. But if you can’t afford such luxury, build a small pond in the yard, or place containers with cool water, for example, barrels, into which you can happily plunge after warm and pleasant bath procedures.
And in winter, water procedures can be replaced with snow rubdown:
- Be sure to ensure that the water in the barrels, pool or pond does not stagnate. Disinfect containers with water. Especially if other people are bothering you;
- Over time, you will be able to expand the bathhouse, add a relaxation room, and use it to earn money. After all, this is a good idea for business.
conclusions
Now you know how to make a bathhouse from a barn with your own hands, it is not such a difficult task. By taking a steam bath, you get a lot of positive emotions, while seriously improving your health.
Yes, building a bathhouse is quite a labor-intensive process, and if you complete the job you started, you and your family will be happy, and if you approach this business with creativity, use your ingenuity and imagination, you can make good money.
Bathhouse made of polystyrene concrete
Polystyrene concrete blocks have poor thermal conductivity. For a bath this is an ideal option. However, the material absorbs moisture. The walls of the bathhouse are protected to the maximum with reinforced waterproofing from the inside and outside.
Bathhouse construction technology
A reliable strip foundation is poured under a bathhouse made of polystyrene concrete blocks. From above, the base is covered with two layers of roofing material. Laying out the walls starts from the corners. The first row of bath blocks is placed on cement mortar. The subsequent rows are laid using glue. The thickness of the seam is kept to a maximum of 5 mm. Every third row is reinforced. Grooves are cut in the blocks for the rods. The laid reinforcement is filled with mortar. Further laying is again done using glue.
The roof of the bathhouse is made gable. Mauerlat is laid along the perimeter of the walls. Rafter legs and floor beams are attached to it. The rafters are filled with sheathing, waterproofing is rolled out, and a roofing covering, most often corrugated sheeting, is laid.
A ventilated façade is installed on the walls of the bathhouse outside. Mineral wool is used as insulation, and the cladding is chosen as desired. The inside walls of the bathhouse are similarly insulated and vapor barriered. Wooden lining is used for cladding. The ceiling of the bathhouse is hemmed in the same way as the walls. The floor is concreted. The rest room is tiled and heated with electric mats. Boards are laid inside the steam room.
The video gives tips on how to properly lay out the blocks:
Pouring the foundation
For a bathhouse with a garage, a strip foundation is usually poured. The exception is small, light and mobile baths that can be placed on a columnar foundation. A strip foundation is more difficult and expensive to build, but the result is worth it. Such a foundation can support both a stone building and a bathhouse with two floors.
The trench into which the foundation will be poured is dug along the entire contour of the building, as well as under load-bearing internal walls, if they are intended. The basis of the strip foundation is a carefully compacted sand cushion. Sometimes the foundation is reinforced to give it greater strength. If the building is being erected from stone materials, this will have to be done. Before pouring, pipes for the bathhouse sewage system are laid in the trenches, if this is provided for in the project, and other communications are installed.
The process of pouring a strip foundation for a utility block and a bathhouse
After pouring the concrete, the foundation should set and settle for several days. It is desirable that the strip foundation for the bathhouse rise above the ground by at least 25 cm. Waterproofing of the foundation is required; this can be thick construction cellophane or two layers of overlapping roofing felt; sometimes for even greater insulation it is coated with bitumen along the entire length.
Furnace and ventilation
I placed a stove-stove on fire bricks near the door. He also placed bricks between the stove and the wall. The pipe was taken outside. The stove was fenced with wooden railings so as not to accidentally touch the hot metal.
I drilled a small hole in the wall next to the stove to allow air flow into the stove. I also made a ventilation hole under the ceiling. Both openings were equipped with valves that allow you to regulate the inflow and outflow of air.
Link on topic: Do-it-yourself bathhouse - several options for building a bathhouse
So that it doesn't drip on your head
No matter what drawing you draw, the requirements for any type of woodshed are the same. Freshly cut firewood should dry well in it, and dry firewood should not get wet in the rain and snow. This means that it is necessary to ensure good airflow (ventilation), but protect the structure from dampness. And direct sunlight.
The latter seems strange, but experienced people confirm: firewood that has been lying in the sun for a long time does not burn well in the stove and produces little heat. Provide lighting. It will come in handy in the evening.
The approach to the woodshed should be convenient and clean. If you are not confident in your design talents, place the woodshed on the back side of the house so that it does not become an eyesore. Choose a site for construction on a level and dry place.
Do-it-yourself bathhouse from a barn
You can get by without building a dugout if there is an old barn in the yard. After a little modernization, the building will turn out to be a good bathhouse. The shed is suitable from any material: wood, stone, foam block, brick.
The construction of a bathhouse begins with the layout. Most of the barn is used for the steam room. It is optimal to calculate 2 m2 of steam room area for 1 person.
Under the stove, choose a place where there will be a partition separating the steam room from the locker room. When planning a bathhouse, think through a convenient arrangement of shelves. It is optimal to make the floor pourable. The underground is filled with concrete screed or laid out with slabs and waterproofed with bitumen. Logs are laid on the base, a board 50 mm thick is laid with a gap of about 5 mm.
Ventilation windows - vents - are cut out in the foundation of the barn. Through them, they organize the drainage of water from the underground of the pouring floor.
Important! The concrete screed of the underground is made with a slope towards one of the walls for better water drainage.
It is optimal to cover the walls of the bathhouse with aspen boards. First, a timber frame is attached. The walls are covered with waterproofing, insulation is placed in the cells of the frame, covered with a vapor barrier, and the board is nailed down.
To cover the walls of a bathhouse, it is optimal to take a board with connecting grooves. The locking connection reduces the likelihood of steam penetration into the insulation. The nails are driven in with the heads going deep into the body of the board, otherwise you can get burned on them in the steam room.
Covering and insulating the ceiling of a bathhouse is no different from finishing the walls. You can use a thin board for cladding. The shelves for lying are made of boards 50 mm thick. The wood is sanded well. The optimal shelf width is 700 mm.
The video shows an example of remodeling a bathhouse:
Furnace and ventilation installation
A platform made of refractory bricks is laid under the stove in the bathhouse. The chimney exits through the roof. The stove itself is laid out in brick or a metal potbelly stove is installed. In any design there is a place for heating stones and water.
The furnace firebox is located in the dressing room of the bathhouse, and the rest is located inside the steam room. For ventilation, vents are cut out in opposite walls. The lower air intake window rises 500 mm from the floor, the upper exhaust window rises 2 m from the floor.
FAQ
Conduct an internal inspection. Seal all visible cracks and defects. Additionally, insulate the walls using 5 x 5 cm bars. The step between the bars is 2 cm. Place the insulation in the sheathing and cover it with a vapor barrier film. After this, you will level the walls and be able to lay the finishing material or secure the old one.
It is not necessary to buy new roofing material. If the holes are small, they can be sealed using a special solution. To do this, mix asbestos, water, cement and add PVA glue. Apply the composition in 2 layers, first waiting for the first one to dry.
Try to make the shelves wide. The optimal width is 65-70 cm, of course, if the size of the room allows. Be sure to treat the surface of each shelf to avoid splinters.
Source
Time for change: how to make a bathhouse out of a barn?
If there is an old and unnecessary barn on your country plot, you can quite easily convert it into a bathhouse. All redevelopment work takes place in several stages and requires the following actions:
- The first step is to determine whether the building needs to be surveyed to determine whether it needs renovation. If everything is in order, then you can begin remodeling the barn.
- Since the bathhouse is 2 rooms, one of which contains a dressing room, and the second a steam room, you will have to build a partition with a door inside the building.
- Now let's start arranging the floor. In the room where you plan to install a steam room, make sure there is a drain and a slight slope that would allow water to flow better and faster into the hole.
- You will have to make sure that the roof has good waterproofing. In addition, it will need to be insulated so that the building does not release heat. The most successful solution would be to choose wood for arranging the ceiling. It is important that beams and beams are impregnated with protective agents against rot, fungi and insects.
- To insulate the roof, it is necessary to lay the beams at an angle of 90 degrees relative to the wall. Boards should be nailed at the bottom, and the empty space should be filled with insulation and insulation. It is very important that there are openings in the roof for the stove chimney.
- Insulation of a future bath also includes thermal insulation of the walls. For this purpose, a wooden sheathing on top of which sheets of insulation are laid is best suited. After the insulator is laid, you can proceed to finishing work.
- The most current and popular finishing option is wall cladding using wooden slats. Among the most successful types of wood are hardwoods. Unfortunately, cladding with pine or spruce is impossible due to the fact that these species begin to release resin when exposed to high temperatures.
- Do not forget that there should be a space of at least 2-3 centimeters between the insulation and the sheathing.
- When everything is ready, you can think about choosing benches and sun loungers. By the way, here again preference should be given to deciduous trees.
Self-construction or use of a ready-made project
When a bathhouse is combined with a barn or other technical room, many shortcomings are made, which subsequently lead to larger fire safety violations. Even externally, such buildings will look less aesthetically pleasing.
In this regard, the best option is to use a ready-made individual or template project, according to which the future owner of a bathhouse with an extension has the right to build it himself or hire specialists.
Proper planning allows you to:
- be confident in the reliability of the buildings being constructed;
- calculate the cost of the complex;
- draw up a plan for the phased implementation of construction work and see in advance what will be obtained after its successful completion.
Typical designs of bathhouses with utility units differ in the following parameters:
- linear dimensions;
- total cost;
- complexity of construction work;
- number of premises, etc.
Bathhouse from a gun carriage
In villages, in simple language, truck trailers are called carriages. For bathhouse builders, a carriage is a round timber hewn on both sides. The material is also called “two-roll timber”. The carriage was invented by the Norwegians. They came up with the idea of a strong locking connection. The docked carriage does not allow heat to pass through and ensures reliable stability of the walls of the bathhouse.
Laft baths have a number of advantages, but there are also several disadvantages.
Positive features:
- The carriage is environmentally friendly. Wood does not emit chemical impurities in the bath, creates an aroma, and maintains a special microclimate.
- The locking connection of the carriage is considered one of the most durable. The walls of the bathhouse are not deformed in dampness or after drying. There are no gaps between the carriage.
- The appearance of the carriage has natural beauty. There is no need to additionally line the outside of the bathhouse.
- For the carriage, logs with a thickness of about 400 mm are used. Such a bath wall reliably retains heat without additional thermal insulation.
- The carriage inside the bathhouse is beautiful. The walls do not need to be sheathed with anything additional.
- The price of the carriage will seem high to many, but the construction of a bathhouse will be cheaper due to the absence of the need for additional interior and exterior decoration.
- If we compare two identical bathhouses made of a carriage and a rounded log, then the first building turns out to be more spacious.
- The walls made from gun carriages are lightweight. There is no need to pour a powerful foundation under the bathhouse.
We suggest you read: Installing a door frame: tips for beginners
Among the shortcomings of construction from a gun carriage, 3 important points are identified:
- The carriage is susceptible to rotting faster than a log. The problem is the hewn sides. The core of the tree is exposed, which is less resistant to moisture. To increase service life, the carriage is often and carefully treated with protective impregnations.
- The cost of a bathhouse built from a gun carriage will be cheaper when compared with stone buildings that require interior and exterior finishing. In other cases, the costs will be higher. Construction from logs or beams will cost less than a similar option from a gun carriage.
- An important drawback is the appearance of cracks on the carriage. However, not a single tree is immune from this problem. The cracks in the carriage are not through.
In terms of speed and ease of construction, timber construction wins. In the carriage there is a difficulty in making the locking connection.
Advice! It is better to buy a bathhouse carriage with ready-made locks.
A bathhouse is assembled from a gun carriage in the same way as a construction made from timber or logs. First, the foundation is poured, the walls and roof are installed, and the interior space is arranged. The difference in construction is the assembly of walls from gun carriages. Logs are used from coniferous trees. To make a carriage yourself, the round timber is dried. Pre-made longitudinal cuts will eliminate the appearance of cracks. The shrinkage of logs for carriages after drying reaches from 5 to 15 cm.
The corner connection of the carriage has a similar pattern to the Russian bathhouse. The edges are made with protruding ends. However, according to the Russian system, the lock of the bathhouse logs has a semicircular shape, and a secret wedge is made on the gun carriage. It goes inside the groove of the lower crown of the bathhouse.
The semicircular connecting lock of the Russian bath is connected to the insulation lining. The carriage wedge fits tightly into the groove. Without insulation, a castle according to the Norwegian system does not allow cold to pass through. The lower crown of the bath is laid on a 60 mm thick embedded board. The initial assembly of the log house is carried out without dowels. Major assembly is performed after errors are eliminated.
Important! If ventilation slots can be arranged between the logs, then the number will not work with a gun carriage. The air is left under the roof of the bathhouse.
The construction of the carriage is difficult only in construction. In all other matters, the bathhouse wins.