There is no arguing about the need to build a toilet on a summer cottage. Installing a summer shower in the country is also an equally important and necessary part of comfort. But structures built separately take up a lot of space, and if the dacha plot is small, then they try to build them in small sizes. This option is inconvenient and uncomfortable. To solve this problem, you can build a toilet and shower combined in one building with your own hands.
- 2 Advantages and disadvantages over separate structures
- 3 Preparing a project for a shower room combined with a toilet
- 4 Choice of materials
- 5 Tools needed
- 6 Step-by-step instructions for DIY construction
- 7 Installation and nuances of use in the country
- 8 Video: stages of construction of a country toilet with a shower under one roof
Shower and toilet projects for a summer residence
Before planning a utility unit, study the rules of SNiP.
Then a site is selected in accordance with the parameters: a cesspool is installed at a distance of 20 m from the well and at a distance of 5 m from a residential building; Important! This rule is neglected if a powder closet or dry closet is installed, because
sewage does not have direct contact with the soil.
4 m from plantings; 1 m from outbuildings; 2 m to the fence; 10 m from the water supply.
In addition to SNiP, the possibility of supplying water and electricity is taken into account. The cabins must be illuminated so that it is possible to take a shower at night. A tank for water intake is installed on the roof of the shower, so the water supply must be thought through at the design stage. Some summer residents install heating, so it is necessary to plan for electric heating elements and insulating building materials.
The project of a utility block for a dacha can be arranged in several options. The first is a rectangular building 4 m long and 2 m wide. The room is divided into three compartments:
- toilet;
- pantry;
- shower with changing room.
Each compartment is equipped with a door, and the barn has a window. The dimensions of the toilet and shower are 1.05 m * 2 m, with a total area of 1.61 m2. The length of the pantry is 2 m, the width is 1.9 m, the total area is 3.23 m2.
The second option is a rectangular dacha cabin 2.5 m high, 5.8 m long, 2.3 m wide. The building is equipped with one entrance door and two windows. Upon entering the utility block, you find yourself in a corridor with two doors opposite each other. One leads to a bathroom equipped with a shower and toilet. The second door leads into the room. This compartment can be used as a storage room or as a living room while the main house is being built. The change house allows you to equip a warm shower and toilet in the country by placing the heating system in the corridor.
The third version of the project is a utility block with a toilet and shower, 2.3 m wide, 5 m long, 2.5 m high. The room is divided into three: a toilet, a shower with a dressing room, and a shed. Each compartment has its own door. The toilet is 2.3 m long and 1.1 m wide, with a total area of 2.53 m2. Shower length 2.3 m, width 1.8 m, total area 4.14 m2. The shower room is equipped with a dressing room and a bench. The storage room is 2.3 m long, 2.1 m wide, with a total area of 4.83 m2.
The next option, a project for a utility block with a gable roof, differs in that the entrance to the bathroom is on one side, and the pantry is on the opposite side. The total area of the building is 11.15 m2, width 3 m, length 4.5 m. The shower and toilet for the dacha have separate rooms, each of which is equipped with a door and a dormer window. Toilet area 1.75 m2, width 1.23 m, length 1.475 m. Shower area with changing room 2.1 m, width 1.47 m, length 1.475 m. Shed with a total area of 7.3 m2, width 3 m and length 2.725 m is equipped with an entrance door and a window.
An interesting option is a corner utility block and shower with toilet for a summer house with a total area of 13.68 m2 and a length of 5 m. It has three compartments:
- toilet with a total area of 1.98 m2 with an entrance door and a dormer window;
- shower with dressing room, area 3.06 m2 with window and door;
- a room of 8.64 m2 with an entrance door and a window.
Let's dance from the stove
We don’t start with purchasing materials, choosing a location, or even with a drawing. Initially, you need to understand how much firewood is needed for the season. Why do you need them? For stove heating at home? Bath kindling? Organizing outdoor picnics or a home fireplace? All these needs require different amounts of firewood.
The choice of design depends on the volume that will have to be stored. Do you go to your dacha only on weekends to take a steam bath and barbecue? Then prepare no more than one and a half “cubes”.
Do you constantly live in a house that is heated by a stove? Here the calculation of the need for firewood will be different.
It is believed that for heating a living space of 100 square meters. m will burn up to 2.5 cubic meters of wood per year. But it's always better to have a two-year supply on hand. After all, wooden blanks reach minimum humidity only after a year of storage. They are the ones that burn the best and longest.
In villages, up to 12 “cubes” are harvested at a time. These are several cars. For warehousing and storage of large volumes, a simple shed is not enough.
Below you will find a description of different types of woodsheds - attached and permanent. And also tips on how to stack firewood at the dacha so that it retains its combustible properties for as long as possible and does not spoil the appearance of the site.
Outdoor toilet diagram
The most common option for a country or garden toilet is a rectangular structure. It is also called a “birdhouse” because in the version with a pitched roof it is very reminiscent of it.
Project of a country toilet made of wood like “Birdhouse” (to enlarge the size of the picture, click on it with the left mouse button)
In the toilet drawing shown in the photo above, a 40 mm thick board was used for finishing. The construction is quite inexpensive. Doors can be made from the same boards, fastened with strips at the top, bottom and diagonally. The hinges can be installed externally, like barn hinges, decorating the building in a deliberately rough style.
Samples of country toilets: the drawings are the same, the design is different
Despite the fact that the building is utilitarian, if desired, it can be given an attractive appearance and the birdhouse will turn into a quite attractive small building. For example, you can make a small mill from this building.
Country toilet-mill - a little imagination and an unsightly building becomes a decoration of the site (to enlarge the size of the picture, click on it with the left mouse button)
The same birdhouse, but made from a log house - a completely different look. Everything will look especially harmonious if the building on the site is built (or will be built) also from logs.
Even the simplest log toilet looks almost exotic. Moreover, it can also be used as a winter option (to increase the size of the picture, click on it with the left mouse button)
For regions where wood is a luxury and it is irrational to spend it on building a toilet, the same structure can be sheathed with a different material. For example, the frame is sheathed with any sheet material - plywood, fiberboard, gypsum fiber board. You can lay finishing material on them outside - tiles or decorative stone. An even more budget-friendly option is to sheathe it with corrugated sheeting.
You can build a toilet in your dacha with your own hands from any material. This one is made from corrugated sheets (to enlarge the size of the picture, click on it with the left mouse button)
This is the type of toilet that is not difficult to build using bricks. They are usually made in half a brick. There are no difficulties even for an inexperienced mason. Offset masonry, cement-sand mortar.
Using the same project and drawing, you can build a brick toilet (to enlarge the size of the picture, click on it with the left mouse button)
Distance to a pit toilet for 2022
For holiday villages, sanitary standards were adjusted taking into account the constant complaints and disputes of neighbors about the discomfort from neighboring toilets. According to SNiP 30-02-97 as amended in 2022 and SP 53.13330.2011, in the territory of dacha settlements, rural and urban settlements, toilets with cesspool type pits should be installed at a distance of 12 m instead of 8–10 m.
Their construction for a holiday village requires permission from the SES at the design stage. Instead of traditional houses over a pit, it is recommended to build septic tanks and install biotoilets with special compounds processing feces into odorless inorganic substances, as well as powder toilets with processing feces into dry matter. There are standards for the installation of powder closets with the collection of waste into boxes with powder, drying of the contents and processing into inorganic fertilizer.
If you have a home sewer system and the types of pits recommended by SNiP, you can place the toilet closer. The demarcation between a dry closet and a septic tank from a neighbor's house is allowed 6 m, for a powder closet - 8 m.
The distance from the toilet to the neighbor’s residential building should be measured at 12 m, the same as to your own. According to changes in SNiP, the permissible distance to the playground and cellar remains 8 meters.
Based on SanPiN 42-128-4690-88, for places where the size of the plots does not allow maintaining the distance to yard toilets and waste disposal pits, standards are established by a commission that includes representatives:
- Quarterly Committee.
- Regional architecture.
- SES - Sanitary and Epidemiological Station.
- Housing and maintenance department.
Based on the results of the site inspection, the commission draws up a report with recommendations on the layout of plots and changes in the minimum distances between residential buildings and toilets. Documents are submitted to the executive committee or village council for approval.
In rural areas or villages, in cities and towns, an outdoor public toilet should be located from public buildings, schools and shops at a distance of 20 to 100 m.
Subtleties of choosing building materials
Once the decision on the type of toilet structure has been made, you need to select the material that will be used in construction. The choice of building material is important even at the stage of drawing development.
Most often used:
- tree;
- brick;
- metal.
These are familiar materials for summer residents, which almost everyone knows how to handle.
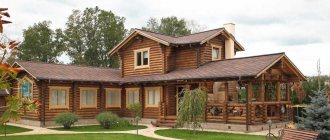
Option #1 - a simple and reliable wooden toilet
When it comes to country house construction, the first thing that comes to mind is all kinds of buildings made of wood.
Boards and beams made from inexpensive, but quite strong and durable coniferous wood are easy to obtain, and the work does not require complex equipment. In extreme cases, you can work with wood even without the use of power tools.
Depending on how you design your toilet, you can build completely different restrooms from the same drawing. One of the options is to decorate the walls with a block house or clapboardIf you want to make a toilet not just practical and functional, but also a full-fledged decorative element at your dacha, try building it from a log house. It will take a lot longer, but the result is worth it.
A country toilet is not the most favorable environment. Wood can rot and collapse if it is not treated with special means. Impregnation with an antiseptic is a mandatory condition when constructing a latrine from lumber.
The construction of a toilet house using frame technology includes a number of traditional stages:
Option #2 - permanent construction made of bricks
The advantages of brick buildings over wooden ones are known to everyone from the fairy tale about the three little pigs.
In addition to strength, a brick toilet has low thermal conductivity, which is important if you go to the country in the cold season. A brick country toilet looks like a house with a single- or gable roof
Windows can be designed.
It is not necessary to use ordinary brick. More modern block materials such as foam concrete, cinder block, aerated concrete will be an excellent alternative
The design of such a toilet includes not only a drawing of the above-ground part of the toilet, but also the foundation. In this case, it will not be possible to do without a foundation, since the dead weight of the brick building is quite large.
Without support, the soil will soon become compacted and sag, which will cause cracks in the walls of the toilet.
Option #3 - metal toilet
Metal is a material with a high thermal conductivity coefficient. A closet made of metal sheets will be unbearably hot in summer and very cold in winter.
Without the use of thermal insulation materials, an iron toilet in a country house can only be a temporary project - until the construction of the main toilet.
Most often, corrugated sheets are used, sewn onto a metal profile frame. In this embodiment, a profiled sheet of metal is used. Polycarbonate roof on a metal frame
It is difficult to achieve tightness at the joints of such a thin and flexible material. There will be cracks in the corners through which the wind will blow through the house, which also does not add comfort.
If you apply modern technologies and use sandwich panels as wall materials, you can get a completely comfortable restroom. Polystyrene foam or mineral wool is used as insulation.
We also recommend that you study our material on how to build a toilet in your country house with your own hands.
Foundation preparation
For the strength and stability of the utility block, you first need to build a foundation. For sheds made of wood or those that are collapsible, a columnar foundation is suitable . If the building is made of brick, then a strip-column foundation is needed.
Recent Entries
Chainsaw or electric saw - what to choose for the garden? 4 mistakes when growing tomatoes in pots that almost all housewives make Secrets of growing seedlings from the Japanese, who are very sensitive to the soil
The process of pouring pillars is very simple. For the posts, you need to take a garden drill and dig round holes located in the corners and in those places where the load of the shed will be maximum; the depth of these holes should be approximately one meter and twenty centimeters. If you have the financial means, you can use asbestos cement pipes.
But it’s cheaper and faster to make your own pipe from roofing felt with the diameter of the hole. Then at the bottom you should make a cushion of sand and gravel from one hundred to one hundred and fifty millimeters, and install a pipe, and inside it a frame made of reinforcement. First, concrete is poured to one third and the pipe is pulled out one hundred millimeters. After two hours, you can add the rest of the concrete.
A strip-column foundation is more difficult to pour. It is necessary to fill the pillars, and between them it is necessary to dig a trench fifty centimeters deep . It should be fifty millimeters wider than the shed wall. Next, formwork is made, reinforcement is laid and concrete is poured.
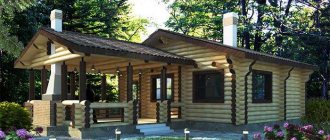
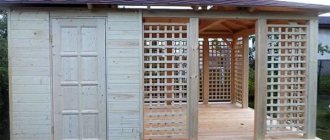
What is a utility block with toilet and shower?
The name of the utility block with toilet and shower speaks for itself; it is a combined structure that allows you to combine several rooms for various purposes. Such premises can be not only a toilet and shower, but also a storage room, garage, shed or a place for a recreation area.
Such buildings were previously used to store various things and garden tools. But, subsequently, they were assigned a different role. They began to be used more purposefully, equipping a kitchen, shower or veranda inside.
The size of a utility block with a bathroom and shower may vary, depending on what goal a person pursues when erecting such a structure for his dacha.
The advantage of such premises is that several sections of a certain value can be placed under one roof.
In one utility unit you can place:
- Storeroom, garage, shed, toilet, shower, veranda.
- Toilet, shower, terrace, veranda.
- Shower, toilet, bathhouse, garage and storage room.
This utility unit combines three functions;
This utility unit (pictured on the left) is designed for storing garden tools, storing tools or equipment. After harvesting, the harvested supplies can be dried and packaged indoors.
The toilet room is located inside the woodshed (there is no need to install an additional building on the site), and it will significantly save your budget, since buying a separate toilet and delivering it will cost a tidy sum. Our development of a 3 in 1 utility unit will help you save a lot and free up space for beds and flower beds.
The woodshed is designed for storing and drying firewood. This woodshed can accommodate up to 8 meters of cubic firewood.
Why make a country shower and toilet under one roof?
Very often at the dacha there is a need to go to the toilet and shower. It's especially great to take a cool shower during the hot summer. If you build a toilet and shower separately, it may take up too much space. Therefore, it is useful to build a combined country shower and toilet under one roof.
The main feature of combining a shower and toilet is that they will form a single structure. This is convenient, since everything will be at hand. The shower and toilet must have separate doors, and the rooms must be separated by a wall. It can be made from either wood or brick.
As for the toilet, its design must include a container for storing water and its subsequent supply. It is necessary to connect pipes through which water will be supplied to this container. Water enters the toilet through pipes that are connected to the washbasin and toilet tank. There should also be a pipe running through the shower that will be connected to the shower head. In order to regulate the water, you should install a faucet in the shower. This way you can control the water pressure from the pipe. All this is sold in plumbing stores.
When you choose a place for a toilet on your site, take into account access to the sewage systems that are needed to pump out sewage from the toilet. If you are digging a deep and wide hole for a toilet, then you need to take care of the hatch. It is needed to drain the contents of toilet waste.
Making a country shower and toilet under one roof is not without its advantages. The advantages of such a building include:
- Saving space on the site where you can plant flowers and flower beds;
- Saving material for construction. When building a separate shower and separate toilet, a lot of materials go into building them. Combined shower and toilet save not only materials, but also your money;
- Short construction time. A combined shower and toilet can be built much faster than they are built separately;
At the same time, it is worth adequately assessing the construction of a combined shower and toilet. Therefore, there are also disadvantages:
- The smell from the toilet can be felt in the shower. Of course, if you sprinkle the pit with sawdust and take care of the cesspool and the toilet itself, then there will be no odors. But if you treat this issue with disdain, the smell will manifest itself;
- A pump must be constantly connected to the shower tank. It is needed to pump water into the tank. But you can also make automatic water supply;
- The water is cooling. But you can make an open barrel, in which the water in the open sun will constantly heat up. This will help you take a pleasant summer shower under the rays of the sun.
Many summer residents still do not understand why there is a country shower and toilet under one roof. In the end, it turns out that this is convenient, practical and budget-friendly than making a shower and toilet in different places. Show an example of a combined shower and toilet on your property, and your neighbors will want one. Go for it!
Step-by-step description of the workflow
Let's look at the step-by-step process of building a wooden shower with toilet on a personal plot:
- First, the site for construction is prepared. It is cleared of debris, roots, and carefully leveled.
- Next, a pit is dug for the drainage hole.
- Afterwards the foundation is laid.
- The next stage is the construction of the frame, which is sheathed with boards, OSB boards or other material.
- Next, windows and doors are installed, communications are provided.
- The final stage of construction is the arrangement of the roof, and after that you can proceed to the interior finishing work.
We start with design
The main thing is to make sure that all amenities are located inside one house. And there will be no need to litter the area with many small buildings that stand separately from each other.
In general, when creating projects, it is worth considering several factors. First, this building should be located as far as possible from other buildings. After all, it is characterized by a constant outflow of water, and a high level of humidity is constantly maintained inside. Sunlight should freely penetrate inside, so there should be no heavy trees nearby.
At the same time, everyone decides for themselves whether it is necessary to build a foundation in this case or not. It becomes a mandatory requirement for situations where a full-fledged utility block is being built. Screw piles are the most affordable solution, and their installation does not take much time.
The drawing should also take into account the materials that will be used in the future.
Selection of materials
It is believed that wood is most suitable for such construction. Buildings are built from it the fastest. The outside surface is sheathed with clapboard or corrugated sheets, and the roof is covered with tiles. It is necessary to provide for the installation of two plastic windows.
You can separate the shower and toilet areas with partitions to make it more convenient. Thermal insulation will strengthen the interior walls of the room, so now it will be comfortable inside even in winter. Typically, this role is played by polyurethane foam, membrane or glass wool.
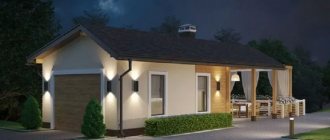
What is more profitable: buying a ready-made utility block or building
If the utility block is the first building on a new site, then the shortest possible time is allocated for its construction. Often the owner of a plot of land is faced with a choice: to build or buy a ready-made building.
There are options available for sale on a metal frame, the construction of which is quite a labor-intensive and slow process and requires welding. The advantage of such a construction is a long service life and the ability to be transported to another location.
Metal utility block for shower and toiletSource velesagrovet.ru
You can purchase a ready-made utility unit with a shower and toilet in a frame, panel or other design. It is enough to install the structure on a lightweight foundation or concrete slab.
However, ready-made utility units are small in size. They consist of a room, shower and toilet, which does not suit everyone. Many private owners are inclined to a more economical and diverse option in terms of layout - construction according to the project they like.
Organization of utility unit
For ease of use, sometimes in dachas they use a combination of toilet, shower and shed at the same time. The resulting structure in one block takes up less space and is economically beneficial from the point of view of waste disposal. If living in a dacha occurs in the summer, this is an ideal option.
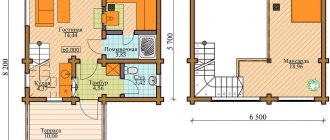
Plan of the Cheburashka economic block
Layout of a utility block with a utility room
The combination in the order of warehouse-shower-locker room-toilet is popularly called “Cheburashka”. The implementation is similar to building a cabin using support posts and wooden blocks, but differs in size. With proper installation and location, the construction is compact and expedient in the future process of its operation.
Layout of the utility block (toilet-shower-shed)
Right view
As you already understand, building a country toilet with your own hands is not so difficult, since this process does not involve any heavy technical operations. The design of the cabin depends only on your capabilities and imagination. The main thing to remember is that the decisive factor in the successful construction of a country toilet is its ease of use and correct location.
What designs of toilets for summer cottages exist?
Such buildings can be divided into several varieties suitable for a summer residence:
- toilet house with cesspool;
- standard powder closet;
- factory biotool.
Toilet house with cesspool
For such a structure, a foundation pit is first dug. Then they build a cesspool by strengthening the walls with concrete rings, bricks, monolithic concrete, or installing a plastic container in the pit.
A toilet house made from scrap material is installed above the pit, in which a pedestal or toilet seat is placed. Such a toilet design for a summer house involves the accumulation of waste in a cesspool.
To eliminate the smell spreading from the cesspool, install a ventilation pipe
If the structure is not sealed, liquid waste partially seeps into the soil or evaporates. Filling a sealed pit occurs faster. When sewage reaches a certain level, it has to be removed. Cleaning is carried out either independently using a pump, or by calling a sewer truck.
Powder closet - a house without a cesspool
A house is also built for a powder closet, but without a cesspool. In this version of the country toilet, waste is collected in a container located under the toilet seat. For greater convenience, two “different-sized” tanks are installed. Small holes are made in the smaller one and inserted into the larger one, on the side of which a round outlet is made and a drainage hose is installed. It will drain excess liquid into the ground or into the drainage system. A container for the filler is placed next to the toilet seat. This could be sawdust, peat or dry soil.
Despite the fact that the filler partially suppresses odors, the powder closet requires the installation of a ventilation pipe
After visiting the toilet, the waste is sprinkled with litter. This reduces unpleasant odors and promotes the decomposition of sewage. As the tank fills, it is taken to the compost heap. The scheme for constructing a powder-closet-type toilet in a country house should take into account the method of obtaining the container. Basically there are only two of them. In the first case, the reservoir is removed from the toilet seat by lifting the seat. In the second, a small door is built at the back of the building, by opening which you can remove the drive.
If you don’t want the hassle, buy a dry closet
For those who do not have the desire or time to build a toilet, there are ready-made products. Manufacturers of dry closets have already taken care of everything. All you have to do is choose the appropriate option and install it in your room or house. If funds allow, you can buy a toilet along with a stall.
Whatever type of toilet is chosen, it is advisable to begin its construction by drawing up a diagram. It is necessary to indicate the dimensions of the structure and the location of all components. For example, the construction plan for a country toilet with a cesspool should be drawn up taking into account the width and depth of the pit.
Advantages of cabins
Unlike ordinary outbuildings, which previously served as temporary housing, standard cabins are more durable and reliable. By leaving things and equipment in the shed for a long time, you don’t have to worry about the safety of all this property.
The cabins are built on the basis of professional designs, in which the optimal dimensions of the premises, window and door openings are used. In projects, the most comfortable arrangement of all planning elements is thought out. Therefore, country houses are quite convenient to use. You can at least stay in them overnight or shelter from the rain. In any case, having installed an equipped change house, you will not have to build a separate shower-toilet for your dacha.
Inexpensive lightweight materials are used to make cabins. They can be placed on a prepared site without having to carry out complex work on building a foundation. The materials of garden houses allow for high-quality insulation of walls, floors and ceilings, and therefore they are suitable for use at any time of the year.
Insulated cabin for year-round useSource vagon32.ru
If necessary, the cabin can be moved and installed in another location. If such a temporary building is needed for only one or two seasons while a cottage is being built on the site, then upon completion of construction it can be sold to other summer residents.
Design of a country outdoor shower
In fact, all summer showers have three main components - a water tank, a cabin and a drain. Let's look into every detail. The water container should be enough for the maximum number of showers, but the large volume should not negatively affect thermal comfort. For better heating, special flat tanks made of dark plastic or metal are suitable.
Outdoor country shower and toilet
The color and shape allow not only to receive more sunlight, but also to warm up all the water. If you use thick tanks and barrels, the lower layers of water may not warm up completely, but they are the first to pour out when the tap is opened.
| We build an outdoor shower and toilet | We build an outdoor shower and toilet |
To increase the efficiency, the container can be covered with a homemade greenhouse, similar to those made for seedlings. To do this, just knock down a wooden frame to the shape of the tank and cover it with transparent cellophane. The north side is trimmed with foil. Handles are attached to the top or sides of the greenhouse to make it easier to remove and place it when adding water.
| Country shower design | Design of a country outdoor shower |
Proper arrangement of the shower stall will make showering more comfortable
It is important to provide a vestibule for changing clothes and functional shelves and hooks for accessories. The simplest shower cabin design has three static walls made of polyester and one retractable curtain made of the same material.
The building is based on a square wooden pallet with a side of 1 m, the height of the walls is 2 m. A cabin often found in summer cottages is not exactly what a person living in a private house needs. Based on the shortcomings of this design, we will formulate several rules
The simplest shower cabin design has three static walls made of polyester and one retractable curtain made of the same material. The building is based on a square wooden pallet with a side of 1 m, the height of the walls is 2 m. A cabin often found in summer cottages is not exactly what a person living in a private house needs. Based on the shortcomings of this design, we will formulate several rules.
- Firstly, one room is not enough; it is worth at least making a small vestibule for changing clothes and storing bath accessories.
- Secondly, it is better to prevent possible drafts, even taking into account the high temperature of the summer air, since children can also take a shower.
- Thirdly, the material for the walls should be more durable.
Frame construction technology using a wooden or metal base can be called optimal in terms of lightness and strength. The outside of the walls can be finished with any material, but it is better to use the one that is used on the facade of the main building or other technical buildings. Waterproof products are used inside: plastic panels, durable PVC film, impregnated and coated wood. The finishing is attached to the frame, which must first be additionally protected with plastic film.
There are many options for ready-made shower stalls on the market, which all you have to do is install them on the constructed drain. The main part is a plastic tank.
The installation of a shower drain includes not only drainage, but also affects the entire base. Since the cabin area is small and the height is about 2.5 m plus a heavy tank on top, it is preferable to organize a pile foundation. To do this, four holes 1-1.5 m deep are drilled in the ground, metal pipes with a diameter of about 10 cm are immersed in them. The length of their above-ground part should be about 25 cm. Subsequently, a 10 x 10 cm beam will be attached to the pipes. By the way, bandaging it is more convenient to start from the top and carry it out on the ground, using long and thick bolts. But let's return directly to the stock. To collect water, the easiest way is to use a tray with a pipe connected to the drain, or a homemade reinforced concrete screed. Another method is to create a waterproof layer (laying hydroglass insulation or PVC film on an inclined embankment). In the latter case, a lattice wooden flooring is made under the feet.
The collected water can be discharged into a septic tank, and then to a filtration field. The latter is a plastic pipe buried in the ground with cuts that allow all the drained water to be distributed over a crushed stone base
It is important to consider the amount of water drained and whether the soils can handle it. Otherwise, the system will flood, spoiling the drainage material
Moisture-loving plants can partially help with water drainage. The cost of such a building directly depends on the materials used.
Construction stages
A country wooden toilet is a fairly simple construction. After the improvement of the waste storage facility is completed, the main part of the work begins.
- First, the foundation is formed. Posts are driven in around the perimeter. They will serve as a support. The posts can be metal, brick or wood.
- They knock together the frame. Ruberoid is applied to the rear part so that water does not “undermine” the base. The frame is located on posts.
- With the help of racks, frames and crossbars, the frame of the future cabin is formed - walls, seat, window for ventilation, ceiling, roof slope, door.
- The frame is installed and secured to the foundation.
- The frame and cladding boards are treated with an antiseptic.
- They knock together the door and attach it to the hinges.
- The floor and seat are covered with wood.
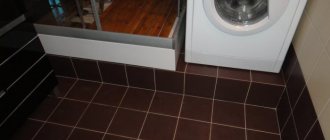
- For hygiene purposes, the circle around the hole and part of the floor are tiled to make the seat easier to clean, and dirt and water do not accumulate on the floor (they also use a regular plastic toilet seat, and cover the floor with a rug).
- Cover the roof.
- They conduct electricity and screw in a light bulb.
- A pipe for ventilation is attached to the rear wall.
These are the main steps - the rest depends on the type of toilet and the wishes of the owner regarding the decor and design of the cubicle.
The construction of a toilet box begins with assembling the boxSource byk.vykola.ru.net