It is difficult to imagine a modern kitchen without a hood. This kitchen unit performs an important function. A variety of models for air removal and purification allows you to select equipment of the desired shape and design.
Installing built-in appliances in a wall cabinet will not only help clean the air from odors and grease, but will also save space. The compact arrangement of such equipment occupies a small part of the kitchen furniture, which preserves the functionality and aesthetics of the interior. We'll tell you how to install a hood with your own hands.
Types of hoods and their design features
A variety of kitchen air filter devices
Before purchasing equipment, you should decide on the location where the stove will be located, since the hood is installed above it. The design features of the model depend on the installation location of the slab. Depending on the type of location of the kitchen area, hoods are divided into several types.
- Flat. It is small in size and does not require installation of an air duct. It has built-in filters through which polluted air passes. The disadvantage is that they need to be changed periodically. The service life of the filter directly depends on the intensity of use of the stove and hood.
Flat hood - an inexpensive option with built-in filters that takes up little space
- Dome. The equipment of this group is connected to ventilation and has high performance. The more impressive size of the case makes it possible to install larger fans than in flat ones. Therefore, they are used in spacious rooms where there is a need to filter a large air flow from the kitchen. Remove odors from far corners of the room.
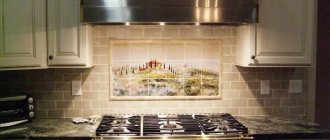
A dome or fireplace hood has good aerodynamics, operates almost silently, but is more expensive - Built-in. The most widely used type. The main advantage is that it hides in kitchen furniture or countertops and does not spoil the overall style of the interior. Another plus is that installing a built-in hood in a cabinet is easy to do independently and there is no need to call a paid technician.
A built-in hood is the most optimal solution for small spaces
Which type of hood to use depends on the size of your kitchen. If the kitchen is small, then the power of a flat hood will be quite enough. Built-in models are good in typical Khrushchev buildings. They save space, since the air duct and the frame itself fit neatly into the closet. In the kitchen, where space allows, there is a free-standing island; a fireplace or dome hood would fit perfectly there.
Scheme of operation of kitchen hoods
Reviews
These and many other hoods require self-assembly, so they will cost much less than similar hoods from other manufacturers. Read reviews of Ikea hoods - and find out about other models with equally effective performance.
Maria, Ryazan: I ordered a kitchen set from Ikea, and in the same catalog I also chose built-in exhaust hood appliances. I settled on the Lagan model with a capacity of up to 400 cubic meters, since there is not always a need for regular ventilation.
The hood is built-in, i.e. it is completely built into the surface of the furniture, it is controlled manually, all control keys are located at a convenient distance from the edge of the cabinet, so they can be switched with a light touch of the hand. On the same side of the keys there are also two small lamps: lighting along the back wall would also be nice, but such lighting is enough to see the hob area normally.
Among other advantages of the model, I can highlight the ease of dismantling the built-in filter: the grease removal panel can be easily removed from the body, so special efforts are not required to clean the hood in a timely manner.
Design - black durable glass: it will be an excellent choice for both modern and traditional kitchens, but it will look more successful in combination with a dark glass-ceramic stove.
Oleg, St. Petersburg: I was looking for a simple hood without bells and whistles, so that it would work properly and not make noise. We took a closer look at some options from IKEA, but they all differed in power.
Experts advised choosing a model with a “reserve” of performance, so I purchased a hanging dome hood for 10 thousand rubles. The selected model can work both using an internal filter system and in a standard way, through an air vent: then the power will be higher, although it is possible for unpleasant odors to get back into the kitchen.
I assembled the hood myself, and called specialists for installation, who also installed a valve that blocks the return flow of exhaust air. The hood is made of metal and painted white, matching the rest of the appliances in my kitchen. I was afraid that over time the light-colored body would no longer look like new, but so far everything is in order, so I can only say positive reviews about the operation of the hood.
If earlier I did not consider IKEA a worthy substitute for leading technology brands, today I will confidently give preference to the equipment of this particular manufacturer.
Sources
- https://ru-remont.com/kvartira/kuhnya/tehnika/krupnaya/vytyazhka/brend/ikea.html
- https://otzyvy.pro/reviews/otzyvy-vytyazhki-dlya-kuhni-ikea-339399.html
- https://ikeazakaz.ru/index.php?route=product/product&product_id=23724
- https://ikea-kitchen.ru/items/item-2144/
- https://irecommend.ru/content/kolpak-vytyazhnogo-shkafa-ikea-lagan-70304588-0
Built-in hood dimensions
Diagram of a hood with a retractable unit with detailed dimensions
In order to correctly install a built-in hood, measurements are taken of the slab and the existing cabinet into which the equipment will be built. If you do not pay attention to this, it may turn out that the size of the device will exceed the dimensions of the cabinet.
Frames and examples of layouts
This is the basis or background of the future METHOD kitchen.
The bottom row is represented by modules with a height of 80 cm or tall cabinets from 140 cm. Let's look at examples of what options there may be with real photos in the interior.
- There are both linear and angular ones, which, accordingly, allow you to create a kitchen with a linear, angular, U-shaped layout.
Corner kitchen METHOD "Budbin" in the interior
"Sevedal." Corner module – with a rotating section.
Linear kitchen "Budbin"
- Cabinets with shelves, with one or 2 doors (including under the sink).
- Modules with drawers (including under the sink). Retractable mechanism - Maximera (more expensive) or Forvara (cheaper).
- 80 cm modules for built-in appliances: hob, oven, dishwasher.
- Tall storage case with shelves, drawers behind the door, 208 cm high.
- Tall cabinet for built-in appliances: ovens, microwaves.
Glossy “Ringult” with built-in appliances
The upper row of METHOD kitchens is represented by cabinets with a height of 40, 60, 80, 100, 120 cm. There are also corner modules for the appropriate kitchen layout.
Wall-mounted units can be equipped with shelves, drawers or both. Doors can be solid, glass or open.
"Ringult" glossy
Gray IKEA kitchen "Budbin"
The frames are available in 2 options - white and black. They can be covered with a decorative panel or strip of the desired color by selecting the appropriate one in the corresponding section of the website “Overlay panels and strips”.
There are open cabinets and separate METHOD modules for storing wine and other items, for example, beautiful jars of spices, cookbooks, etc. These are available in the “Vadholma” and “Tutemo” series in the color of natural wood or in white and black.
Kitchen METHOD with open shelves
Installation of built-in hood. Required materials and tools
Correct installation of a kitchen hood
Let's consider the option when you decide that there is no need to make a new box, all that remains is to re-equip the existing wall cabinet. Before you begin installation, you need to decide on the material from which the ventilation duct will be made, and prepare the necessary tools so that everything is at hand.
Types of materials from which the air duct is most often formed.
Plastic air duct for connecting to the hood
Corrugated exhaust duct hidden behind the panel
Both types have a number of pros and cons. What to choose, you decide based on the parameters of the equipment, the capacity of the cabinet, and your preferences.
A structure made of flat rectangular pipes can be hidden in a suspended ceiling, almost without taking away the height of the room
The following tool will be useful for this work. For marking and measurements you need a tape measure, a square, a pencil. For cutting holes - a jigsaw, wood saws. A screwdriver, bolts, and screws will also come in handy. To glue joints, purchase adhesive sealant. To enhance the tightness, clamps are used; they need to be prepared.
Review of models from catalogs
Ikea is famous for its appliances with a simple design and compact shape, so it is not surprising that the built-in models of hoods from this brand are gaining the greatest popularity.
Small-sized appliances cannot always provide ventilation for large rooms, but in a small kitchen they can easily clean the air of any contaminants.
Several flat-type hood models from Ikea are suitable for attaching to the base of hanging cabinets. For example, there is a commercially available hood with a capacity of about 265 cubic meters per hour with a maximum noise level of 70 dB. This model can be installed either with a ventilation pipe to remove polluted air from the room, or without additional elements: in this case, it is enough to use a carbon filter.
An external grease-absorbing filter is included in the kit and does not require replacement: it is enough to periodically wash difficult stains in the dishwasher. The speed switches are located on the front panel of the hood body. The cost of this model is about 2.5 thousand rubles.
The next option for a built-in hood is a model with a metal design, which helps clean the room at a power of up to 322 cubic meters per hour. This hood can also work simultaneously due to air exhaust and circulation, but carbon filters are not included in the kit. The control panel is electronic. A hood of this type will cost from 4 thousand.
If you need to increase the operating area of your range hoods, but the lack of free space in the kitchen does not allow you to purchase a large model, slider telescopic hoods from Ikea are suitable for you. Such hoods are more expensive than other built-in models, but take up less space, since they are almost completely hidden in wall-mounted furniture. Outside the cabinet walls there will only be a sliding panel with a filter.
A hood of this type with a capacity of up to 323 cubic meters will cost from 6 thousand rubles.
An even better option for a cramped kitchen would be hoods that are completely built into the base of wall cabinets and hidden behind their doors. Such equipment is also presented in Ikea catalogs: a hood with a maximum capacity of up to 617 cubic meters and a noise level of about 66 dB will cost buyers 30 thousand rubles.
Wall-mounted hoods from Ikea are no less diverse in design and performance characteristics. A classic dome hood with a steel body with a maximum power of 400 m3/h costs about 7.5 thousand rubles.
A hood of similar shape and size with a capacity of 636 cubic meters with a ventilation air vent included costs 13 thousand and more.
A small cylindrical hood for installation against a wall, with performance characteristics of up to 320 cubic meters, will cost about 10 thousand.
Among the hoods of non-standard shapes for installation above a wall-mounted kitchen unit, pay attention to the model with a trapezoidal body, operating in exhaust and circulation mode with a maximum power of up to 626 cubic meters. This model is estimated at approximately 35 thousand rubles.
Hanging T-shaped hoods are also widely available. Modern models are complemented by elements made of black glass: a stylish hood of this type with a power of up to 630 m3/h and an electronic control panel on the front side of the body costs about 40 thousand rubles.
Among the less expensive options, pay attention to the hood without a ventilation pipe included, which is noisier, but purifies the air at almost the same power (up to 602 m3/h). Such a hood costs from 15 thousand rubles.
Ikea ceiling-type hoods are suitable for both island and standard kitchens. For example, a suspended square-shaped model with a capacity of up to 320 cubic meters per hour with two built-in filters.
Cylindrical island hoods are also popular in modern kitchens, so Ikea offers customers a wall-hung model with a capacity of 596 m3/h and elegant LED lighting. The cost of these models will be 25 and 40 thousand rubles, respectively.
1)MATTRADITION
At the top of our list is a range hood from a well-known brand. With years of experience in the industry, the company knows what and how to do better when it comes to indoor air quality.
Pros:
- There is no need to use air ducts;
- Inexpensive option;
- Multiple size options
- Easy installation;
Minuses:
- Not suitable for large rooms.
This unit is 6 inches tall and 17.5 inches deep. Widths vary from 24, 30, 36 and 42.
Designed to be so compact but with multiple width options, hoods can be combined with a variety of hob types and fit into most standard kitchens. Many satisfied customers also find that installation is effortless and the entire process takes no more than 40 minutes.
MATTRADITION
Relies on air recirculation and carbon filters rather than ductwork. Two-speed fan driven by a lubricated motor that spins at 2850 rpm at maximum speed, before steam and smoke, which carry heat, odor, grease, etc., through strainers and charcoal before being circulated back into room, the air will be purified.
However, ducted hoods do a much better job of maintaining kitchen air quality. However, how do you imagine having a chimney in your apartment? Ductless hoods are the best alternative.
One thing I forgot to mention is the suction of these models. Their maximum capacity is 190 cubic meters. In other words, these hoods can handle 19,000 BTUs, which is not as low as some people think. In fact, it is ideal for a regular home kitchen with a 4 burner stove.
The units are also equipped with 75W bulbs (A19), which are protected by lenses designed to distribute light evenly across the hob.
Overall, the MATTRADITION range is an excellent, well-rounded choice for the average ductless kitchen. Considering the price and functionality, you can't get a better deal.
OMNEID - BEST WALL HOOD
OMNEID has been on the market for quite a long time. You've probably seen their wall-mounted hoods on TV and in various stores, including IKEA.
Pros:
- Ducted (better ventilation);
- Several sizes available;
- Retractable pipe;
- Deflectors;
Minuses:
- Air duct required;
All products in the series are made of 430 polished stainless steel. They measure 10.5 inches high by 17.7 inches deep, and width options include 30, 36, 42, and 48.
A chimney that wraps around a 6-inch round duct meets the 9.2 by 8 standard. Interestingly, the chimney length can be changed to 32 inches if you have a really high ceiling. In addition, an outlet adapter with a check valve is also included in the kit.
The company recommends using speeds 1-2 for light frying/boiling, 3 for heavy cooking/frying/boiling, and 4 for frying/high-frying.
The blower's suction varies between 280/400/580/760 CFM according to the 1/2/3/4 buttons on the control panel. Maximum power 760 cc. cfm allows the range hood to control up to 75,000 BTU or 6 burner burner. Surprisingly, a hood of this range is relatively quiet during operation, with a maximum noise rating of 60 dB, which is equal to the volume of a normal conversation.
Besides the speed buttons, there is also a power button, a display button, and a backlight button to control the 2-way 3W LED lights. The power button can be used to activate the 3 minute delayed power off feature by simply pressing and holding the button until the display flashes three times.
Regarding filters, OMNEID models are equipped with deflector filters. Baffle filters are the most durable and effective smoke control solution. They are also dishwasher safe, which is very convenient since they need to be washed from time to time. However, you should consider the size of your dishwasher because these filters are not exactly small.
In conclusion, at the price they are offering now, the OMNEID series is an attractive buy, without a doubt. If you are planning to install a wall-mounted hood, you should take a look at the models from this company.
BALANCERAD
For those who love neatness and technology, BALANCERAD
It will fit perfectly. BALANCERAD is a relatively new model. First introduced in 2016.
Pros:
- Better ventilation;
- High-quality assembly and modern appearance;
Minuses:
- Air duct required;
Made from stainless steel, the hood has a durable yet compact frame that measures 7 inches tall and 22 inches deep. Although there are not many sizes, it offers the most practical sizes for the hood: 30 and 36. This should be enough for the average cooking range.
Installation/replacement is pretty standard. If you like to do it yourself, the whole process should not take more than 40 minutes, that is, if your kitchen is already connected to the ductwork, otherwise the process becomes more complicated.
The recommended duct configuration is 6 or 3-1/4 by 10. Personally, I find versatility to be a big plus for any hood.
Instead of physical buttons, it has a touch control panel and a display for turning on the timer, clock, brightness and speed control.
In addition to the blower panel, powered by a powerful pair of dual motors, it offers 6 speed settings that can ultimately reach up to 860 CFM to take care of all the burners and a total of 86,000 BTUs. This is equivalent to 8 burners. Quite a powerful indicator.
BALANCERAD also added deflectors to this package. Compared to conventional mesh filters, baffles are much more efficient and durable, although they are expensive. However, they are larger compared to a standard dishwasher. You should keep this in mind because they need to be cleaned from time to time.
BALANCERAD is an absolutely fantastic option for a hood. It offers everything a person wants from a modern product.
Built-in hood UNDERVERK stainless steel
Episode title: UNDERWERK
Package dimensions (cm) WxHxD: 43x41x61
Designer
IKEA of Sweden
Helpful information
This information about the product “UNDERWERK built-in hood” will help you get to know the product better.
Must be completed with flexible pipe NITTIG 150 for air cleaner for connection to valve. For recirculation mode, can be supplemented with a flexible pipe NYTTIG 150 and a carbon filter NYTTIG FIL 440. Energy class: B. Built-in fume hood with 3 different speeds. Capacity in tap mode: 625 m²/h. Noise level at max. output speed: 66 dB(A). Throughput in recirculation mode: 424 m²/h. Noise level at max. speed in ventilation mode: 72 dB (A). Motor power: 200 W. Voltage: 220-240 V.
Main features
- Free 5 years warranty. Read more about the terms of the warranty in the warranty brochure.
- Built in; is installed behind the kitchen cabinet door, giving the interior a harmonious look.
- The grease filter can be easily removed and washed. 1 grease filter included.
- 2 halogen lamps included. Provide lighting for the work area.
- Easy to install in a wall cabinet.
- Two installation methods: with a ventilation duct to the outside or in recirculation mode in combination with a carbon filter.
Product sizes
Width: 56.1 cm Depth: 35.5 cm Height: 35.8 cm Wire length: 125.0 cm Weight: 10.00 kg Throughput: 625 M?/h
Fume hood IKEA LAGAN 703.045.88
- Use experience:
one year or more - Price:
2500 rubles
Now it's time to furnish your new apartment! It’s nice, of course, but it’s a little expensive to buy everything at once. We decided to buy an IKEA kitchen, so we decided to buy a matching hood. We ordered delivery from another city; there is no IKEA in our city. Having never been to IKEA, we decided to take a chance. And for 2500, this is generally a fairy tale. There were no problems with assembly or installation. My husband is not an expert in installing hoods, but he succeeded thanks to the detailed instructions. Fits into the kitchen, just like it was here.
A bit noisy. You can no longer hear the TV if you turn it on at full power. Well, the absorption is not great, but quite normal. What can you ask for at such a price? The photo shows the switches. On the left, off on is the light. On the right is the hood itself and the power – 1 2 3.
I wash it once every six months or so. She is one year old in the photo. It's time for another wash)
Everything about the hood is elementary and simple; the removable part is removed and washed. There is a light bulb that can be replaced if it burns out. Ours burned out after 8 months. We replaced it.
Made in Italy.
I can't say anything bad about the hood. I recommend!
Advantages
- Not bad quality
- Suitable for IKEA kitchen
- Price
Flaws
- Not enough power
4)FOLLENDE
- The control panel is located on the front panel for easy access.
- The grease filter can be easily removed and washed in the dishwasher. 2 grease-absorbing filters included.
- A shelf along the edge, on which it is convenient to place spices, allows you to free up space on the countertop.
- Two installation methods: with a ventilation duct to the outside or with a carbon filter for recirculation mode.
- Adjustable LED backlight included. Provides effective lighting of the work area and energy savings.
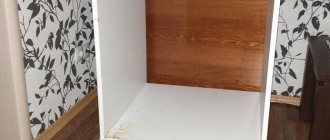
Working with the bottom shelf of the cabinet
Preparing a kitchen cabinet for installation of a built-in hood
When installing a built-in hood in a cabinet, you can go in several ways.
- Order a kitchen cabinet without a bottom. To bring out the air duct, you will need to make appropriate holes for it in the middle shelf and the top.
- Make a cabinet for the hood with your own hands, based on the dimensions.
- Remodel an existing piece of furniture, first remove the bottom or cut a hole according to the existing dimensions.
There is no need to disassemble the cabinet. You need to remove it from the wall and disconnect the doors. It will be more convenient to perform your actions on the floor. “Unstitch” the back wall, unscrew the side fastenings, then the bottom shelf will easily come off on its own.
When you cut out a place for a hood, you need to do it so that the body of the device fits tightly to the front wall, and not vice versa. Mark the place where you will cut with a marker, drill holes in the corners of the mark, and then cut.
Performance, filters, management
According to sanitary standards for kitchen premises, tenfold air changes are recommended every hour. Therefore, when calculating the performance of the hood, you should focus on the volume of the kitchen, expressed in cubic meters. To do this, you need to multiply the length, width and height of the room, and increase the resulting result ten times.
For example, for a kitchen with an area of three by four meters and a ceiling height of three meters, you will need a hood with a capacity of (3 m X 4 m X 3 m X 10) 360 cubic meters per hour. And this is the minimum value.
Sellers recommend purchasing a kitchen hood with some power reserve. If the performance of the device is lower, it simply will not cope with cleaning the kitchen air from contaminants. How to calculate the power of a kitchen hood is written in detail here.
Grease filters vary in composition as follows:
- organic (based on synthetic winterizer);
- paper (based on non-woven fabric);
- synthetic (acrylic based);
- metal (aluminum or steel).
Paper filters are a disposable option and need to be replaced with new ones every time they become dirty. Synthetic analogues can be washed, but this must be done very carefully, as they are easily damaged. They will also have to be replaced from time to time, although not as often as paper ones.
Metal filters are considered the most reliable; they are wear-resistant cassettes. Coal varieties, which are used only in recirculating installations, also cannot be purified. They must be replaced promptly, otherwise the performance of the hood may be significantly reduced.
When choosing a hood, you should pay attention to its type of control. Electronic control usually allows:
- automatically adjust performance levels;
- change operating modes;
- configure the device to turn on and off automatically;
- turning on the built-in lighting when there is movement near the stove;
- light indication of filter status, etc.
Among the useful functions of a hood built into a cabinet, one can note the residual mode: the fans run for some time after the hood is turned off to ensure the most complete removal of contaminants.
The additional ventilation mode allows you to automatically start the hood at low power at certain intervals to maintain optimal air exchange in the kitchen.
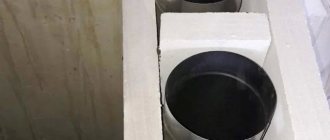
Transforming the middle part of the cabinet
You will have to cut holes in the cabinet shelves to allow the air duct to pass through.
Most often, the hood is attached to the middle shelf. Therefore, you also need to make a cutout for the air duct. We mark the cut location with a pencil; if it is round, we drill a hole with a diameter of 10 mm for the saw to enter and cut along the mark.
Then you need to mark the places where the device is attached to the middle part. Attach the shelf to the body of the device, make a notch with a sharp object in the location of the future location of the screws.
Example of mounting a hood to a wall
To secure the shelf to the sides, use plastic corners. First, we attach the four corners to the shelf, adjust its position by placing the box on the floor.
Exiting the power cord above the hood, as well as organizing a hole for a corrugated pipe
Additional features
When choosing a hood, an important factor is the additional functions that the device is equipped with. Among them we can highlight such a program as switching on at certain intervals. That is, the hood will start on its own and function for some time, regularly purifying the air in the kitchen.
There is also a residual run function, when the hood will be able to work for some time after switching off. This usually lasts from five to fifteen minutes, which allows you to make the air in the room perfectly purified. For more expensive models, there are programs that may not be the most necessary, but also no less useful. For example, an LCD screen for watching videos or connecting a computer. The weather system allows you to monitor the weather, while the fume hood is connected to a weather station on the street, and the results are displayed on the display.
We build the hood into the cabinet and install the air duct
Ceiling version of ventilation installation
The penultimate stage of work will be the connection of all parts. The cabinet with the middle part and the hood attached to it is hung in place. We must not forget that the retractable part of the equipment must move freely back and forth. This part contains a filter that catches grease. It starts working when the moving part is located above the stove.
Installing Ductwork on the Top of the Cabinet
The last stage is the installation of the air duct. It is inserted through the top of the cabinet, into a hole cut in advance, and connected to the device. The joints must be coated with glue and secured with clamps. It is also important to maintain the ability to detach parts to clean the system from dirt.
Then the air duct is connected to the ventilation. Special grilles are used for fastening. A hood is an electrical appliance; there should be a grounded socket nearby.
Connecting the air duct to the ventilation duct
The work is not at all difficult if you take into account the points described above. A built-in hood is a good option for those who want to save space and maintain a beautiful interior.
An example of mounting a hood in a cabinet above the hob
Features of operation
The operating rules for both fully built-in and canopy, retractable hoods are not much different from the use of any other household appliances. It is important to avoid overheating of the equipment (to do this, install it correctly), ingress of water, promptly wipe off dust and other contaminants, do not drop or hit, avoid twisting the wire or its contact with hot surfaces.
Regarding the hood, which is built into the cabinet, the following rules should also be observed:
- The grease filter protects the internal system of the structure, trapping droplets of fat and splashes of cooking food. The performance of the hood depends on its cleanliness. Therefore, it is necessary to regularly remove it when it becomes dirty and wash it with detergent. It can be easily removed and put back;
- The carbon filter of a recirculation hood is one of its most important elements. Over time, it loses its cleansing abilities. Therefore, it is necessary to replace it with a new one at least once every six months. There are different brands of carbon filters;
- It is necessary to ensure that the sliding panel slides out and slides back easily. To do this, it also needs to be regularly cleaned of dust, dirt and grease particles;
- If the hood has touch control, then in the kitchen it is especially susceptible to contamination. There are fingerprints on it, food splashes, and dust sticks to it all. The ease of operation of the device depends on its cleanliness, and a strong degree of contamination can lead to breakdown. Therefore, it is necessary to especially carefully monitor the cleanliness of the touch panel, wiping it with special wet wipes;
- The push-button control system can also be damaged by grease particles and kitchen fumes. When dirt gets stuck between the buttons, it can impair their performance. Therefore, the cleanliness of the control panel must be as carefully monitored as a grease filter.
If the equipment breaks down or its performance deteriorates, you must contact the service center. Timely handling can save equipment and extend its service life.
Popular mistakes when installing a hood
Popular mistakes made by users when installing a hood
We told you how to properly install a hood in the kitchen. Now let's look at the mistakes that users often make when deciding to act on their own:
- Blind connection of an air duct with natural ventilation. Some owners, although they install a grill, still completely cover it with an air duct.
- For a powerful hood, use a small-diameter corrugation or pipe that does not coincide with the socket.
- Installing a hood in the kitchen above the stove without taking into account the height. Which can lead to a fire.
- Exiting the air duct to the street through a hole in the wall of the house. What is prohibited in apartments.
- Long duct with many turns. This affects both the operation of the device and the noise level.
- Installation of a powerful hood (800 m3/h and above) with a connection to conventional ventilation, which is capable of 300 m3/h.
- Connecting the channel parts with glue. After that, such a channel can no longer be disassembled.
- No outlet near the hood. And then you have to resort to tees and other methods of connecting the device to the network, which looks ugly and is inconvenient to use.
- Errors in installing the check valve. Angles and inclinations must be taken into account to ensure that the valve operates smoothly.
- Incorrect placement of slots in the grille. Sometimes you need them to be at the bottom, not at the top.
Selecting the type of fastening
We recommend starting with choosing a mount. The sequence of actions when assembling an IKEA cabinet and installing it depends on this. There are two types of fastenings:
Installing furniture on corners and hangers requires the most accurate height measurement. The cabinet is attached using screws or dowel-nails, the location of which on the wall is not adjustable. Corners are convenient to use on uneven surfaces. Some cabinets are installed on corners by default.
An example of such furniture is the KNOXHULT wall cabinet.
The mounting rail is a metal strip that is attached to the wall with screws. The kitchen cabinet is mounted on a rail using hooks fixed on its back wall. The rail allows you to adjust the position of the cabinet horizontally and vertically (within 2 cm) without dismantling.
METHOD hanging frames can be secured using either corners or a mounting rail.
Preparing the walls
Having chosen suitable fastenings, prepare the walls for work. The better you prepare them, the fewer problems you will have when installing the cabinet. Proceed in the following order.
Check flatness
Unevenly mounted wall cabinets are very noticeable. Even a slight slope of the walls, recesses or bumps immediately become noticeable when installing wall furniture. That is why it is so important to correct all defects in a timely manner if possible.
To do this you will need a building level. There are several types of such devices:
The most popular in construction is the bubble level. Electronic is almost no different from bubble, but the result is displayed on a digital display in the form of an angle of inclination.
The laser level is convenient because it only needs to be adjusted once. Place the device on a flat surface and level it using the bubble indicators. If your device has automatic leveling, it will beep until it is perfectly level. If you're going to be hanging a cabinet alone, your best bet is to use a laser level.
Having determined the evenness of one of the walls, make sure that adjacent walls are located at an angle of 90° to it and to each other. A construction square will help detect deviations.
Light irregularities are found quite often in apartments and houses. They can be corrected during installation - for example, using slats or pads. In case of severe unevenness or slope, the best solution is to contact a plasterer. When the walls are smooth, proceed to the next stage.
Make sure the walls are strong and thick enough
The thickness of the kitchen wall must be at least 10 cm so that it can support a cabinet with dishes. Not all walls are made of concrete. Sometimes behind a layer of plaster there is drywall, behind which there is 20 cm of air. It also happens that such voids are found in main walls. They are easy to detect manually: tap the wall along its entire length. Dense areas have a dull and quiet sound, empty areas have a more booming and loud sound. More professionally and accurately, voids and dense areas are found using an ultrasonic flaw meter. This device measures the thickness of the wall and displays a graph with the corresponding values.
Source
At what height should kitchen wall cabinets be mounted?
Almost every kitchen has a combination of floor and wall cabinets. Such furniture makes it easier to maintain order and helps free up space for household chores. However, to maximize the efficiency of your cabinets and countertops, it is important to install the furniture correctly.
From this article you will learn how and at what height to mount wall cabinets, and also become familiar with some other ergonomic rules for organizing kitchen space.
DIY fume hood installation
It is quite possible to install a hood in the kitchen yourself in an existing wall cabinet, without resorting to the help of specialists. To do this, you should familiarize yourself with some tips and tricks and select the right materials and tools.
The easiest way to mount a static type device, without a telescopic panel. Here you need to prepare the following tools:
- hacksaw or electric jigsaw,
- bolts and screws,
- screwdriver,
- pencil with tape measure.
To turn a conventional wall-mounted module into a fume hood, you need to remove the top and bottom panels from it. A hole should be cut in the top wall for the air duct. On the bottom panel, mark the places where the corrugation is attached, as well as the bolts and cable. Next, you need to secure the hood at the required height above the stove. Attach the body of the hood itself to its sides. Pass an air duct through the top panel and connect it to the entire structure. The last step is to pull the cable and connect it to the outlet.
With simple steps, you can install a fume hood yourself and enjoy the process of regular air purification in the kitchen. But, despite the rather simple installation scheme, you should follow the instructions and safety precautions, and it is also advisable to use work clothes, gloves and safety glasses.
The hood is an indispensable part of the kitchen. It not only purifies the air during cooking and eliminates unpleasant odors, but also gives the interior a stylish and modern appearance. Unfortunately, not every kitchen can boast of a large area, then a fume hood will come to the rescue. It is capable of performing the same functions as a classic hood, but at the same time significantly saving space and not compromising the integrity of the kitchen unit.