A beautiful summer gazebo in the country where you can relax with the whole family is a great solution, but if you add a stylish technical unit to this structure, it will become much more practical. Let's look together at why the Russian people fell in love with this model of a summer residence so much, and at the same time I will tell you from what materials and how to build a gazebo with a utility block with your own hands.
A gazebo combined with a utility block is many times more practical than a regular canopy.
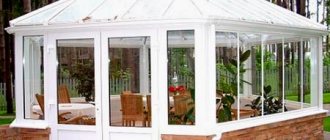
Examples of projects
When choosing the most suitable option, you need to choose the one that suits you for financial reasons and at the same time is suitable in terms of quality. Here are a few different examples of buildings of this type.
Simple option
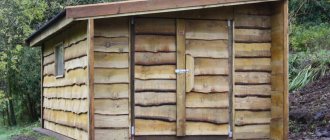
If you want to choose a relatively inexpensive option, you need the walls to be made in the form of a wooden frame covered with clapboard. In most cases, the roof is made of a gable roof, common to both the bathhouse and the utility block. In this case, it is recommended to choose a project with a minimum number of premises.
One of the possible options could be a house with two doors, where in one room there is a steam room, a toilet and a relaxation room, and the other is intended for household purposes. Source anticafe-sandbox.ru
Unfortunately, apart from cheapness and simplicity, it is difficult to find advantages in this option. In this case, the walls are short-lived and will have to be replaced after a few years. Due to poor thermal insulation, it makes no sense to heat this house in winter.
Weak moisture insulation will lead to rust on metal objects in the utility room Source pinterest.com
Since in most cases it will be necessary to heat water using wood, the bathhouse with the barn must be supplemented with a woodshed.
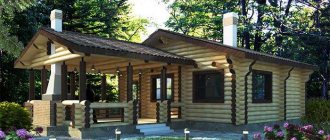
Compact project
If a building is made of timber, this will give it durability and reliability. A project can be made by including the bare necessities. Here's what it might look like, for example.
Project of a utility block with a bathhouse and a relaxation room Source 2proraba.com
If you build walls from brick or cinder block, and then cover them with wood, the quality of such coatings will be no worse than wood, and the strength, reliability and durability will increase many times over. The bathhouse and barn will last for many years under one roof.
Bathhouse with utility block 4×8
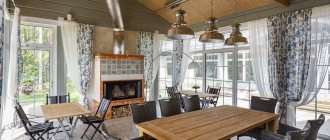
The combination of a bathhouse and a utility room can be made into a comfortable place to relax.
Let's consider the following project.
Household projectSource highlogistic.ru
It can include a kitchen and a sofa in the rest room. If there is heating, you can not only wash or cook in such a house, but also receive guests or live for some time.
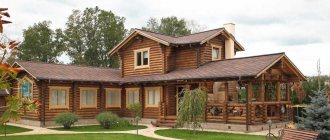
Of course, this is only one of the possible options. There are projects where such a house has a second floor, where, for example, there may be a workshop or a bathhouse, a utility block and a veranda under one roof.
Option of a utility block with a bathhouseSource assz.ru
Projects in which the house is built at an angle are also popular. Thus, a bathhouse and a barn located under one roof are more compact compared to the linear option.
The utility block is in the gazebo. 4 valuable benefits
A room that combines a recreation area with a storage area is advantageous in several ways:
- Saving territory. By placing several buildings under one roof, it is easy to unload the site. Instead of building a gazebo and then starting to build a shed, you can combine the two structures in one.
- It is quite possible to install a shower cabin inside the block. A gazebo with a utility block for the dacha will allow you to take a summer shower and have a pleasant time under the roof. Refresh yourself, drink a glass of aromatic herbal tea in the fresh air - what could be better?
- The combined building will definitely appeal to those who would like to invest in a main house.
- Are you planning to install a barbecue directly in the gazebo? A utility block will come in handy. In rainy weather it will provide dry firewood.
These are important, but far from the only advantages of “2 in 1” outbuildings. They are convenient and practical, multifunctional and reliable. Therefore, the high demand for pergolas with utility units is not surprising.
Advantages of combined construction
The main advantage is saving space on the site and reducing costs. The structure is made from the same materials and looks attractive. The room can be used not only for storing tools or other equipment, but also act as an additional recreation facility.
Such a building has a number of undeniable advantages:
- saving of territory, functionality and placement of different buildings in one place;
- attractiveness of the site with a neat and thoughtful design;
- possibility of arranging a summer bathroom and shower in the utility room;
- savings on the construction of utility rooms and so on.
It is recommended to build such a building on the north side of the site. This is additional protection from the wind. In the gazebo itself you can install a grill or barbecue, and store firewood under the canopy.
A large room for utility needs or for a relaxation room with a gazeboSource besedkis.ru
Bathhouse + utility room
The steam room and utility block are built on the same foundation. An extension with communications is being built nearby. In order for the complex to be not only effective, but also safe, a number of requirements are imposed on it:
- It is advisable to make separate entrances/exits.
- A separate water supply line will be very useful. Standard capacity is often not enough.
- A joint roof is more efficient.
- Sewer outlets for utility units and bathhouses must be different.
If you or your guests are used to spending more than 2 hours in the bathhouse, the extension can be equipped as a kitchen block. And turn the rest room into a real living room.
Action plan
Having understood the functional purpose of the utility unit, you should consider a number of the following questions:
- Choose a suitable place for construction.
- Decide on the size of the building.
- Come up with your own or choose a floor plan from a construction company.
- Clarify the complexity of construction work (foundation, insulation, interior decoration, communications).
- Select high-quality building materials.
Wooden garden utility blockSource paneldomstroy.ru
Having some construction skills, you can independently develop a simple project and implement it. To implement complex projects for a utility block with a shower and toilet, it is advisable to contact a construction company.
Design Features
Almost always, the construction of such a structure is planned at the site design stage. Sometimes a gazebo is attached to a finished barn, but this is very rare. A utility block with a veranda under a common roof has various design solutions.
Form. A square or rectangular shape is almost always used. It is distinguished by its large capacity and ease of construction. Designs with a large number of angles are less commonly made, but they are distinguished by an interesting design and original solutions.
Size. The sizes can be absolutely any. Here the main thing is the free territory of the site, the wishes of its owner and the purpose of the building itself. Another important factor is financial capabilities.
A rough sketch will help you imagine the future structureSource erp-mta.ru
Roof. The configuration largely depends on the budget and size of the building. The roof can be of several types:
- single-pitched - economical, simple and quick to erect, not suitable for regions with heavy snowfall;
- gable - you need to calculate the angle of inclination, which will eliminate problems with the single-slope option, a rafter system is required, wind loads are also taken into account, more financial costs and materials are required;
- hip - rarely used for such buildings, very difficult to construct, more suitable for large structures;
- combined - has an interesting project, different technologies can be used, can affect the cost of the result and completion time, all factors of the options used are taken into account.
Window. You don’t need to install them in a shed if it only stores equipment. But if you plan to relax inside the building, it is used as a summer house, a guest house, it is planned to be converted into a bathhouse, and so on, then the presence of windows will be a prerequisite for natural lighting of the room.
Foundation. The features of the foundation completely depend on the total mass of the gazebo with the utility block for the dacha and the characteristics of the soil.
It is better to place the gazebo on a small hill above the ground. Source erp-mta.ru
It is not advisable to place such structures on the ground; they quickly deteriorate due to dampness. Strip foundations are quite time-consuming and labor-intensive, but sometimes they are the only solution. A columnar foundation is considered optimal in terms of the ratio of financial investment and quality. The depth depends on the occurrence of groundwater, the type of soil and the level of freezing. The interval between the pillars depends on the dimensions of the building and the materials used.
Required materials and tools
The choice of tools depends on what material the structure will be created from:
- Tree. The simplest option, which is quite possible to build yourself. It requires the owner to have knowledge in carpentry and to have the following equipment: an axe, a saw, a mallet, a nail puller, chisels, a grinder and a grinder.
- Metal. When constructing such a gazebo on your own, you should have experience working with a welding machine. In addition, you need to get somewhere or make the forged parts necessary to create the decor yourself.
- Brick. Such a structure will be the most capital; for its construction you should have experience in construction and have a supply of bricks, cement, sand and crushed stone. All standard construction tools will also work.
How to build a gazebo in 3 steps
It is best for a home craftsman to build a gazebo with a utility block made of wood or metal. You need to start from the availability of tools and skills, so if you don’t have a welding machine and you don’t know how to cook, then forget about metal.
The collapsible version (with studs and bolts) is suitable for a simple canopy, but it is difficult to assemble the room in this way. But anyone who owns a hacksaw and a hammer can build a frame from timber and cover it, for example, with planed boards, so we will talk specifically about this option.
In this case, there is no point in pouring a strip foundation or a reinforced concrete slab under the entire structure. These types of foundations are installed under brick or stone structures. For a wooden canopy, it is enough to arrange a row of pillars and install a frame on them.
It makes sense to pour a foundation slab only if the floor in the gazebo is planned to be made of concrete.
The pillars can be made square or round; personally, I prefer to fill round pillars, because it is simpler, faster, and most importantly, more reliable. Although the technology for arranging the pillars is the same in both cases.
Scheme of a square pillar for a gazebo.
- First, arm yourself with a garden drill and make holes 50-70 cm deep at the nodal points of the structure. Typically, the pitch of the pillars is 1 meter. By the way, if you decide to make square pillars, then they are buried there by 35-40 cm, this is due to the fact that they are larger in area;
- Now pour 10-15 cm of sand and gravel mixture into the bottom of the hole and compact it well;
- According to the diameter of the hole, roll up a pipe from roofing felt and insert it into the hole;
- Tie the reinforcement cage and insert it into the center of the hole;
The easiest way to make formwork is from roofing felt.
- There should be a long reinforcing rod or threaded rod in the very center. We calculate that after pouring the concrete, this rod will stick out from the post by 30 - 40 cm, and we will fix the floor frame to it;
- Further along the level (the same in all pillars) we pour concrete and wait a couple of weeks until it gets stronger.
It is advisable to install a pin in the center of the post.
Foundation diagram for a brick barbecue or oven.
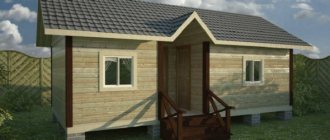
The simplest design of a gazebo with a utility block.
For intermediate floor joists, timber no thinner than 50x100 mm is taken; the joists themselves are installed in increments of 30-40 cm.
The supporting frame is fixed with studs to the foundation pillars.
Now we install vertical racks for the walls. It is also advisable to make these racks from 100x100 mm timber. There is an interesting point here, professional carpenters join beams by cutting, in different ways, I recommend that you use metal corners and other similar fittings, it’s much easier and faster.
It is more convenient to join the timber using metal fittings.
What the roof on the gazebo should be like - everyone has their own opinion, but if you have never installed a rafter system, then I advise you to go with the lean-to option.
Frame diagram for a lean-to gazebo.
The most you can still try is the simplest gable design. Believe me, hip, hip, multi-level and other complex types of rafter systems are beyond your power.
The gable rafter system is relatively simple.
When the rafters are installed, an under-roof sheathing is placed on them; the frequency of this sheathing depends on the type of roofing material. The most economical would be to use corrugated sheets or asbestos-cement slate; the lathing is placed under them in increments of 200-300 mm.
Roofing made from corrugated sheets is inexpensive and can be installed quickly.
Step No. 3: cladding
Since we are talking about a summer gazebo, the cladding will accordingly be light. The simplest option is to take a planed board 20-30 mm thick and cover the frame with it. To make the structure look more original, the board can be filled not in the usual smooth way, but in a herringbone pattern, as in the photo below.
The herringbone cladding looks original.
Some useful tips
- If you plan to make a roof from galvanized iron, then you can do without lathing. For a 3x6 shed, 2 sheets are enough, but they need to be laid with an overlap.
- When covering a shed with edged boards, an overlap of about 25 mm should be made. To prevent unpainted areas from appearing after the wood dries, it is better to paint it before covering it.
- Paint consumption, if applied in 2 layers, is about 15 liters for a barn dimensions of 3x6 m.
- On average, it takes 7 days to build a shed of this type.
- The installation of a single-slope structure requires 30% less money than for a 2-slope structure.
- If one wind direction prevails at your dacha, then the option with a pitched roof suits you more than others.
Building a simple shed with your own hands is a feasible task. The main thing is not to forget to step back the legal 3 m from the neighbor’s fence and 5 m from the road, but there are no other restrictions.
Finishing
Wooden gazebo-sheds require good regular care. The paint layer should be renewed every six months. You can impregnate the wood with heated drying oil, which is applied in two layers. Cover the top with oil paint or leave it in its natural form. To prevent the wood from rotting, it is better to install a house made of timber for the household needs of a dacha on a special platform - a flat platform made of concrete, boards, or paving slabs.
Pots of flowers on the windows, a wall of green climbing plants, and garden furniture will help you decorate your home built by yourself.
A veranda for a summer residence made of timber, combined with an outbuilding, will become a place for relaxation from garden work and simply for pleasant time with the family.
It is clear that building from timber is not as simple as it might seem at first glance. It will take time, material costs and physical strength of the owner. But the site will acquire such a necessary structure for a dacha, such as a change house with a veranda, built under one roof. In addition, any work done with one’s own hands warms the soul and increases self-esteem.
Some useful tips
- If you plan to make a roof from galvanized iron, then you can do without lathing. For a 3x6 shed, 2 sheets are enough, but they need to be laid with an overlap.
- When covering a shed with edged boards, an overlap of about 25 mm should be made. To prevent unpainted areas from appearing after the wood dries, it is better to paint it before covering it.
- Paint consumption, if applied in 2 layers, is about 15 liters for a barn dimensions of 3x6 m.
- On average, it takes 7 days to build a shed of this type.
- The installation of a single-slope structure requires 30% less money than for a 2-slope structure.
- If one wind direction prevails at your dacha, then the option with a pitched roof suits you more than others.
Building a simple shed with your own hands is a feasible task. The main thing is not to forget to step back the legal 3 m from the neighbor’s fence and 5 m from the road, but there are no other restrictions.
Utility block + gazebo with one roof
A pergola, which combines a place for a meal and a utility block, has many obvious advantages. Here they are:
- Reduced costs. Especially in comparison with the project of separate structures.
- By choosing the style of two buildings at the same time, you can achieve the perfect combination. From a landscape design point of view, this is very reasonable.
- There is also no need to create additional paths to connect the gazebo and other utility rooms.
And in summer, such a structure can easily be turned into a sleeping area. And this is another plus of the “2 in 1” combination. You can more clearly see the construction process of such a structure in the video below:
Conclusion
I tried to talk about the most popular options for sheds with a utility unit and give the most economical assembly schemes. The video in this article shows alternative options. If you have any questions, write in the comments, I will try to help.
A gazebo equipped with a utility room can be used for both summer and winter.
Related article: How to flush your heating system
Gazebos with utility room. Interesting ideas
All existing projects of gazebos with utility units can be divided into 2 groups. The first includes the development of a detailed project with an economic part, which is located separately from other buildings. The second group is an extension to the main building. It is the most difficult.
Before building an extension, you need to consider:
- Shrinkage percentage. The pergola, built several years ago, has already shrunk quite a bit. Therefore, construction must be carried out taking this parameter into account.
- The roof of the gazebo and the extension must be in different planes. The recommended slope size is 30 degrees. Otherwise, roof destruction cannot be avoided.
- Various building materials can also provoke destruction, since their structural parameters differ.
- Creating a foundation on loose soil is mandatory. If the installation is done poorly, subsidence and cracks on the walls cannot be avoided.
How to determine the difference in wall height?
Rafters are the basis for any roof, and they are made from pine and spruce without knots.
Before. How to use beams: They are well treated with antiseptics against various insects, as well as special impregnations that give the wood greater strength, fire and moisture resistance.
The rafter system for a shed roof is called a sloping system, and the first thing you need to do during construction is to calculate the level of difference in the walls of the building that will be needed for the slope.
To do this, let's use a function from trigonometry and open a simple school textbook:
So, the magnitude of the difference of all walls is equal to the width of the garage multiplied by the tangent of the angle of inclination of the barn roof.
Let your garage be 5 meters wide, and the slope you need is 25 degrees. So, we determine the difference in walls = 5, multiply by tangent 25, we get 2.33 m, which means that the front wall of the barn should be exactly 2.33 meters higher than the back wall.
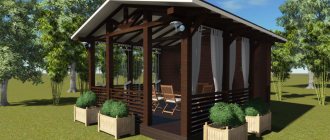
Gazebo-shed made of wood. Self-construction
We propose to build one of the simplest options for a “2 in 1” gazebo - a wooden pergola with a shed. If the groundwater runs deep and the soil on the site is sandy, ordinary support piles or pillars will be quite sufficient. They are installed in the corners.
To make a pile foundation, you will need an asbestos-cement pipe with a diameter of 15 cm or more.
Dig holes in the ground and prepare a sand bed. After thorough compaction, insert a piece of pipe and secure it with metal pins. Fill the supports with concrete mixture to 1/3 of the length. In this case, each pipe is slightly raised so that the solution gets under the base. This will make the foundation stronger. If the structure is heavy, additional reinforcement is inserted inside. Or they install brick columns. Owners of plots with wet soil will have to make a strip foundation. Sand concrete blocks can be used as a base. First remove 30 cm of the top layer of soil, fill it with 15 cm of sand, and compact it thoroughly. Then sand concrete blocks are laid. Don't worry - they can easily support a log house. The construction of the foundation requires good waterproofing. A variety of materials are used for these purposes. Bituminous plastic and roofing felt have proven themselves best
It is important to avoid contact of wood with waterproofing material. The latter is laid on top of the supports. The next stage is the construction of a frame at the bottom in the form of a square of timber with a section of 15 x 15 cm
The beams laid on the supports are screwed with anchor bolts, and logs in the form of transverse beams are laid on top. They will support the flooring. A beam of 10 x 10 cm will be quite enough. During use, wood can be damaged by rodents, insects and mold. Constant exposure to the street and exposure to precipitation also destroy wood. But this process can be slowed down if you treat the timber with an antiseptic solution in advance. When the logs are installed, you need to secure the frame beams in a vertical position. Sections 2.5-3 meters long and with a cross-section of 10 x 10 cm are suitable. At the top they make a frame from boards 10 by 5 or 15 by 5 cm. The frame will become more rigid and will support the rafters. It is advisable to make the roof pitched. This will make it easier for the snow to melt, and the water will not linger. Almost any roofing materials are suitable for cladding - from slate and bitumen shingles to metal sheets. Sometimes the roof is made differently. For example, a gazebo is covered with wood, and a barn is covered with tiles.
At the final finishing stage, the gazebo is varnished. The procedure is repeated every year. To avoid rotting of the wood, the house is installed on a platform made of tiles or concrete. For decoration, original furniture, climbing plants, and flower pots are used.
Of course, building a structure that combines a gazebo and a barn is not the easiest task. You need free time, certain investments, and physical strength. But on the site there will be a structure that will combine a platform for summer meetings with friends, a veranda, a shed for storing tools or even a shower. Any chore done independently always warms the soul.
By the way, ideas for construction or finished projects can be gleaned from the video:
Design
In modern low-rise construction, all buildings are erected according to preliminary designs. This is the main condition that ensures quality, durability, comfort and a presentable appearance for all elements of home ownership.
Designing a garage is not difficult, but it must be done by a specialist - a qualified builder or architect. When designing, many nuances are taken into account, such as the design of the foundation, the thickness of the walls, the type of building and finishing materials, etc.
The main task of the designer is to create a convenient garage that will fully meet all the owner’s requirements. At the same time, it should be absolutely safe. Therefore, all structural elements of the building are carefully calculated
Particular attention is paid to the selection of wall and roofing materials
If a garage is being designed that will be attached to the house, an even higher level of security is provided. The attached garage should be as fireproof as possible and isolated from the main building. In addition, the extension must be designed so that it becomes a structural part of the house and does not violate its architectural integrity.
Garage attached to the houseSource hitas.eu
Some typical projects
This section will look at various designs for a one-car garage. Each of them has its own characteristics. Positive and negative sides.
Garage with attic
If the plot is small and does not allow you to conveniently place a residential building and a garage, then this is not an insoluble situation. A good option in this situation might be to build a garage with a residential attic.
At the same time, there is space for a car on the ground floor, and there is a living area under the roof.
The attic can be intended not only for housing. Some owners have a utility area here. For example, under the garage roof you can arrange a place to store a variety of household equipment.
They also build those that actually have a second floor where you can live.
When you need a garage for a summer residence, this type of project is not widespread. However, it also has its fans. First of all, this is due to their main advantage: they save space on the existing site. The area that such a building will occupy is half that of a house and garage built in the usual way.
Garage with a residential atticSource www.argust-stroi.ru
Such houses are popular among those who garden. After all, such a structure, among other things, will allow compact storage of garden tools.
However, garages of this type have their disadvantages:
- When such a country garage project is used, you often have to use stairs
. This is not for everyone. - There may be difficulties with heating
, because not only the home needs to be heated, but also the garage. - is imperfect sound insulation
here . If a car is not only kept here, but also work is carried out, the noise will penetrate into the residential area.
Garage combined with bathhouse
This combination may seem unusual, but it has significant advantages:
- The construction of a building that will perform both of these functions will significantly reduce the cost
of building materials. - The presence of a bathhouse will solve problems with heating
the building. - Since in both cases you need to carry out appropriate communications
, you can
save
money by doing this.
However, there are points that need to be paid special attention to. Project of a garage with a saunaSource yovape.ru
Project of a garage with a saunaSource yovape.ru
When constructing a garage, the project must take into account:
- Between these rooms there must be high-quality moisture insulation
. - Since the temperature conditions of these two rooms are very different, it is necessary to ensure reliable thermal insulation
.
In some cases, such a project may be a good choice.
Garage with basement
Often it is used not only as a room for a car, but also for other purposes. If you provide a basement in it, it can be used for the following purposes:
- store supplies
in it , including food. - set up a workshop
in this room . This is especially beneficial in situations. When it is impossible to find a place for its arrangement outside the walls of the garage. - This can be additional storage space
. - a recreation area
in the basement .
A garage with a basement will allow you to store more necessary thingsSource territoria.by
When arranging, it is important to pay attention to the following nuances:
- Installation of high-quality ventilation
. - Warming up an underground room is more difficult
than a normal one. - There is a danger of groundwater entering here, so it is necessary to provide waterproofing
.
Having a basement provides additional opportunities and does not require additional space.
Simple garage
One of the most common standard projects includes a minimum number of additional features. There is only room for the car and a small space around it.
Regular garageSource souo-mos.ru
Although this is a relatively simple project, it is important to pay attention to the features of such buildings:
Good ventilation is important. If it is not there, moisture will accumulate inside the garage and condensation will begin to settle.
If this is allowed to happen, the result may be rust formation on the car. To protect against adverse weather conditions, how the roof is constructed is important. It should not allow moisture to accumulate or snow to accumulate on it. Although you can enter through the entrance gate, some standard models include side doors and windows. If such a possibility exists, it is advisable to install electricity into the garage. It can be useful for car repairs and other work.
The main advantage of such a garage is its relatively low (compared to other options) price and ease of operation. Source oooarsenal.ru
Roof slope using roof trusses
Extraordinary solutions can be applied to any construction project. For a shed with a pitched roof, such a solution can be considered ready-made trusses of the rafter system - it is fast, safe, accurate and reliable, since the entire structure is assembled on the ground. You can also simply buy a ready-made design.
If we are building a low-budget shed, then this solution will help not only speed up construction, but will also ensure sufficient design accuracy, which means reliability and durability, because it is easier to install ready-made trusses than to make calculations, drawings and mount a roof above the ground.
The main advantage of ready-made trusses from rafter beams is manifested in minimizing lateral loads from the roof on the walls of the barn: thrust forces have a very negative effect on the strength of load-bearing walls of any structure. When using trusses, lateral loads are distributed and absorbed within the rafter system, so the frame row of the barn itself does not experience any weight.
Another advantage of roof trusses is that they are mounted on walls of the same height, which greatly simplifies the entire construction. At the same time, replacing ready-made farms with home-made ones is not difficult, since all manufacturing and assembly work is carried out on the ground. The main thing is to maintain a right angle in a triangular truss.
The hypotenuse of the rafter triangle is the rafter beam, but sometimes the truss is laid on a pre-prepared support. The floor beam in the roof is a long leg of a rectangle, and its short side acts as a cantilever-girder frame assembled from the ends of trusses.
For detailed instructions on roof construction, see the video below.
If you increase the angle of inclination to more than 8 0, then the costs of building materials will increase - timber for the rafter system and roofing. If the angle of inclination is reduced, then the cost of waterproofing will increase, since it will be necessary to lay several layers of moisture-proof coating, as well as additionally protect difficult areas of the roof from rain and snow.