The main devices with which you can control the lighting of an apartment are switches. Today, the market offers a huge selection of different designs and appearances. And if a few decades ago it was rare to find a light switch with three keys in ordinary residential premises, now they are found in almost every modern home. This device is convenient because it can be used to manage three groups of lighting fixtures from one access point. And since these electrical switching devices are so popular, let’s talk in more detail about how to connect a three-key switch.
Box in insulating plastic
The three-key switch looks like a box made of insulating material. Most often, its body is clad in plastic, which can get quite hot, but not ignite.
The box contains mechanical components that provide disconnection and connection of the electrical circuit. It also contains terminals for connecting the cable. It consists of one main wire and three cores after opening. They must connect to the lamps.
Decorative and functional facial details
The housing structure also contains fastening elements and a number of front parts. This is a plastic frame and three key inserts.
- The frame is necessary to cover the edges of the wall recess into which the switch is mounted.
- It also effectively protects the wallpaper from sweat and dirt, which are present to one degree or another on the hands.
- The wider the installed frame, the cleaner the wall around the switch will be after 1-2 years of operation.
- These parts are detached without much effort, after which they are just as quickly fixed on the spacer fasteners.
Original industrial design
A three-circuit light switch is better than analogues with fewer keys for a number of reasons. Firstly, such a device looks much more original, which is pleasing to the eye and brings zest to the interior, which is sorely lacking in the era of widespread minimalism and pragmatism.
You can be convinced of the unusual design of this device and its aesthetic superiority by studying a couple of dozen photos of three-key switches.
Lighting control from one remote control
When laying apartment or office wiring to the installation site of such a switch, no technical or engineering difficulties will arise. To install the box, any ordinary wall recess is sufficient. As for other similar devices, for them it is necessary to make several recesses in the wall at once.
Most often, three-button circuit breakers are installed in buildings that have an atypical layout. Such devices are also used to illuminate long corridor spans, control the top and side light of several rooms at once from the same point.
What is required for installation
It will not be possible to carry out electrical installation without a minimum set of tools:
- To strip the insulation you will need a mechanic's knife;
- to shorten the conductors you will need wire cutters;
- to check the absence of voltage you will need an indicator screwdriver or a multimeter;
- for installation work - a set of screwdrivers.
If the connection in the junction box is made by twisting copper conductors, then it is advisable to solder the connection points. To do this you will need a soldering iron and consumables for it. Perhaps in the process of work the need for other tools will arise.
Preparatory work
Before starting installation, determine the location of the switches. If you plan to do hidden wiring, purchase built-in switches and socket boxes of appropriate sizes (plastic boxes in which the device will be installed). If the wiring is open, shims must be placed in the places where the devices are installed.
Serviceable switch
When choosing a three-circuit switch in a store, you should carefully inspect it. It would also be useful to read the electrical description and ask for a connection diagram.
It will not be difficult to distinguish a conscientiously manufactured three-button from a defective one based on a number of signs:
- The polishing of the decorative frame and keys must be without the slightest defect.
- The keys should switch without effort or jamming.
- Each key press should produce a soft click that is pleasant to the ear.
- All mechanisms and fastenings of the internal part must work flawlessly.
Self-connection
Installing a three-key switch with your own hands can be done even with a complete lack of experience in such work.
It is enough to strictly adhere to the step-by-step algorithm, and the result will be definitely positive.
The installation procedure is divided into the following stages:
- Connecting the wire to the switch;
- Switching conductors inside the box;
- Testing contacts and correcting errors.
Choosing an installation location
If we turn to the seventh edition of the Electrical Installation Rules, it turns out that there are no strict conditions for the installation of household switches. Clause 7.1.51 recommends installing switching devices at the entrance at a height of 1 meter from the handle side . The rules only determine the minimum distance to gas pipelines. It must be at least 50 cm. But there are two exceptions:
- in children's institutions, switches must be mounted at a height of 1.8 m - beyond the reach of children;
- It is prohibited to install switching equipment in wet rooms (baths, saunas, showers).
Otherwise, when choosing a place to install three-key devices, you can be guided by your own ideas about convenience and safety.
Cabling
On the eve of connection, it is necessary to study the corresponding diagram. This will prevent many annoying mistakes.
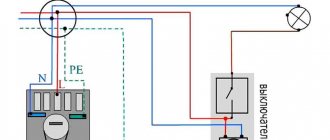
The box contains several wires, each of which is responsible for a strictly defined task:
- The three-core cable goes to the machine installed in the panel niche;
- The four-wire cable is routed to the three-button.
Simple connection diagram
The circuit of a three-key switch for three light bulbs assumes that switching will be carried out with a four-core or five-core wire with a diameter of one and a half to two millimeters. A chandelier with six or nine lamps is connected using exactly the same principle.
When using three different light sources, three different 3-core wires must be run. This method is used very widely, and therefore you can easily find a visual aid on this issue on the Internet.
How to choose?
Nowadays there is such a huge range of switches on the electrical goods market that you can find a suitable model and color for any design solution or interior. However, you understand perfectly well that shade and appearance are far from the main indicators that you should pay attention to when choosing a device. When purchasing a three-key switch, check the following:
- The presence of modern self-clamping terminals, they are more convenient to use. Simply insert the wire into the hole and it will immediately be fixed.
- The outer side of the product is without burrs, scratches or damage.
- Normal operation of all terminals; they must ensure reliable fixation of the wire cores.
- The keys do not stick when pressed (on or off) and work clearly, with a clearly audible characteristic click.
- On the reverse side there should be a connection diagram for the triple switch.
Try to avoid cheap Chinese electrical wiring products. Buy devices from trusted companies and manufacturers.
Connecting wires with a switch
Often such a switch is combined with a socket, so many people ask how to connect a three-key switch in this combination.
To do this, you need to act according to the following plan:
- Take a copper wire and stretch it from the main panel. You should not stretch the wire from the box to the three-key switch.
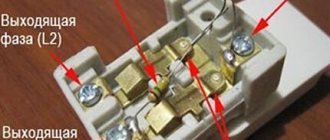
- The copper wire runs down a groove made in the wall. This will allow you to pull it to the switch and outlet. The common cable is connected to the contact. This fact is motivated by the fact that the load on the sockets is usually much higher than the load on the switch.
- Using a jumper, you need to direct the phase to the upper terminal. Zero is output to the second contact.
The cable connection in the box is made in exactly the same way. The difference lies in the connection of the additional neutral core with the central point.
Area of application of the three-key player
The most obvious use of a 3-panel fixture is to control three lighting fixtures separately. Such a necessity in everyday life is rare. And in office or warehouse premises this is a very real situation.
But multi-arm chandeliers can be used in a house or apartment. Although they are real energy hogs (two 50-watt incandescent bulbs produce less luminous flux than one hundred-watt), such lighting devices are widely used for aesthetic reasons. The efficiency and comfort of operation of such lamps can be increased by using switches with several keys. By controlling not the chandelier as a whole, but individual lamps or groups of lamps, you can choose a convenient level of lighting and not waste electricity.
Switching conductors in a junction box
There are five wires in the box that should be neatly combined into clusters of wires.
- All zeros must converge at one point.
- Next, you need to connect the phase conductors, and then connect the conductors extending from the keys to the phases.
- When installing in this case, it makes sense to simplify your task by using Vago clamps.
- On the eve of the first switching on, you need to make sure that the three-key switch connection diagram is correct.
- Then the machine starts and the lights turn on.
Design features of combined switching
Options that were once only available in a smart home are now available to everyone. You can use autonomous switching on/off of lamps from several remote points in combination with other devices:
- time relay (diodes automatically turn on in the evening);
- presence sensors;
- cotton switches;
- remote control (remote control);
- various types of crossover and pass-through switches.
All of them are very convenient to use, provided they are connected correctly. If there are difficulties connecting any devices that control lighting from 3-4 points, use a clear connection diagram.
The technical characteristics of the cross switches are largely similar:
- current: 10 A4;
- voltage: 220–230 V;
- box material: thermoplastic, plastic or polycarbonate.
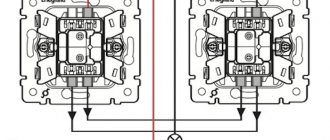
Pass-through switches can be used autonomously, while cross switches are closed according to a general circuit, which is their fundamental difference. Cross-type models work in conjunction with pass-through models. This will be multiple control points with one button or paired 1-gang switches closing a system of contacts that are connected by a jumper. Four-wire wires are required for connection.
There are also rotating models, but they are more expensive. From the catalogs you can select devices of different designs, as in the photo of the cross switch. If you wish, you can assemble it yourself according to the diagram if you have the suitable components.
Photo of connecting a three-key switch
Share with friends