In order to calmly walk barefoot even in winter, sit by the fireplace or play with a child on a laminate floor, it is worth installing an additional heating system. But many owners of wooden houses are concerned about the compatibility of such a device with the fire and environmental safety of their home.
We propose to find out whether it is possible to make a heated floor under a laminate on a wooden floor, what are the pros and cons of such a solution. We will tell you how to choose the optimal installation method, and also describe in detail the technology for arranging a floor-type heating system.
Is heating compatible with laminate flooring?
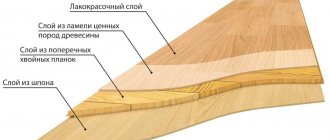
Although laminate is positioned in advertising as a wooden covering, in fact it is a multi-layer “pie” made of a protective film, paper impregnated with various resins, and a base - a slab of compressed sawdust. Therefore, the issue of security is really relevant.
When heated, resin and glue release phenol, phthalate, toluene, the infamous formaldehyde and other toxic substances that negatively affect our health.
When choosing a laminate, be sure to pay attention to its emission class and thickness, because a thin flooring of 21-23 mm is better suited for heated floors
But it is important to consider the following nuances:
- Harmful fumes are released only with strong heating - from 40°C and above.
- To protect the coating from overheating and spontaneous combustion, you need to install a thermostat with a temperature sensor for the underfloor heating system, which will monitor the temperature and turn off the system if the specified parameters are exceeded.
- If the protective layer of chipboard is not damaged, then even at high temperatures, volatile substances enter the air in insignificant concentrations.
- For residential premises with heated floors, it is worth purchasing a decorative coating with an emission indicator E0 (in extreme cases - E1), where the concentration of volatile substances is several times lower than the permissible norm.
If you take these simple rules into account, you can safely install a floor heating system under the laminate and enjoy comfort during the cold season.
Options for arranging heated floors
For heated floors, you can install a water or electric heating system. If desired, any of these structures can be hidden under the laminate and laid on a wooden floor, so we will consider all the options to choose the best one.
Types of electrical systems
Electric underfloor heating is considered the optimal solution for heating floors with dry screed. It does not require the creation of a complex multi-layer structure and concrete pouring, and even a beginner in the repair business can handle its installation.
True, there are several types of electrical systems, each of which has its own characteristics and installation nuances.
The main advantage of heated floors is the distribution of temperature in height, because for physiological reasons we feel most comfortable when our feet are warm (+)
The “progenitor” of warm electric floors is the cable system. To install it, a well-insulated heating core is cut into sections and laid on the floor, secured with special clamps. When connected to electricity, the cable transfers heat to the floor covering.
A more modern version of the design is thermomats, in which the wiring is already fixed to a fiberglass mesh, which greatly simplifies the installation process.
For a wooden base, a cable floor is considered the most fire-hazardous system, so it must be equipped with a thermostat and temperature sensors that will monitor the heating level
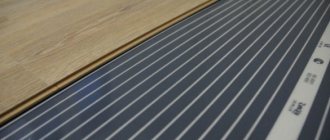
Infrared film flooring is the most popular option today for installation on a wooden floor under a laminate. Essentially, this is a film with polymer strips sealed inside with a thin layer of carbon fiber, silver or graphite, which, when connected to the network, emits electromagnetic waves in the infrared range.
The main feature of this design is the absence of glowing elements, due to which heat is released without the threat of self-ignition.
It is recommended to ground the electrical heating system to protect yourself from electric shock and to avoid damage to structural elements during power surges in the network
Warm carbon floor is another system based on the work of infrared rays. It is based on carbon rods connected to each other by a high-strength copper cable.
Although this design is quite expensive, it has a number of advantages over other types of heating: it does not heat up, consumes minimal energy, automatically controls the heating temperature and is not afraid of the load from heavy furniture.
The peculiarity of infrared radiation is that the rays transfer heat not only to the surface of the laminate, but also to the furnishings in the room, without heating the system itself
Advantages of infrared floors compared to cable ones:
- Heating is faster and more uniform , because the cable heats the coating only in places of contact with the floor, and the film heats up its entire area.
- Easy to install - the film system can be installed in literally an hour of work and you can immediately begin laying the laminate.
- Reliability - in the event of mechanical damage, only one segment fails, and the system continues to operate.
- Health Benefits – Far infrared radiation supports the immune system and is even used to treat certain diseases.
In general, electrical systems have relatively few disadvantages. For example, it may be difficult to rearrange furniture, since heavy objects can pinch the cable or film and damage the structure.
Well, the most important disadvantages, like any electrical device, are high energy consumption and the danger of a short circuit with subsequent ignition of wooden materials. Infrared and carbon fiber floors are most reliably protected from the latter.
Advantages and disadvantages of a water circuit
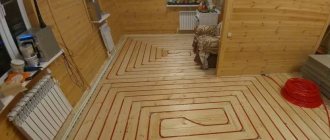
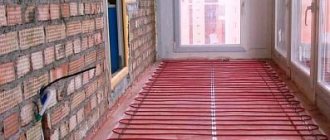
Water heated floors are small-diameter pipes laid under a decorative floor covering and connected to a heating boiler or central heating system.
Although it is traditionally recommended to lay the water circuit on concrete, for heated floors in a wooden house, you can also install a dry screed under the laminate so as not to overload the floors.
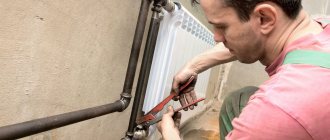
Considering the characteristics of the laminate, the heating of the pipes under the floor should not be higher than 35-40 degrees, and since the water circulating through the heating circuit exceeds this figure, you cannot do without a thermostat (+)
Advantages of a water circuit on a wooden substrate:
- Economical . Minimum energy costs compared to other types of heated floors.
- Safety . There is no risk of short circuits and spontaneous combustion of materials.
- Maintainability . If repairs are necessary, you can simply remove the laminate and replace the problematic section of the pipeline without having to deal with dismantling the concrete screed.
The main disadvantage of the water system is that for its operation it is necessary to start the boiler and wait for the coolant to warm up, so there will be no rapid heat transfer. And if the system is connected to centralized heating, then it will only work during the heating season.
By the way, it is prohibited to install such structures without authorization in apartment buildings, so connecting heated floors to radiators is only possible in a private house.
The pipes also have lower heat transfer - they do not fit as tightly to the laminate as infrared film or electrical cable, although this issue can be partially resolved by installing heat distribution plates.
Well, the last drawback is the complexity of installation, which will require both accurate calculations and experience, so it is better to entrust it to specialists.
Is it true that plywood is a panacea?
When a repair specialist is asked what is the best way to level the base with laminate, he will affirmatively say that it is plywood, and he will be right without a doubt. This material has a whole host of positive properties:
- She is very easy to work with.
- Plywood weighs a little.
- It has no unpleasant odors at all.
- Even a beginner can install plywood.
- Has optimal rigidity.
- Has the ability to withstand enormous pressures.
In addition, plywood is also more profitable financially, for example, when compared with the same cement screed. As for specific advantages, they also exist and are expressed:
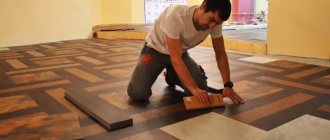
- Plywood covering is best suited for laminate flooring. The floors will end up being rigid all the way around.
- Due to the fact that the plywood parameters are quite large, the flooring can be done in a short time.
- If the base itself is uneven, the plywood sheet bends in the desired direction, maintaining all its qualities.
- And besides this, it is practically unpretentious; it can be installed under a wide variety of floor coverings, or used as a full-fledged floor.
The nuances of heating floors with a wooden base
First of all, let's differentiate the concept of wooden floors. If we are talking about old boards that covered the floors of Soviet-built houses, then it is better to remove such a base and install a heating system using a standard concrete screed.
The reasons are obvious: the new floor will be perfectly smooth, without waves, squeaks and other consequences of “savings”.
A wooden base will allow you to quickly complete repair work, since the entire floor “pie” can be installed in just a day or two, rather than waiting for the concrete screed to dry for two weeks
But if you cannot overload the floor slabs (as, for example, in old buildings, houses made of laminated veneer lumber or logs) or you do not want to reduce the already critical height of the ceilings, the best solution would be the so-called dry heated floor with a wooden base.
But there are a number of nuances here. If for an infrared floor a deck made of durable plywood or chipboard is sufficient, then this will not work with a water circuit - the probability of damage to the pipes with subsequent flooding is too high.
Therefore, if it is not possible to arrange a concrete screed, a modular system can be used to install water floors - special lattice sections made of OSB or chipboard with channels provided for placing pipes that are laid directly on the logs.
Their width varies from 13 to 28 cm and is selected depending on the pattern and step of laying the contour. The plates are fastened together with locking fasteners and form a grating floor.
Before installation, it is recommended to install a layer of hydro- and thermal insulation on the wooden base of the floor, and lay the modules with a damper gap of at least 2 cm to compensate for possible expansion when the material is heated
The second option for installing water pipes on a wooden floor is a rack system. To do this, slats made of boards, plywood or chipboard are installed on the subfloor, and circuit pipes are laid between them. This method will take more time and effort, but will allow you to save a lot on purchasing ready-made modules.
Water circuit installation instructions
To arrange water heating, you can use ready-made modules, OSB or chipboard boards with channels cut with a router for pipes. You also need to select pipes, a thermostat, insulation, and waterproofing.
The length of the pipes is calculated based on the layout method and the size of the heating zone - a warm floor can be either an additional or the main source of heat.
Depending on the layout of the room, the arrangement of furniture and the design of the heating system, you can lay the pipes in loops, snails or spirals, but for self-installation the simplest “snake” is considered the easiest (+)
For wooden houses, the lath installation method is most often used. To do this, you need to prepare the surface of the subfloor - make a flooring on beams made of plywood or OSB with a thickness of 15-20 mm, level it if necessary and insulate it (the maximum permissible unevenness is 2 mm per 1 linear meter).
It makes sense to install a water heated floor if the house is equipped with autonomous heating, but connecting to a centralized network is not recommended for a number of reasons - in an apartment it is simply prohibited, and in a private house there is a risk that the pipes will not withstand pressure surges (+)
Stages of upcoming work:
- Think over the layout and calculate the pipes for the floor. It is important that the slatted base is installed perpendicular to the supporting joists.
- Then cut strips from moisture-resistant plywood, 2.5-3 cm wide less than the pitch for laying out the pipes. For example, for a step of 20 cm, stripes with a width of 17 cm are needed, for 30 cm - 27, etc. The thickness of the slats should exceed the diameter of the pipes by 10-15 mm.
- Lay a layer of hydro- and vapor barrier (foil polyethylene is most often used).
- A damper tape is attached along the perimeter of the walls, which will provide the necessary clearance when the materials expand due to heating.
- In accordance with the layout plan, the pipe location markings are transferred to the floor.
- Then cut slats are installed on the logs or the surface leveled with wooden materials so as to form a groove for the pipeline. In places where it is planned to rotate the contour according to the markings, it is advisable to round off the planks themselves, and then secure them with self-tapping screws.
- Now heat-conducting plates are laid between the slats, which must occupy at least 80% of the floor area to ensure uniform heating of the laminate.
- Water circuit pipes are installed in the grooves of the profile.
Then the structure is checked for functionality by connecting to the heating circuit. To make sure there are no leaks or deformation of the pipes, it is worth observing the operation of the system for a couple of days, creating maximum pressure.
If desired, heat-conducting plates can be replaced with pieces of thin aluminum sheet or metal profile, but the use of foil for such purposes is useless
At the final stage, all that remains is to cover the “pie” with waterproofing (for example, a layer of polyethylene at least 100 microns thick) to reduce noise effects when heating and cooling the pipes. For finishing the flooring, kiln-dried plywood or gypsum fiber sheets that conduct heat well are best suited.
But before sheathing begins, the heated floor must work for at least 2 days, after which it must cool to a temperature of 15-17°C.
Additional information about installing warm water floors on a wooden base is presented in this article.
Cost of work and materials
Another important point that worries those who want to install a heated floor under a laminate: prices for materials, installation and work on its installation.
They depend on the complexity and area of installation, as well as on the manufacturer of this floor covering. For example, average prices for products of the most famous and popular brands will look like this:
| Firm | Model | Class | Guarantee period | Dimensions, mm | Price per sq.m., rub. |
| TARKETT , Russia | Woodstock Premium | 33 AC5 | 25 | 1292Х194Х8 | 630 |
| CLASSEN , Germany | Futuro Harmony ML | 32 AC4 | 15 | 1286x194x8 | 555 |
| KRONOTEX , Germany | Dynamic | 32 AC4 | 20 | 1380x193x8 | 500 |
Please note that when purchasing laminate flooring for underfloor heating, before choosing one model or another, you must make sure that it is suitable for water heating systems!
The cost of services will be:
- Installation of water heated floors: from $7 per square meter.
- flooring installation : $5 to $7.
- Installation of infrared heated floors: 3-5 dollars.
- Laminate installation : $2-4 per square meter.
Installing a water meter with your own hands: tips and tricks, step-by-step instructions and advice from experts in our article. Read how to make a long-burning solid fuel boiler with your own hands at https://klimatlab.com/otoplenie/tverdtoplivo/tverdotoplivnyj-kotel-dlitelnogo-goreniya-svoimi-rukami.html
How to make your own electric heated floor
Cable and film floors vary significantly in thickness, so their installation has a number of nuances. But to imagine the scope of the work ahead, let’s consider the main stages of installation of both systems.
Cable system installation instructions
The installation of a structure made of conductive cables is carried out by analogy with the installation of a water floor, with the difference that such spacious niches are not required for the wiring, so instead of slats, you can get by with small recesses.
If the size of the room requires a large heating area, it makes sense to make several electrical circuits and connect each to a separate thermostat so as not to overload the network (+)
The sequence of work looks like this:
- The gaps between the beams are insulated with a layer of thermal insulation (for example, mineral wool, ecowool or perlite).
- Then a heat-reflecting layer of foil material is laid, on top of which a mesh with a cell of 50*50 or 40*40 mm is attached.
- Small recesses are made in the subfloor joists where the cable turns, and metal insulation is applied to each cut.
- Then the electrical cable is laid, fixed to the grid with special clamps.
- A temperature sensor is installed between the wires, enclosed in a corrugated tube and connected to the thermostat.
The power cable is supplied in a metal sleeve to the socket and connected through a thermostat, after which the structure is checked for functionality.
After this, you can lay the subfloor for laying the laminate.
Installation of film infrared floor
As already mentioned, the simplest and most accessible option for arranging heated floors for beginners in the renovation business is an infrared system.
To install infrared floors, do not use nails or other fasteners that damage the film - this may cause a short circuit
Work algorithm:
- A heat-reflecting substrate (4 mm thick) with a lavsan coating, which does not conduct electric current, is laid over the entire area of the room. The joints between layers of material are glued together with mounting tape.
- The heated area is marked.
- The heating film is cut at the cut locations according to the layout plan.
- Then the film is spread on the floor, the sections are connected to each other in parallel using grommets. After connecting and crimping the wiring, the connection point is sealed with bitumen insulation, and the film strips are fastened end to end with tape.
- To prevent the wires from being deformed, small grooves are cut in the insulating layer with a stationery knife, the cable is placed there and secured with tape.
- Now installs the heating sensor (its wire is also hidden in the foil material).
- A hole is made on the wall (usually at a height of 50-100 cm from the floor) for the thermostat, and a groove is drawn to it for wiring the sensor and power supply.
During the installation process, try not to bend or crease the film so as not to damage its integrity, because the performance of the entire heated floor system depends on this
Installation of logs on the surface
The timber is laid according to the markings on the fixed linings. The logs are mounted parallel to the wall with windows, i.e. across the direction of sunlight entering the room. The first lag is installed at a distance of 30-40 mm from the wall, and all subsequent ones - 40-50 cm from each other.
When specifying the distance between the logs, you must remember that the gap between the last beam and the rear wall should also be no more than 40 mm. The distance between the lags should be the same. The logs must be fixed parallel to each other strictly at the same height (along the surface). All logs are chosen to have the same section size, except for the log located at the front door. It is advisable to install this beam from a wider beam (at least 50 mm).
The logs are attached with screws to wooden pads, previously positioned and secured with anchors according to the markings. The heads of the screws should not protrude outward (it is advisable to have them recessed into the joist by 2-3 mm). The height of the logs must be strictly the same, so during installation the height is constantly monitored using beacons (if installed) or using a level. To increase the height, a roofing felt pad of the required thickness is placed under the joist.
The beacon allows you to determine the force with which the screw is screwed in, so the height of the log is adjusted. To strengthen the lags, transverse bars (crossbars) are usually installed. Such bars are fastened across the beam in places where wooden pads are installed and are attached to them with screws.
For reliability, after installing the logs, all wooden elements are coated with parquet or other similar glue. It is advisable to fill the volume between the joists with insulation and sound insulation. For this, mineral wool, expanded clay or expanded polystyrene (foam plastic) are usually used. Before backfilling, all communications are carried out (if necessary). It is also recommended to place a layer of parchment or bitumen paper on top of the lag. Sometimes the timber is installed without the use of wooden supports. In this case, the lags are leveled by placing pieces of roofing felt. The joists are secured to the floor with anchors. The length of the anchor is selected 5-6 cm greater than the thickness of the bar.
Some tips for safe operation
When planning the installation of heated floors, do not forget that neither electrical cables nor water pipes should be laid under heavy pieces of furniture. Also, you should not install heated floors in close proximity to a wood-burning, gas fireplace, stove or other heating devices.
For rooms for various purposes, you can program different temperature conditions, for example, in the bathroom and living rooms it will be comfortable at 22-24°C, and in the kitchen and corridor 20°C is enough
Practical nuances:
- After completing the repair, you should leave the heating system on and maintain the same temperature for 3-5 days. This precaution will allow the entire floor “pie” to be heated evenly and thoroughly and ensure reliable operation of the system.
- At the beginning of the heating season, you need to properly prepare the floor heating system for operation. To do this, you should increase the heating degree by 5-7 units every day until the temperature reaches the required value. This approach will avoid sudden temperature changes that can damage laminate and other materials. Similarly, the heating is turned off during the warm period.
- Do not forget that film infrared floors do not tolerate moisture well. Therefore, it is not recommended to install it in rooms with a humidity level above 70%, and after wet cleaning, wipe the laminate dry.
- The optimal temperature for heated floors is considered to be within 20-30 degrees.
And lastly, do not cover the heated laminate flooring with carpets or other furnishings that interfere with the effective distribution of heat.
How is TP better than radiators?
During the construction phase of a new home, its owner has the opportunity to choose the appropriate heating option from a variety of available ones. But if there are already radiators in the room, then you need good reasons to refuse them. Floor heating has a number of advantages, which for many become a decisive factor when choosing:
- Efficiency. Unlike radiators, which primarily heat the space under the ceiling, heated floors transfer energy from the bottom up, uniformly heating the living part of the room at a height of up to 2-2.2 m.
- Saving. More efficient energy distribution allows reducing coolant costs by 20-30%. And while radiators will generally be cheaper to purchase and install, underfloor heating provides long-term savings that look into the future.
- Inertia. Depending on the type of radiator, this figure may differ, but the floors take longer to cool down after switching off.
- Comfort. The use of radiators requires a high coolant temperature (70 degrees). The average temperature of heated floors is 45° C, which is more comfortable and safer for the inhabitants of the house.
- Practicality. Radiator heating is characterized by a large volume of coolant, which is placed along the walls and under the windows, occupying part of the room. Underfloor heating is hidden from view, so it fits into any design and does not take up the usable area of the room.