Civilized life is impossible without a large number of electrical appliances. In addition to Ilyich light bulbs, modern houses and apartments use air conditioners, washing machines, dishwashers, boilers, computers and other electrical installations. The total power of this equipment is constantly growing, which increases the requirements for electrical wiring.
When laying electrical wiring, it is advisable to divide consumers into groups. This allows you to reduce the cable cross-section, simplify installation and select protective equipment (automatic circuit breakers, RCDs) that corresponds to the type and power of the load.
This article talks about how to divide electrical wiring into groups and select the correct circuit breakers.
Why do you need a wiring diagram?
It turns out that installing modern electrical wiring in an apartment is a real art, which only a professional electrician can handle.
If you do not want to constantly change the decoration of the walls in order to mask cables that appear here and there, we recommend that before renovating an apartment or building a house, draw up a drawing indicating all significant objects related to electricity: sockets, switches, an electrical panel with an RCD, lighting fixtures.
A sample diagram that a homeowner can sketch
Attention is paid to marking the locations of all electrical points, from the electrical panel to the sockets. Focusing on the requirements or wishes of the home owner, the electrician draws up a schematic diagram of the electrical wiring in the apartment
His task is to divide the cables into groups in order to correctly distribute the load, think through the control and protection system, and ultimately do everything to guarantee safety and comfort.
Based on the requirements or wishes of the home owner, the electrician draws up a schematic diagram of the electrical wiring in the apartment. His task is to divide the cables into groups in order to properly distribute the load, think through the control and protection system, and ultimately do everything to guarantee safety and comfort.
What must be taken into account when drawing up a diagram, drawing, work plan necessary for proper installation of electrical wiring?
Let's consider the electrical network from the point of view of its component parts:
- Automatic protection devices installed in the electrical panel. The functioning of all home equipment and the safety of users depend on their quality and proper installation.
- Cables and wires with the correct cross-section and good insulation.
- Sockets and switches with high-quality contacts and safe housings.
In private houses, a mandatory element is an input circuit breaker and a power cable from it to the switchboard. Using a circuit breaker, the power consumption is regulated and, if necessary, all electricity in the house is turned off.
Approximate wiring diagram in a private house
The main attention should be paid to the distribution of power across circuit breakers and the protection of each dedicated line. The electricity meter is usually installed at the entrance, after the input circuit breaker
The electricity meter is usually installed at the entrance, after the input circuit breaker.
Tool for getting the job done
In the process of performing electrical work, a home handyman will need a set of the following installation tools:
- Sharp knife.
- Pliers (pliers).
- Side cutters.
- Slotted screwdrivers, thin and medium, possibly Phillips medium.
Electrical tape may be required to insulate the wire connections inside the junction box or light housing. In these cases, it is recommended to use CB tape. Over time, it does not melt or stick to the constantly heating contacts it insulates, but only dries out. If necessary, crumble well with pliers.
It’s great if you have a special wire stripping tool - a stripper or wire cutters with slots for stripping insulation. In the absence of such devices and a large amount of work, you can get by with a folk remedy by modifying the side cutters.
To do this, use a file to make opposite cuts in the cutting edges closer to the hinge, which together should form a hole slightly larger than the diameter of the exposed wire strand.
What does the PUE say about the difference between group networks and supply and distribution networks?
The main document for an electrician, PUE (Rules for the Construction of Electrical Installations), surprisingly clearly and reasonably interprets the concepts of group, distribution and supply networks in Chapter 7 (clause 7.1.10-7.1.12)
- The power supply network goes from the substation switchgear or branch from the overhead power line to the input, input-distribution devices, and the main distribution board.
- The electrical distribution network follows the supply network to distribution points and electrical panels.
- And finally, the group network (circuit), it follows the distribution network, from panels to electrical receivers (lamps, sockets, etc.).
As we can see from the clear definitions, the group networks of an apartment start from the floor or apartment electrical panel to the apartment’s electrical receivers.
Regulatory documents on separation
Friends, today there are no strict rules regarding whether it is REQUIRED to separate power into group lines or not. In one of these documents SP 256.1325800.2016 “Electrical installations of residential and public buildings. Design and Installation Rules” I found only a recommendation in paragraph 10.2 which says the following:
Below is a diagram of the division of electrical wiring into groups in the apartment.
Implantation (“freezing”) of electrical cables
We moisten the recesses for the sockets with water, prepare the sockets for installation (break out the perforations for the cables), spread the alabaster, level the sockets by “freezing” them with diluted alabaster. We also secure the cable with alabaster after 30-50 cm. After the alabaster has hardened (2-3 minutes), the grooves and sub-walls can be sealed with gypsum plaster.
Several additions
- Connect old aluminum wires to new copper wires through electrical connection terminal blocks.
- The ends of the stranded wires are crimped with a sleeve using special pliers. It is possible to twist stranded cores with subsequent soldering of the twist.
- When installing sub-walls under the tile “apron” in the kitchen, make sure that the sub-walls stick out from the wall to the thickness of the tile with mortar (8-10 mm).
- Before laying electrical cables, as well as after freezing them with alabaster, measure the insulation resistance of the electrical cable. They must match and be within the limits indicated in the table below.
The insulation resistance for apartment electrical wiring is measured using an Ohmmeter with an output Voltage of 500 Volts, at a temperature not lower than +5°. And as can be seen from the table, it should not be less than 0.5 MOhm.
That's all about dividing electrical wiring into groups! Good luck to you in your endeavors!
Especially for the site: Everything about apartment renovation
Methods for routing wires and cables
Choosing a method for distributing wires in a home electrical network is a very serious and responsible undertaking. This largely determines how all the electrical equipment in the apartment will function in the future.
The most popular method of wiring is to connect all components of the electrical network through distribution boxes. This installation diagram provides for an electrical panel installed outside the apartment on the landing. An electric meter and circuit breakers are installed in it. Next, a cable with a certain cross-section is laid from the panel, which is brought into the apartment. From it, using distribution boxes, wires are routed to each room according to a pre-designed diagram.
Another method involves a star connection. With this connection, each point - socket or lighting fixture - is powered from a separate cable line. Each line is connected directly to the panel, in most cases, together with a separate circuit breaker. This type of wiring is characterized by a significant increase in the number of wires and cables, as well as labor costs for their arrangement. Ultimately, the project becomes more expensive. However, if we fully take into account all the positive and negative aspects, we can conclude that such a system is much more reliable than a conventional one and allows you to control every element in the electrical circuit.
The “loopback” system is considered a cheaper connection. It is similar to the “star” option and differs in the ability to connect several consumers to one cable at once. This method is used in accordance with the individual characteristics of the premises and the entire apartment. In any case, each of these methods is rarely used in its pure form. As a rule, combined options are used in the circuits, which allows for the most efficient and safe wiring of home electrical wiring.
Wires on the chandelier
At the location of the chandelier (ceiling) there are wires to which this lighting fixture must be connected. As a rule, these are three conductors.
- Blue – zero N.
- Brown – L phase.
- Brown – L phase.
The fourth wire can be yellow-green - PE ground. It is connected to the chandelier body.
There may be several of them, the coloring must comply with the standards.
Connection options
You can connect a chandelier with 2 wires (phase and neutral) to a single-key switch, or to one key of a multi-key switch.
You can connect a chandelier with 3 wires (zero, phase, phase) to a 2-key switch. There can be from 2 to ten or more lamps on a chandelier, but there will be 3 operating modes.
You can also connect a chandelier with 4 wires: zero, phase, phase, ground to a two-key one. If the earth comes out of the ceiling, then the earth of the chandelier is connected to it. If not, then this chandelier wire is not connected anywhere, it is simply isolated.
A three-arm chandelier is connected like this:
The following modes are possible here: one, two or three lamps are on (1+2). It is clear that there are no other options.
Three blue wires - zeros on the chandelier are collected together (into one bundle) and connected to the zero that comes out of the ceiling.
There remain 2 brown ceiling wires and 3 of the same color that come out of the chandelier. Two chandeliers (any) are assembled into a bundle and connected to the ceiling phase conductor. The remaining one is connected to the second phase ceiling wire. You can check how everything works.
If it doesn’t work, you need to check the presence of phase and zero (with the switch on), the integrity of the wires, lamps and contacts of the chandelier. It is advisable to do this before connecting. There are no other reasons.
The connection points are insulated, the wires are hidden behind a decorative cover, and the chandelier is hung on a hook. The connection is complete.
Connecting a five-arm chandelier
The connection is similar: five blue wires are collected together and connected to the zero, which comes out of the ceiling. Then 2 groups of lamps are determined that will be turned on by the right and left switch keys. The brown phase wires in these groups are connected together.
Then a bundle of 2 brown wires from the chandelier is connected to one of the phase wires that come out of the ceiling, and a bundle of three is connected to the second.
Typically, the phase wires on a chandelier are connected so that the lamps in the group are located not next to each other, as in the figure, but across one. This way the chandelier will glow more aesthetically.
If there are 6 or more lamps on a chandelier, they are still connected into two groups. In the picture above, the 6th, 7th, 8th and so on lamp is simply added. To any group - optional.
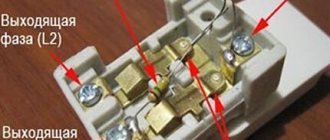
Correct connection of the lamp
The lamp base is connected like this. The phase comes to the side contact, zero - to the bottom.
The logic of this particular scheme is simple. If the switch is in the “off” position, no phase is supplied to the lamp. There is no danger of electric shock when unscrewing a burnt-out lamp and screwing in a new lamp.
If the switch opens zero, the phase will be supplied to the cartridge constantly. This is a direct violation of the electrical installation rules (PUE). Such cases occur if careless electricians delve into the distribution panel and, without the knowledge of the owner, swap phase and zero.
Distribution of consumers by groups
In addition to connections and connections, the distribution of all consumers located in the apartment into separate groups in accordance with their purpose is of great importance. Typically, the wiring diagram is made on different sheets, where each sheet corresponds to one group.
Such a breakdown will be even more effective when each group of consumers is connected to a separate circuit breaker. With this technical solution, in the future it becomes possible to carry out repairs of electrical equipment without completely turning off the power, but only in the part of the apartment where the work will be performed. In addition, separate lines have another important advantage: they do not require a high-power cable that can withstand high loads. Such loads necessarily arise when several consumers are connected to one line at once.
An electrical panel located directly in the apartment makes it possible to connect each consumer to a separate machine. This scheme makes the operation of the network convenient and safe, solving in advance all problems that may arise in the future.
The standard division into groups could be as follows:
- Only lighting for living rooms, kitchens and corridors.
- Connecting power to living rooms.
- Connecting power to the kitchen and hallways.
- Lighting and power supply are separately connected to rooms with high humidity - the bathroom and toilet. This group should be highlighted because increased requirements are placed on it.
- If the kitchen has an electric stove, it must be connected to a separate line.
Additional safety is ensured by installing a separate residual current device (RCD) on each group, which is also known as a residual current switch. These devices must be installed in the kitchen and bathroom lines.
After the groups are formed, the places where the main electricity consumers will be connected are determined. These include electric stoves, washing machines, water heaters, air conditioners, dishwashers and ovens. The installation locations of sockets, switches, lighting fixtures and distribution boxes are marked on the preliminary electrical diagram of the apartment. Next, a conditional connection of the wires is made, and their length in each section is also marked on the diagram.
After preliminary sketches, a final version of the diagram is drawn up. It is applied to a precise floor plan: electrical devices are indicated by special symbols, and wires are marked with multi-colored lines so that power cables, lighting and grounding can be distinguished from each other. The diagram must contain the maximum number of sizes. The area of the rooms, the distances from the wires to the structural elements of the premises, heating and water supply systems are noted. A detailed diagram allows you not only to significantly speed up repairs, but also to calculate all the necessary materials and costs.
Features of combined products
Paired modules are suitable for installation on surfaces made of wood, stone, plasterboard and concrete. They are distinguished by their aesthetic appearance, ergonomics and can be installed with a minimum number of installation channels.
Models can be built into the wall or located on its surface. They are suitable for indoor use or are equipped with a moisture-resistant housing for outdoor installation. A special cover prevents moisture and dust from accessing the inside of the case and the contacts. This solution is relevant if the bathroom is equipped with an interlocking modification.
How to form consumer groups
Electrical wiring is divided into groups at the design stage. Before starting this work, it is necessary to mark on the apartment plan the location of sockets, lamps and powerful electrical appliances, indicating the power and current consumption.
In addition to the necessary ones, it is advisable to add several spare sockets. Sooner or later they will definitely be needed. The number of sockets in the rooms should be sufficient to eliminate the use of tees and extension cords. Instead, double sockets or a socket block are installed
Important ! Standard household sockets are rated at 16A, but the total current of electrical appliances connected to a double socket or socket block should not exceed this value. This is due to the cross-section of the supply cables
If there are no electrical installations available, the location of the proposed installation is marked. If this is not done, then when installing new electrical appliances you will have to hollow out the walls and lay additional wiring.
Electrical wiring is divided into groups according to certain rules:
- For sockets, the total current of the devices is calculated. If it exceeds 25A, then such a group should be divided into two and connected with a copper cable with a cross-section of 2.5 mm². The connection to individual sockets is carried out using a 2.5mm² wire.
- Lighting is laid with a wire with a cross-section of 1.5 mm²; a 1.5 mm² cable is also used to connect individual lamps and switches. The rated current of the lighting machine is 10A.
- Electrical appliances with a power of more than 3.5 kW are connected with a separate cable and a circuit breaker. The wire cross-section and rated current of the machine are determined by the power of the device.
- Electrical wiring in the bathroom and other wet rooms should be a separate group. It is connected via an RCD with a response (leakage) current of 10 mA. If there are several such rooms and they are located nearby, then they are connected together.
- For each group, the total current of electrical appliances is calculated and, based on this, circuit breakers and RCDs are selected. The leakage current of RCDs in ordinary premises should be no more than 30 mA.
Why should electrical wires be divided into groups?
Previously, in apartments and private houses the total power of installed electrical appliances was 1 kW. This made it possible to carry out wiring with aluminum wire with a cross-section of 2.5 mm² and connect all electrical appliances to a panel with an electric meter and 5A plug fuses.
Now the total currents have increased to 40A, and in some cases, for example, if there is an electric stove or electric heating, the house is connected to a 3-phase 380V network instead of single-phase wiring.
However, for the safety of home residents, the rated current of the circuit breaker must match the power of the electrical appliances. Additionally, according to the PUE (Electrical Installation Rules), it is necessary to install an RCD (residual current device) or a differential circuit breaker, the operating current of which depends on the premises that are connected to this device - from 10 to 100 mA. This complicates the input panel and makes it necessary to separate consumers.
Electrical wiring is divided into groups in two ways. They can be used separately or simultaneously:
- By power. Powerful electrical installations are connected to separate circuit breakers - washing machines, dishwashers, boilers, kitchen sockets and low-power equipment - indoor and outdoor lighting and indoor sockets.
- By position. Separate cables and protective devices connect different rooms
This division of electrical wiring into groups allows you to separately disconnect different groups and rooms when performing repair work:
- when the sockets are turned off, the lighting in the room remains on;
- When repairing lighting, you can plug a portable lamp into the outlet.
In addition, in an emergency situation, only one group of protective devices is triggered. This simplifies troubleshooting, and until the accident is eliminated, some electrical appliances remain turned on.
| In modern electrical installations, it is imperative to separate lighting and power parts into groups. That is, lighting lines should not be connected to socket lines. |
What to do with the introductory machine
When designing electrical wiring and dividing consumers into groups, inexperienced electricians ask the following question. If it is necessary to install 4 circuit breakers for 16A sockets and 2 circuit breakers for 10A indoor and outdoor lighting in the electrical panel, the total current of these devices will be 84A, which is much higher than the rated current of the input circuit breaker, which is 40A, and sometimes even 25A.
Maybe when dividing electrical wiring into groups, it is necessary to replace the machine with a more powerful one?
It is impossible to change the input circuit breaker to a more powerful one for several reasons:
- For each apartment or private house, the electric company allocates a certain power, which is limited by the input machine. This is done in order not to overload the supply transformers and input cables, including at the entrance.
- The rated current of the protective devices must correspond to the cross-section of the wires. Replacing these devices with more powerful ones without replacing the input cable can lead to overheating of the wires and an accident.
- In many cases, the electric company installs the input machine in a separate sealed panel. Unauthorized removal of such a seal will lead to problems with the electric company and a large fine.
- When installing electric heating or an electric stove, you must obtain permission to increase power consumption. In this case, the input circuit breaker and cable are replaced.
Information! With a significant increase in power consumption, it is advisable to replace the single-phase 220V input with a three-phase 380V and connect the groups evenly to different phases.
In fact, when dividing electrical appliances into groups, there is no need to change the input circuit breaker. The rated current of circuit breakers of individual groups shows not constant, but the maximum permissible current. For example, a 16A circuit breaker is installed in a group of indoor sockets, and the total current of the TV and mobile phone chargers is less than 1A. Even high-power devices do not work all the time, but intermittently.
Problems may arise when turning on the washing machine and dishwasher at the same time, especially together with an electric oven and electric kettle.
In this case, the total current will reach 2 kW (kettle) + 2.5 kW (dishwasher) + 2.5 kW (washing machine) + 1 kW (electric oven) = 8 kW or, in a 220V network, 36A. When the boiler or air conditioner is running, this will lead to an overload of the network and tripping of the circuit breaker. Therefore, such powerful electrical appliances must be turned on one by one.
Advantages and disadvantages
Dividing consumers into groups has advantages over connecting all devices to one machine:
- reduction of cable cross-section;
- increasing the safety of home residents;
- simplifying repairs;
- in the event of an emergency shutdown of one of the groups, the rest remain in operation;
- no need to make a complete shutdown for repairs.
In addition to advantages, separation has disadvantages:
- the calculation of electrical wiring becomes more complicated;
- the dimensions and cost of the electrical panel increase.
The complication of the input panel and installation of electrical wiring when divided into groups is justified by the convenience of further operation and repair.
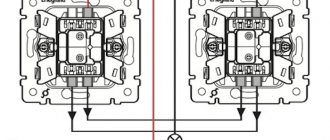
Hanging block for connection
At the same time, there is an original and very simple way out of this situation, proposed by master Vitaly Kotsaba, which will greatly facilitate your work.
We are talking about hanging sockets, combined into one circuit with a room switch and a light bulb.
No, not like the one in the photo above