Stove decor
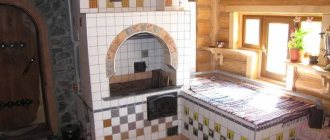
The Russian mini-stove can easily fit into a wide variety of home decor. It can be painted and painted without much effort, giving it uniqueness and special charm. When the stove has already been built, in any case it makes sense to finish it, because the surface of the brick is rough and will accumulate dust and dirt. Finishing work can be carried out in different ways: whitewash, paint, apply plaster, veneer with ceramic tiles or make a beautiful painting. It all depends on your imagination.
To paint, the surface of the stove must be rubbed down. After this, it is treated with a primer. Paint is applied over the dried primer. It should be chosen special - heat-resistant. All materials can be freely purchased in stores and markets.
For whitewashing, use slaked lime, to which you need to add blue.
Clay-based plaster can be applied to the surface of the stove. This method has been used since ancient times. Repair of such coating must be done every year.
Before tiling the stove, you need to remove dust from the surface and clean the seams. Then the mesh is attached and the solution is applied to it. Then the tile itself is laid.
To paint the stove you need sandpaper, chalk, brushes and your imagination. Original patterns can now be easily found in various sources.
You can do this work yourself or hire a specialist.
Having made a high-quality stove, you will receive a magnificent heater for your home, which will create unique coziness and comfort.
Chimney installation
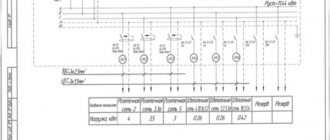
The chimney required for the operation of a Russian stove is absolutely no different from the chimney of any stationary solid fuel unit, be it a “Dutch”, “Swedish” or some new-fangled bell-type stove, calculated using computer modeling. The design and arrangement of the chimney can be taken from the drawing below.
Chimney device for a Russian stove with orders
During the work process, we recommend following a few simple rules:
- The design and installation location of the pipe for removing combustion products must comply with the standards of the current SNiP.
- At the point of transition from the ceiling to the attic, the pipe should thicken.
- The lower part of the chimney is placed on the same solution as the stove.
- The internal cross-section of the smoke duct must correspond to the power of the heating device.
- Above the roof, the chimney is built using a mortar with the addition of cement.
- The places where the pipe passes through the ceilings are insulated using non-flammable and waterproofing materials.
During work, the geometry of the structure and the deviation from the vertical are constantly monitored using a level or plumb line.
Sizes and orders
Order for a Russian stove
The heat transfer of a stove depends on the area of the surfaces that give off heat. At the first stage of calculations, the possible heat loss of the house itself is determined. The parameter depends on the material, wall thickness, and insulation quality.
If you don’t want to go deeper into the topic, you can use a simple option suitable for average buildings:
- Measure the length, width and height of the interior of the house.
- By multiplying the data obtained, the total volume is obtained.
- Multiply the volume by 40 W/h, obtaining the average energy loss of the building.
Example. The house is 10x10 meters with a wall thickness of 40 cm and ceilings of 2.6 m. The internal volume is 9.6x9.6x2.6. We get 240 m3. Heat loss will be (240 m3x40 W/h) 9600 W/h.
For heating, it is necessary to build a stove with a heat output of about 10 kW/h.
Builders recommend another method of calculation. For 10 m2 of area, the heater power is 1 kW/h. If you multiply 9.6x9.6 m, you get 92 m2. This also gives an approximate furnace power of 92/10 = 9.2 kW/h.
Operating experience shows that a square meter of the surface of a Russian stove is capable of delivering 0.5 kW/h of heat. For calculations, only side walls are taken without taking into account the base and ceiling. Therefore, with ceilings of 2.6 m, the perimeter of the furnace should be 20/2.6 = 7.69 m. Such a perimeter will be provided by a device of 2x1.7 meters.
Based on the dimensions, a suitable working drawing of a Russian stove with order is selected. Schemes can be found on the Internet; they are published by professional stove makers and specialized organizations.
The structure of a Russian stove
Main components of the unit:
- a furnace or firebox is the basis of any heating structure used for cooking;
- vault - a part located at the top of the furnace, on which an array capable of retaining heat is laid;
- under - the lower element of the firebox, designed to increase the strength of the combustion chamber;
- cheek – front wall of the furnace;
- mouth - a hole in front of the furnace through which fuel is added and dishes are loaded; this is the part connecting the firebox to the room and the chimney;
- hearth - the area on which household utensils are located before being placed in the firebox or after being removed from it;
- sub-stool - an unheated compartment under the support, intended for storing dishes or other things;
- under-furnace - the area under the bottom of the unit where firewood is placed for heating;
- hailo - a device for releasing smoke into a chimney;
- stoves - niches to increase the heating area and improve heat transfer; they were used for drying herbs, berries, mushrooms and storing dishes or shoes;
- sill - part of the mouth up to the vault, designed to increase efficiency by retaining flue gases under an arc-shaped ceiling;
- ceiling - the upper part on which the bed was installed.
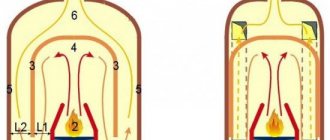
About the principle of operation of the rocket stove
- It is distinguished by direct combustion - flue gases move in the stove channels, being free and not driven by draft, as in the case of structures with chimneys
- Despite the fact that the dimensions of the furnace are small, pyrolysis afterburning of flue gases is organized. (pyrolysis is the process of decomposition of fuel into solid and gaseous phases with a deficiency of oxygen, in order to transfer the process from rapid oxidation to smoldering, slow. Smoldering occurs with complete combustion of both the generator gas CO and flue gas particles with a large release of heat)
In its simplest operating design, a rocket stove can be represented as follows: two pipes, one located horizontally, and the other directed towards the top. If it is possible to make welds, then one pipe is possible - bent by analogy.
The rocket stove has no “extra” parts - the fuel is placed directly into the pipe. During combustion, the hot flue gas, according to the laws of physics, will rush to the top, vertically. If you install a container on the top edge of the rocket tube, you can cook food and boil water very quickly. Of course, it is necessary to leave a path for the free exit of smoke from the rocket: for this, a gap is left between the container or stand and the pipe itself.
Stove with a stove bench - Russian classic
Today, large and comfortable structures on which you can “warm your bones” are varied in both shape and design. Here are a few samples that you can make yourself if you wish:
This variety of design is dictated by the desire of the owners to decorate the interior and make it unique.
Brief description of the design
Many people do not know how to properly build a Russian stove with a stove bench, because they do not know either the basic elements or the details of the masonry.
The main elements that must be present in every design. In different regions, the names of parts may differ (for example, podpechka - podpechek)
The furnace is the main, large chamber, which serves both for stacking firewood and for baking pies. The upper part of the furnace - the arch - heats up and transfers heat to the stove bench.
In front of the furnace there is a hearth - a small compartment where it is convenient to place baking sheets and pots. Here they also carry out manipulations to place firewood on the blade. Sometimes a small niche is placed under the pole - a sub-pole.
The mouth is a hole leading into the furnace.
The under is an important part of the furnace, its lower plane, slightly inclined towards the mouth. The smoothest polished oven surface.
The oven is a niche under the stove, which is used for drying logs, storing large utensils, grips, shovels, and brooms.
Overpipe - a chamber between the furnace and the pipe, located above the hearth.
View - a damper that blocks the chimney after the wood burns out.
A bed is a large horizontal surface for resting or drying.
A samovar is a hole into which the samovar pipe was previously inserted.
Often a smaller structure with a cast iron hob is attached to a large stove. It can be heated in the summer to cook dinner
If additional heating of the house or outbuildings (veranda) is required, a hot water boiler is built into the furnace body and the wiring is made to the required rooms.
Pros and cons of the structure
The Russian stove has many advantages over modern heating devices, which is why it is still popular, especially in country houses and dachas.
Advantages of the structure:
- efficiency - if you build a complex furnace, the efficiency reaches 70-80%;
- low cost of materials and work of stove makers;
- some models are heated not only with wood, but also with other types of solid fuel;
- multifunctionality - heating, cooking, relaxation included;
- requires attention once a day;
- Dry heat from bricks has a beneficial effect on health.
If construction rules are followed, safety is guaranteed.
A brick structure usually lasts at least 30 years. Structures built by craftsmen live much longer - 100 years or more without major repairs
But there are also disadvantages due to which building owners refuse to install a stove. Fuel must be prepared in advance, dried and selected. Modern electric and solid fuel boilers operate more efficiently, take up less space and do not require constant attention.
A Russian stove can only be installed in a separate private house; it is not suitable for heating apartment buildings, much less multi-storey buildings.
Before you calculate and assemble a Russian stove with a stove bench, you must determine its dimensions and installation location. Be prepared for the design to take up a lot of space.
Disadvantages include regular cleaning of the stove from ash and soot.
Do-it-yourself iron country stove - step-by-step instructions
The simplest version of an iron stove is the well-known potbelly stove, which is absolutely undemanding in terms of fuel. Refined factory versions can be made of steel and cast iron, have decorative trim and a glass door, and be installed on bent legs
But for self-production, something else is important: simplicity, reliability, straight lines of design
Table 2. Characteristics of popular Butakov iron stoves.
| Model | High school student | Student | Engineer | Assistant professor | Professor |
| Room volume, cubic meters m | 100 | 150 | 250 | 500 | 1000 |
| power, kWt | 6 | 9 | 15 | 25 | 40 |
| Dimensions, cm | 37*66*78 | 37*66*78 | 44*76*89 | 57*97*115 | 67*111*125 |
| Weight, kg | 55 | 77 | 113 | 182 | 235 |
| Chimney diameter, mm | 120 | 120 | 120 | 150 | 200 |
| Min. height of the chimney from the grate, m | 5 | 5 | 5 | 6 | 8 |
A good option for making your own is the Loginov potbelly stove. It is distinguished from a conventional stove by the presence of two shelves at the top of the firebox, which more than double the path of burnt gases, increase efficiency and heat output.
Step 1. Cut the material. Having drawn a diagram of the potbelly stove on paper, estimate all the dimensions. The best option: 80 * 45 * 45 cm. In addition to the box itself, inside you will need to place a grate and two reflective shelves. It is better to make all elements removable. The cutting can be done with a grinder, and the chamfer can be removed from the edges with a grinding wheel.
Drawing of Loginov's potbelly stove
Step 2. First, the side and rear walls are welded together, point by point. They are tapped with a hammer for leveling, placed on the bottom, which is also welded, now along the entire seam to make the parallelepiped rigid. The grate can be made from a sheet of steel with a thickness of at least 4 mm, in which longitudinal holes can be cut. 4 pieces of reinforcement are welded along the inner walls, on which the grate will rest. The upper reflectors are installed in the same way, but always with an offset - the lower one is closer to the front wall, the upper one is closer to the rear.
Prices for popular models of welding machines
Welders
The side and back walls are grabbed first
Step 3. To hang the door, the hinges are first welded onto it, and then onto the front wall. The firebox door is larger than the vent. The easiest way to make latches is from bolt-mounted strips that will fit behind hooks welded to the front wall. The front wall is welded last, after the top sheet with a hole for the chimney.
Door version
Step 4. The box is ready. For convenience, legs from pieces of metal corner are welded from below. A section of pipe is welded to the chimney opening, onto which the rest of the pipe is then placed. In this section you need to make a gate, that is, a damper, by adjusting which you can turn an ordinary potbelly stove into a long-burning stove. The principle is simple: if you shut off the damper and close the doors of the firebox and the blower, the air will flow very slowly, and the wood will smolder rather than burn.
By laying a lot of wood, you can stretch one firebox for 8 - 10 hours - just enough to sleep comfortably. Two coaxial holes are drilled in the pipe, a pin is inserted into the bottom, and the outer end is bent 90 degrees. Inside the pipe section, an iron round slightly smaller than the diameter of the pipe is welded to the stud. By turning the pin around its axis, you can adjust the width of the open chimney channel.
The gate allows for slow combustion
Step 5. The height of the vertical pipe is about 1.2 - 1.5 meters. Next comes an inclined part from one and a half to two meters long. It is called a hog and also participates in heating the room, because hot gases heat it up greatly. It is better to take it outside through the wall, covering the exit with glass wool or mineral wool.
Well-organized chimney
Place the finished potbelly stove on a steel sheet. Sometimes a screen is hung on the sides. It performs a dual role: protects against contact with hot walls; heating itself, it serves as a plane that releases a lot of heat into the room. With these simple measures you can turn a simple iron stove into a work of engineering art.
Why are Russian stoves so popular?
The Russian stove is a large structure that heats up well and retains heat for a long time.
The variety of designs allows you to obtain many qualities that were the reasons for the return of fashion for Russian stoves.
The device warms up slowly, but at the same time, the massive brick walls give off heat for a long time. Thanks to this quality, the house is heated only twice a day, which reduces maintenance time. Modern building materials only improve efficiency and properties for maintaining a comfortable microclimate.
If you plan to cook food regularly, in addition to the obligatory crucible, the design includes a hob and a small oven. To use these elements, separate fireboxes are provided so as not to heat the house in the summer.
For small buildings, as well as for rarely visited dachas, it is advisable to build a Russian stove with a stove bench, which will warm up and become a comfortable resting place.
The walls of the structure do not heat up to high temperatures, so it is safe to dry clothes and shoes made of any materials on them.
In addition to serving practical purposes, a Russian stove can be a home decoration. To do this, they use tiles, tiles, and sometimes simply whitewashed walls add color.
You can lay out the oven of any size and design
The positive qualities of the structure add to its popularity:
- fire safety - surfaces do not heat up to high temperatures, which eliminates the ignition of walls, ceilings and surrounding objects;
- long service life before major repairs, ensured by the use of durable materials;
- uniform heat distribution due to the large area of heated walls;
- versatility, the ability to integrate the structure into various room designs;
- ease of maintenance.
Among the negative aspects are:
- the difficulty of self-building for an inexperienced user;
- the need for a massive foundation;
- high cost due to the large amount of building materials and payment for the work of professional stove-makers;
- high consumption of firewood, which must be stored in a place protected from precipitation.
Having decided to build a Russian stove with your own hands, they begin to select a project, prepare materials and directly start work.
Construction stages
There are three main stages of construction:
- arrangement of the foundation;
- construction of the “body” of the furnace;
- chimney construction;
- Finishing work.
In each case you will need your own building materials. The composition and proportions of solutions are important.
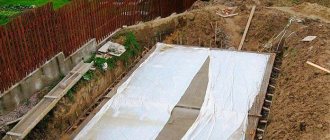
Foundation arrangement
To pour the foundation, it is necessary to cut through the floor and remove a layer of soil.
Russian stoves are built from solid brick. The mass of the building is large, so a solid foundation is required.
Step-by-step algorithm for building a foundation:
- They dig a pit 40-50 cm deep.
- The bottom is covered with a mixture of sand and gravel in a 1x1 ratio. Level the surface, spill water on the pillow and compact it thoroughly.
- The formwork is arranged so that the height of the concrete base is 30-40 cm.
- Reinforcement with a diameter of 8 mm or more is laid with a grid pitch of 15x15 cm.
- Pour the concrete mixture. Solution grade M150–M200. To do this, take cement (M500): sand: medium fraction crushed stone in the ratio 1: 2.5: 3.5. Another method of construction is to arrange a rubble foundation, when large stones are laid, and the space between them is filled with cement-sand mortar grade M150 (cement 1 part, sand 3.5–4 parts).
The period for concrete to gain full strength is 28 days. They can be spent on preparing bricks and masonry mixture components.
After the solution gains strength, continuous layers of ceramic solid bricks are laid on the concrete pad, so as to bring the base to the floor level of the first floor.
Construction of the furnace body
To lay bricks, you will need a clay mortar.
Before buying a brick, carefully study the order of the masonry, based on which they calculate the number of bricks needed.
The internal walls in contact with the flame must be lined with fire-resistant bricks. For the walls and chimney, solid ceramic is used, and for the external walls, finishing or the same ceramic, if the finishing consists of plaster or whitewash.
For masonry, use purchased mixtures or prepare a clay-sand mortar yourself.
Depending on the clay used, the ratios are chosen:
- for oily clay - a bucket of clay and 2.5 buckets of sand;
- for medium - 1x1.5;
- for skinny ones - 1x1.
Instructions for making the solution:
- The clay is crushed, cleaned of impurities, and sifted.
- Measure the amount of the resulting component.
- Fill the clay with water for at least 3 days.
- Add sand to the container based on the required proportions.
- Stir the mixture until smooth.
Experienced stove makers recommend a practical way to check the readiness of the masonry composition. It is necessary to put the solution on a bayonet shovel. If it slides when tilted at about 45°, the consistency is correct.
Using the chosen order, the furnace is erected. Doors, flaps and latches must be installed and secured with mortar.
It is not recommended to lay out more than 2-3 rows in one day, since the mortar is plastic and may not withstand the mass of bricks.
To make a hob, it is advisable to use cast iron parts with concentric rings and lids. They allow you to select and open fire for pots of different sizes.
Chimney features
The chimney of a brick stove is laid through the ceiling and attic.
Before 3 bricks reach the ceiling, they begin to arrange cutting - increasing the thickness of the pipe, necessary to ensure fire safety. The rule is especially important for wooden floors.
After exiting the attic, the pipe is returned to its original dimensions. It is allowed to lay pipe bricks on a cement-sand mortar of grade M 200.
As construction progresses, the inner surface of the pipe is plastered and carefully leveled, so less soot will be deposited.
The top of the chimney is protected with a cap.
For residential premises, a mandatory rule applies: the height of the chimney cut from the bottom of the firebox should not be less than 5 m, and the cut itself should be located above the roof ridge.
Counterflow furnaces
The most advanced type - efficiency can reach 90%. Such an impressive figure is possible thanks to the original design, in which the chamber with an open fire is separated from the chimney by a wall. As a result, the smoke is removed through the lower part of the stove, and the room is heated evenly.
It seems impossible - hot air always rises! This is true. But the device has a special hood in which the smoke accumulates and cools. Cold gas particles move down and are removed through the chimney, and heated air enters in their place. This achieves high efficiency.
Vimana stove
Such heating stoves have a number of advantages:
- the ability to construct devices of any size and shape;
- a water heater, oven or steam generator can be installed in the hood;
- there is a prospect of automating the process.
Vimana stoves, retrofitted with an air recirculation system, can even be used in apartment buildings. Their only drawback is the complexity of the design. Not every master can build this variety.
Grum-Grizhimailo stove
Another counter-flow design, developed by the Russian stove maker-inventor V.E. Grum-Grizhimailo. It has a round shape, so it can be styled like a Dutch oven (which is what enterprising Russian stove makers have been doing for the last 150 years). Its operation is based on the principle of free movement of gases.
In the middle of the firebox there is a hailo - a hole through which gases penetrate into the upper part, over which the hood is located. Heat transfer occurs in this section, the cooled gas descends, and the heated air rises.
The Groom-Grizhimailo device perfectly accumulates heat - the temperature in the room does not drop even if the stoker forgot to close the valve. Cold air entering the furnace through the ash pan does not allow the hot streams to cool and therefore the device gives off heat for a long time, despite the relatively thin walls.
How to find out the weather forecast at a Russian stove
Cast iron pots in the hearth of a Russian stove. Photo: N. Korol / photobank “Lori” Russian stove. Photo: V. Salomatnikov / photobank “Lori”Smoke from the chimney. Photo: A. Matveychuk / photobank “Lori”
Villagers knew how to predict the weather using their stoves. There was a whole set of folk signs, according to which peasants noticed various details and then interpreted their meaning.
If the wood in the stove burns with a bang, there will be frost, and if it burns with a humming noise, expect a snowstorm.
The firewood burns sluggishly or goes out - a thaw will come in the coming days.
The wood in the stove flares up well and burns with a slight crackle, and the smoke from the chimney rises - a sure sign of a sunny and windless day.
The smoke bends like a rocker and spreads along the ground - confirmation of the impending bad weather.
Russian stove in the house
The traditional home life of the Russian peasant was literally built around the stove. When constructing the hut, a significant part of the internal space was allocated for it. The stove not only heated the room, but also served as a place for the whole family to sleep, cook food and bake bread.
Ancient Russian stove in a hut
The advantages of such stoves include:
- long service life with proper care;
- ability to retain heat for hours;
- many additional uses - drying berries and mushrooms, use for household chores and crafts;
- the ability to protect the body from disease.
The latter means that on the bench of a well-heated stove, the temperature is maintained at approximately 25-28 degrees Celsius for almost the entire heating period.
This design also had its disadvantages:
- the stove in the house took up a lot of usable space;
- due to its significant weight, it had its own foundation (therefore it was not possible to equip it in a multi-story building);
- required a large amount of fuel;
- the firebox could not withstand high temperatures.
The main drawback of the historical design of the Russian stove was that heating of the room occurred only in the middle and upper zones, and did not occur at all closer to the floor. This shortcoming was partly compensated for by the construction of additional fire chambers (flooding chambers).
Description of Russian stoves “black”
In more ancient times, people built heating units from clay and without a chimney - smoking devices, so named because they “smoked” over low heat. In such equipment, strong combustion was not allowed in order to prevent a fire. The smoke was discharged outside through the narthex above the entrance doors, but at the same time, cold air from the street entered the house, which led to significant heat loss and inefficient operation of the firebox.
Later, to ensure the escape of smoke, people began to make a hole in the wall, called a fiber window, which was covered with wooden dampers when the stove was not heated and cooled down. The owner of the home required special skills in melting such structures.
It was important to prevent the wood from burning too much due to the risk of a fire from a spark. In addition, excessive amounts of smoke could lead to suffocation for the owner and her family.
Advantages of a black stove:
- Capable of transferring maximum heat to the room. The hot smoke perfectly warmed and dried the air, thereby creating a healing atmosphere in the hut.
- The walls were disinfected under its influence, thus preventing infection with infectious diseases. Thanks to the smoke, there were no insects in the house.
- Possibility to smoke meat and fish. By hanging the food from the ceiling, after some time, cold smoked food was obtained.
Disadvantages of heating structures “in black”:
- There is a high probability of a fire caused by a spark.
- Constant control over the burning power of wood.
Design elements
Design elements of a Russian stove
To understand the drawings, their explanations and understand the order, you should study the terms used by stove makers.
- A firebox or crucible is a part of a structure in which fuel is burned and, in some cases, food is cooked by baking or simmering.
- The vault is a massive element that bounds the top of the furnace. The laying is carried out without voids. Due to the large mass of stone, the vault accumulates heat during combustion and warms the room for a long time in the period between laying firewood.
- Under (flat) - the bottom of the firebox, necessary to give the structure strength.
- Cheek (chip) - the façade of the furnace, combining the under, crucible and vault.
- The mouth is the opening of the furnace through which fuel is added and dishes are loaded.
- The sixth is a horizontal surface that makes it easy to work with dishes. Utensils are placed on the platform before placing them in the crucible and after removing them.
- The subrack is used to store utensils, fuel and other accessories. The element is located under the pole and does not heat up.
- The oven is the space under the hearth in which a supply of firewood is stored.
- Hailo is a device connecting the furnace and the chimney.
- Stoves are niches that increase the area of the walls and improve heat transfer. The recesses are used for drying herbs and small items.
- Threshold (tooth, gas threshold) - an arc-shaped ceiling of the arch to retain hot flue gases and increase the heat transfer area, thereby increasing efficiency. Sometimes the element is called a scutum or shield.
- The roof is the part of the stove on which the stove bench is installed.
- The hearth is a hollow space to increase the combustion time of flue gases.
- The subtop is a small oven located under the hearth or on the side of it.
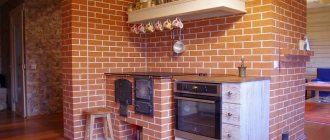
Mini Russian stoves
Currently, mini-Russian stoves, which are installed in kitchens instead of kitchen hearths and cooking stoves, have become widespread (example “” and). Their pole can be equipped with a stove. Their fire chambers are not lined due to their small size - one firebox is enough for one batch of prepared food. Mini-Russian stoves that do not have smoke circulation are also installed in gazebos, summer kitchens and as part of barbecue complexes.
No. 22 RP - 3000 with bottom heating "Economy"
Processing a standard project
| Designed for heating a room with an area of 25±3 sq.m, cooking food in the heat chamber and on the cooking floor of the first heating. The flue gases of the second heating heat the underfloor space and the combustion chamber (the entire furnace body is heated). Due to its small size, the stove is advantageous to install instead of kitchen fireplaces in country and garden houses and cottages. Smoke circulations are made according to the principle of the Russian stove “Ekonomka”. Stove dimensions in plan (1020x1280) mm. (small flooding extends beyond the dimensions of the stove by 130 mm). Firebox dimensions: Fire chamber (640x570) mm; Large flood (260x510) mm; Small flood (320x380) mm. Quantity of bricks - 720 pcs. The volume of the project is 38 pages in A4 format. The cost of the project is 1900 rubles. switch to mirror image |
No. 49(A) Mini-RP – 3500 with side heating
| switch to mirror image | Designed for heating 1-2 rooms with a total area of 30±4 sq.m, cooking in the fire chamber and heating the stove on the cooking floor. The flood chamber is heated by a side heating panel at the same height as the stove bench. When heating an adjacent room, the stove panel can be placed above the level of the stove bench. The Russian stove has a “summer operation” with the heating of the side heating panel turned off. Stove dimensions in plan (1150x1410) mm. Firebox dimensions: Fire chamber (640x640) mm; Flooding (380x380) mm. Quantity of bricks: Red - 870 pcs; Figured R60 – 11 pcs. (The figured brick can be replaced with a regular red brick); The volume of the project is 41 pages in A4 format. The cost of the project is 2200 rubles. |
No. 49(B) Mini-RP – 3300/900 with trestle bed with independent firebox
| switch to mirror image | Designed for heating 1-2 rooms with a total area of 35±5 sq.m, cooking in the fire chamber and heating the stove on the cooking floor. The flood chamber is heated by a side heating panel at the same height as the stove bench. When heating an adjacent room, the stove panel can be placed above the level of the stove bench. The Russian stove has a “summer operation” with the heating of the side heating panel turned off. Flue gases are removed from the trestle bed in the body of a mini-Russian stove. The dimensions of the stove in plan are (1150x1410) mm, the trestle bed - (700x1660) mm. Firebox dimensions: Fire chamber (640x640) mm; Flooding (380x380) mm. Top bed (260x570) mm. (lining is being done); Quantity of bricks: Red - 1200 pcs; Figured R60 – 51 pcs. (The figured brick can be replaced with a regular red brick); Fireproof - 14 pcs. The volume of the project is 42 A4 pages. The cost of the project is 2900 rubles. |
No. 50(A) Mini-RP – 3500 with side heating
| switch to mirror image | Designed for heating 1-2 rooms with a total area of 30±4 sq.m, cooking in the fire chamber and heating the stove on the cooking floor. The flood chamber is heated by a side heating panel at the same height as the stove bench. When heating an adjacent room, the stove panel can be placed above the level of the stove bench. Stove dimensions in plan (1150x1410) mm. Firebox dimensions: Fire chamber (640x640) mm; Flooding (260x570) mm. (lining is being done); Quantity of bricks: Red - 770 pcs; Figured R60 – 16 pcs. (The figured brick can be replaced with a regular red brick); Fireproof - 20 pcs. The volume of the project is 41 pages in A4 format. The cost of the project is 2200 rubles. |
No. 50(B) Mini-RP – 3500 with trestle bed
| switch to mirror image | Designed for heating 1-2 rooms with a total area of 30±4 sq.m, cooking in the fire chamber and heating the stove on the cooking floor. The flood chamber is heated by a side heating panel at the same height as the stove bench. When heating an adjacent room, the stove panel can be placed above the level of the stove bench. Stove dimensions in plan (1860x1410) mm. Firebox dimensions: Fire chamber (640x640) mm; Flooding (260x570) mm. (lining is being done); Quantity of bricks: Red - 1000 pcs; Figured R60 – 16 pcs. (The figured brick can be replaced with a regular red brick); Fireproof - 20 pcs. The volume of the project is 42 A4 pages. The cost of the project is 2700 rubles. |
Principle of operation
How the process of fuel combustion and removal of combustion products occurs is shown in the cross-sectional drawings of a Russian stove presented below:
The movement of gases in a Russian stove is carried out not only due to the natural draft created by the chimney, but also due to the peculiarities of the combustion process. Cold air from the room enters the mouth, meeting along the way with the opposite flow of flue gases. At the same time, they practically do not mix; air occupies the upper zone of the passage, smoke - the lower. Having met at the outlet and the mouth, the flows exchange heat, as if a natural gas-air heat exchanger was working.
To build a Russian stove, you need to understand very well how all the processes take place in the firebox. Heated air enters the combustion zone, and flue gases leave it through the upper zone of the firebox, exiting through the mouth, high and further into the chimney. But this does not happen immediately; the combustion products make several revolutions inside the firebox and are burned, giving off as much heat as possible to the walls of the stove. They are forced to do this by the inclined configuration of the chamber and the presence of a threshold, whose role is identical to the fireplace tooth in large English fireplaces. That is, within the firebox, multi-pass heat transfer by gases is organized without the installation of unnecessary smoke channels.
On the one hand, due to the large dimensions of the firebox, the size of the Russian stove with a stove bench is also quite large. On the other hand, the efficiency of the furnace is at least 60%, which is an unattainable indicator for most other solid fuel air heating units. Not to mention the ability to maintain temperature for a long time and the healing properties of the Russian stove.
And only in it you can cook amazingly tasty dishes, you just need to do it correctly, using the simmering process after the crucible has died down. Finally, a well-finished Russian stove looks great even in a modern interior.
Over the years, the ancient design has undergone a number of modernizations, resulting in many modifications, for example, a heating and cooking stove with a low bench. In this case, although the principle of operation of the Russian stove is preserved, the heating of the floors no longer occurs due to the furnace, but from flue gases passing through many channels. This modification is quite difficult to implement, especially for beginners.
Therefore, it makes sense to consider how a conventional Russian stove with a stove bench and stove is laid. Only here the heat source is equipped with one more function - heating water for household needs. Let's look at the whole process in order.
Brick laying
In most cases, the brick is placed on the bed, but other options are possible; they are presented in the figure below. In order for the masonry to be strong, the vertical seams in rows of adjacent heights should not coincide; the overlying and underlying bricks should overlap each other, preferably by half.
Types of brick laying and dressing
In the figure the letters indicate:
- laying bricks on the bed;
- laying bricks on edge (spoons);
- laying bricks on a stick;
- correct ligation of stitches.
It is also customary to distinguish masonry by thickness; the options are shown in the figure.
Brick thickness
In the figure the letters indicate:
- quarter masonry (bricks lie on spoons);
- half-brick masonry (in bed);
- in two quarters (half a brick, but the bricks are laid on spoons);
- three-quarters (row for spoons and row for bed);
- three-quarters (rows of spoons and bed alternate);
- into a brick.
In addition to the above options, others are also possible, but as is clear, the thickness of the wall brick is determined by the size of the brick, that is, in more detail:
- if the thickness of the wall is equal to the width of a spoon or butt, such masonry is read as a quarter;
- the thickness is equal to the width of the bed - half a brick;
- the length of the bed is a brick.
Quarter masonry Half brick masonry
Brick masonry One and a half brick masonry Two brick masonry
Next come multiple and composite sizes - two, three, four bricks, two bricks and a quarter or a half, etc.
Also, masonry is distinguished by the type of seams (it should be noted that when laying stoves, they try to achieve their minimum size of literally a few millimeters, in contrast to conventional masonry). Types of seams are shown in the figure below.
Options for masonry joints
The figure shows the following seam options:
- Vostoshovka - masonry mortar does not fill the seams to a depth of 5-10 millimeters. Such seams are used if the stove will be plastered in the future, then part of the plaster solution fills the resulting grooves and thus ensures stronger adhesion to the surface.
- Undercut - the seam is filled completely, excess mortar is removed with a trowel (trimmed)
- In convex jointing - after trimming with a special jointing tool, the seam is given a special profile for decorative purposes.
- Concave jointing is the same, but the profile does not protrude beyond the contour of the wall, but rather goes deeper into it (the photo at the beginning of the article shows an option with such seams)
Joining joints with a special tool
Now that we have understood the theory, it is better to use an example to understand the issue in more detail - the order of a brick heating stove. To get started, you can watch the video in this article, then we’ll look at two designs.
Purpose and main functions of the Russian stove
One of the advantages of Russian stoves is their versatility.
Here is a list of just the main tasks that can be solved with the help of these useful structures:
- heating the entire house or individual rooms;
- cooking on the stove and in the crucible;
- drying herbs, mushrooms, berries, fruits;
- using a couch as a sleeping place;
- heating water for household needs;
- drying clothes;
- heating the samovar.
The construction of the stove is designed so that it heats the house. To do this, a brick structure is erected in the center of the building or positioned so that heat flows into adjacent rooms. If the building is small, then there is enough heat to ensure that the temperature in all rooms is comfortable for living.
For spacious houses, structures are built that are large in size or have additional heating parts - shields, boilers for heating water.
Hot water from the hot water boiler is passed through pipes leading to heating devices - radiators. They are usually located in rooms away from the stove
To save on fuel and make the home more comfortable, owners of buildings with stove heating carefully consider thermal insulation, since a lot of heat is lost through cracks in door and window openings, cold walls and floors.
Food cooked in a Russian oven has a special taste and richness. It doesn’t just “fit” when heated, as would happen on a regular stove, but languishes
Thanks to this method of preparation, soups, porridges, roasts, and stews retain the beneficial properties of the products included in their composition.
The oven is also used for household purposes - for example, for drying everything in the house. During construction, they think of small niches in which they used to put hats, mittens, and pants that were wet after a winter walk - by the morning they became dry and warm.
To dry vegetables, herbs, and berries, wider niches were made so that the crop could be evenly distributed over the surface and ensure good heating. We also used a stove and floorOften, sheds were built near the stove - wooden plank sheds that continued the bench and performed the same functions. Since the floors were under the ceiling, they were also always warm.
Recommendations for use
The stove does not require maintenance. To avoid undesirable consequences, you must follow the rules for using a mini-oven:
- You cannot fire two fireboxes at the same time. In this case, the ash and combustion doors of the unused firebox must be tightly closed;
- Do not use flammable liquids such as gasoline or kerosene for kindling;
- keep the heater damper closed. If there is a need to open it, then first you need to open the ventilation duct valve;
- monitor the amount of ash. Remove it in a timely manner, otherwise there will be no fuel savings, because it will absorb heat and the heating of the rooms will deteriorate. It is better to do this procedure at least twice a week;
- you need to let the fuel warm up well for ten minutes, and only then start cooking food in the oven;
- It is not very practical to use paper for kindling - it burns quickly. It’s better to put wood chips or birch bark in the oven;
- Check periodically for any cracks in your stove. If any are found, they need to be repaired. If the damage is significant, then major repairs will have to be made. A clear indicator of a problem is a decrease in the heating temperature produced by the stove. The house has become colder - inspect the stove;
- It is preferable to carry out repairs in the warm season, when the stove is not used for heating;
- Before burning fuel, you need to close the doors of the ash pit and fireboxes;
- you need to clean the chimney in a timely manner;
- It’s better to start heating the stove during the day, then by the evening the whole room will warm up;
- It is preferable that the fuel be dry. And to ensure that it is not exposed to moisture and water and does not become damp, store it in a specially designated place. It should be dry and closed;
- It is desirable that the logs are approximately the same thickness and length. This is necessary because thin ones burn too quickly, and thick ones, on the contrary. The house will not be heated well enough in this way;
- stack the logs not randomly, but in a certain order. First, rake the coals with a poker closer to the door. Place a log across it. Then thinner firewood is laid obliquely, and thicker firewood is laid on top of it.
How to build a stove correctly
In the vast majority of cases, construction begins with the construction of a foundation for a future heat source. An exception may be outdoor mini-ovens, which due to their low weight are sometimes placed directly on the concrete screed of the yard. All others, regardless of location, must be built on a solid foundation. Moreover, it is not allowed for the foundation of the stove to be connected to the base of the house or placed close to it; it is necessary to leave a gap of at least 5 cm, and preferably 10.
Important. Failure to comply with this requirement may lead to the fact that after a year or two the stove may crack and even deviate from the vertical. If the house has a good foundation in the form of a cement screed, and the total weight of the stove does not exceed 750 kg, then a foundation is not required; masonry can begin directly from the screed, having previously laid sheets of asbestos and roofing steel
The structures presented in the previous section weigh over 750 kg, and therefore it is necessary to provide a reliable foundation for them. There are 2 types of foundations for the furnace: rubble and reinforced concrete.
If the house has a good foundation in the form of a cement screed, and the total weight of the stove does not exceed 750 kg, then a foundation is not required; masonry can begin directly from the screed, having previously laid sheets of asbestos and roofing steel. The structures presented in the previous section weigh over 750 kg, and therefore it is necessary to provide a reliable foundation for them. There are 2 types of foundations for the furnace: rubble and reinforced concrete.
Regardless of the type of base, you first need to dig a hole whose dimensions exceed the area of the stove by 10 cm in each direction. The depth depends on the thickness of the upper layer of chernozem or other subsidence soil, while the base of the foundation should rest on a denser layer. In the first case, the pit is laid with rubble stone and dressing, using a solution of the following components:
- sand – 6 parts;
- cement – 1 part;
- lime mixed with water - 1 part.
All voids between the stones are also filled with this solution, and the upper part, located at a depth of 80 mm from the floor, is also leveled with it. The reinforced concrete base is poured with formwork and reinforcing mesh, having previously poured a 10 cm thick cushion of crushed stone onto the bottom of the pit.
Important. After the mortar or concrete has hardened, a waterproofing barrier made of roofing felt in 2 layers must be laid on top of the foundation
The furnace is laid according to the procedures, observing the thickness of the seams within the range of 3-5 mm. After laying each row, it is necessary to control compliance with the vertical and horizontal using a plumb line and a building level. The mortar can be applied to the brick with a trowel or by hand; light tapping of the stone after placing it in place is allowed.
The remaining mortar is removed from both sides of the wall, and the inside is wiped with a wet rag to create a smoother surface. This is necessary to ensure the least resistance to flue gases.
When installing fittings and water tanks, it is important to ensure that there are no gaps between the masonry and the metal surface; the joints must be carefully filled with a solution, otherwise the stove will begin to smoke. Upon completion of construction, it is necessary to wait 2 days until the solution dries completely, after which you can test fire the stove, starting with a small amount of firewood. How to build a small stove at home is described in detail in the video:
How to build a small stove at home is described in detail in the video:
Required Tools
The masonry is made on a ready-made foundation.
Equipment and tools for construction are in the arsenal of any home craftsman.
You will need:
- bayonet shovel for digging a foundation pit;
- shovel for mixing the solution;
- level and plumb;
- square and string for setting right angles;
- ruler or tape measure;
- trowel or trowels for masonry and plaster;
- hammer-pick for laying and adjusting bricks;
- container for mixing the solution, buckets.
To accurately select and cut bricks for the vault, it is better to use a grinder with a cutting wheel for stone.
Types of furnaces by purpose:
- Heating
- Cooking and heating
- Specialized
The task and purpose of a heating stove is to heat a residential building. Modern stove units compare favorably with those that were built a quarter of a century ago - today no one is surprised by the efficiency of a home stove of 90% or more. The main way to ensure efficiency is to design the furnace with a well-thought-out air circulation and supply system.
Cooking and heating stoves are common in rural areas and consist of two sections - a combustion chamber, which provides heating to the rooms, and a hob located above the combustion section. The hob material is usually iron, there are two, three or four burners. Cooking stoves often have an oven. It is easy to connect a water heating tank or water storage tank to such a stove and install an internal heat exchanger. Cooking and heating stoves have the highest efficiency and are optimal for heating small rooms - up to 25 m2.
Specialized stoves for heating stones create a special thermal regime in baths and saunas.
Choosing building materials
For the stove masonry of the Russian stove, ordinary red brick is mainly used, which is able to withstand exposure to open fire for a long time and has good strength. The main thing is that it has straight edges, the correct shape and high-quality firing, does not have chips or voids, and makes a ringing sound when tapped.
To connect the structure, a mortar was used, which was prepared from sand and clay - there were no other building materials in the old days. You can read about preparing materials for mixing and the proportions of clay mortar here. The use of high-quality materials will ensure the reliability of the heating structure and ensure that the required temperature in the room is maintained for a long time.
What can the device be made from?
In order for the installation of the furnace to be successful, preparatory measures are carried out, which play an important role for further assembly operations. For everything to work out, you need to:
Select a project. You should be guided by the main points - the functionality of the stove and the structural features of the room in which the future stove will be located.
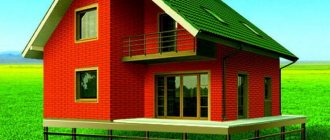
If we are talking about large cottages, then it is better to give preference to massive structures equipped with thick walls.
It is not easy to build such a stove; it is advisable to invite experienced stove craftsmen.
The same cannot be said about a device for heating a small country house - anyone can handle laying out such a structure. It does not have a large number of labor-intensive elements.
Select materials. The main building material for laying out a country stove is refractory brick. Experts advise purchasing high-quality bricks from a reliable manufacturer and preparing them before use. The bricks are thoroughly cleaned and then soaked in water for 12 hours.
To lay out the firebox, a fireclay variety of the mentioned building material is used. Before use, do not soak it, but simply rinse it
Particular attention is paid to the selection and preparation of cement mortar. You can buy it ready-made or mix it yourself.
Metal sheets with a thickness of at least 3 mm are required to make the firebox door. The hob included in the design is purchased separately, as is the water heating tank.
If the preparatory measures are carried out efficiently, the display will take place without delays or difficulties.