Everything you need to know about floors before starting construction
Floors are the internal horizontal enclosing structures of a residential building, dividing it in height into floors and giving additional rigidity to the entire building. This is the most important element of the structure of the house. The safety, health and peaceful rest of people largely depend on its condition.
Floors located above basements are called above basements; those separating the upper floor from the attic are called attics; those located between adjacent floors are called interfloor. Depending on the method of transferring the loads perceived in the building, floors are divided into without beams and beams.
What flooring options are there for private owners?
As a rule, in a two- or three-story cottage, wooden beams are more often used for floors between floors, reinforced concrete slabs, monolithic and prefabricated-monolithic floors are used less often. Let's briefly look at the features of each type of flooring.
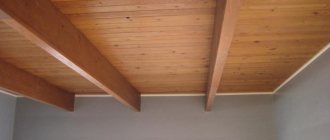
Wooden floors
The advantages of wooden floors are relative ease of assembly, light weight and sufficient strength. The basis of the floors is wooden beams resting on the walls. The strength of the structure depends on the cross-section of the beams and the frequency of their location. The disadvantages of such floors include the need for insulation and sound insulation. In addition, they have a relatively short service life compared to concrete options.
Reinforced concrete types of floors
Reinforced concrete slabs have long been known and have proven themselves, quite popular in the construction of large-area cottages. They evenly distribute the load over the entire surface and additionally add rigidity to the building. When laying, it is necessary to use special equipment, since the size of the slabs ranges from 2.4 to 6.8 m in length, and the weight is from 0.9 to 2.5 tons. When a reinforced concrete slab is laid as a floor between floors, on brick walls or blocks, it is necessary to make an additional reinforced concrete belt.
Monolithic floors
Monolithic reinforced concrete floors are used for buildings with non-traditional layouts. In terms of strength, such a floor is superior to the prefabricated version, since it is a cast structure. But it is characterized by high labor intensity of work and the need to perform all work on the construction site. Both options, for all their advantages (strength, durability, etc.) are very heavy and require additional reinforcement of the walls. Therefore, prefabricated monolithic floors are gaining popularity; they are also durable, but lighter and easier to install.
Size information
The lightweight floor slab can be made in different sizes, depending on the customer’s requirements and the manufacturer’s capabilities.
Standard sizes of PNO:
- Thickness (usually unchanged) – 22 centimeters
- Length – can vary in the range of 2.4-12 meters
- Width – from 1 to 2.6 meters
The exception is the types of slabs that rest on 4 sides (PKK), their dimensions can vary from 3 x 4.2 to 3 x 7.2 meters. All types of plates have round holes, with the exception of PG (here they are pear-shaped). Options marked PKK allow for beveled ends.
What are prefabricated monolithic floors, or SMP for short?
This is essentially an improved version of reinforced concrete slabs. The basis is suitably spaced beams, between which special blocks are placed to form a filling layer. Such floors are characterized by both lightness and strength.
Reinforced concrete slabs
Partitions between floors in a house of any number of floors can be lined with reinforced concrete slabs.
They need sound insulation and insulation. They should be supported only by load-bearing walls, and at the same level, so that the ceilings are not skewed. The slabs used are factory-made 9 m long. They are hollow or thinner, flat, without voids. Place it on a fairly liquid clutch solution. All cracks at the joints of the slabs are also sealed with a cement mixture. Then the entire surface is leveled with a screed.
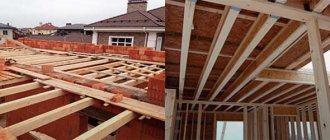
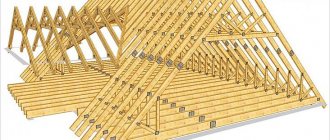
Installation of prefabricated monolithic floors
So, the basis of the SMP is floor beams (made of concrete or reinforced concrete), which are laid on a cleaned and pre-leveled horizontal surface of the walls (crossbars). The installation of beams can be done manually or using small-scale mechanization. From below, as a rule, temporary telescopic racks are installed for support, which are placed at an average distance of 1.5 m from each other. If there are no racks, you can use wooden poles. Mounting supports are installed before laying the beams. When using high-strength concrete beams in certain openings, you can completely avoid the use of racks.
Important: To support the rack, you need a solid foundation with good load-bearing capacity, otherwise there is a danger of the rack being pushed through under the weight of the ceiling.
The beams are laid directly on the wall material, the strapping belt is poured later simultaneously with the slab. The filler can be ordinary or special T-shaped (blocks with a chamfer at the bottom), aerated concrete, foam concrete, polystyrene concrete, expanded clay concrete blocks, as well as blocks made of warm ceramics, pressed wood or polystyrene foam (for installing an insulated monolithic slab at the level of the first floor) . When installing blocks (filling elements), they can be modified (trimmed). Generally, blocks can be cut with a diamond wheel or, as with pressure-treated wood blocks, with a regular chainsaw. They are laid manually along the longitudinal direction of the beams with a minimum gap between adjacent elements.
After installing the frame elements, a concrete diaphragm is poured - a top layer of concrete about 5 cm thick, located directly above the inserts and forming the upper surface of the floor intended for use. Before concreting, all surfaces of the floor elements must be cleared of construction debris and dust. Additional supports can be removed when the concrete reaches at least 70% of its design strength, preferably 85%. At an average ambient temperature above +10 °C, the supports are removed after 10–18 days, at a temperature of +5…+10 °C – after 20–30 days.
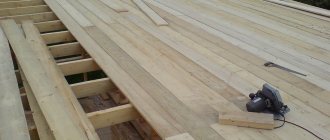
Rolling flooring recommendations
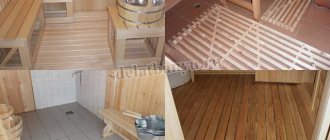
In order to make the ceiling of the first floor, it is necessary to roll up. This stage of work can be carried out using a wide variety of materials.
Skating plan.
In the most common version, skull blocks are nailed along the side of the beam. Such bars should have a cross-section of 40*40 or 50*50 mm. They should not protrude below the main beam. It is on them that smooth boards will subsequently be attached, the thickness of which should be in the range of 10-25 mm. In order to line the ceiling, you can use sheets of plywood. Using sheet material, you can get a perfectly flat ceiling. The minimum thickness of plywood in this case should be at least 8 mm
It is very important to ensure that the edges of the sheets lie exactly in the middle of the beam
Instead of using cranial bars, you can make special grooves in the beams. In order to use this method, the cross-section of the beam must be thought out in advance.
As an option for flooring, the lower part of the floor elements can remain open; for this, the cranial elements are nailed not flush, but slightly higher. Thus, the flooring is carried out between the beams.
After the rolling is done, you can begin laying the floor of the second floor. If instead of the second floor there is an attic, then a subfloor is sufficient. If there is a room on the second floor, then the floor must be made of high-quality material. Wooden boards will be laid directly on the joists.
Expert opinion on light floors
Oleg Gren, commercial director
Prefabricated monolithic floors are becoming more and more popular every year for many reasons. In particular, there are no restrictions on their scope of application: they can be used for laying new and replacing old floors in residential buildings, administrative and public buildings. Our process uses pressed wood core elements. The light weight of the finished ceiling (element weight is about 3 kg and dimensions 1.2 x 0.6 m) and ease of installation allow you to immediately cover an area of 0.7 m2 with one element. One pallet holds 70 m2 of elements, which seriously reduces transportation costs. In addition, a special feature of wood elements is their arched shape, which allows the installation of utility lines in the “ceiling” space. At the same time, the height of the room does not decrease. For fastening engineering equipment and suspended ceilings, our specialists have developed a special suspension, which makes it possible to attach guides without disturbing the geometry of the load-bearing prefabricated beams after pouring the floor.
Thank you for your help in preparing the material and the illustrations provided, rector-group.ru
Photos : Shutterstock/fotodom.ru
The nuances of laying reinforcement with your own hands
Installation of interfloor ceilings is carried out, if possible, without touching the surface of the formwork. The dimensions of the fittings range from 6 to 12 mm. At the same time, the structure is secured with certain clamps. The formed frame leaves cells of 10*10 cm. Wire is used to tightly bind the frame to the cells. Beams can be used in various types from wood to aluminum. Next, the entire surface of the layer is densely filled with mortar, forming a homogeneous surface. The disadvantage of forming a reinforced floor is the formation of beams along the entire perimeter of the structure at minimal distances.
It is quite difficult to completely fill the ceiling with your own hands. The main nuance is to carry out the filling layer no more than 10-12 hours from the previous one. To create a uniform layer, the solution should not be allowed to dry completely. The technology of interfloor slabs makes it possible to obtain reliable adhesion of the monolith to the surface of the floor and mortar, holding the entire structure together. This method of creating a ceiling with your own hands is the most reliable, safe and easy to install. Complete hardening of the entire layer occurs no earlier than 28 days from the moment of the last pouring. Uneven drying leads to subsequent destruction of the surface, the formation of chips, cracks and additional dust. If it is necessary to eliminate the resulting defects, it is important to simultaneously fill the entire surface with a small amount of water and leave until completely dry.
Technical requirements
The ceilings in the house are original structures that divide adjacent rooms by height, forming floors, separating them from the attic and basement. The installation of floors in a wooden private house must meet the following requirements:
They must be durable to cope not only with their weight, but also with payloads (furniture, appliances). The parameters are indicated taking into account the purpose of the room. Attic structures must support a weight of no more than 105 kg/sq. m, interfloor and basement - from 210 kg/sq. m;
- When installing, ensure good insulation. It is important to seal every crack in the structure. This will ensure that heat and sound cannot penetrate into rooms adjacent in height;
- It is important that the structure is rigid. It should not sag due to temporary or regular loads;
- Fire safety should also be taken into account. To do this, impregnations and plaster are applied to the ceiling in a wooden house.
Insulation and finishing
A vapor barrier is placed in front of the insulation in case of danger of steam penetration or condensation. The film must be placed on top of supporting structures. Sound and heat insulators are placed between them on top.
In addition to these layers, waterproofing is required. If the top floor is used for non-residential premises, that is, there are no plans to wash the floors there, you don’t have to use the film. Parquet, linoleum, and carpet are used for covering. There is no need to do cladding in the attic.
Quantity calculation
Before starting construction, it is important to calculate the length of structures, their number, cross-section, and spacing. This directly affects safety and load bearing capacity.
The length is affected by the width of the span and the method of their fastening. If metal supports are used for this, the length will be the same as the span width. When using grooves, the length is calculated by adding the span and the depth of insertion of the ends of the beam into the grooves.
The distance between the axes is from 0.6 to 1 m. To calculate their number, you need to plan the localization of the outer beams at a distance from the walls of 50 mm. Other parts are placed evenly in the span space, taking into account the selected step. The cross-section is affected by the load, the width of the span along the short side of the room, and the spacing of the elements.
To avoid doing independent calculations, you can use ready-made charts and tables. They record the relationship between size and load and span width.
Wall mount
Beams are attached to walls using several methods:
- Sealing into wall grooves. They are usually used in timber and brick buildings. You need to drill deep grooves, lay the ends of the beams, then create waterproofing;
- Use of metal supports. They are attached using screws or self-tapping screws. This option is technologically advanced and does not take much time, but in terms of reliability it is inferior to the previous one.
Important point
Before choosing slabs for creating floors, you need to carefully study all the nuances. The main conditions for effective installation of panels are room temperature and low humidity, as well as the absence of chemical activity in the surrounding space.
It is necessary to foresee the location of the mounting loops in advance. These are special gripping structures that simplify the construction process. It is possible to discuss the location of the hinges individually with the manufacturer.
When choosing a slab, it is important to calculate all the loads: they can be distributed (a suspended ceiling, for example) and point (various suspended elements). You also need to remember about complex loads - pressure from furniture and decorative items. Complex loads, for example, include a bathroom: if it is full of water, it exerts a distributed load on the floor, while each of its legs presses pointwise.
Features of installation of a hollow-core slab:
- When lightweight floor slabs are installed, it is imperative to comply with all calculated parameters for support on the walls according to the drawing. If the area is larger, the thermal conductivity will increase; if it is smaller, the wall may be deformed.
- When assembling overlapping structures, take into account the minimum allowed depth of support, depending on the structure of the building’s building materials. So, for foam concrete and aerated concrete the depth is 15 centimeters, for brick – 9 centimeters, for steel frames – up to 7.5 centimeters.
- The depth when embedding slabs into walls should not be more than 16 centimeters for brick or light blocks, 12 centimeters for concrete and reinforced concrete structures.