If the construction of a house is carried out from aerated concrete, the best floor for it is wooden. This is the most economical option that can be made by hand.
Installation requires only two people. Another advantage of wood is its light weight, which is very important for aerated concrete.
Wooden floors in aerated concrete houses can be interfloor, basement and attic. The fundamental difference between them is small, but there are some features of their arrangement.
Pros and cons of wooden floors in aerated concrete houses
Owners of private houses choose wooden floors because they:
- durable - high-quality processed and correctly installed beams last 100 years or more;
- accessible - the cost of wood is quite low, and an attractive price generates demand;
- easy to install - beams, unlike slabs, can be installed by two people or even one. At the same time, builders do without specialized equipment and without wet, labor-intensive technological processes. If necessary, do this work alone.
Wood is more convenient to use:
- ceilings and floors are much warmer than concrete; the structure does not need to be additionally insulated.
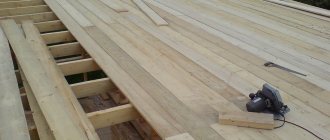
- the rough floor, which is obtained after the initial lining of the beams, is practically suitable for use. To give it an aesthetic appearance, you can get by with carpet, laminate or any other decorative and finishing material.
Unlike wooden ceilings, concrete ceilings need to be improved after the slabs are installed. Additionally you need to do:
- backfill with expanded clay,
- reinforce the surface and lay the screed,
- level it out;
- and only then – a month after it has dried – decorate the floor.
Regarding the disadvantages of wooden floors, it can be noted that they are rather theoretical in nature. Critics of this technology usually name two disasters that could happen:
- fire;
- biological pests.
In response, it should be recalled that 200 years ago builders were able to effectively prevent such troubles: houses built during that period are still in use in all major cities of the country.
Expert opinion Vitaly Kudryashov builder, aspiring author
Ask a Question
It can be added that even an untreated pine beam does not collapse in the 15th minute of a fire, like, say, a steel beam, but resists the flame for at least 40 minutes. And biological treatment today is much more effective than half a century ago.
Features of the construction of the rafter system during frame construction
In the construction of light frame structures, rafters can be attached directly to the floor beams without a Mauerlat. Step-by-step instructions for carrying out this work are as follows:
- When you start working with the rafter system, you must have walls and a rough ceiling erected. Install additional supports during the work.
- Connect the ceiling beams and the top trim. Secure them.
- Install the rafters. To strengthen their block, you can use double vertical posts.
- Using racks, attach the rafter legs to the walls. After this part of the work, you can begin lathing and installing the roof.
It is best to watch a video on the construction of a rafter system on frame houses without a Mauerlat before starting construction. It will help you understand how to carry out the work so that the rafters can withstand even the heaviest loads.
When building frames, you will need a tightening. It will take on part of the load and make the structure unified. To tighten, it is not necessary to use timber; a board will do.
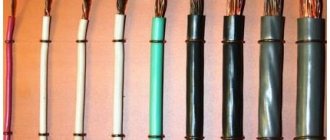
Types of wooden beams
For the installation of floors, beams of three types are used:
- solid;
- glued;
- I-beam
Solid timber beams
Beams cut from one trunk have the disadvantage of warping. The fiber structure of wood is heterogeneous. When moistened and then dried, the board moves: it can bend like a propeller, or it can turn into a gutter.
For this reason, GOST limited the length of beams made of homogeneous solids. The norm is no more than 4.6 meters. In most cottages, the width of the rooms does not exceed 3 meters, so this wood is quite suitable for constructing floors.
Beams made of laminated veneer lumber
Glued laminated timber is considered more rigid. And all thanks to a special technology for connecting individual parts. The wood is unraveled along the grain, and then one half is turned 180° and glued together. The result is a composite of two layers, in each of which the fibers are directed in different directions. Deformation forces acting in opposite directions balance each other.
Glued beams are more technologically advanced: their length can reach 12 meters. This material is more durable. It is believed that the fire retardant characteristics of prefabricated modules are much higher than those of ordinary wood.
Prefabricated floors are made from glued beams. If the load on the main beam is too great, it is reduced by additionally installing spacer bars or installing intermediate columns.
Wooden I-beams
I-beams are a three-layer structure. It is interesting because the outer elements are wider than the middle lintel. This prefabricated beam has very high rigidity, strength and uniformity.
Working with I-beams is a pleasure. And these floors are convenient to use: they do not bend, do not creak, or crack.
The only disadvantage of such beams is the high price. But, as they say, the game is worth the trouble.
Aerated concrete floor slabs
Such floors are made from reinforced autoclaved aerated concrete with a density of D500 or D600. It is possible to order your own version of the slabs at the factory. Although the thermal insulation of these floors is good, there is little point in it, since the second floor also needs to be heated, and there is little point in separating them with thermal insulation.
If we consider an aerated concrete floor as a ceiling from a cold attic, then it is too expensive; it is cheaper to make it from wooden beams insulated with mineral wool.
Advantages and disadvantages:
- High installation speed.
- Lightness of the slabs.
- Excellent thermal insulation.
- You can do without an armored belt, although it is desirable.
- Average load-bearing capacity (up to 600 kg/m2).
- The length of the slabs is up to 6.4 meters.
- High price.
- Requires hiring a crane.
What are the sizes of beams?
Beams can theoretically be made to any length, as long as the production line allows. However, standards in different countries set strict limits on the length of structures. This is due to the fact that the beam during operation should not bend by more than 1/350 of its length.
Expert opinion Vitaly Kudryashov builder, aspiring author
Ask a Question
The degree of deflection of the beam depends on the magnitude of the load per unit area of the floor. Therefore, the main parameter is the dependence of the interval between beams (step) on its length, width and height.
Relationship between cross-section, installation interval and span length:
| Design span length, m | Installation interval, mm | |
| 600 | 1000 | |
| Width x height of beam, mm | ||
| 7,0 | 150 x 300 | 200 x 275 |
| 6,5 | 150 x 250 | 200 x 250 |
| 6,0 | 150 x 225 | 175 x 250 |
| 5,5 | 150 x 200 | 150 x 250 |
| 5,0 | 125 x 200 | 150 x 225 |
| 4,5 | 100 x 200 | 150 x 200 |
| 4,0 | 100 x 200 | 125 x 200 |
| 3,0 | 75 x 200 | 100 x 175 |
| 2,5 | 75 x 150 | 100 x 150 |
| 2,0 | 75 x1 00 | 75 x 150 |
Features of creating a roof project
Errors when creating a rafter system can lead to roof collapse and leaks. At the design stage, it is important to correctly set the angle of the roof so that it can withstand the load from snow and other precipitation. In addition, you need to consider the distance between the elements so that the roof has an optimal weight.
When preparing your project, pay attention to the following points:
- roof shape;
- roofing material used;
- locations of internal supports;
- rafter system;
- at what angle the roof slope will be located;
- distance between walls.
The appearance of the future roof will depend on these points. The use of such a structural element as a Mauerlat depends on the material of the walls of the house and the distance between them. If it is less than six meters, then this beam does not need to be laid.
How to properly support wooden beams on aerated concrete
There are two documents approved by Gosstandart that regulate the depth of support of beams.
- One GOST establishes requirements for the use of wood, in particular beams. It defines the minimum support heel - 15 cm (when laying beams on wooden walls - 7 cm).
- The second GOST regulates the amount of support for floors on walls made of aerated concrete. It sets the size to 200mm.
In our opinion, when building a house from aerated blocks, there is a reason to be guided by the norm approved by the second standard.
There are technological subtleties when working with wood:
- a waterproofing, vapor-proof material should be placed under the beams to prevent dampness and damage to the wood;
- the ends of the beams are cut obliquely - at an angle of 70° to ensure ventilation of the internal fibers.
The cavities formed between wood and aerated concrete are filled with insulating material.
Rigid mount
For a rigid connection, you will need to cut out a rafter beam or use a retaining strip. This type of fastening is used both to create a shed roof and for other types of construction.
The step-by-step execution of the cutting method is as follows:
- Cut out all the blanks according to the template. To begin, install the beam for the future rafter leg with a certain angle (laid in the project), and then mark the location of the notch. Its depth should be no more than a third of the height of the bar. After making one rafter leg, use it as a sample. You will need to make the rest identical. It is important not to make a mistake at this stage.
- Place each rafter leg with a saddle on the Mauerlat and secure with nails. First, hammer two at an angle to each other, from the sides of the rafter system. The third one must be driven vertically - it ensures the strength of the structure.
This way you will get a rigid rafter connection that can withstand any load. Remember that cutting cannot be done in the Mauerlat, as this will weaken it. Look carefully at the photo to understand how to correctly cut and assemble rigid fasteners.
There is another method of rigid fastening: when using it, meter-long bars are hemmed to the rafter legs, which rest against the mauerlat. They must be secured with metal corners.
Methods for laying beams
In aerated concrete houses, beams are laid using one of two technologies:
- Beam
- Beam-distributed.
- The beam design is traditional and intuitive: the ends of solid or glued beams rest on walls facing each other.
- With beam-distributed technology, longitudinal elements are fastened together by short runs. This method allows you to reduce the number of beams, since the force experienced by the lattice at each point is lower than the load on the beams.
There are other installation methods, but they are rarely used, so we will leave their description for another article.
Sliding type mount
The movable joint is used for houses made of timber, logs and other materials that shrink. If in such a house you make a rigid joint between the rafter legs and the mauerlat, over time the entire structure may collapse. When there are errors in construction, deformation begins from the walls of houses and is transmitted further.
For a sliding connection, it is a good idea to purchase a special fastener called a “sled” from any hardware store. You can also purchase corners with unusual holes for connection (oblong shape). The rafters are attached to all roof elements using clamps and brackets.
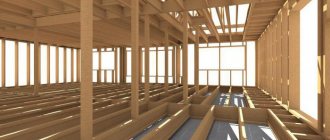
How to install floor beams between floors in a house made of aerated concrete with your own hands
The general layout of the interfloor overlap looks like this:
- Basic structure. These are single beams - matitsa, or a lattice with short purlins - exchangers, as the builders say.
- The bevel between the beams is transverse boards laid on the cranial bars.
- Skull bars are longitudinal slats screwed along the lower border of the beams.
- Vapor barrier and insulation - rolled or panel materials laid on the roll.
- Joists are cross beams, the basis for floor boards.
- Finish floor - boards on joists.
- Finish ceiling - panels, hemmed from below to the runway.
In special cases, some elements may not be in the overlap. For example:
- When installing from below, rolling is not necessary. It is more advisable to install only logs and lay insulation between them.
- If the ceiling is mounted on top, then there is a reason to fix the roll, but you can refuse the lags.
Expert opinion Vitaly Kudryashov builder, aspiring author
Ask a Question
Important: a vapor barrier must be added to sandwich structures. This is an air-impermeable film that is fixed to the outer surface - on the side that is in contact with the colder environment.
Technology of work execution
- Any practical work begins with calculations and planning.
We choose the most reliable floor scheme - the beams are located parallel to the short wall. Beams should be selected such that each square meter of floors can withstand a load of 400 kg.We select the cross-section and installation interval of the beams in accordance with the data in Table 1.
A rule of thumb: it is better to install fewer beams of larger cross-section than many small-gauge boards.
The optimal section is considered when the height is related to the width by a factor of 1.5.
Based on this data, we calculate each type of material.
- Preparing beams and wall surfaces for installation.
- We coat the ends of the beams with antiseptic and fire-retardant materials.
- Walls: first you should carry out leveling - checking the levels of marks. The support platforms for all beams must be in the same plane.
- The next task is to thoroughly clean the seats in the wall and install waterproofing gaskets.
- Installation of the first pair of beams.
This is a lighthouse couple. Beams are installed first at the extreme points - at opposite walls. Installation should be performed so that there is a ventilation gap of 3–5 cm between the ends of the beams and the wall.The beams are secured with dry gravel backfill; their edges are trimmed as indicated above.
- Installation of all floor beams.
- The intermediate beams are placed at the same level as the lighthouse beams. The gap between the wall and the end is a rule mandatory for all beams.
- The ends of the beams are filed at an angle, the edges are wrapped with roofing felt.
- The ends are secured. The gaps are sealed with a heat insulator, and CBR is poured into the free cavities.
- Further operations depend on the selected technology.
- You can install logs on the top. Insulation and vapor barrier are placed in the resulting grooves. Then the finished floors are laid.
- The second option is to attach longitudinal bars to the beams - cranial ones, the builders say. These slats run on each side at the very edge of the bottom rib. The slats are covered with bevels - transverse boards. Insulation and vapor barrier are laid on the ramp. Then the floors are installed on the upper surface of the beams, and the finishing ceiling is installed on the lower surface.
Preparation of materials and tools
Materials and tools are purchased after calculations have been made. The logistics technology is as follows:
- Based on the drawn laying diagram, a list and quantities of required materials are formed.
- Based on the analysis of the technical process, a list of tools and equipment is drawn up.
It is obvious that in addition to the basic materials - timber, boards, plywood, waterproofing, etc., you will need:
- auxiliary – primers, impregnations, paints (for metal and wood), crushed stone, etc.;
- hardware – screws, screws, hooks, various brackets, chucks, etc.
Tools and equipment: drills, angle grinders, winches, mixers for preparing CPR, clamps, saws, pliers, hammers, axes, grinding wheels.
Installation work
The main stage is, of course, the installation of beams. It implies competent preparation at the stage of construction of the first floor.
First, the wood should be pre-treated with a fire-retardant compound, as well as an anti-rotting liquid (this must be done with the entire crossbar). This must be done immediately after purchase. If the material will lie for some time before laying, it needs to be rearranged: a row of beams, then 3-4 bars across, then the next row. This will allow the board to ventilate and dry out. This will prevent mold from appearing.
The part of the beam embedded in the wall should also be coated:
- Bitumen or primer.
- Ruberoid, roofing felt or glassine.
- Liquid waterproofing agent consisting of bitumen.
- Linocrom.
This is done due to the fact that wood, when in contact with concrete and blocks, can absorb moisture and begin to rot over time .
Reference
For aerated concrete, an operating humidity content of 3-5% is considered normal. No matter how dry the blocks may seem, direct contact of wood with this material is unacceptable.
The beam must be embedded into the load-bearing wall at least 12 cm. The ends are cut at an angle of 70 degrees in order to ensure the removal of moisture.
Attention!
There is no need to cut off the end of the beam with waterproofing material. Otherwise, access to moisture evaporation will be blocked. It is required to leave a small air gap between the end of the beam and the wall.
Beams are laid on a reinforced surface (to enhance the strength of the structure). Instead of an armored belt, some manufacturers in small houses allow a 6x60 mm metal strip to be supported on aerated concrete with a lining.
The beams are fastened to the reinforced belt in houses made of gas silicate using anchor bolts.
To insulate the street side, insulation can be placed in front of the beam. As a rule, the outer ends of the beams are insulated from the outside with expanded polystyrene.
Filling the voids between the laid beams is done with gas blocks. Gaps of 2–3 cm are left between the gas silicate and the timber. They are tightly packed with mineral wool, thus preventing the formation of condensation and dampening of the beams.
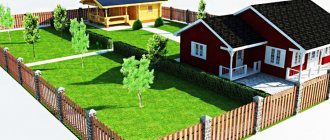
Do not forget to think about the placement of the stairs to the second floor , since the opening must be provided immediately:
Well, that's all, the floors are ready. Now you can begin the subsequent finishing.
Installation ↑
To construct the murlat, wooden beams are used, which are laid in a plane parallel to the future ridge. They begin to install it during the construction of walls. For example, in the case of brickwork, you can do the following:
- closer to the top, approximately 4–6 rows below the edge, lay a thick wire at intervals of 1 m; the wire is firmly fixed inside the masonry in the center; the length of the free ends should be sufficient to subsequently wrap around and tie around the support beam without any problems; after construction is completed, visible parts of the fasteners are hidden, for example, by applying a layer of plaster.
To prevent rotting of the murlat beams, they are waterproofed by laying rolled material such as roofing felt.
When arranging the Mauerlat along the perimeter of the walls, it is necessary to check not only the reliability of the fixation, but also the horizontalness of the support beam.
Main elements of the rafter system
The wooden roof frame is assembled from the following parts:
- Mauerlat - a kind of base for roofing elements, attached along the entire perimeter of the building to the upper edge of the outer walls in order to disperse the pressure of the roofing pie;
The Mauerlat serves as the basis for the roof frame
The ridge girder is located exactly in the middle of the building
Tightening and struts are necessary for proper distribution of the load on the Mauerlat
Racks can support not only the roof ridge, but also the rafters
The bench is located on the inner wall parallel to the mauerlat beam
The ridge is formed in the highest zone of the rafter system
The fillies lengthen the rafter legs
The eaves overhang is constructed to protect the walls from rain
Sheathing boards are laid perpendicular to the rafters
Main connecting nodes
The main components of the rafter system are:
- rafter truss - connection of a pair of rafters, braces, as well as racks and braces;
- ridge knot - combination of two opposite rafters;
- a link made of a mauerlat and a rafter resting on it;
- a module including a run, a stand and a bench;
- connection of the rafters with the strut and the stand.
The most complex element of the roof frame, according to the author, is the roof truss, which is distinguished by the fact that:
- assembled on the ground, and then transported to the roof, since this is the only way to successfully fit one wooden part to another;
The roof truss consists of at least three elements
The ridge knot also has several features:
- formed as a result of connecting two opposite rafters due to special cuts or notches;
There are many methods for creating a ridge knot.
The rafters and mauerlat become a single link, which is characterized by the following:
- the connection occurs due to cutting in each rafter leg, corresponding to the shape of the element that serves as a support for it;
The rafters are secured to the mauerlat so that they do not move to the side
A module of purlins, racks and beams is formed by driving construction brackets, steel dowels or overlays made of steel strips into the places of their connections.
An assembly of a beam, a rack and a purlin allows you to divide the load between the external and internal walls of the building
Struts, racks and rafters are assembled into a single module, creating cuttings. To prevent their connection from being weak, construction staples are used.
An assembly of struts, posts and rafters allows you to soften the pressure on the internal wall of the house
How to create a reliable foundation for rafters?
The first step you need to take is to build a solid foundation for these rafters. For example, if the floor beams do not have any support (at least in the form of an intermediate wall of the house), then the trusses on it need to be organized only according to the hanging principle. If there is support, the rafters can be safely supported directly on the beam without any auxiliary elements.
-The simplest classic support consists of a tie, one support beam and struts. The puff is suspended in the middle. Such suspension systems are used today most often for large spans.
-Double support consists of a tie, hangers, two struts and a crossbar, which serves as a spacer between the boards.
-There is even a triple support, which is a separate three hanging systems, or one double hanging system and one simple. This is already a complex rafter system.
Ideally, you can also calculate such beams for deflection and tension, to what extent they are ready to support the entire roof. There are special online calculators and formulas for this, although it will also be enough to invite an experienced carpenter for your own peace of mind.
Making an armored belt
Since aerated blocks have a relatively fragile structure, before arranging the ceiling on the walls, it is necessary to form a reinforcing belt of reinforced concrete. It will evenly distribute pressure loads over the entire area of the walls, and will also additionally strengthen the walls of the house.
To create an armored belt, U-shaped gas blocks are used, which are laid as the top row. If such blocks are not available, you can make them yourself by cutting out recesses in ordinary aerated concrete. After laying the U-shaped blocks, a load-bearing frame of reinforcement is formed in the recesses. It consists of four longitudinal rods connected to each other into a single structure. Pieces of wood are placed under the lower reinforcement to create a monolithic layer of concrete under the metal.
After this, concrete is poured into the blocks. The surface for laying the ceiling is ready. An armored belt can be made without U-shaped blocks by simply pouring concrete into the formwork fixed on top of the walls, but this method is too labor-intensive.