Benefits of wood
Floors are horizontal structural elements of buildings and structures that divide them into floors or separate them from technical rooms (attic or basement). Depending on what material the building is constructed from, the floors can be monolithic, prefabricated reinforced concrete or wood.
For the construction of a private house, floors on wooden beams are most suitable, since their weight is less than that of structures made from other materials, and constructing them with your own hands is cheaper and easier.
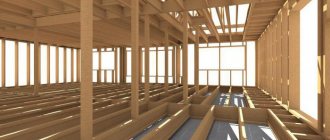
Wooden interfloor ceilings can be installed in houses made of any material, with the exception of monolithic reinforced concrete. They are erected simultaneously with the construction of the walls, as the latter are built to the height of the next floor. In frame wooden buildings, floors can be made simultaneously with the construction of the frame of the entire building, even before it is insulated and covered.
Solution
In order to protect your home from excessive noise with maximum efficiency, or to reduce the amount of sounds penetrating through floor ceilings, you need to start addressing this issue not yet at the stage of building a house.
All intersecting structural elements must be installed through soundproofing gaskets. This way you can reduce the number of vibrations that pass from one element to another. This must be done during the construction of the log house, since later such an opportunity will no longer exist.
The ceiling should be assembled in such a way that the installed logs form a kind of lattice. This design solution greatly increases rigidity, which has a positive effect on noise absorption. But this alone is not enough - it is necessary to fill the resulting squares with material that can not allow sounds to pass through.
Another feature of the interfloor slab in a wooden house is the ability to arrange two systems of beams and joists that are not in contact with each other, between which vibration-absorbing material is laid. This solution gives the best effect, and its structure can be seen in the figure attached below.
In old buildings, to solve the problem with sounds, the interfloor structures were filled with sand, which perfectly absorbed all sounds. Now this method is still relevant - sand can be used as one of the soundproofing layers. Just remember that it takes a lot, so you need to calculate the strength of the structure taking this point into account.
Filling with sand can only be done after the entire space where it is planned to be poured has been covered with plastic film. It will prevent sand from spilling down. You need to select a film that is strong enough, but at the same time retains its elasticity so that it can be laid in all corners and bends of the structure.
The joints of the film sheets must be taped with strong tape. After this, backfilling can be done. The thickness of the sand layer should be between 50 and 60 millimeters. This layer is enough to ensure that the sound insulation in such a wooden house is simply excellent, and it will not weigh too much.
Along the joists, in places of contact with other parts of the floor or flow, it is imperative to lay soundproofing tape. This will reduce their ability to transmit sounds.
The next step towards good sound insulation is the use of sound-absorbing materials for insulating floors. If in a house, the ceiling of the lower floor will also serve as the floor of the upper floor, you need to use a backing for the floor covering on the upper level.
Gluing special membranes - sound absorbers - brings a very noticeable effect. But all problems need to be solved comprehensively, and only a membrane will not completely solve the problem. Therefore, we also need fiber filler for the assembled structure.
Sometimes, instead of fibrous materials, ordinary expanded clay is used. It dampens sounds quite well, but you need to put it on a sand cushion, which will prevent it from coming into direct contact with the floor beams.
Modern sound absorbers have also proven themselves to be excellent, and the same products can be used in wooden buildings as in brick or panel buildings. Schumanet materials, Isotex panels with sound-absorbing coatings and Texound soundproofing membranes have good performance.
[custom_ads_shortcode2]
Correct floor design
Interfloor wooden floors are arranged on beams. They are usually used as timber. The size of the section depends on the size of the span that needs to be covered, as well as on the size of the expected load on the floor and the types of wood used. Most often, timber with a section width of 100 mm and a section height of 150-200 mm is used.
Next, the ceiling itself is formed by installing the floor boards of the upper floor and hemming the ceiling materials of the lower floor. You can often see that floor boards are laid directly on beams, but it is more correct to first install logs on the beams, and then make flooring from the boards over them. The second option is the most preferable, as it will allow for proper interfloor insulation along wooden beams.
The fact is that in the pie, which the filling of the interfloor ceiling is so similar to, there must be layers of vapor barrier.
They are made of a special membrane with a certain coefficient of vapor permeability, and the top layer of the membrane allows steam to pass in only one direction - from the insulation into the air. Therefore, an air gap is needed between the membrane and the plank floorboard, which will remove steam from under the boards. Otherwise, the latter will simply begin to rot.
In this case, the membrane is laid on the interfloor floor beams, and the air gap is formed due to the thickness of the logs laid perpendicular to the beams.
Steam is removed from under the boards through specially cut holes in the floor or slotted skirting boards used to edge the perimeter of the room.
Note! The bottom layer of the membrane must be made of a material with a very low vapor permeability coefficient.
This is necessary so that moisture from the lower rooms does not seep upward through the interfloor ceilings, and also does not linger in the layers of insulation. All air from the floor should be vented into the atmosphere only through ventilation ducts or windows for ventilation.
Soundproofing wooden floors with sand
The method is controversial. A labor-intensive process, a lot of weight, and most importantly, the sound is partially damped, because the main resonance is transmitted through the lags. The principle of the device is shown in the photo.
Soundproofing wooden floors with sand
Soundproofing floors with sand
Sound insulation of floors with sand
Of course, it all depends on the method of installation, as the craftsmen advise, you need to pour sand between the joists and the subfloor, and not just between the floor beams, and install a floating floor system on top.
Scheme of soundproofing floors under plasterboard
Diagram of sound insulation for plasterboard floors
Technology for soundproofing floors under plasterboard
Insulation layers
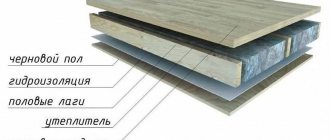
So, if you imagine a cross-section of the interfloor insulation cake, it will consist of the following layers:
- upper floor flooring boards;
- logs;
- floor vapor barrier;
- beams with a layer of heat and sound insulation laid between them;
- ceiling vapor barrier;
- ceiling cladding.
In multi-storey buildings, insulation of the interfloor floor is relevant only if this floor is made between the basement and the first floor, as well as in the case of the floor between the upper floor and an unheated attic.
If the ceiling separates two residential heated floors, then the role of insulating material for insulation is negligible. In this case, the soundproofing properties of the structure are much more important. Despite the fact that heat and sound insulating materials are included in the same group when classified according to purpose and technological characteristics, their properties may be different.
These differences must be taken into account when using this or that material in a specific interfloor covering.
Cork covering
Cork sheets, in addition to having high soundproofing qualities, play the role of an aesthetic ceiling finish. Of all soundproofing coatings, cork is the only pure environmental material of natural origin. Sound waves get stuck and are damped in the structure of the cork.
Cork sheets are glued to the surface of the upper ceiling. For this purpose, special adhesive compositions are used. Cork ceiling not only significantly reduces background noise in the room, but also decorates the interior of the room.
The above types of ceiling soundproofing in a wooden house, in addition to cork, require the subsequent installation of a suspended or suspended ceiling.
Types of floor insulation
The logs are wide bars installed on an edge and running from wall to wall parallel to each other. Plastic or metal beams can also play their role. Next, the finished floor boards are attached to them, so it is very important to lay them correctly so that over time the floor does not begin to creak or deform.
The selected insulation option is placed between and sometimes under the joists. Let's try to figure out which material for floor insulation is better to give preference to, and which should be completely abandoned.
It is not necessary for the logs to be exactly boards. Often this is an ordinary beam, adjusted to the level in one plane. The main thing is to secure them well and level them so that subsequent laying of the floor does not bring problems to the homeowner.
We will consider the most popular types of insulation materials, which are distinguished by fairly high heat saving rates.
These included:
- sawdust or sawdust mixture;
- expanded clay;
- glass wool;
- mineral wool;
- ecowool;
- penoplex;
- expanded polystyrene.
All of the listed insulation materials are quite airy, which means they will let the cold through with great reluctance. In addition, a high-quality layer of insulation can prevent the appearance of high humidity in the house, which is also important.
Option No. 1 - budget sawdust
This material has the most unstable characteristics. Often, it becomes saturated with moisture, which significantly worsens its heat-protective properties.
In this case, the owner better take care of the bottom layer of waterproofing, since wet wood will begin to rot, and this can cause not only damage to the coating, but also a number of serious diseases.
Often, as a relatively inexpensive option, pellets or sawdust granules similar to pellets are used to insulate the floor. In them, sawdust is compressed and held in place by an adhesive base.
Such insulation will have slightly better thermal conductivity, but experts do not recommend insulating the floors of your home with such material. Its moisture resistance leaves much to be desired.
Of course, if you plan to insulate the floor in a country house or in an outbuilding, you can use sawdust, but they are completely unsuitable for insulating floors in a house. It is better not to save money, but to purchase more expensive and high-quality insulation.
According to experts, sawdust is one of the most undesirable materials for floor insulation. But the budgetary nature of the material often takes its toll. Experienced builders recommend using sawdust only when insulating the floor of outbuildings
Insulating a wooden floor
If everything is very clear with the arrangement of the ceiling covering, but soundproofing the wooden floor of the upper floor is a process with many unknowns, since it is necessary to reduce the load on the floors as much as possible, while ensuring good efficiency of the work carried out. Consistency in the work allows you to achieve the desired effect in terms of sound insulation and thermal insulation of the partitions of the first and second floors.
First floor
The first floor of the house needs sound, heat and waterproofing, since neglect of such rules can cause extraneous noise and high humidity. There is a certain list of steps that cannot be ignored when ensuring maximum comfort and coziness.
@Derevyanniidom
As a rule, the floor arrangement is created on logs, therefore the following positive qualities are ensured:
- Provides a high level of isolation from extraneous sounds.
- When installing insulation, there are no fastenings, so they act as conductors of additional noise.
- The simplicity and clarity of masonry technology allows you to cope with the assigned work even without experience and certain skills.
- The materials are reasonably priced, so there are no overpayments when installing insulation.
Step 1: Preparing the base
Before starting insulation work, proper preparation of the space is required, namely, the floor covering is removed down to the subfloor. Careful preparation allows you to simplify the process of subsequent installation of soundproofing materials.
After preparation, the amount of necessary raw materials for the work is calculated so that in the future you do not encounter a lack of soundproofing or decorative products.
Step 2: Installation of formwork or frame
Initially, formwork or a frame structure is installed, on which soundproofing and decorative products will subsequently be mounted. For this, it is better to use solid boards 2-2.5 centimeters thick, since this ensures structural strength, reliability and the ability to cope with high humidity during operation.
The frame is assembled depending on the selected material for sound insulation. If it is sand, then you can make small cells, and if it is fiber boards and the like, then the step can be a little larger. The most important thing is not to forget about supporting structures so that the coating does not sag during subsequent use.
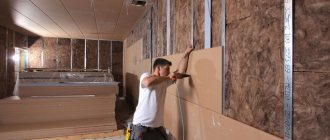
Step 3: Laying Insulation
Laying soundproofing material is the most important process, which allows you to create comfortable conditions without inconvenience for residents. At the moment, there are a lot of product and technology options, as mentioned earlier. Therefore, the installation method may differ depending on the chosen option.
First of all, you need to repair all the joints between the floors, since this is how convenience is formed in combination with performance. To process corners, special rubberized tapes can be used that tightly close the joints, therefore preventing the spread of noise in the room.
Additionally, a vapor barrier material is laid between the layers of sound insulation and insulation, since this eliminates unstable humidity levels, which negatively affect the condition of the finished coating. A wide range of types of both soundproofing and heat-insulating materials is an excellent opportunity to effectively cope with the assigned work.
Step 4: Screed and sheathing
Screeding the flooring after installing the soundproofing material is an opportunity to create ideal evenness, which eliminates inconvenience when using the room. Any unevenness negatively affects the quality of the floor covering.
A practical and at the same time effective solution is a concrete screed, which allows you to eliminate any unevenness and make the coating ready for subsequent construction.
Conventionally, the floor screeding procedure can be divided into three types with characteristic technical and operational features:
- Wet screed is a traditional method that involves the use of cement mortar to fill the floor in order to level it. This process requires a lot of time to implement and subsequent drying in order to be practical.
- A semi-dry screed is something between a wet and a dry screed, since a solution of medium liquid is used, so a minimum of drying time is required. And it doesn’t take much effort to complete the work either.
- Dry screed is a modern method of leveling flooring. The work requires a minimum of time and effort, which ensures high efficiency. As practice shows, there is no need to wait more than a week for the coating to dry, since no more than a day will be enough. A dry mixture that is used to level the subfloor for convenient subsequent fastening of the floor material.
Step 5: Decorating
Decorating is the simplest, but at the same time no less important process, since you need to select the flooring material in accordance with the overall interior design. There are many options: laminate, parquet, linoleum, carpet and so on. Floor tiles can also be used. Each option has its own positive properties and features in terms of application, therefore, special care is required on the part of the consumer.
But what material is ideal for a wooden house? As practice shows, many people prefer parquet or laminate, which is considered a similar material, since wood is a noble raw material that allows you to emphasize the sophistication of a room, as well as make it more comfortable. In addition, wood acts as a thermal insulation product, so the room becomes cozy and warm.
Upper floors
The upper floors need to be worked out even more in terms of protection from the penetration of extraneous noise and sounds. The fact is that impact, acoustic or structural noise can create inconvenience, so the soundproofing system must be not only reliable, but also practical.
But the soundproofing system must be lightweight, since overload can cause the coating to collapse, creating a danger for everyone around.
Classification of noise and methods to combat its spread
To effectively reduce the volume of sound passing through ceilings, you should clearly understand what you have to fight with. In some cases, laying soundproofing material is sufficient, while in others it will be necessary to make changes to the structure of the ceiling structure.
According to standards in residential premises, a comfortable noise level is considered to be within 40 dB, and harmful to hearing - more than 80 dB
Sound pressure levels of various sound sources
Necessary consumables and tools
Before you begin, you need to prepare the necessary tools and materials, namely:
- soundproofing material in rolls or mats;
- ladder;
- screwdriver, drill;
- hammer, hacksaw;
- roulette;
- construction level (preferably laser);
- self-tapping screws;
- construction stapler;
- draft boards;
- putty;
- antiseptic for surface treatment;
- beams for sheathing (if necessary);
- moisture-proofing material (if necessary).
It is recommended to purchase noise-insulating material with a reserve.
Rules for sound insulation with soft materials
The effectiveness of soundproofing work depends on how correctly the technology is followed, since otherwise it can result in discomfort when using the finished room. Considering that each method is individual in terms of installation, they must also be considered separately.
Soundproofing with sand
The process of sound protection of a partition using sand is very labor-intensive, and there is a lot of controversy about this. In addition, sand creates a lot of pressure, which causes characteristic inconveniences. If we consider the basic rules of this method, they are as follows:
- The sand must be dry, since the moisture content of the substance not only adds weight, but also causes a violation of the hygiene of the finished insulation.
- It is necessary to make a cellular subfloor to fill each compartment separately with sand to prevent the spread of extraneous sounds and noises.
- You can make a “floating” floor on top of a layer of sand for a better effect.
Sand technology also has certain technological features that cannot be ignored:
- A lath is fixed to the underside of the beam, and the resulting gap must be sealed with solid plywood to avoid depressurization of the seams. Additionally, a vapor barrier is installed.
- To connect wooden partitions, it is recommended to make small slots under the beam, since this is how you can achieve the maximum “adhesion” effect. As a result, small blocks will be provided for subsequent filling with sand.
- When filling the cells with sand, it is recommended to retreat a couple of centimeters from the top to avoid overfilling if the sand’s moisture content increases. And a small gap creates optimal ventilation conditions.
- After filling the blocks with sand, you need to cover them with felt, and then lay plywood.
Such a “sandwich,” as experienced craftsmen say, allows you to avoid uneven sound insulation, since all the components and structures will be connected to each other as firmly as possible.
"Floating floor" for wooden floors
Technologies are provided in a wide range, so each client, depending on the need, will be able to choose the most practical and effective option. And the “floating” floor technology is considered one of the most effective techniques.
To create a “floating floor” you need to acquire the following components:
- Sealant.
- Elastic gasket for insulation.
- You can't do without lag.
- The flooring is created from chipboard or OSB panels.
- Acoustic mineral wool slabs are used as optimal sound insulation.
- You will also need insulating supports.
You can achieve the desired effect if you take into account the following recommendations:
- It is important to increase the mass of the top flooring.
- The logs must be installed on elastic supports with a low resonant frequency.
- The height of the logs increases to the maximum possible level.
- Mineral wool slabs, which have a high sound absorption coefficient, are suitable for arranging the insulating layer, thanks to which the desired effect can be achieved.
- The flooring between the floor and the walls must be separated using elastic insulating spacers.
As studies have shown, the presence of a “floating” floor in a soundproofing coating system makes it possible to create a comfortable space in terms of the absence of extraneous sounds.
Warm "floating floor"
In addition to the standard “floating floor,” warm technology can be used, which combines not only noise insulation, but also thermal insulation properties. The technology is very simple, but still combines certain design qualities that cannot be ignored:
- Before installing the insulation, the entire beam must be treated with an antiseptic agent to avoid subsequent deformation from high humidity.
- Between the beams, a rough flooring is prepared from boards 25-30 millimeters thick, and then the top layer is made and a vapor barrier is made to protect the structure.
- After the vapor barrier, insulation is laid, and here it is necessary to lay the product not only on top of the beam system, but also between them. This way, cold bridges are eliminated and the desired thermal insulation is formed. The technology is ideal for sound insulation.
- A vapor barrier is again laid on top of the insulation. This creates a greenhouse effect for maximum heat accumulation.
Important! All layers must be as tight and high quality as possible to avoid bridges of cold and humidity.
It is better to make the subfloor from boards 30 millimeters thick, but experts recommend using two layers of chipboard to avoid open joints.
Due to the fact that the structure is strong and dense, it will stay in place without additional fastenings. And also the absence of fastening elements eliminates the appearance of impact noise when using the upper floor.
Suspended ceiling
Installation of a suspended ceiling in a house with wooden floors covered with soundproofing materials is carried out in the same way as in other buildings. It should be taken into account that the metal suspensions of the metal profile frame can play the role of acoustic bridges.
Before you start installing a suspended ceiling, you need to think about the design of the suspensions. Suspensions at the junction points can be wrapped with soundproofing tape or strands made of polymer materials can be used.
Perforated acoustic boards are used as soundproofing panels in suspended ceilings. Armstrong slabs are sandwich panels with an internal mineral wool core.
Beams in a brick house
In a brick private house, before laying, the ends are wrapped in roofing felt or tarred. The space between the end of the beam and the brick is filled with insulation, more often with mineral wool. Be sure to leave a gap for ventilation so that the material does not rot or become covered with condensation. If grooves are not provided, then the beams are fixed with your own hands onto anchors previously embedded in brick or reinforced concrete.
The insulation is placed exactly between the joists and beams, no more and no less. It is allowed to leave 3-4 cm for ventilation . It is not advisable to use polystyrene foam and polystyrene in this case, as they have poor sound insulation.
Calculation of sections of beams between floors
Extruded polystyrene foam and material that suppresses rattling noise are allowed. Next, chipboard and flooring are laid out.
The role of sound insulation is performed by insulation from glassine sheets; any heat-insulating material is used.
When building interfloor wooden floors with your own hands, special attention is paid to the places where the pipe options pass: boiler rooms, chimney rooms, fireplace rooms. The gap between the beams and pipes must be at least 0.25 m. An asbestos gasket is installed around the pipes. Instead of asbestos, you can use basaltite.
Method of fastening wooden beams in wall grooves
Possible installation difficulties and errors
To avoid any difficulties during the installation process or at the end of the work, you need to know certain nuances. If you do not follow them, you will have to redo the work:
The joints and places where screws are attached must be covered with a layer of plaster. The rest of the work is carried out only to dry it.- When dismantling old floors, it is recommended to leave the backfill - this will save time and money. Otherwise you will have to fill in a new one.
- There is no need to use unrelated materials for soundproofing.
- The surface must be sheathed not only with a sound-reflecting layer, but also with a sound-absorbing layer.
- When installing the sheathing, do not leave gaps or holes.
Timber laying algorithm
During the construction of walls intended for laying timber, they are covered with their own hands in several layers of roofing material. 1 day before laying, the timber is treated with a fire retardant solution to protect it from fire .
At the ends, the timber is hewn at an angle of 60° and treated with an antiseptic solution, then with resin.
The ends of the wooden beams are wrapped in waterproofing material and placed in niches. The distance from the ends of the beam to the walls of the niche must remain at least 4 cm. This device is filled with foam plastic or mineral wool.
Do-it-yourself ceilings in a timber house
If the wall is brick and the thickness of the wall is less than two bricks, the space is filled with cement mortar. Every third beam is fixed with an anchor protruding from the wall by 20 cm, laid during the construction of the wall. First, a device for an anchor corresponding to the diameter and depth is drilled into the beam with your own hands.
In the wall, the beam is additionally secured with a bracket attached to wooden beams.
The beams are laid from the walls to the center, checking the evenness of the laying with a level. Having discovered an unevenness, it is eliminated using tarred boards adjusted to the width. It is forbidden to cut the timber or place it under wood chips, as this will lose the strength of the structure.
Beams are laid with your own hands strictly parallel to each other with the same spacing.
The outer beams are never placed close to the wall, leaving at least 10 cm. The beam is never installed directly next to the chimney pipe.
Noise insulation
Interfloor sound insulation in wooden floors typically has a thickness of 15 cm. At the same time, the total thickness of the floor between floors is at least 25 cm. Specifically for the layer of fiber insulation, it is necessary to give a thickness of at least 10 cm with a sound insulation density of 50 kg/cub.m.
We recommend: Soundproofing the ceiling in an apartment with modern materials
After installing the beams and laying the mineral wool slabs, you can additionally lay roll, cork or felt flooring on the floor. In cottages, a mineral membrane is often used. Rules for installing soft fibrous materials when laying interfloor sound insulation:
- Place 40x50 mm slats on the vertical part of the beam from below.
- Sew boards with a thickness of 25 mm or more to the slats.
- Wrap the beam with a vapor barrier, extend the edge of the vapor barrier beyond the junction of the beam with the wall by 10 cm.
- Stuff felt strips onto the beam; you can use metal, or preferably plastic, fasteners.
- Place fiber blocks tightly between the beams.
- Lay felt flooring over the base.
Regardless of the material or type of installation, wooden floors are treated with an antiseptic; before installation, the beams are covered with drying oil and dried at room temperature for 48 hours.
The main part of the sound insulation between floors has been laid. The bottom surface is ready for covering with plasterboard, clapboard, or other material. To arrange the floor, it is necessary to additionally lay thermal insulation on top of the layer of rolled insulation if the main floor is planned to be made of boards. When a laminate is used as the main floor, thermal insulation is not used; plywood is used as a substrate for laminate slabs.
How to lay an interfloor ceiling on wooden beams?
Before installation begins, a calculation of the beam for deflection is made. You will need:
- beams;
- bars nailed to the lower parts of the joists (cranial wooden bars);
- materials for waterproofing;
- rolling shields,
- floor and joists.
The use of backfill is inappropriate, since it does not have the necessary noise insulation properties. It is undesirable to use polyurethane due to its high toxicity.
The structure of such an overlap on beams is multilayer. The comfort of living in a private home depends on its quality. The options used here are noise-insulating and heat-insulating materials.
Step-by-step installation on beams:
- A material that acts as a ceiling is attached to the beams: plywood, chipboard, boards, etc.
- A vapor barrier ceiling covering is laid one on top of the other, overlapping; if necessary, the film is secured to the beams with a construction stapler.
- Mineral mats are placed in the interfloor ceiling along the beams with special care.
The insulation must fit exactly onto the beams. The device serves as a sound insulator. If it is foam plastic, then it is best to fix it with wooden pegs between the beams and the foam plastic.
The insulation layer in the house is covered with a membrane that protects the structure from steam. The main purpose of this layer is to prevent mineral wool elements from penetrating into the room.
- The device between the beams and ceilings is filled with polyurethane foam, and the remains are cut off after hardening.
- Finally, waterproofing material is installed in the form of boards, chipboards, etc.
- All gaps between the walls and slabs are filled with felt, thereby reducing normal and impact sounds. On the top floor or attic, a rubber-cork track is laid on the ceiling, which provides ideal sound insulation. The entire perimeter is accompanied by a gap in the form of foamed polyethylene or damper tape. Ventilation holes are formed in the corners, which are included in the general ventilation system in a private house. They will help remove steam and moisture from the ceiling.
average cost
The cost of work depends on the type of flooring and materials for sound and noise insulation.
For floors and interfloor ceilings, average prices are indicated per sq.m.:
| Type of work | Unit | Average cost, rub. |
| Laying rolled soundproofing material under the screed | Sq.m. | 130 |
| Laying rolled soundproofing material in mats | Sq.m. | 130 |
| Installation of edge layer with trimming | Linear meters | 220 |
| Installation of tape soundproofing gasket with trimming | Linear meters | 50 |
| Laying shumoplast up to 7 cm | Sq.m. | 800 |
| Laying zip panels zip floor | Sq.m. | 520 |
| Filling joints with sealant | linear meters | 50 |
| Laying a vapor barrier layer | Sq.m. | 50 |
| Leveling the floor with a screed up to 10 cm | Sq.m. | 1000 |
| Self-leveling floor device | Sq.m. | 350 |
| Laying plywood | Sq.m. | 230 |
| Plywood cutting | Linear meters | 120 |
| Sanding plywood, screeds | Sq.m. | 270 |
The average cost of soundproofing attic floors is given below:
| Type of work | Unit | Average cost, rub. |
| Installation of rolled soundproofing material (lightweight) | Sq.m. | 400 |
| Installation of rolled soundproofing material in 2 layers (light) | Sq.m. | 600 |
| Installation of roll soundproofing material (heavy) | Sq.m. | 600 |
| Installation of soundproofing material in mats | Sq.m. | 420 |
| Installation of soundproofing material in mats in 2 layers | Sq.m. | 580 |
| Installation of tape soundproofing gasket | Linear meters | 50 |
| Laying soundproofing material in mats into a frame | Sq.m. | 180 |
| Installation of vapor barrier | Sq.m. | 100 |
| Laying soundproofing material in mats in 2 layers in a frame | Sq.m. | 220 |
| Installation of soundproofing panels | Sq.m. | 580 |
| Filling joints with sealant | Linear meters | 40 |
| Frame structure without filling | Sq.m. | 700 |
| Sheathing with plasterboard | Sq.m. | 240 |
| Ceiling plaster without beacons up to 1 cm | Sq.m. | 700 |
| Ceiling plaster on beacons up to 5 cm | Sq.m. | 900 |
| Installation of plaster reinforcing mesh | Sq.m. | 220 |
How to check the quality of flooring using beams?
Check for distortions in the wooden beams; they should not be more than 1.5 cm vertically and 2 mm horizontally. The change in shape of the materials used should not exceed 0.7 mm per meter.
There should be no vibration or noise while walking.
If you plan to use putty in the future, stretch a polymer film over the foam. Next, the suspended ceiling, plasterboard or MDF sheets are fixed. At this stage, you can finish the ceiling.
Foam boards
The lightweight porous material has high sound-proofing and moisture-resistant qualities. Foam boards are easily cut with a knife, which greatly simplifies the work of forming coating fragments of the required size.
It is better to glue polystyrene foam to a wooden surface. To do this you need to use special glue. The porous coating can be attached in the same way as polyurethane foam panels.
Article on the topic: How to soundproof a ceiling: modern effective materials for sound insulation
Installation Tips
When choosing sound insulation for interfloor wooden floors, it is recommended to use fire-resistant mineral wool panels, basalt wool, expanded clay, and antiseptic-impregnated felt. Other recommendations:
- Use foil insulation if porous sound insulation is used.
- Insulating each wooden block from each other will prevent structural noise from occurring.
- Leave gaps between the walls, ceiling and floor, which are covered with roofing felt, this will avoid friction of the wood.
During installation, it should be taken into account that the greater the thickness of the total layer of insulating gaskets, the faster the sound wave of any range will be damped and dissipated.
Stretch ceiling
Installation of a stretch ceiling is carried out in the traditional way. You can combine the use of a soundproofing coating on a wooden floor with the use of an acoustic stretch ceiling fabric.
The acoustic canvas is a perforated film material. Sound waves get stuck in holes filled with air. Having lost their main energy, the waves are reflected into the interceiling space, where they finally die out.
How to make sound insulation under a suspended ceiling.
Calculation of the amount of material and its cost
Calculation of sound insulation between floors is made based on the following parameters:
- Sound insulation thickness, number of layers of base material.
- Installation technologies. If a roll sound insulator is used under the subfloor, then the size will be equal to the area of the interfloor floor. When felt is used on logs or beams, footage is added taking into account bends.
Installation of the ceiling at the construction stage requires one roll of roofing felt. When purchasing layers of mineral or basalt wool, the area for insulation is first calculated without taking into account the beam exits. The foil material, which is spread under the subfloor, is taken with a reserve, taking into account that the flooring must be carried out with the smell of the sheet.
Properly installed sound insulation between floors will ensure silence in the house and enhance heat conservation. The market offers a range of building materials for insulating floors during the construction stage and for finishing old interfloor floors, without dismantling the latter.
Conclusion
The technology of soundproofing floors for a wooden house, in contrast to brick and concrete buildings, has a number of features that are directly related to the design of the floors, their properties and sound-conducting characteristics. The methods described above will help to isolate or significantly reduce the penetration of sound waves between floors in frame cottages, as well as in houses made of rounded logs or timber.
Sources
- https://DrevoGid.com/zashhita/uteplenie/perekrytiya.html
- https://texnotoys.ru/otoplenie/mezhetazhnoe-uteplenie.html
- https://teploguru.ru/uteplenie/drugoe/mezhetazhnoe-uteplenie-ili-zvukoizolyaciya.html
- https://ProAntiShum.ru/shumoizolyatsiya-kvartiry/zvukoizolyatsiya-mezhetazhnogo-perekrytiya-po-derevyannym-balkam
- https://lestnitsygid.ru/kuda-vedut-lestnitsy/mansardy/shumoizolyaciya-derevyannogo-perekrytiya.html
- https://opotolkax.com/plita-perekrytiya/mezhetazhnoe-perekrytie-po-derevyannym-balkam.html
- https://obshum.ru/shumoizolyatsiya/mezhetazhnogo-perekrytiya
- https://moydomik.net/steny-i-perekrytiya/253-zvukoizolyaciya-derevyannyh-perekrytiy-chumoizolyaciya.html
Noise Characteristics
Noise easily overcomes partitions and spreads both through the air and through the ceiling, creating sound vibrations in the walls. When designing wooden transitions between floors, it is necessary to soundproof the main structures (joists and beams) and install an insulator between all surfaces. Each type of insulation reduces sound waves over a specific range and physical characteristics. To choose the right sound insulation, you need to understand the nature of noise and how it spreads.
- Acoustic noise. Transmitted through the air: this is a conversation, sounds from operating appliances, penetration of sounds from the street into the house, determined by the Rw index. Noise insulation, which prevents the spread of interfloor airborne noise, has a protection index of at least 47 dB.
- Impact or structural noise is determined by the Lmw index and is transmitted through walls, floors, and ceilings. Noise insulation to prevent shock wave has protection characteristics of up to 66 dB.
In addition, wooden passages, blocks, and parts of the flooring create their own noise level. If the installation of the ceiling was carried out without the use of proper sound insulation, the tree, changing shape, begins to move, creating acoustic and structural sound.
What materials are used to absorb noise
The noise absorption system must be carefully considered during the construction phase. The following materials are used to soundproof a wooden house:
- mineral plate;
- cork;
- drywall, foam plastic - effective and durable, not subject to corrosion;
- OSB and chipboard - mounted without rigid fastening, which helps dampen noise;
- mineral wool, glass wool - placed between beams and joists in order to eliminate contact between the wooden parts of the house;
- sand - suitable for soundproofing the floor, placed on a substrate;
- expanded clay - used for sound insulation between floors
- felt - used between floors and for insulating joints.
In addition to the function of noise protection, they can cope with the task of thermal insulation of the room. Any of them can be used to cover the walls of a wooden house.
These soundproofing materials make it possible to qualitatively insulate rooms and protect wooden houses from acoustic influences.
When starting work, you should carefully seal all the cracks through which sound can pass with special mastic or putty. All voids provided for electrical wiring and switches must be filled with foam. Using elastic sealants, the entrances of water and gas pipes into the building are sealed.
Warm and inexpensive floor
The problem of floors that do not burn your feet in winter with their icy cold has existed for as long as the houses themselves have existed. Solutions to this problem have also existed for a long time and in various ways. And as a rule, these solutions are as technologically advanced as they are expensive. Therefore, we are faced with the question: is it possible to get a warm floor that does not freeze in winter frosts for little money? Having started building our own house, we solved this problem using old technologies and new materials.
Subfloor
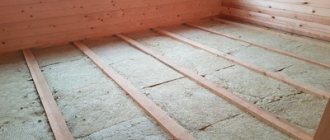
The basis of the floor in our house, as in any other, was the floor beams. We have beams measuring 150 by 50 mm, the distance between the beams is 80 cm.
A subfloor made of 150mm by 25mm boards was laid on the beams at intervals of 400mm. On top of the sheathing between the transfers, 8 mm thick foil thermal insulation was laid with the foil side facing towards the house.
The edges of the insulation were tightly sewn to the beams with a stapler
Now the thermal insulation lies on the sheathing and is not hemmed with a monolithic carpet, but sewn to the sidewalls of the transfers, in order to ventilate the beams from the subfloor side, which is extremely important for the durability of wooden structures
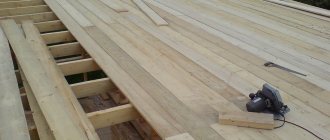
Finish floor
After that, we began laying the finished floor. The flooring is supposed to be made of linoleum and laminated floorboards. For these works, usually for the purpose of leveling floors. whatever they are, use plywood with a thickness of 10 - 12 mm.
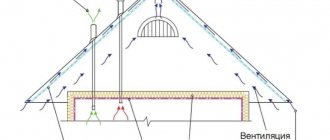
To ensure air flow and ventilation in the interfloor space in the corners of all rooms, it is necessary to drill ventilation holes in the finished floor.
The floor design we have described has been tested several times and has shown itself to be very good. And we know that insulated linoleum or parquet boards laid on the footboard will only add warmth under our feet.
Many may be confused by the apparent lightness and low load-bearing capacity of such a floor. I assure you, it only seems so. At first, the floors, which play slightly, gradually take on the full load, settle and behave no worse than monolithic reinforced concrete.
Dependence of sound insulation on types of houses
Each house, depending on its design, requires a certain type of insulation materials. Knowing this allows you to organize an optimal insulation system at minimal cost.
If in brick houses you can only stop at partial sound insulation, then in monolithic construction large-scale work is required. Otherwise, there is a high risk of wasting time and materials - the design features of monolithic objects require large-scale work to be carried out after construction is completed.
How to ensure sound insulation in a brick house
For brick houses, partial sound insulation is used, which consists in localizing the most disturbing sound sources. In such apartments there are few sound sources - entrance doors, windows, ventilation systems.
You should fill the voids in the door and window openings, if possible, replace the wooden windows with modern double-glazed windows, and install a special grille for ventilation. Considering the material and thickness of the inter-apartment walls, in brick houses they practically do not transmit sounds.
Reducing noise in the apartment
Providing sound insulation in a monolithic house
For such an apartment, the only effective way out of the situation is to insulate the entire apartment: walls, ceiling, floor, door and window openings. The fact is that in such houses the thickness of the floors is minimal, and the concrete used in construction is an extremely poor soundproofing material.
Partial insulation will not bring a significant effect - sounds spread from the walls, ceiling and floor. For this reason, complete installation of sound insulation is required, which reduces the usable area of the apartment as a whole.
https://youtube.com/watch?v=nB5WGZYmIG8
What other materials can be used to soundproof the ceiling in an apartment?
, Rockwool and Schumanet produce modern materials that will help soundproof the ceiling and walls in the house. The cork system has good noise-absorbing properties. It helps to significantly reduce the level of impact noise.
Fiberglass also has a good soundproofing effect. This material is organically pure and inexpensive. In addition, fiberglass does not deform when exposed to moisture. This material can also be used for thermal insulation of floors and walls.
Algorithm for installing fiberglass on the ceiling:
- First you need to clean the ceiling of the old finish.
- Fill holes in the ceiling.
- Install supporting profiles.
- Next, attach the fiberglass to the ceiling. Secure the material with self-tapping screws.
- Cover the frame with PVC panels or plasterboard.
Noise insulation between floors
Of course, to ensure sound insulation between floors, it is worth insulating both sides, or rather the ceiling and floor, and doing this at the same time in order to increase the noise barrier. Soundproofing material must be inserted into the main structure of the interfloor ceilings.
Beams that support the strength of the building are insulated with glass wool, foam rubber or other sound-reflecting material. Boards or plywood are laid on top, and they are fastened with self-tapping screws to the beams through the insulation.
These structures will last longer if you soundproof the ceiling, floor, walls and coverings between floors according to all the rules. And in wooden houses, the slightest rustle or creaking will be heard by the whole house due to the fact that wood has the property of being an excellent sound conductor. Glass and varnished wood surfaces also have a similar characteristic.
Summarizing all of the above, we can conclude that such an event as insulating floors from noise and extraneous sounds in a wooden house is simply necessary to ensure not only good sleep, but also comfortable living throughout the day. It's difficult to live where you can hear every rustle.
And by isolating the premises from penetrating sounds, you can ensure proper work and sleep. These are important elements of good mood and vital activity.
Secrets of Effective Sound Canceling
Insulation work begins with calculations of the effectiveness of a specific method and selected materials. The design that protects the room from background noise must meet several requirements:
- Multi-layering. Acoustic waves are quickly damped by several layers of protection.
- Plasticity, elasticity. Soft materials almost do not allow sound to pass through, and therefore provide better protection from it.
- Heaviness. Required for protection against low frequencies and vibrations.
- Correct installation of insulation on the ceiling. All materials must be used in strict accordance with specifications.