Among the various roofing designs, the multi-gable roof is considered the most complex and attractive. The peculiarity of its design lies in the large number of complex elements. These include gables, gables, valleys and ribs. In this article we will tell you how to build a multi-gable roof by hand, show drawings and diagrams, photos and video materials.
Most often, a multi-gable roof is made in several cases:
- originally;
- in the process of adding premises;
- for installation of side lighting in the attic;
- in buildings with complex layouts and many rooms.
Peculiarities
Scheme of the rafter system
A simple version of the gable roof is a gable roof without gables. In this design, the upper triangular section of the wall is called a gable. There are no simple steps in the process of building a multi-gable roof; all actions, starting with calculations, require knowledge and skills. The roof structure allows for a living space to be located underneath it. Despite the difficulties, home owners undertake independent installation, which allows them to save a significant amount of money. A multi-gable roof will require enormous physical and financial costs, but will delight the creators with the architectural beauty of the building.
Design advantages:
- thanks to the balanced rafter system, the roof can easily withstand high loads;
- the roof has an original and attractive appearance;
- the design is reliable and durable;
- free space appears for an additional room or attic;
- Snow cover does not linger on steep slopes.
Flaws:
- complex design requiring competent calculations and installation;
- a large amount of waste generated when cutting roofing material, especially metal tiles;
- high load on the valley caused by snow;
- the need for high-quality waterproofing of internal joints.
Design nuances
Typical designs of houses with a multi-gable roof include a pitched rafter system with a slope towards the walls of the building. This makes it possible to effortlessly ensure the drainage of rain and snow removal. The structural elements that make up the roofing device are as follows:
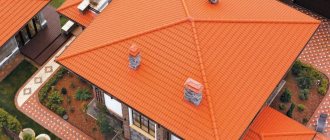
A slope is a fragment of a roof without bends or turns; Gable (pediment) - the upper fragment of the outer wall, the boundaries of which are determined by the slopes of the roof. There is a minor difference between a gable and a gable: a gable has no cornice at the bottom; Valley (gutter) - internal corner joints of the roof that appear at the junctions of the slopes. At the end, the valley ends at the border of the pediment. The valley is the most loaded part of the roof structure, as snow and rain streams constantly collect in the inner corners (see photo above)
During construction work, it is this area that needs to be given special attention in order to avoid problems associated with leaks in the future. Rib (ridge - a horizontally located joint that is formed when connecting adjacent slopes; The overhang provides the connection of a roof fragment with a width of 300-500 mm. The main function of the overhang is to protect the building from rain and snow, the maximum possible drainage of rain and melt water; The drainage system drains water from roofing into the drainage system; The junction is a fragment of the junction of the slopes with the outer wall.
Valley roof
Pediment elements
- Skate;
- Pediment detail - wind or end batten;
- Lower valley;
- Upper valley;
- Drip edge - cornice strip;
- Snow retention bar;
- Adjacent strip;
- Ventilation shaft cover;
- Low tide on the window;
- Pediment L-strap for external roof corners;
- Soffit;
- Ventilation duct covered with corrugated sheet;
- Window in the attic;
- Wall J-channel;
- Gutter.
Elements of a multi-slope roof
Octagonal roof - photo The slope angle at which the multi-gable roof rafter system is erected and the roofing covering is laid is calculated when drawing up the project, and depends on the following parameters:
- Climatic conditions in the region;
- Roofing and other materials used;
- Architecture of the house.
The simplest solution when building a multi-gable roof is two gable planes adjacent to each other at an angle of 900 (see photo below). The top view clearly shows the cruciform shape of the roof. This design is welcome not only in a single version - you can combine several such pitched structures on the roof of one house at once. This technique is designed to construct original gable roofs that improve the design and architecture of the building.
4 stingraysDesignations of main structural elements
The roof structure
of the Endova is the place of internal connection of the slopes; they are one of the key nodes. They have to withstand a significant load from the accumulation of snow, so support from below is provided from a system of supports and struts. Waterproofing the unit is of great importance; all the water flowing down the roof passes through the valleys. Any design error will result in a leak.
Ribs - represent the outer corner of the connected slopes. One of the most difficult places in the design of a multi-gable roof is the intersection of the ridge beam, to which the valley adjoins. A ridge is one of the ribs of the roof.
A gable is a section of a wall limited by slopes; it is shaped like a triangle and is not separated from the wall by a cornice.
Mauerlat is the load-bearing base of the entire roof, distributing the load on the walls and foundation.
Rafters - layered, hanging and diagonal.
Sheathing is a timber frame necessary for fastening roofing material and insulation.
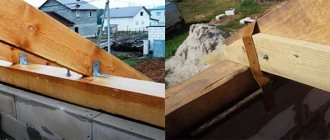
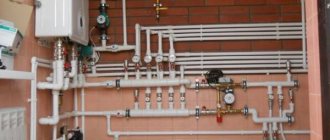
Laying the Mauerlat
Installation of the rafter system of a low-rise building begins with laying the mauerlat. This term refers to the support beam, which is mounted on the upper frame of the load-bearing walls where the roof slope rests on them. The number of mauerlat bars involved in the design always coincides with the number of slopes. The Mauerlat is made from thick wooden beams 10-15 cm thick. The laying of this frame element is carried out in accordance with the following rules:
- The Mauerlat is installed only if the frame of the house is made of brick, concrete, gas silicate, or foam block. In wooden buildings, the role of the mauerlat is played by the upper crowns of the frame, firmly fixed with metal brackets or dowels.
- Some types of layered rafter systems do not provide for the installation of a Mauerlat, since they do not exert a bursting load on the walls of the structure.
- Strong waterproofing is always laid between the wall of the house and the mauerlat to prevent condensation from settling or rotting of the wood. For these purposes, use glassine, roofing felt or roofing felt.
- It is not allowed to make a tie-in under the rafter legs in the mauerlat, since each violation of the integrity reduces the strength of the beam.
- The Mauerlat beam is fastened using studs embedded in the wall of the house, or long anchor bolts.
Rules for installing the Mauerlat
Installation of the rafter frame
Roof truss system
The basis of a multi-gable roof is the Mauerlat. The base element is subject to high load, so a beam with a cross section of 150x150 mm is used for it. It is attached to the walls of the building with anchors laid during the construction of the house. The rafters rest on the mauerlat. Rafters can be layered or hanging. Their choice is determined by design features.
In the case of hip and half-hip roofs, diagonal rafter legs are installed at the junction of the slopes. These elements bear the main load, so they require reinforcement by specialists. Such rafters can be made double, connected from two boards 150x50 mm. Rafter legs, reinforced with struts and crossbars, form trusses. To ensure the attractive appearance of a multi-gable roof and the necessary structural rigidity, all truss parts are made using templates. Beginning builders can assemble trusses not by cutting them, but by fastening them with overhead metal elements.
How can you calculate a multi-gable roof yourself?
The process of calculating a multi-gable roof is not an easy task, especially when the structure has a complex configuration, with sections of different heights and locations. But if the user has good spatial imagination and basic knowledge of geometry and trigonometry, then any system can be “decomposed” into simpler figures. Among these figures, triangles will clearly predominate, which already “submit” to strict mathematical rules.
Prices for fastenings for rafters
fastenings for rafters
General calculation procedure
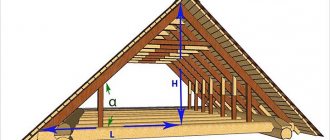
As an example of the calculation, we will take a fairly common and, perhaps, the simplest to design system of a three-gable roof, that is, with one extension to the house. In this case, the total height of the ridge (H) and the lines of the eaves overhangs of both sections of the rafter system are observed.
Diagram to demonstrate the principle of calculating a three-gable rafter system
Many of the calculations, in principle, repeat the design of a gable or hip roof. And for such calculations, our portal already has convenient calculators - the necessary links will be given to them. The calculators will open in separate browser windows, so this will not interfere with further reading of this article. All calculators are accompanied by detailed instructions for their use.
- The first step is usually to calculate the height of the ridge H , depending on the width of the building D or extension (along the gable wall) and the angle of the roof slope a . Or the inverse problem is solved - given the known planned height of the roof at the ridge, it is necessary to determine the slope angle of the slopes (this will be required for some further calculations).
Obviously, if the height of the ridge of both sections of the roof is equal, and the width of the building and the extension is different, then this will be reflected in both the angle of the slope and the length of the rafter legs.
Link to open a calculator for calculating the height of the ridge or the angle of roof steepness
- The next step is to calculate the length of the main rafter legs, separately for the main building and for the extension. At the same time, the “working” length of the rafters is being calculated, that is, from the ridge to the mauerlat.
Link to open the rafter leg length calculator
- The calculation of the length of the slanted rafter leg, which becomes the valley - the internal angle between the two sections of the roof, has some peculiarities.
A diagram showing the principle of calculating the length of a rafter leg.
The rafter leg, as shown in the diagram above, becomes the hypotenuse of a right triangle (highlighted in red), the legs of which are:
— previously calculated length of the rafters of the main building (highlighted in blue);
- half the width D2 of the extension to the building (highlighted in green).
Based on this, using the Pythagorean Theorem, it is easy to make a calculation.
Calculator for calculating the length of the sloped valley rafter leg of a multi-gable roof
Go to calculations
- Between the ridge and the slanted rafter legs, shortened rafters are installed - rafters. You can immediately determine their length - there is a separate calculator for this. It is true that it was created for calculating the extensions of a hip roof, but the principle remains the same, only the extensions are installed in a “mirror image”, not between the mauerlat and the ridge rafter, but between this rafter and the ridge.
Link to open the calculator for calculating the length of the spigots
- So, the lengths of the rafter legs have been calculated, but if it is also planned to create a cornice overhang using the rafters, then it is necessary to provide for a certain extension for this. Even if you plan to install special extension fillies, knowing their “working” length will also not be superfluous.
Link to go to the calculator for calculating the elongation of rafters to form an eaves overhang
- Now it is necessary to determine the loads falling on such a roof in order to select the correct cross-section of the rafters and provide for the placement of additional reinforcement elements, that is, support points for the rafter legs.
There is a special calculation algorithm for this, which is outlined in the article with the corresponding calculator.
Link to go to the calculator for calculating distributed unloading on rafter legs and determining their optimal cross-section
- And finally, an important calculation parameter is always the total area of the roof covering - this needs to be known, at least for reasons of purchasing the materials necessary for the work: roofing, membranes, insulation, and in the case of continuous sheathing - sheet covering (plywood or OSB).
In this case, the total area will be the sum of:
- two rectangular roof slopes of the main building, minus the triangle limited by layered rafters along the valley line.
- two trapezoidal roof slopes of the extension.
In order not to bore the reader with geometric calculations, we will immediately suggest using a calculator, in which all the main dependencies of the total area of a three-gable roof on the linear dimensions of this rafter system have already been entered.
Calculator for calculating the roof area of a three-gable roof
Go to calculations
So, the main parameters of the roof have been determined. In accordance with them, you can calculate the required amount of materials and proceed to installation.
Installation of the valley
After installing the rafters, the sheathing is placed on them; at the joints of the slopes, where the valleys are located, it is continuous. The waterproofing scheme for the internal corner provides for laying an additional layer to ensure the reliability of the structure. Waterproofing is laid on the boards and the bottom strip is mounted. If the valley consists of several parts, they are attached from below, with the upper part covering the edge of the lower element. The junction of the bottom strip and the roofing is insulated. To give the structure a finished look, a top valley strip is installed.
Video description
Installing the Mauerlat is a responsible procedure, since it serves as a support for the rest of the structure. For a better understanding of the Mauerlat installation method, it is recommended to watch the video:
- Laying the bed. One or two beams are placed on the central axis (or on the sides of it at a calculated distance).
- The outer stands are installed at the ends of the bed. Intermediate elements are installed between them in increments of 3-6 m, if the length of the roof allows this.
- A ridge girder is strengthened on the top of the row of posts. It is fixed with metal brackets or special corners.
- The rafters are being installed. The lower part is attached to the Mauerlat, the upper part rests on the ridge with fastening to it, or is connected to the opposite rafter leg with support on the ridge girder. The installation pitch of the rafters ranges from 0.6 -1.2 m. They are evenly distributed along the entire length of the roof.
- The rafters are strengthened with struts and crossbars according to the design diagram. If the width of the slope is large enough, the number of elements can be increased.
- Laying a vapor barrier membrane. It is placed in overlapping stripes, starting from the bottom.
Laying vapor barrierSource stroytvoydom.ru
- Installation of fillies, design of eaves overhang. Lining the bottom with boards or siding.
- On top of the rafters, a continuous plank flooring or a thinner sheathing is installed. Typically, a 40 mm thick edged board is used for it.
- Roof installation. The work is carried out in accordance with the installation technology of this coating.
The assembly procedure given is valid for any type of roof. Minor adjustments are made to it to give the desired shape or configuration.
Lathing, insulation and roof installation
Installation of a roofing pie
The last element of the rafter system is the sheathing. It is pressed onto the rafters in increments depending on the choice of roofing covering. For a soft roof it is made continuous, for metal tiles - in increments of 25–30 cm. A sheet for waterproofing is laid horizontally on the sheathing, the overlap of the strips is 10 cm. If insulation is provided, the material is laid under the waterproofing. When insulating a structure, we must not forget about the ventilation holes. For a multi-gable roof, a lightweight covering is recommended so as not to create additional load on the rafters, for example, when laying metal tiles.
Installation of the roof of a multi-gable roof is completed.
There are many options for how to make a multi-gable roof, they differ in the complexity of the design and appearance. This type of roofing looks best on square and rectangular houses.
Stages of the construction process
Let's move on to the section: stages of the construction process
.
For multi-tongue
Roofing on your own requires a work plan, from which it is absolutely not recommended to deviate from it. Now let's move on to the construction stages:
- Now you can proceed to laying the Mauerlat, which is fixed on the reinforced belt, and installing the rafter legs. If you plan to install a half-hip or hip roof, you need to install diagonal rafters reinforced with spigots.
- Metal brackets, plates or corners are used as fasteners for installing rafter legs on the mauerlat. It is also possible to fix these elements using technological cuts.
To install rafters, metal brackets, plates, and corners are used
- If the house has a large area, most likely it will require the installation of ceiling beams (longitudinal or transverse) that serve as tie-downs.
- First you need to take the dimensions of the house.
- After this, a vapor barrier material, sheathing and counter-lattice (ventilation system) are placed, the upper part of the rafters is attached to the ridge.
Before installing the roof, a ventilation system is installed
- Next, the cross-section of the rafters is determined and a scheme (project) for installing all roofing elements is developed.
Rafter drawing
multi-gable
roof systems - The final stage of work is the installation of roofing material (metal, bitumen, ceramic tiles, etc.).
_
Construction
– type of production activity, the result of which is construction products or construction materials and products. (SNiP 12-03-2001)
Device
– a set of elements representing a single structure (multi-contact relay, set of transistors, board, block, cabinet, mechanism, dividing panel, etc.). The device may not have a specific functional purpose in the product. (GOST 2.701-84)
Roof
– the top element of the covering that protects the building from the penetration of atmospheric precipitation. (SNiP II-26-76); – the top element of the covering that protects the building from precipitation. (VSN 35-77)
Project
– design and estimate documentation developed for a specific facility in accordance with the requirements of the Building Code for the time being. development, coordination and approval of design and estimate documentation. (SNiP 3.01.01-85)
Section
- an image of a figure obtained by mentally dissecting an object with one or more planes. The section shows only what is obtained directly in the cutting plane. (GOST 2.305-68)
Installation
– energy the conventional name of an object in power structures for which a diagram is issued, for example, main circuits. (GOST 2.701-84)
Material
– any ingredients, raw materials, components, parts, etc. used to manufacture the product.
Materials
- a collective term denoting a variety of material elements of production, used mainly as objects of labor - raw materials,
basic
and auxiliary materials, fuel, energy, purchased products and semi-finished products, work clothes, spare parts for repairs, tools and low-value and wearable items.
Photo
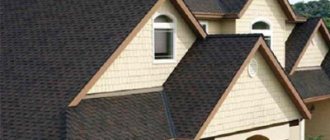
Multi-gable roof
Beautiful multi-gable roof
Multi-gable roof made of flexible tiles
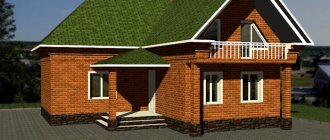
From metal tiles
Multi-gable roof on a wooden house For a country house Multi-gable roof with an attic
Simple design Complex design
Protection from moisture and heat loss
Waterproofing materials in rolls are very easily rolled out into strips and attached with an overlap (overlap - 100-150 mm), perpendicular to the slope. The joints of the rolls are sealed with special adhesive tape or construction tape. Joints and seams on valleys must be sealed especially carefully - with two or three layers of tape or tape.
If the installation of waterproofing layers was carried out with violations of the technological process, using low-quality materials, then you should expect corresponding consequences - moisture will collect under the roof, the thermal insulation layer of the roof will get wet, wooden beams and rafters will rot and mold.
A couple of decades ago, the most popular materials for roof waterproofing were glassine and roofing felt, but time and technology do not stand still. Innovative waterproofing membrane coatings (films) are capable of not only maintaining their performance characteristics much longer, but also meeting the requirements for environmental friendliness and safety of people living in the house.
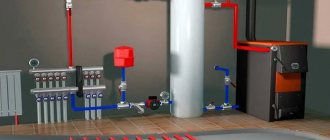
Protection of multi-gable roofs from condensation and heat loss
When assembling a multi-gable roof, additional unoccupied space appears in the attic, and it is possible to arrange residential or technical utility rooms in it. In view of this additional opportunity to expand the space, the roof must be well insulated and protected from atmospheric moisture. Mineral wool and other similar insulation materials are an ideal solution for complex roofing, as they can take any shape. A layer of soft thermal insulation prevents the formation of “cold bridges” - this is where moisture first appears. Basalt or glass are best suited for the manufacture of mineral-based thermal insulation. The advantages of these materials for surface insulation are obvious:
- Low weight of insulation;
- High fire safety and fire resistance (NG group);
- Environmentally friendly operation.
Mineral wool also absorbs noise, which is important for all residents of the house.
Scheme
Multi-gable roof drawing
Creating a wireframe
Window frame on multi-gable roof
Roof structure
Multi-gable roof rafter system
Main structural components
Did the article help you?
Briefly about the main thing
Installation of the rafter system is the main stage of roof construction. This is a supporting structure that receives and distributes snow and wind loads, holds the roofing in a given position, and protects the walls and foundation of the house from moisture.
The rafters include many elements, each of which performs its own task. Some serve as a frame for the perimeter of the walls, others support the rafter legs, and others connect them and keep them motionless. The result is a strong, balanced structure that is light in weight. And the load-bearing capacity is very significant.
The elements of the system can be connected in several ways, which allows you to obtain different roof designs. The choice of one form or another is made at the design stage, but, if necessary, you can change the shape and configuration of individual sections or the entire roof.
It is recommended to entrust installation to experienced specialists who can perform the assembly correctly and avoid mistakes.
Brief step-by-step instructions for construction
Installation of a multi-gable structure must be carried out in strict accordance with the design documentation.
All work is carried out in stages.
- Climatic data that is typical for the region of the facility under construction is collected. This information is taken into account when carrying out technical calculations and developing the project.
- Object design and calculations. It is better to entrust a thorough preliminary calculation of all components of the roof to experienced specialists. In addition, it is necessary to determine in advance the types and volumes of materials that will be used in construction.
- A Mauerlat is laid around the perimeter of the building.
- Vertical support posts are installed and horizontal beams are mounted - purlins that form the ridge.
- Installation of main and additional supports forming the transitions of the planes.
- The posts and rafters are reinforced with rafter legs or struts. They help distribute the load evenly and also prevent structures from sagging.
- The elements are connected using metal fasteners - plates, brackets, threaded rods or anchors. To strengthen the connection of the boards, wooden bosses are used.
- On top (along the rafters) lathing in the form of horizontal strips is laid.
Waterproofing and protecting attics from heat loss
Roll waterproofing is laid in overlapping strips and perpendicular to the direction of the roof slope. An overlap of at least 15 cm in width must be made. The joints of the strips are glued together using a special adhesive tape or construction tape
Particular attention is paid to valleys, as they receive the largest amount of rain or melt water, and therefore are the most vulnerable place
It should be noted that traditional waterproofing products in the form of roofing felt or glassine can no longer provide long service life and strength. They do not fully comply with modern standards of environmental cleanliness and safety. Therefore, membrane materials are becoming increasingly widespread. In addition to their main function, they are able to significantly reduce heat loss by increasing the thickness of the insulation to the full height of the rafters.
The construction of a multi-gable roof involves the formation of an attic space spacious enough to accommodate residential or utility rooms. Therefore, the roof must be well insulated and insulated from excess moisture entering it. Insulation based on mineral wool is ideal for this. They prevent the appearance of “cold zones” where condensation can form. Among the features, it is worth noting the particularly soft structure, which allows the use of this material in hard-to-reach areas.
For the production of mineral insulation, glass or basalt is used. Their undoubted advantage is the simultaneous combination of the following properties:
- ease;
- fire resistance;
- environmental friendliness.
In addition to all of the above, this type of building material is distinguished by a high degree of sound absorption and sound insulation, which is especially important during heavy rain or hail.