- attached;
- retractable;
- folding;
- telescopic.
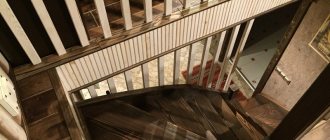
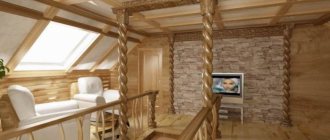
The attic in a private house is as necessary as air. This is an excellent utility room where you can store old or seasonal items, empty containers, and canning jars. There is no better place to dry herbs, mushrooms, and berries. A room in the attic is an excellent option for summer relaxation, deep sleep to the accompaniment of rain, if the attic is equipped with convenient functional access.
The hatch that provides access to the top must be voluminous and comfortable, but not only that. The staircase used to climb to the attic should decorate the room in the ceiling of which there is a hatch. Obviously, a banal stepladder cannot be considered such a decoration.
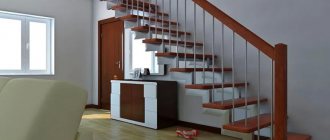
Sometimes the staircase to the attic space is made permanently, in which case you need to make sure that it does not create inconvenience , but more often a manhole with an extension or retractable ladder is used. Folding staircase constructors, which unfold only when the entrance is opened, have gained particular popularity.
Choosing a location for the attic entrance
Sometimes the staircase to the attic space is made permanently, in which case you need to make sure that it does not create inconvenience , but more often a manhole with an extension or retractable ladder is used. Folding staircase constructors, which unfold only when the entrance is opened, have gained particular popularity.
Before making a manhole, you need to decide on the design ; it must match the design of the room where it will be located. The lid should open well and freely. Please note that the entrance may require insulation.
When installing a manhole, it is unacceptable to remove part of the supporting structure; this leads to a decrease in the strength of the entire ceiling.
When choosing a material, they are usually based on design and financial capabilities.
Useful tips
Before installing the structure, consider these simple tips for better results:
- Choose your material carefully. If it is wood, then it must be completely dry, free of knots and of the highest quality.
- It is necessary to carefully calculate the sizes of all elements. You cannot put an increased load on the hinges, so the ladder should be made so long that when unfolded it rests on the floor.
- To prevent accidental operation of the mechanism, install additional brackets at the bottom of the ladder. Otherwise, when opening the hatch, the structure may spontaneously unfold, injuring the user.
- Fasteners and fittings are one of the main elements of the entire product. The safety and durability of attic ladders depends on their quality, so select these items very carefully.
- For convenience, it is advisable to install one or more handrails so that a person of any age can easily climb up. This point must be considered at the design stage of the structure.
Handrails for attic stairs Source krovelnyj-mir.ru
Two options for arranging an attic hatch
I would like to note right away that both options are guaranteed to work and have been tested in practice. If you are interested in quick installation, then it is better to choose 1 method of arrangement, and for creative individuals who have the time and desire, option 2 is suitable.
Option 1: fast, simple, reliable
We are talking about a plastic construction . First, you need to take accurate measurements of the ceiling opening; it is not necessary to make a drawing here; a simple diagram will do.
- In addition to the length and width, it is necessary to measure the diagonals; if they are not the same, it means that the opening is skewed and requires alignment.
- The thickness of the overlap is considered an indirect parameter, but this characteristic is also indicated. You can order a window block with this scheme.
Advice! To ensure that the edges of the opening in the ceiling are in harmony with the hatch, it is better to line them with the same plastic; you can buy these panels when ordering; they are intended for arranging slopes.
When ordering a plastic hatch, it is advisable to immediately buy lining for the slopes
- Now you need to temporarily fix the structure in the opening. To do this, insert the hatch into the opening and wedge it around the perimeter, after which you remove the door and check the diagonals of the frame, there should be no distortions.
- The frame has drippers (holes for condensation), they should look down.
- Next, take a drill or hammer drill and drill 2-3 holes on each side through the frame. The structure is fixed through these holes, anchors are used on concrete, and self-tapping screws are used on wooden floors.
When drilling and fixing, the main thing is that the frame does not warp
- At the next stage, the cover is put in place, after which the gap between the frame and the ceiling is filled with polyurethane foam, and when it dries, the excess is cut off and the slopes are glued.
Any home craftsman can install the plastic structure
Option 2: assembling a wooden structure
a wooden structure is not much more difficult than installing a plastic one, plus this option is cheaper.
4. Hinges are attached to the finished hatch and to the ceiling base with self-tapping screws.
How to insulate a sunroof: three main methods
In a house with wooden floors, it is very simple to make an uninsulated hatch in the ceiling into a cold attic: you need to cut an opening and close it with a door. This option is suitable, for example, for country houses with seasonal accommodation. In dachas, the attic floor is rarely insulated, so there will be no problems with a “cold” hatch.
But making an insulated attic hatch with your own hands is much more difficult.
Firstly, a warm floor is a thick floor. Even when insulated with extruded polystyrene foam, the thickness of the thermal insulation is usually 10 cm or more, and mineral wool is generally laid in a layer of 30-40 cm. It turns out to be a kind of well in which you need to somehow organize the opening of the door. At the same time, the hatch to the cold attic should not crush the insulation when opened.
Secondly, the insulated hatch is also thick. And quite heavy due to the massive frame box. And this is an additional load on the hinges, and it is inconvenient to use such a hatch. Therefore, an insulated attic hatch is often equipped with special lifting mechanisms that make it easier to open and, at the same time, fixed in the desired position.
Thirdly, there are gaps between the hatch and the opening - potential cold bridges. To reduce heat loss, they also need to be closed.
The range of problems has been outlined, and now let’s talk about how to insulate the hatch to the second floor in order to solve them. There are three main ways.
Option one: hatch cover
A simple and cheap design, which is suitable if you need to go into the attic 1-2 times a year or less. In this case, the door, made exactly to the size of the opening, is painted on one side so that it does not stand out too much against the background of the ceiling, and on the other side it is insulated. Moreover, it is desirable that both the thickness of the layer and the insulation are the same as on the attic floor.
To insulate the hatch with mineral wool, you must first make a small frame along the edges of the cover. Then the bottom of the lid of the warm hatch to the attic and its ends are lined with a vapor barrier film, gluing it with double-sided tape or special tapes. Then mineral wool is placed inside the resulting structure.
If the ceiling itself is insulated using the open method, then that’s all - the warm hatch to the attic is ready. If it is covered with waterproofing, then it must be secured to the hatch. To do this, the waterproofing membrane is simply glued along the contour.
It is much easier to make an insulated attic hatch if extruded polystyrene foam or polyurethane boards are chosen as insulation. Plates of such insulation are simply glued with the same tape or glue, first to the lid, and then to each other. And that’s all: no vapor barrier or waterproofing is needed.
The hatch cover is simply inserted into the opening. It should fit very tightly into it and stay in the ceiling without additional fasteners. This is the main difficulty of this design - the gaps must be minimal, since they are usually not sealed.
For convenience, one or two handles are made on the hatch-cover, since without them it is difficult to remove it and, moreover, to install it in place. And for reliability, small valves are placed on the ceiling on two opposite sides, which, when turned, additionally fix the hatch in place.
Option two: tilting insulated hatch
The most common type of insulated attic hatch, which is a thick slab on hinges. Typically, such a hatch opens outward. In this case, from the side of the room, the opening to the attic is often closed with another hatch-door, which usually serves a decorative function. An insulated hatch to the attic can also be hinged indoors, but this design is a bad choice: when opened inward, a heavy slab will hang on hinges that, with rare exceptions, are not designed for such a load.
The tilting attic hatch is convenient to use, and if the ceiling is thick enough, you can fit a compact folding ladder between it and the decorative door. At the same time, you can make such an insulated attic hatch with your own hands without much difficulty, working for several hours over two days.
Tools and materials
The attic hatch is usually made of wooden boards 25-30 mm thick or OSB boards. It is advisable to take boards from durable and dense wood, such as oak, birch or larch. Pine wood is soft and resinous, so it is not very suitable for interior elements.
You can also use steel sheets, but this solution has no particular advantages, and making a metal hatch for the attic, insulated with your own hands, is much more difficult than a wooden one.
In addition to wood, the following materials will be needed for the box:
For a box made of wooden boards, you will also need antibacterial and fire-retardant impregnation. For greater aesthetics, it can be painted and coated with wood varnish, but this is not necessary if the hatch is closed from the side of the room with a decorative door.
Tools needed:
Instead of power tools, you can take a hand tool - a saw and a screwdriver - but then it will take much more time and effort to install an insulated hatch into the attic.
We make the box and frame of the insulated hatch
The hinged hatch consists of two parts: a box and a cover.
Like doors, the frame is installed in the opening and holds the door leaf - the lid. Since it is very difficult to cut a perfectly even opening in the ceiling, there should be 20-25 mm between its walls and the frame. This will allow the box to be positioned correctly during installation.
The assembly of the box begins with measurements. First, measure the opening, then mark the boards and cut them into pieces of the required length. The standard box size is 60x120 mm, but larger or smaller can be made if necessary. The main criterion is convenience. Through the hatch you should be able to easily get into the attic and carry all the necessary things. When marking boards, be sure to take into account the connection method - the length of the boards should be enough to make grooves and tenons on them.
Then the boards are placed on the edge and joined to each other with a quarter or half notch. The box should be strictly rectangular - you can check this using a carpenter's square. Ideally, when assembling, use a tenon connection for greater strength. In this case, each board should have a tenon on one side and a groove on the other.
The boards are fastened using long self-tapping screws screwed into the ends of the boards or metal corners. The second method is simpler and therefore preferable. In addition, a self-tapping screw can damage the board if it is screwed in incorrectly: too close to the edge or shifted to one side. It is not recommended to glue boards - this method of fastening is too unreliable for the supporting structure.
After the box, they begin assembling the insulated hatch cover. It consists of three parts:
Before insulating the hatch into the attic, the wooden frame and frame are treated with an antiseptic and fire retardant. Further work can be started no earlier than one day after treatment.
We insulate the hatch to the attic
Before laying the insulation, the hatch frame is lined with a vapor barrier, securing it with a construction stapler. Primary polyethylene is best suited for this, since among household materials it has the lowest vapor permeability after foil. The vapor barrier film must be laid with the expectation that it should completely cover the insulation both on the sides and on the inside of the insulated hatch.
Then the selected type of insulation is placed inside the frame. Since the height of the frame is approximately equal to the required thickness of the thermal insulation layer, the insulation does not even need to be attached additionally - it will be pressed down by the sheathing. In any case, mineral wool. It is still better to fasten rigid insulation boards to each other using double-sided tape or special glue.
Mineral wool is placed in the lid by surprise. Extruded polystyrene foam or polyurethane foam boards are cut with a construction knife exactly to the dimensions of the frame so that the material fits tightly into it without gaps.
When all the insulation is placed inside the hatch, it is completely covered with a vapor barrier. In this case, the joints of the film are glued with reinforced tape or sealing tape, otherwise steam will easily penetrate through them into the thermal insulation layer. After this, the frame is sewn up on the second side. Thin boards can be used for this, since their only job is to hold the insulation.
Installation of an insulated hatch
First, the insulated attic hatch is assembled on the floor: hinges are attached to the lid, a seal is glued along its contour, then its position is adjusted relative to the box and the mating parts of the hinges are secured to it. It is desirable that the lid goes completely inside the box - this way the insulation efficiency will be maximum. If the lid will only partially fit into the box, then you need to select boards or bars in advance so that after installing the hatch, they can be used to make a support frame for the canvas.
Then the hatch cover is removed from its hinges, and the box is secured in the opening. Depending on the floor material, anchors, dowels or corners are used for this. The box is installed strictly horizontally, checking the correct installation using a building level.
The lid is placed on the installed box again. If necessary, support bars for the hatch are placed around the perimeter of the box from the attic side. After this, check how the hatch opens and closes: it should fit into the box without clinging to its walls, the hinges should not dangle or jam.
If everything works correctly, the gap between the ceiling and the frame is foamed and left like that for several days. The completely dried foam is cut with a construction knife to the level of the opening. A vapor barrier is attached over the gap and covered with boards.
A handle and a hook are placed on the insulated hatch from the attic side - it is needed so that you can fix the lid in the open position using, for example, a rope stretched from the nearest rafter leg. From the side of the room, the opening is closed with a decorative door if necessary.
Option three: insulated hatch in the outer box
This type of insulated attic hatch is very similar to the previous one. Only the box for it is not placed flush with the ceiling in the opening, but is partially taken inside the room. This design is needed if the ceiling height will decrease during finishing. For example, when using suspended or suspended ceilings.
The process of manufacturing a warm attic hatch in this case is not much different from the standard hinged design. Except that the box often has to be made from OSB board or thick plywood, so as not to complicate the work by attaching two boards along the edge.
In addition, there are several subtleties associated with the location of the hatch.
For example, if you need a hatch in a suspended ceiling in a cold attic, the remote box is made away from the walls so that installers have good access to it from all sides. How far you need to move the box depends on the installation technology, the type of stretch ceiling and the qualifications of the craftsmen. The minimum permissible distance from walls to obstacles can be obtained from the company you are going to work with.
In a suspended ceiling, on the contrary, the hatch is made close to the walls, preferably in the corner of the room. This way it will not interfere with the laying or maintenance of communications.
Dimensions
You can make an insulated attic hatch with your own hands, based on the existing opening, which in the standard version is 120 cm long and 60 cm wide. There are cases when the opening has the shape of a square with dimensions of 100x100, 80x80, 70x70, etc. This plays a significant role only in the case when bulky indivisible objects have to be dragged into the attic.
secret (Fig. 5)
with folding ladder (Fig. 6)
with wooden stairs (Fig. 7)
hatch with folding ladder (Fig. 8)
The attic hatch should:
Types of products and their designs
Structurally, hatches can be of several types. This is due to the location and design features.
Types of attic hatches:
- Horizontal.
- Vertical.
- Angular type.
In addition, hatches are also distinguished according to other parameters:
- Hidden structures;
- Designs with folding stairs.
Such structures are also distinguished by their diameter. He considers the standard size to be 120 by 60 cm. However, the sizes are completely different, it all depends on the specific conditions and capabilities of the owners. The design of the room itself also plays an important role. For example, many people make the entrance to the attic a real highlight of the house. In this case, the entrance to the top is designed as creatively as possible, and the size of the passage can vary depending on the wishes of the residents.
Today, factory-made hatches have become widespread. There are a great variety of their designs. Just go to any construction hypermarket and you can find dozens of options there. The most popular designs are those with retractable stairs. There are variations here for every taste - metal, wood, plastic, combined. The length of these ladders is usually adjustable, however, most often varies from two meters to two and a half. The staircase design can be chosen from ready-made options , and it is also possible to make it to order.
What should an attic hatch look like?
The attic hatch should:
- fit into the overall interior of the room
- open and close freely
- do not interfere with movement around the room
- do not fall under the floor beams to maintain the integrity of the ceiling frame
- be easy to install for do-it-yourself installation
- have a modern design
- be reliable, durable, functional
- have insulation on the lid
- be equipped with a comfortable handle, arguments, and beautiful fittings.
Installation of stairs for the attic
Additional insulation
Absolutely all modern lyadas can be divided into two categories: with an attached ladder and without it. Each case has its own nuances. If the owner of a private house has purchased a ready-made structure with a folding staircase, then additional compaction is not necessary. If the master does everything with his own hands, then all subsequent actions must be carefully considered.
Experts note that many manufacturers equip lids with special heat-saving plates located on the front surface of the lid. This creates the desired effect and also prevents the loss of valuable heat. To insulate the hatch yourself, you need to prepare a high-quality plywood sheet, as well as the seal itself. You can use the scraps that remain after cladding the attic. After this, you need to perform the following manipulations:
- At the initial stage, you need to take measurements of the attic hatch opening.
- Based on the data obtained, you can assemble a frame from boards (2 to 3 cm thick).
- Now the master can assemble the hatch cover, which should be 50 centimeters smaller than the frame itself. Thanks to this, the sealing material can be fixed as firmly as possible.
- A vapor barrier film must be placed on top of the lid.
- To fix all the parts, you can use ordinary wooden planks and glue.
- The hatch needs to be covered with a prepared sheet of plywood and decorated. In this case, you can show all your imagination, but the finished product must fit harmoniously into the existing interior.
- All wooden parts must be treated with a high-quality antiseptic.
- At the final stage, all that remains is to secure the do-it-yourself hatch to the second floor. In this case, the master will need hinges and screws.
A structure insulated with foam plastic will look no less original.
Manufacturing stages
Cutting the opening
Cutting an opening for the attic
If a roof access hole was not provided during the construction of the house, you will have to cut it out yourself. Of course, if such a hole for installing the door already exists, this stage of work is skipped.
To begin with, markings are carried out with the expectation that the hole should be 5–6 cm larger than the dimensions of the hatch frame. In the future, the gap will help compensate for the thickness of the boards from which the frame will be made. The material from the sawn piece of the ceiling can be used for cladding the lid, of course, if it has a normal aesthetic appearance.
Assembling the opening frame
Assembling the opening frame for the attic
Making a lid
Hatch with lid to the attic
We do insulation and finishing
Attic insulation scheme
As you already understand, this is how the simplest hatch leading to the roof of the house is installed. More complex solutions include a design with a retractable staircase. The installation process here is carried out according to a similar scheme with only some differences.
The presence of a manhole in the attic allows the owner of the house/cottage to acquire additional usable space, which can subsequently be used in various ways: for example, if there is a manhole, it is much more convenient to install heating or ventilation equipment in the attic, to arrange an attic floor there for summer recreation, etc.
Buy or make?
Extending the stairs
Those who plan to buy a finished product can use the instructions for installing it, which will also be given in this article, and those who want to make a convenient hatch to the attic with their own hands will be interested in the full information about the process, which we offer for reading. So, here are a few important nuances that will be useful in your work:
- choose a location for the opening so as not to hit your head on the rafters or roof when climbing up;
- an entrance to the roof of the house is not built under the floor beams;
- if the top floor is still not insulated, you will have to make thermal insulation;
- the opening definitely needs to be strengthened. For wooden structures, wooden beams are suitable, and in concrete houses, reinforcement is carried out with metal corners;
- It is necessary to provide free space under the hatch for the retractable ladder.
If you make the hatch along with the ladder yourself, do not be lazy to carefully study all the stages of the process, then you will not encounter difficulties in the work, and it will not seem complicated to you.
Let's look at the components of the manhole manufacturing process
Door
First, we decide on the location of the future opening. It is advisable to cut it closer to the landing, but at the same time not next to it, otherwise inconvenience may occur during the subsequent manufacture or installation of the staircase. Of course, it is unacceptable to plan to make a manhole in the bedroom. An important point that should be taken into account is the slope of the roof of your roof in the place of the future hole, because for the convenience of subsequent use of it, the space above the opening must be large enough.
Next, we proceed to the manufacture and subsequent assembly of the frame. It is best to use boards with a thickness of at least 30 mm. It is clear that your hole should be quite compact, so it is better to make it rectangular rather than square. The frame must have equal corners.
Door for hatch to attic
In order to insulate the manhole, a sheet of fiberboard should be cut to fit the internal size of the frame, to which you can additionally attach a sheet of polystyrene foam. glue another sheet of fiberboard to it , the resulting “sandwich” will provide the necessary temperature conditions in the interior of the house. A sealing rubber band is glued along the inner perimeter of the attic hatch.
Insulation of the attic hatch can be done using another option. For this purpose, a vapor barrier film is fixed inside the finished lid, on top of which insulation is installed, which is usually used for interfloor ceilings (foam plastic or mineral wool will do). Fastening is done with glue or wooden planks.
The manhole door is ready, now it needs to be attached to the frame using hinges. The hatch will be much more convenient to open if its door is equipped with a handle and a latch.
Cutting an opening
Attic hatch with ladder looks simple and stylish
It remains to think about the issue of getting into the attic through the hole. You can purchase an aluminum ladder, or you can make it yourself.
Despite the fact that the main goal of decorating a crawlspace in the attic will be to give this structure a more aesthetic appearance, there are a number of requirements that will need to be taken into account when choosing a design option. There are not too many of them and following these recommendations will not be difficult:
Complex designs
Installing an attic ladder
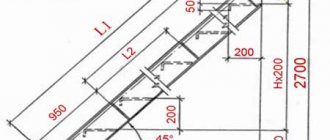
The attic hatch can be equipped with a stationary ladder. Here, too, work begins with cutting the opening. The further course of the process depends on which design you have chosen and in what order you will make it. Let us immediately make a reservation that the work of assembling and installing the hatch with the ladder in this case will be somewhat more complicated than in the option discussed above. Be sure to ensure that all sizes of interacting elements match:
- retractable ladder;
- doors;
- opening;
- thickness of the ceiling.
You can measure all these parameters yourself or remove them from a purchased product if you do not make it yourself. In this case, the cover must have a space that will accommodate the longest part of the retractable ladder in the assembled position.
Also remember that the weight of the ladder must be adequately supported by the lid, otherwise breakage and, in the worst case, injury cannot be avoided. We must not forget about the reliable latch, which will firmly hold the structure in the frame of the ceiling opening.
All the processes that we have mentioned are presented schematically, but if you decide to build an attic hatch yourself, you do not need more detailed information, because you most likely have certain skills, but general recommendations with illustrations will not hurt anyone. Anyone who buys a ready-made hatch for access to the roof of a house can use the installation instructions, which are necessarily included with the product.
General design requirements
Despite the fact that the main goal of decorating a crawlspace in the attic will be to give this structure a more aesthetic appearance, there are a number of requirements that will need to be taken into account when choosing a design option. There are not too many of them and following these recommendations will not be difficult:
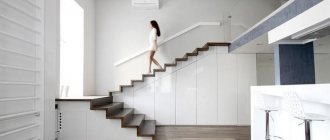
Where the hatch is installed is of great importance. If this is a technical room, then no special decorations will be needed, but if the passage to the attic space is organized from the kitchen or other living part of the house, you will have to create a beautiful design. In addition, this design often includes a retractable ladder and should also be easily accessible when the door is opened.
Before starting work you must purchase:
Features of the construction of a manhole in the cellar
Tip: Installation of the hatch cover is carried out after it is completely manufactured.
In this case, it is necessary to take into account:
What material is better to use
To make a manhole cover you can take:
- Glued plywood, at least 10 millimeters thick. This is a lightweight material that has sufficient strength, which is provided by glued veneer sheets, where the layers are placed alternately across and along the wood fibers.
Tip: After making the workpiece, it must be soaked in drying oil and coated with varnish or paint.
- A good option is a frame made of timber and covered with plywood on both sides. The cellar lid, if desired, can be insulated. To do this, the space between the lower and upper coatings is filled with a gasket. The following are used:
- residues from mineral wool mats;
- Styrofoam;
- foam;
- old blankets;
- carpet that has served its purpose;
- old coats. (read Basement insulation with polystyrene foam: features and nuances of the work)
- Galvanized iron will last long enough. The wooden frame is covered with it on both sides or on one, with or without insulation.
Tip: Unless absolutely necessary, the frame is sheathed only on one side, the top side. But this can only be done if major protection against cold or break-ins is not needed.
Experts advise making and installing insulated hatches to prevent cold air currents from entering the home.
How to make a wooden staircase yourself
Both a beginner and an experienced specialist can make a ladder with their own hands. The difference lies in the complexity of its design, the number of additional elements and materials, as well as the manufacturing method. The most popular options include a simple two-section model, as well as a product with hinges. Choose a device according to your strengths and skills.
Two-section design
Such a ladder includes two parts, the upper one will be fixed to the hatch itself, and the lower one will be folding. The peculiarity of such a product is that it is always located within the premises, since all elements are attached to the visible area of the lid. If the room is non-residential, then this type will look appropriate and will not spoil the interior. You can safely use this solution in garages, workshops, outbuildings, as well as utility rooms at home.
Staircase of two sections Source prolestnici.com
The staircase is completed very quickly, it will only take a few hours of your time. It is enough to prepare the materials for work:
- Wood hacksaw;
- Measuring devices, such as tape measures;
- Standard wooden ladder;
- 4 card loops for folding ladder;
- Two bars, the length of which is equal to the manhole cover, and also two bars slightly longer than this value;
- Self-tapping screws, anchors, loop and hook.
When building a structure, the first step is to make an ordinary staircase from straight wooden beams. This stage is quite easy and anyone can quickly cope with it even without special preparation. The length of the product should exceed the distance from floor to ceiling by approximately 30 cm.
The sequence of further work is as follows:
- A short block is attached to the upper edge of the ladder with loops;
- A second block of the same size is fixed at the bottom of the product in a rigid manner;
- To strengthen the structure, two slats are placed diagonally behind the steps. This action must be performed carefully so as not to make it difficult to move up the stairs.
- Take a pre-fabricated ladder, measure it, and then saw off the top. About 60% of the product should remain.
- Using card loops for the attic hatch, the resulting fragments are connected. It is important to place the fasteners behind the product so that it can unfold freely.
- The top block is attached directly to the lid.
- To prevent accidental opening of the ladder, a hook and eyelet are provided. In this case, the hook is placed on the wall, and the loop should be on the bottom block.