The technology and process of arranging floors in a steam bath and washing department differ significantly from the principles of constructing floors in residential and commercial buildings.
To ensure an effective system of drainage, ventilation, water and thermal insulation, it is necessary to adhere to the basic rules of installation. A properly equipped bathhouse floor ensures rapid removal of wastewater and maintains the microclimate in the room.
Often the floor for a bathhouse is made of wood or concrete. It is difficult to determine which floor is better, since each type of base has its own operational features and characteristics that should be taken into account when arranging a private bathhouse.
Concrete floor
Many experts recommend installing a concrete floor in bath rooms, which is the most durable and practical option.
Concrete screed has the following characteristics:
- Long service life - from 30 to 50 years.
- Resistant to the negative effects of high temperatures and humidity.
- Resistant to rotting, deformation, destruction, development of pathogenic organisms and mold.
- Affordable cost of consumables for manufacturing.
- Possibility of decorative cladding.
- Simple and affordable care without the use of expensive chemicals.
Wooden floor
A wooden floor is simpler and more accessible to install, but less durable than its concrete counterpart. After only 10 years of active operation, individual elements of such a structure are subject to reconstruction or replacement.
Plank floors can be made from coniferous and deciduous wood, resistant to moisture and temperature changes. The wooden base comes in two types: leaking and non-leaking.
Leaky type floor
This is a budget design option, presented in the form of a wooden lattice, the individual elements of which are installed in compliance with the gaps for the free discharge of wastewater into the ground.
A leaky floor does not require the installation of a complex drainage system and additional insulation. For this reason, it is recommended to use a bathhouse with a similar floor in the summer or in regions with a warm climate.
Such a foundation is available for self-arrangement; in addition, repair work will not cause technical difficulties. In this design, the floorboards are not attached to the joists, so if necessary, they can be dismantled for drying or replacement.
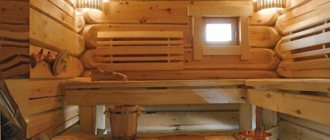
Non-leakage floor
The non-leakage floor has a continuous structure installed on wooden logs, which are built into the ground or concrete base. For efficient drainage, it is performed at a slight slope towards the drain hole.
To install a solid floor, a tongue-and-groove board made of larch or pine, installed on supports, is used. High-quality floor boards should not have deformations or defects.
The top flooring is laid on the subfloor, which is pre-insulated with moisture-resistant material.
A bathhouse with this type of floor can be used throughout the year at any temperature.
Finish coating
It is allowed to use a special stable varnish as a finishing coat. Before application, the surfaces should be sanded and the dust thoroughly vacuumed. For grinding, it is better to use an electric machine; it not only makes the work easier, but also significantly improves the quality. You can never make such a smooth surface with your hands.
Floor sanding
Alternatively, you can sand the floor by hand.
Acrylic wear-resistant varnishes have proven their good performance in practice. If the manufacturers are responsible, then the floor will be used for a long time; no periodic repair work will have to be done due to wear and tear of the finishing coating.
You can cover it with an ordinary paint brush, the number of layers is at least two. Moreover, when covering with the second layer, the brush should move in a perpendicular direction to the first. For steam rooms, it is recommended to apply three or four layers of varnish, which increases the service life. Each subsequent one is applied only after the previous one has completely dried; there is no need to try to reduce the number of layers by increasing the thickness of each. Such a gross violation of coating technology has extremely negative consequences.
The floor is covered with wear-resistant acrylic varnish
After completing the work, it is recommended to ventilate the steam room for several days, during which time unpleasant odors and harmful chemical compounds will be completely removed. After the first warm-up, ventilation also needs to be repeated, and only then is it allowed to enter the steam room.
Prices for floor boards
floor boards
Video - Solid wooden floor in the steam room
Selection of consumables and basic calculations
The construction of the floor in the bathhouse involves the use of construction and thermal insulation materials, waste pipes made of metal and plastic, and galvanized fasteners.
What is the best material to make the floor from in the steam room and sink? The quantity and type of consumables depend on the type of floor structure and how it is installed.
Calculations for a concrete floor
The following are calculations for a steam room in a sauna or bathhouse measuring 3 × 3 meters, in which the base is located at a height of 55 cm from the top soil level.
For installation work you need to prepare:
- Fine sand for filling a layer 12 cm thick. Volume of material (O) = (3 × 3) × 0.12 cm = 1.08 cubic meters. m.
- Expanded clay for backfilling before thermal insulation with a layer thickness of 30 cm. Volume of material (O) = (3 × 3) × 0.30 = 2.7 cubic meters. m.
- Expanded polystyrene sheets extruded for thermal insulation. The thickness of the insulating layer is 10 cm. The number of sheets for a room of 9 square meters. m – 2.5 packs.
- A mixture based on cement and sand (ready-made or homemade). The thickness of the screed is from 6 to 12 cm. The consumption of the dry mixture is on average 18 kg/sq.m. m. Concrete layer of 1 cm = (3 × 3) × 18 kg/sq. m = 162 kg. For a 6 cm layer: 162 × 7 = 1134 kg or 63 bags of ready-made mixture.
- Reinforcement mesh for fixing a concrete layer measuring 5 × 5 cm.
- Rolled roofing felt for waterproofing the sand cushion from the expanded clay layer.
- Metal profile for beacons under screed. For a steam room with an area of 9 sq. m. 18 meters of profile will be required.
- Plastic pipe for drainage up to 5 meters long, with a cross-section up to 3.2 cm, siphon and swivel elbow.
Calculations for wooden floors
As a working example, the calculation of materials for installing a wooden floor in a steam room with an area of 9 square meters is given. m.
To build a simple leaky floor, you will need:
- A block for the subfloor measuring 3 × 3 or 4 × 4 cm along the length of the beam. The distance between the beams is 0.5 meters, the total amount of material is 30 meters.
- Unplaned board for a base up to 25 cm wide and 2.5 cm thick. For one section you need: (300/25) × 0.5 = 6 meters. To design 5 floor sections: 5 × 6 = 30 meters.
- Guide bar for creating a drain slope with a cross-section of 2 × 3 or 3 × 3 cm.
- A block for fixing joists for a finished base with a section of 6 × 6 cm.
- Rolled or sheet roofing felt for waterproofing. For the steam room you need 16 meters of material, taking into account allowances.
- Rolled basalt wool 8 cm thick for thermal insulation.
- Galvanized steel sheets up to 0.6 mm thick – 11 sq. m. material.
- Polymer pipe, elbow and drain for installation in a drain hole. To organize proper drainage, the installation of the elbow with the connected pipe must be performed at a right angle.
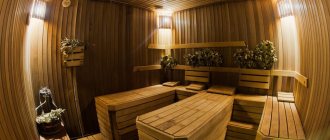
Filling the wash room
The layout of the washroom largely depends on what exactly it will be.
The minimum content of a washing room consists of a bench, a bench and access to water: hot and cold. This set allows you to significantly save space. In modern bath complexes with a small area, the standard option is replaced by a shower cabin.
Option for designing a shower stall in a washroom
However, the washing room can be more functional if its size allows:
- A little space will be taken up by placing a shower design in the sink - a bucket that allows you to cool down after visiting the steam room;
- Possible placement in a washing font;
- A larger area will require placement of spa equipment. Quite common are hammam barrels, as well as massage tables. They can be placed both in the washroom and in the relaxation room;
- New trends include salt treatments, snow and sea air generators. It is quite possible to equip a similar corner in the washing room, if space and finances allow;
- Large washing rooms can be equipped with baths with different types of massage, as well as baths with pools of various sizes.
An example of the design of a swimming pool in a washroom
The filling of the wash room depends on the size of the room, purpose and financial capabilities of the owners.
If the layout is considered according to all the rules, before construction begins, all the wishes of the owners can be taken into account in advance and correlated with the possibilities.
If the need to plan a washing room arose in an already built room, you will have to proceed from its parameters.
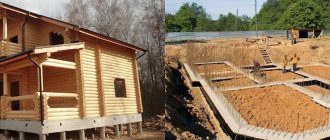
Concrete floor installation technology
The arrangement of the floor begins with preparing the soil inside the foundation - clearing it of debris and dirt.
The layout of the monolithic base is as follows:
- The soil is carefully compacted and leveled. The inner walls of the foundation are treated with bitumen in several layers.
- At the preparatory stage, the sewer pipe is laid through the foundation. To do this, it is enough to make an inlet hole in the base and install a metal adapter for supplying a plastic pipe.
- The drain pipe is brought to the place where the drain hole is provided. The end of the pipe is plugged to prevent clogging.
- A sand cushion up to 12 cm high is poured onto the ground, moistened and compacted.
- Next, you need to put roofing felt on the internal walls of the base with an overlap of 15 cm. Additionally, the joints are treated with bitumen-based mastic.
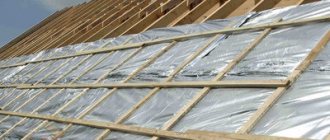
- Expanded clay up to 35 cm thick is laid, leveled and compacted. There is 8 cm left to the edge of the base.
- Expanded clay is covered with a film 200 microns thick, and the joints are taped with construction tape. Thermal insulation is installed on top of the waterproofing.
- After the foundation is insulated, guides are installed for pouring concrete in increments of 55 to 95 cm. The beacons are laid on a mixture of cement and sand.
- When installing guides, it is important to maintain the required slope for proper water drainage. In this case, the beacons are set strictly according to level.
- At the bottom of the walls along the perimeter of the room, a damper tape up to 12 cm high is fixed. After pouring and drying the concrete screed, the remaining tape can be removed.
- The concrete is poured with the prepared mixture and left until completely dry.
Important! 5 days after pouring, the beacons are dismantled, and the existing voids are filled with the mixture. For the first 10 days, the floor is thoroughly moistened with water up to 3 times a day.
Laying technology for leaking wooden floors
A step-by-step guide to installing a leaking floor provides for step-by-step work: preparing the underground, installing joists and wooden flooring.
Preparation of the underground
In order for water entering the underground to be discharged into the ground, it is necessary to properly prepare the base - for this, the top layer of soil is cut off and a waterproofing cushion made of small crushed stone up to 26 cm thick is backfilled.
For soils with a low level of moisture absorption, soil removal is carried out at a slight angle, and wastewater is discharged into a 30-centimeter pit through a drain pipe. The soil is covered with clay and leveled.
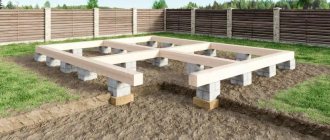
Important! Before backfilling the pillows, supports are installed under wooden logs, and a foundation is erected for heating equipment.
Installation of support beams
How to install logs correctly? They are mounted on concrete supports equipped with a brick stand. The height of the lag is determined by the height of the pillars (column foundation) or strips (strip foundation).
The installation of the logs is carried out opposite the short wall of the building. To avoid deformation of the joists or their swelling, the supports are covered with a double layer of waterproofing made of roofing felt treated with hot bitumen.
To ensure natural ventilation when laying logs to the walls, a minimum technological gap of 4 cm should be observed.
Wood flooring
To lay the floor, use boards that are fixed perpendicular to the installed joists. In this case, it is necessary to maintain 5 mm gaps between individual floor elements and 2.5 cm between boards and walls. The wooden panel is fixed to the joists using metal nails.
What to soak: varieties and their purpose
You come to the store to choose a wood impregnation, and there are so many options there that your eyes widen.
In reality, you just need to distinguish between goals. A bathhouse is most often a separate building, in which, in addition to the steam room, there are other rooms. Many baths are built of wood or have wooden lining. There is wooden furniture everywhere. All this implies different purposes and compositions for them. Manufacturers of protective impregnations distinguish them as follows:
- What does the composition protect against: from water, from infection by fungi, from insects, from rodents, from fire;
- the composition is based on oil or water;
- what exactly is intended to protect: furniture, walls, floor, ceiling;
- product release form: gel, solution, aerosol;
- The wood will retain its natural color (bleach is a separate type) or will be tinted. In the latter case, a catalog of shades is offered.
In our particular case, we are looking for something to saturate the shelves in the bathhouse with. Now let’s decide on the task: what we want to protect the shelves from. It’s tempting to protect against everything at once, but without going into details for now, let’s say that antiseptics and fire retardants do not have a beneficial effect on our health, that is, it’s not worth protecting shelves from rot and fire.
Basically, the wood of the shelves is protected from water. In addition, not only for the sake of beauty, but also as a type of antiseptic, bleaches are used, which return darkening wood to its original color.
We will now consider this limited set of what can be used to cover the shelves in a bathhouse.
Impregnations, colorless and colored
Everything here is quite simple: if you add one color or another to the impregnation, which has no or little effect on the original color of the wooden surface, then the result will be a colored impregnation. Wood painted with it will differ from wood coated with regular paint in that its texture will still be visible.
Each manufacturer of color impregnations accompanies its products with a catalog of colors, from which it is easy to choose the right one. Colors for impregnation are not sold separately.
ON A NOTE! Colored colors can be included in both water- and oil-based impregnations.
Oil
The most well-known property of oils and waxes is their hydrophobicity, that is, non-wetting by water. This is precisely what predetermined their use in the creation of water-repellent compounds for wood.
However, there is one important point: in the simplest case, a hydrophobic coating forms a film on the surface of an object, which differs in its thermal conductivity from wood. In practice, this means that the coating can burn if the air in the steam room is heated to a high temperature.
Therefore, manufacturers contrive to prepare oil for shelves in a bathhouse in such a way that the impregnation is absorbed into the wood without creating a noticeable film on the surface.
Usually bath oil has no color, but there are tinted ones too.
Bleaches
Experienced steamers are not deceived when they see light wood in a steam room - it won’t stay that way for long if you use the bathhouse regularly. However, their expectations may not be met if the owner of the steam room uses special impregnations that bleach the wood.
IMPORTANT! Any bleach will contain either a substance containing chlorine or hydrogen peroxide.
Strong oxidizing agents not only lighten, but also disinfect wood, destroying fungi and their spores too.
The depth of penetration of the composition also depends on the concentration of the active substance. Bleach can be in a more or less concentrated form when sold, and then, if desired, it can still be diluted with water.
Technology for laying leak-proof wooden floors
The installation of a wooden floor in a bathhouse involves the installation of support beams similar to the previous option, with the formation of an inclined surface for effective drainage of wastewater.
Installation of the floor in the bathhouse is carried out in the following order:
- Organization of water intake system. The first stage of installing a non-leaky floor is the organization of a water intake measuring 45 × 45 cm, located between the supports and thermally insulated with a solution of clay or cement. The depth of the water intake is 35 cm. At a height of 3 cm from the bottom of the receiver, at a slight slope, a pipe is installed to discharge wastewater into a drainage well or pit.
- Installation of subfloor. After installing the logs on the support posts, the subfloor is fixed - a sheet of cheap material, for example, a second-grade board. Hydro-, heat- and vapor barrier is laid on the boards in layers to protect against moisture.
- Fixation of the finishing coating. The installed logs are covered with a finishing coating made of tongue-and-groove boards with a low moisture absorption coefficient. Along the perimeter of the room, a gap of 2 cm is maintained from the walls for natural ventilation. The boards are fixed with nails at an angle of 50 degrees. Finally, decorative plinth is installed.
Important! Wall surfaces are covered over the installed baseboard to prevent condensation from collecting under the baseboard.
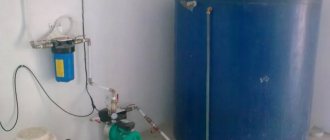
Disposal of used water
If there is no sewer line to dispose of waste water, it is necessary to construct a drainage well, drainage ditch or pit. For a drainage well you need to dig a hole. Its depth should be twice the level of soil freezing in the coldest season. For a small family bathhouse, a drainage well measuring 90 by 90 or 100 by 100 cm will be sufficient.
At the bottom of the well you need to pour a cushion of loose material about 0.5 meters thick. You can use expanded clay, crushed stone, broken brick or fine gravel. The inlet for the drainage pipe is installed 20-30 cm below ground level.