Freezing of a well is a very unpleasant event for residents of country houses who use well water for water supply all year round. It’s quite simple to avoid this - insulate the well yourself. And for a positive result, you need to know the specifics of performing thermal insulation and understand the materials. Do you agree?
We will tell you how to choose the right insulation for thermal insulation of a well shaft. Here you will learn everything about the methods and nuances of carrying out work. Taking into account our recommendations, you can ideally protect your water source from low temperatures.
Reasons for freezing wells
In the old days, when constructing a log house from wood, well builders simultaneously provided thermal insulation for the internal space of the well. In the northern regions, the neck was additionally closed, installing hatches and houses on the head of the structure. Wood has a fairly low thermal conductivity and reliably retains heat without the use of additional means.
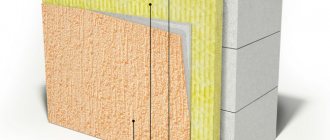
Types of insulation of concrete wells.
Types of insulation of concrete wells.
Now the most common option for lining a well shaft is concrete rings. Even a thick concrete wall can freeze severely when the temperature drops below -10°C. The rings, apart from the ability to quickly transfer heat to the surrounding frozen soil, are not very thick.
The walls of the well lining are about 10 cm thick and almost do not protect the shaft from frost above the ground and at the depth of soil freezing (1-1.5 m or more).
Because of this, an ice plug may form in a well that is not prepared for winter, and if the water supply is laid shallowly (for example, in a summer cottage), the pipes may also freeze.
The best thermal insulators
According to their thermophysical characteristics and availability, the best thermal insulation materials are: polystyrene foam, polystyrene foam, roofing felt, film, polyurethane foam or hard plastic segments.
Another inexpensive thermal insulator is penofol - insulation with a foil surface. Its advantage is ease of installation, but its disadvantage is instability to mechanical damage.
| Material | Advantages | Flaws |
| Polyurethane foam | Tightness, resistance to deformation and destructive effects of moisture, high performance, durability. | The need for annual painting of the insulating surface layer. |
| Expanded polystyrene | Waterproof, frost-resistant, easy to install, durable, affordable price. | Lack of resistance to ultraviolet radiation. |
| Mineral wool | Good thermal insulation, affordable price. | Low water-repellent properties. |
More expensive options are solid wood, brick, but in this case you can get insulation and decorate the well shaft.
Why do you need a well cover?
The water in the well is purified slowly because it is not running. Various unwanted microorganisms can settle in it, and under the influence of sunlight a favorable environment will be created for their reproduction. Ultraviolet light also promotes the spread of algae and water blooms.
In addition, before making a cover for a well, you need to take care of the safety of children who, having played too much, may not notice it and stumble if it does not protrude much above the surface. Even the high above-ground part is not an obstacle to children's curiosity.
You should also take care of the possibility of insulating the lid for the winter or for preservation. And, of course, an important function is decorative. A simple concrete circle among the greenery of the lawn looks very unsightly.
Why is thermal insulation needed?
Wells that are constantly used by rural residents are usually insulated during construction. But the structures that are used mainly in the spring and summer, i.e. during the summer season, they are often done without a heat-insulating layer. This can lead to a number of very unpleasant consequences:
This is what happens to open wells
- The water in the depths of the well begins to freeze much later than the air temperature drops below zero. As a rule, the first signs of ice plug formation appear at a temperature of -15... -200C. Moreover, the higher the water level in the well, the faster it will freeze.
Snow lying on the ground plays the role of a fairly effective heat insulator, so that in a snowless winter freezing will occur much more intensely.
- The most obvious problem caused by the formation of an ice plug is the inability to draw water. Even a layer of ice of two or three centimeters can become a problem, since it will no longer be possible to break through it with a bucket.
- Another unpleasant feature of ice is its increase in volume. As the ice plug expands, it presses on the walls of the well, and if it hits the junction of concrete rings, they move apart, and if it hits a solid area, then the formation of cracks is possible.
An ice plug not only blocks access to water, but also contributes to the destruction of the walls
- Ice formation also harms equipment: freezing can damage the pump or cause hoses to crack. It is for this reason that water meters in wells and caissons must be insulated - the effect of low temperatures on the rather delicate mechanisms of the meters is almost guaranteed to lead to a decrease in their accuracy.
- Finally, a plate of ice 10 cm or more thick may fall into the water during a thaw, damaging equipment located there. I also know of a case where a block of ice formed after two weeks of frost at -250C with its weight broke a fairly strong cable that held the pump.
Pumping and measuring equipment also need to be insulated
In general, there are quite enough arguments in favor of high-quality thermal insulation of a well, especially a concrete one. So I think it's worth investing some time and relatively little money to avoid serious problems in the future!
Reasons for freezing wells
Will the well freeze in winter? This can be predicted with a high degree of probability.
Firstly, if natural wood was used to construct the well, then it will not freeze even with prolonged exposure to sub-zero temperatures. Our ancestors took advantage of this property by constructing wells from wood.
Modern wells are built using reinforced concrete rings, and given that this material has high thermal conductivity, the well will freeze in the same way as the surrounding soil.
Secondly, you need to pay attention to the water level: if it does not exceed 1.1-2.2 m, then the risk of freezing is very high. If the well is deep and the water in it is below the freezing level of the soil, then the water does not freeze.
The third factor that must be taken into account is the depth of soil freezing in the region. In the southern regions, the freezing depth rarely exceeds 0.5 m, in temperate regions - 1-1.5 m, in the northern regions - below 1.5 m.
Thus, the question of how to properly insulate a well for the winter faces owners of reinforced concrete wells located in temperate and northern climates. For residents of the southern regions it is less relevant. There are enough minimal measures - the construction of an insulated cover, and the well itself does not need thermal insulation.
Freezing of a well made of reinforced concrete rings can be prevented by making high-quality insulation, allowing uninterrupted use of water from it all year round
In what cases is insulation required?
If the well was built according to ancient traditions (read: made of wood), then, of course, it does not need any thermal insulation. There are exceptions - for example, a well cover needs insulation. In this case, it is necessary to make an additional cover from wood and fix it inside the structure itself. This cover will protect the country well from:
- snowfall;
- temperature changes;
- ingress of dry leaves and other debris.
Note that almost all modern wells are constructed using reinforced concrete rings. Such wells have numerous advantages, including:
- strength;
- reliability;
- durability;
- ease of installation and further maintenance.
Despite this, they have one significant drawback: they need to be insulated for the winter.
On a note! If the water in the structure is located below the soil freezing level, then the structure itself will not freeze. But if it’s higher, then installation of insulating material is required!
There are three thermal insulation technologies:
- insulation of the structure cover;
- thermal insulation of the upper ring;
- construction of a decorative house.
Let's take a closer look at each of the possible methods.
Choose a place and time
To determine the best place for a well, you should use a plan of your site and general observations. Thus, the source should be installed exclusively at the junction of two gentle slopes. This will allow the aquifer to be reached faster. The location of underground water close to the surface is indicated by the accumulation of midges at the dacha and the growth of lush greenery in the summer. Pay careful attention to the vicinity of the well. It is advisable to dig a source from concrete rings at the dacha away from septic tanks, toilets, sewers, etc. It is necessary to dig a well only when there are no sharp changes in the water level of the high water. As a rule, this is the period from February to March or the end of summer.
Video: Making a house for a well
The finished well house can be decorated at your discretion. You can lay out flower beds and flower beds around it, paint it in the color you like or decorate it with carvings. There are no rules in the design. The building should fit harmoniously into the environment of the site and delight you for many years.
- Author: Andrey Sokolov
Rate this article:
- 5
- 4
- 3
- 2
- 1
(17 votes, average: 3.8 out of 5)
Share with your friends!
Materials and work for insulating a well
Insulating a well before winter is much easier and cheaper than repairing it, eliminating waterproofing defects, and sometimes replacing the rings. The use of modern materials makes the task not only easily feasible, but also accessible for independent solution.
Before carrying out thermal insulation work around the head, it is necessary to remove part of the soil - dig a trench, cleaning the walls of the shaft. The depth of the pit is the sum of the freezing depth and an additional 0.5-1 m for reliable insulation.
Insulation: polystyrene foam
Among the main advantages of polystyrene foam are low price and ease of installation. In addition, the material has the following characteristics:
- conducts heat poorly;
- is not subject to corrosion and rotting, does not decompose in the soil;
- has a low moisture absorption coefficient;
- does not deform under pressure.
To insulate a well, large hardware stores offer semi-cylindrical parts equipped with grooves and projections. When using such a shell, the insulation process will take only a few hours. If it is not possible to buy ready-made parts, then insulation is carried out with foam plastic boards, cutting them into strips of the required width.
Along with polystyrene foam, it is advisable to purchase glue for facade work, as well as a vapor barrier membrane (polyethylene or special materials).
The work is carried out in the following order:
- thoroughly clean the concrete from soil residues and other dirt;
- façade glue is applied to the inner surface of the half-rings or cut slabs (you can use liquid nails, instant installation, etc.);
- pressing the foam tightly to the surface, cover all the walls from the outside, from the bottom of the dug pit to the edge of the head;
- when using half rings, the parts of the locks are combined on the sides, and the plates are placed as close to each other as possible.
When using a foam board, the joints of adjacent parts will not be tight. The gaps must be filled with foam. Further work is carried out after it has dried.
When the insulating lining is completed and the protruding parts of the foam are cut off, all that remains is to make an outer vapor barrier layer of film. Wrap the material around the shaft covered with foam and secure with glue. Fill the excavated pit with the excavated soil, compacting it as the hole is filled.
Insulation: extruded polystyrene foam
Insulating a well with polystyrene foam is not too different from thermal insulation with polystyrene foam. EPS is also produced in the form of slabs or shells for large-diameter pipelines.
The insulating material differs from polystyrene foam only in its increased strength and resistance to external influences. It is little damaged by rodents or insects, and has an almost zero moisture absorption coefficient.
EPPS is produced by Russian companies that produce thermal insulation materials. It is as easy to buy this type of thermal insulation as foam plastic, but the cost of penoplex and similar EPS will be 20-30% higher.
Insulation: cellular polymer materials
To insulate a well with your own hands, you can also use rolled polymer materials with a porous structure (isolon, tillite, penolin, etc.). A number of offered brands have an adhesive layer and do not require the use of other materials for installation on the outer surface of the rings.
To save money, it is recommended to use non-foil materials, since the function of foil is to reflect heat indoors, and will not be needed when constructing a well.
To save money, it is recommended to use non-foil materials, since the function of foil is to reflect heat indoors, and will not be needed when constructing a well.
The peculiarity of cellular coatings is their plasticity. You can simply wrap a strip of material around a prepared pipe made of reinforced concrete rings, gluing the isolon to the surface. Knowing the technology of how to properly install an insulating layer will help you do everything quickly and efficiently:
- clean the concrete surface;
- cover it with a primer (for example, under adhesive for facade tiles);
- if the rolled material does not have an adhesive surface, apply liquid nails or another composition to the inside;
- pressing over the entire surface, glue a strip of material;
- glue the joint with tape;
- fill up the pit.
Insulation: polyurethane foam
According to the method of application, treatment with polyurethane is similar to working with polyurethane foam, only you will not have to fill the cracks, but spray the composition onto the surface of the pipe.
According to the method of application, treatment with polyurethane is similar to working with polyurethane foam, only you will not have to fill the cracks, but spray the composition onto the surface of the pipe.
You can also insulate wells for the winter with your own hands using special mixtures based on polyurethane. You can buy the material in the form of a dry powder, diluted with water before use, and as a ready-made composition in a spray bottle.
The second method is better suited for independent work, since it does not require searching for special equipment for spraying.
Preparation and insulation are carried out as follows:
- clean concrete from contamination;
- primed with a primer for polyurethane;
- apply an even layer of foam;
- leave until completely cured (4-5 hours, unless otherwise indicated in the instructions);
- paint the surface of the polyurethane foam with paint for exterior use and dry it;
- dig a trench.
The head above the ground can be sheathed with a sheet of tin, as builders do when insulating the pipes of a heating plant. This will protect the shell surface from mechanical stress and ultraviolet radiation.
Why can't you use mineral wool?
The main disadvantage of mineral wool is its ability to absorb moisture from the environment. The head and underground parts of the pipe are affected by precipitation, groundwater, and liquid spilled from a bucket.
The main disadvantage of mineral wool is its ability to absorb moisture from the environment. The head and underground parts of the pipe are affected by precipitation, groundwater, and liquid spilled from a bucket.
It will not be possible to protect a porous material from becoming saturated with moisture even with the help of waterproof membranes. Wet mineral wool loses its thermal insulation properties.
Winter water intake equipment: insulation of a classic well ↑
It is not difficult to make sure that the well does not freeze even at -50°C. It is necessary to determine what structure is appropriate to install around the head and prepare materials for thermal protection of all elements of the water supply:
- The upper rings of the shaft, the head.
- Outlet pipe.
- Ground parts and places of insertion, pit.
If the cause of the problem is improper pipe routing from the well, you will have to deepen the insertion and lay the pipe at a greater depth.
At a depth of more than 1.8 m there is no risk of pipe freezing even in severe frost
Mine insulation and insulation: materials
To ensure that the water in your country well never freezes again, you don’t need a large investment. And if the source is used only in the summer, you can use the remains of insulating materials for insulation. To reliably insulate a traditional mine well, you will need:
- Expanded polystyrene (foam plastic), polyurethane foam for special sprayers.
- Durable polyethylene film.
- Insulation adhesive (solution).
- Plywood, boards - to make a cover.
- Materials for pipes: shell or rolled insulation, thermal cable, protective sleeve.
A special heating cable is fixed on the pipe and connected to the network during the cold season
- Polyurethane foam.
- Materials for finishing decoration: wood for the house, paint or tiles.
External insulation
Since the well can rise above the ground level, its protruding part will need to be insulated. The material from which it is made is important. If it is stone or concrete rings, then insulation work is required. The following are used as insulation:
- Styrofoam.
- Polyurethane foam.
- Mineral wool in mats.
- Solid mineral insulation and so on.
As an exterior finish over insulation:
- Tree.
- Decorative rock.
- Plastic.
- A natural stone.
- Siding and so on.
Advice. There must be a lid that will cover it. All this is necessary to ensure that cold air does not enter inside and that air masses form a vacuum that prevents the well from freezing.
Level of soil freezing in the area
Diagram of the depth of the soil foundation and the load on it
In addition to the level of groundwater, the level of soil freezing also plays a major role in the construction. If it is quite large and reaches 70-100 cm, then the water should be at a depth of at least 150 cm. In this case, insulation is mandatory.
Pipes for water supply
Today the following pipes are used to construct a water supply system:
- Plastic.
- Metal.
- Polypropylene.
In our case, polypropylene pipes are not recommended. Both plastic and metal pipes can freeze very easily in winter. It depends on the level of their occurrence.
Advice. Pipes must be insulated, regardless of the level of their installation.
Pipes must be insulated at the initial stage of construction of the entire structure. There are several ways to do this:
- You can do sleeving. What is it? This is when the main water pipe is placed inside another pipe, only larger. Mineral wool is laid between them.
- There is another way to insulate pipes. To do this, the water pipe that goes from the main source to the house is wrapped with mineral wool or any other soft insulation. To secure it to the pipe, wire or special clamps are used. A polyethylene film is placed on top of the insulation, which is attached in a similar way.
How to properly install thermal insulation around the head
Work begins with determining the level of soil freezing: if the freezing depth is up to 1.5 m, then you will have to lay the insulation from a greater depth - up to 1.7 - 1.8 m. It is necessary to dig the shaft in a circle to the planned depth. Thoroughly clean the concrete surface from dirt and clay. It is advisable to treat the surface with a special water-repellent primer - this is additional protection against capillary moisture that will penetrate under the insulation layer from the soil.
It is worth digging the well to a large width to provide the master with access to the walls
The primed surface is covered with polystyrene foam. You can buy ready-made shells according to the diameter of the rings. Such insulation will cost more than conventional sheet construction foam. But this solution has one significant advantage: there will be no joints between pieces of insulation, which means that cold bridges - uninsulated areas of concrete - will not appear.
Factory shell insulation: seamless insulation
Don't miss: Fecal pump for pumping out sewerage: how to choose and install it in a private house, and which one in the country, but with a grinder
Construction insulating polystyrene foam is laid vertically, the edges of the sheets are aligned as tightly as possible. Fix the insulation with a special adhesive glue. Seams and gaps can be sealed with polyurethane foam: this material has minimal thermal conductivity and good water resistance.
The joints are treated with foam - the entire surface of the concrete ring is insulated
They begin to glue the sheets from the bottom, gradually rising to the head. The upper strips are cut so that the insulating material protrudes 10 - 20 cm above the edge of the upper ring. This space is enough to lay a cover - additional protection so that the water in the well does not freeze in severe frost.
Thermal insulation should cover the edges of the ring
After the foam has dried, you can begin to form a blind area or a small foundation if you plan to build a decorative house around the source. The foundation is insulated with coating. Instead of mortar, stone and brick are used.
The foundation will create another hydro- and thermal protective layer
Any material is laid on the base: boards, frames for lining, sheets of plywood.
Well covered with a lid
Important! The only enemy of polystyrene foam is ultraviolet radiation. Under the sun's rays in the heat, the material begins to crumble and turn yellow, so be sure to at least paint the outer surface.
It is better to insulate caissons and drainage wells during initial installation. Craftsmen insulate the containers with special sprayers, forming a dense “coat” that will protect the container from moisture, frost and deformation.
Professional insulation of a finished plastic caisson tank
Cover for winter preservation of the source
A cover with an insulating pad is used for seasonal protection of the water intake. On sale there are ready-made plastic structures of different diameters for wells made of standard reinforced concrete rings with an insulating filler.
Plastic cover for round well
Advantages of ready-made lids:
- Resistant to moisture.
- There is no risk of insulating material crumbs getting into the source.
You can protect water from freezing in a well yourself. From sheets of moisture-resistant plywood you need to cut two identical circles, equal in diameter to the width of the rings. You can use shields made from boards.
Inexpensive wooden lids with a handle for opening
The bottom circle is placed in a ring. An insulating layer of expanded polystyrene is formed on top. You can pre-glue pieces of foam to the shield. Do not use mineral wool: the material crumbles easily and can make the water unsuitable for consumption.
Polystyrene foam is laid on the base
The top shield is placed above the insulation so that there is a ventilation gap between the two circles. Instead of a flat shield, it is worth making a wooden structure in the form of a roof: such a house will protect the water from sunlight and debris in the summer.
The roof can be made from scrap boards
Basic safety rules
When carrying out work, if you decide to make a well on your site yourself from reinforced concrete rings, you should adhere to safety rules. They look like this:
- Having a safety helmet when installing a well in a country house or private area is mandatory. Especially for the one who undertook to dig a well. An accidental fall of a tool, a bucket of earth, etc. is not excluded.
- All safety fastenings must be checked every day before starting work. This is a guarantee of safety for the master who will dig.
- When deepening a mine by more than 6 meters, insurance is required for the digger. Digging a well in this case is more difficult, but high-quality equipment will protect you from accidental falls.
Important: when installing and digging a well, you should be attentive to the presence of gas pockets in the ground. To avoid bumping into them, you need to periodically light a candle in the hole. An even flame indicates that everything is normal. If vibrations occur, you need to ventilate the pit. This should be done using a blanket lowered into the hole several times and raised back up, or using a fan operating at the bottom of the shaft.
Methods of pumping water
The ideal option for draining liquid from the reservoir is to connect to a centralized liquid drainage system. However, on personal plots this method of pumping is impossible. It is necessary to construct a waste pipeline through which the water flows by gravity beyond the boundaries of the summer cottage.
It is important to decide on the location of the discharge, be it a ravine or some kind of reservoir, and coordinate it with local authorities. If drainage does not occur naturally, as the well shaft fills, then they resort to forced pumping of water
This requires an electric pump that can be immersed in a container.
If drainage does not occur naturally as the well shaft fills, then forced pumping of water is resorted to. This requires an electric pump that can be immersed in a container.
Pump for pumping water with a float from storage drainage wells
A float sensor is attached to the pump on a small cable, which reacts to the fill level of the tank and sets the pump in motion. The efficiency of pumping equipment depends on the power of the unit and the degree of contamination of the pumped liquid.
Large debris can accumulate in stormwater wells. This must be taken into account when purchasing a pump. If groundwater is pumped out of the storage tank, then you will need a simpler unit that can cope with solid particles less than one centimeter.
Experts advise completely pumping out well water every month in order to rinse its base with a stream of clean water under strong pressure.
It is important not only to install the drainage system correctly, but also to regularly care for it. Then your home, garden and vegetable garden will be completely safe
Making a well ring with your own hands
If a head or canopy is made, the gray concrete ring remains visible. The view is not the most attractive, I just want to decorate it.
Stone finishing
The most popular way to decorate a well is to decorate it with stone - pebbles or small crushed stone. If everything is more or less clear with the finishing material - buy or assemble, then the question of what to attach it to remains. There are several recipes:
- A bag of adhesive for tiles and natural stone 25 kg + a bag of dry mixture 300 - 50 kg. Mix everything in dry form, dilute it with water to a paste. Soak the stones in water. We apply a thin layer to the ring - a vertical stripe from top to bottom, select and place the stones, sinking them into the solution. When a piece is made, before the solution dries, the stones are cleaned and the seams are rubbed.
Well lined with stone - M500 grade cement - 1 part, sifted medium-grained sand - 3 parts, PVA glue - 1/3 part, water - about 1 part. Work at approximately +20°C, wearing thick rubber gloves: corrosive to hands. Mix a small batch of solution at once: 1 part is a 500 ml jar. This amount can be worked out before the solution sets. The technology is similar: the stones are soaked, but the well ring is also wetted. Then a layer of mortar is applied to it, and the stones are pressed in.
We offer the third recipe for how to line a well with stone in video format. The composition of the mixture is very similar here, but before applying the solution, a mesh is fixed to the ring. With this technology, nothing will definitely fall off.
An interesting version of a hinged lid for a well is proposed in the following video: it hinges almost completely, but whether such a device is needed is up to you to decide.
What is the best way to insulate a well?
Extruded polystyrene foam (pink) - it bends well, the thickness is suitable, the price is reasonable. If the well has a plastic cover, you can blow it out from the inside with foam. Now insulation in the form of foam cylinders has appeared on sale - they stick to concrete without cracks, but prices are still high. I don’t recommend polystyrene - it crumbles unpleasantly. Even if it doesn’t fall into the water, collecting them around the site is not a pleasant task. There is also good news - the functionality of a modern well has made the upper ring above the ground unnecessary. This means that the issue of insulating both the walls and the lid has been significantly simplified.
Thank you for your attention. It's time to drink a cup of aromatic tea. From that same unfreezing well...
How to insulate a brick well
You can insulate an existing brick well using the same methods that are used for concrete wall rings. It's a completely different matter if construction is just starting.
Then waterproofing and insulation of the brickwork is carried out during the work process:
- The well trunk does not have to be round; it can also have a square or rectangular shape. In this case, well masonry with insulation is the most suitable option. This is a very popular method of building walls in the construction of houses: bricks are laid so that empty wells are formed in their thickness, which are covered with sawdust, expanded clay, polystyrene chips, or filled with foam insulation.
Insulation of a brick wall
- In another option, two parallel walls are erected, rigidly connected to each other by anchors, the space between which is also filled. Well masonry with insulation is very convenient for arranging a reservoir in a finished pit. This can be a drinking water intake up to six meters deep, or any other type of well: differential, rotary, inspection.
- Of course, a well does not require the same thickness of walls as a building - one and a half bricks are enough. After completing the masonry work, all that remains is to plaster the outside of the wall and make a drainage sleeve. If you add a plasticizer to the mortar for masonry and plaster, the strength and waterproofing of the walls being built will be ensured to the maximum.
For a drinking well, it is advisable to make a house or a canopy so that it does not get covered with snow in winter. As for the lid: it is better if it is multi-layered wood.
Preparing a well for winter
Ideally, insulation of a well should be carried out at the stage of its construction, but with a competent approach, the desired result can be achieved even when the structure is already in operation.
Pumping water from a well.
If living near a well is seasonal and temporary, complete drainage of the water supply system can protect you from freezing, which will prevent subsequent defrosting of the system and costly repairs.
A complex approach
Insulating a well from which water is drawn even in winter is a little more difficult and requires an integrated approach to prevent freezing of the entire system. Since the top ring is the most vulnerable, it is insulated in several ways. For example, a plastic cover or a decorative wooden frame together with a well house will help your water source not freeze at significant low temperatures.
Thermal insulating structures
Various thermal insulation structures inside the structure will also be very effective. This can be an insulating cover using combined materials or reinforced concrete “eternal” insulation with a plastic hatch.
Hydrant protection
Insulation of the water intake column, namely its upper part, with various materials is also very effective in comprehensively solving this issue. In addition to the well wooden frame and the house around the upper ring, additional insulation can be expanded clay, mineral wool or other insulation installed between the ring and the frame.
It is also possible to create an electrical heating system for the upper parts of the well, water pipes and mains.
How to properly insulate a well shaft made of concrete rings
As we said above, this process consists of covering the entire part that rises above the ground with special building materials from the outside and digging a well to the level of freezing of the soil in order to treat it there too.
In warm areas, covering just the top and using a good lid is sufficient. In the northern regions, efforts will be required to prevent strong temperature changes.
In a simple version, you can use foam plastic or polystyrene; in more complex ones, you can use cellular porous materials and other insulation materials. Quite often they put up a house that will protect from snow, leaves and various pollutants. But its main purpose is to protect the mine and water from hypothermia.
Preventing the well from freezing
To prevent the well structure from freezing with the onset of winter, thermal insulation should be taken care of during its construction. If the suburban area will be visited occasionally (for example, only on weekends), then, in principle, there is no need to insulate the well. In such cases, it is only necessary to clean it and treat it with some kind of disinfectant (such as chloramine) before leaving.
After this, pump out the water completely and close the structure with a lid. Lay a polyethylene film over the lid and cover it all with leaves. Now you can go to the city with a clear conscience, because with the onset of warmth, the well will again provide clean water.
But if the well is used regularly, then the measures should be more serious. For example, pipes to the house must be located below the soil freezing line, the structure itself must be protected by the house described above, or by other available means.
Well cover and wooden house
To prevent the penetration of cold air from above, through the neck of the shaft, a well made of concrete rings is insulated for the winter by installing a lid made of a wooden panel. In the northern regions, internal and external covers are made for insulation.
To prevent the penetration of cold air from above, through the neck of the shaft, a well made of concrete rings is insulated for the winter by installing a lid made of a wooden panel. In the northern regions, internal and external covers are made for insulation.
The first is lowered into the well below ground level. It will be held on by brackets driven into the wall of the shaft. The second, upper one, is placed on the edges of the head. It can be placed on the well in the summer to protect the water from debris and rainwater.
Sometimes, instead of an outer cover, a more aesthetic structure is made - a house. Its size can be minimal and cover only the head. To make it easier to collect water in winter, a small caisson is erected around the well, into which an adult can enter.
Depending on the overall design of the site, the house is given the desired appearance. They finish it with siding, other cladding, or immediately make it in the form of a fabulous log hut. The material for the walls can be boards, logs, sandwich panels, etc.
If the house is designed only to protect the head, then its roof traditionally serves as a hatch for lifting the bucket. It is convenient to install a gate inside the space formed by the slopes, bringing the lever to the street. In a large barn house that covers part of the area around the water source, you can install a traditional well with a collar above its neck.
Plot
0 votes
+
Vote for!
—
Vote against!
Until recently, any piece of land on which people lived had a well. To this day, they are dug in plots to provide themselves with water for household needs. They are indispensable in summer cottages, where water is centralized and supplied in limited quantities according to a schedule. But even with the construction of a country house and the arrangement of a well, wells do not lose their relevance. By lowering a submersible pump into them, it is convenient to use water for irrigation, especially when the groundwater level is high in the area. It is important not only to protect children and animals by closing it with a lid, but also to give it aesthetics. This article will talk about how to make a well head with your own hands.
Why do you need a well head?
- The head is designed not only to protect household members from accidentally falling into the well, but also to prevent debris from getting into the water.
- If the well is planned to be used and not turned into an art object, then it is necessary to provide a convenient cover and lifting mechanism. When thinking through a project, it is worth considering ease of use, and not just design and combination with the surrounding landscape.
- Well head designs can be closed or open. Their cost will depend not on the type, but on the materials used. But in an open well in winter, water can freeze, so for year-round use it is recommended to build it as a closed and insulated house.
- If desired, the open head of the well can also be made warm. In this case, not only the walls of the well itself are insulated, but also its lid. For this purpose, choosing a moisture-resistant heat-insulating material, such as foam plastic or penoplex.
Types of material for the well head
Traditional and modern finishing materials allow you to create not only functional, but also beautiful wells. They fit harmoniously into any landscape design, becoming its decoration.
- Stone . This is a labor-intensive and expensive method of finishing the well head. But the result is very beautiful and solid. In addition, such finishing material does not require any maintenance and will remain in its original form for many decades. You can use stone to lay out an entire wall around the well, or just use it to decorate the head of a well made of concrete rings. In the second case, the cost will decrease several times, but the appearance will not lose.
- Wood . It will fit especially well into the landscape if there are already wooden buildings on the site, for example, a wooden house or a bathhouse. Like stone, wooden heads can be of two types: made of real timber or logs, like the walls of a house;
- simply a frame sheathed with imitation timber or a block house.
- Regardless of the material chosen, a number of requirements are imposed on the head:
- Collar. Even if the well head is needed only for decoration or the water is planned to be pumped out with a submersible pump, it is recommended to provide a functioning lifting mechanism. There is always a chance that it will come in handy.
Construction of a well head in the form of a house
Why is a well house necessary:
- it will protect drinking water from dust, leaves, insects, branches and other debris;
- the water will not bloom or evaporate from the summer heat;
- when using spraying chemicals in the garden, they will not settle on the well cover and will not get into the water;
- on frosty days the water will not freeze;
- when creating a beautiful head on a well, it will become a decoration for the area. For this purpose, it is decorated with carved or forged elements, which you can not only make with your own hands, but also buy ready-made ones. And in the finishing use natural stone and high-quality wood.
Having made a design and created a project based on it, you can start working.
Required materials tools
- The easiest way to work with wood is, moreover, it is a natural material that will always fit into the garden landscape.
- Therefore, first of all, you need to purchase the required amount of timber with a section of 50x50 and 100x50 mm.
- For finishing, edged boards, block houses or lining are used.
- Any roofing material is suitable for the roof, but it is good if it matches the roof on the gazebo or house. The lighter it is, the better - this ensures that the supports will withstand even heavy snowfalls.
- For the lifting mechanism (gate), you need a rounded log and a strong metal rod.
Well head drawing
- Considering that all wooden elements will be outdoors all year round, you need to stock up on special protective equipment.
- To fasten wooden parts in places where the greatest load will be placed on them, you need to buy metal corners.
- Deadbolt, handle, door hinges and fasteners (screws or nails).
- Bucket and chain.
- Saw or jigsaw, level, tape measure, screwdriver or hammer, pencil.
Stages of work on creating a well house
- Depending on the chosen design, the frame of the walls and roof is made. He will bear the entire load. It is easier to assemble it on the ground and attach it ready-made to the well.
- To calculate the size of the head around the concrete rings of the well, it is necessary to measure their diameter. Based on the results obtained, a frame is assembled from a board with a cross-section of 50x100 mm. When fastening parts, you must constantly check the vertical and horizontal levels to avoid distortion.
- At the corners of the frame, vertical bars are attached, equal to the height of the house-head. In addition, 2 more vertical bars are attached to the frame from two opposite sides and connected horizontally from above with a board, resulting in the ridge of the future roof. All vertical posts are also connected to each other with bars with a section of 50x100 mm.
- Rafters made of 50x50 mm timber are attached from the ridge to the side frame in increments of 40-50 cm. For reliable and beautiful fastening, where they are connected to the ridge, the timbers are cut at an angle of 45 degrees. This can be done using a miter saw. For additional strength, these places are fixed with metal corners. Excess rafters are cut off, not forgetting to leave an extension.
- On the side where the door will open, you need to nail a strong and wide board (at least 300 mm). In the future, it will be convenient to place a bucket filled with water on it. On the remaining sides you can use narrower and thinner boards. Their function will be to securely fix the head on the well rings. This completes the assembly of the frame. It must be smooth and durable.
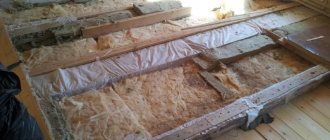
- If the well head provides insulation, then sheet moisture-resistant material is attached to the frame. In turn, slab insulation with high moisture-resistant characteristics is attached to it. It is desirable that they have a tongue/groove connection, which will eliminate cold bridges and through freezing in these places.
- The next step is to install a mechanism for lowering and raising the bucket of water. It is most convenient to make it from a piece of rounded log, the diameter of which should be 15-20 cm (the larger it is, the easier it will be to lift a full bucket). The length is selected individually and depends on the size of the well head. On average, it should be only 5 cm shorter than the internal distance between walls or studs. This will allow the gate to rotate freely.
- If there is no rounded log, then take a simple one and clean it of wane, remove all the irregularities, knots and sand it. The resulting workpiece is shortened to the required size, and the edges are tightly wrapped with steel wire.
- Holes 20 mm in diameter and 50 mm deep are drilled from the ends. To protect the wood in these vulnerable areas from rotting, metal plates must be screwed on. The holes on them must match in diameter and location with those already drilled on the log.
- On the racks to which the lifting mechanism will be attached, similar holes are made with protection from metal plates. The only difference is that on the side with the lever you need to make a through hole.
- Metal bushings are inserted into both holes on the racks. And metal rods are driven into the log from the ends, slightly smaller in diameter than the bushings. One will simply fix the log, and the second has an L-shaped handle for rotation. Then the chain is fastened and wound, tying a bucket to the other end.
- The finished frame is sheathed with finishing material. If it is a block house or lining, then they have a tongue/groove connection, which ensures their tight fit. When using edged boards, even with the most careful adjustment, the formation of gaps cannot be avoided due to seasonal shrinkage of the wood and its cracking.
- Special stains or antiseptic impregnations will help protect wood from rotting. It is also allowed to apply varnish, but only one intended for use at sub-zero temperatures, otherwise it will all crack and begin to crumble.
- Alternatively, you can use plastic or metal siding. The latter not only completely replicates the appearance of the natural material, but even has a similar texture.
- Next, they make sheathing on the roof and be sure to attach a vapor barrier fabric. It will protect the roofing material from high humidity and condensation.
- Then the door is secured. To do this, you need to choose dry wood to avoid deformation and curvature during further drying. Boards are nailed onto the frame to act as a door frame.
- Having measured the size of the resulting hole, the frame of the future door is assembled on a flat surface, which should be slightly smaller. It should have right angles without curvature. The canvas is made from the same material that the house itself was sheathed with. To give the frame rigidity, a rail with a cross-section of 20x20 mm or larger is screwed diagonally from the inside.
- Door hinges are attached to the wall and to the door, then it is hung and leveled. It is necessary to ensure that it closes easily and does not jam. After that, a handle and a lock are attached to it.
- The final stage is decorative finishing, if provided for by the design.
Make a well head from stone
- Let's consider a method where the walls are laid out of brick, later facing it with natural stone. In this case, the walls of the head will be built according to the same principle as the walls of the house.
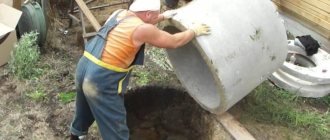
- The concrete ring protruding above the ground is cut down to the required level with a grinder. And the foundation is poured along its perimeter.
- Waterproofing, for example roofing felt, is placed on the concrete base. They begin to make brickwork on top in the traditional way using 1 brick, with bandaging of the seams.
- After finishing the construction of the walls, they are covered with film and left until the solution sets. Thus, the base of the well head is made with your own hands. It's time to install the gate. If the support columns for the lifting mechanism are also planned to be lined with decorative material in the future, then they are made of hollow brick, cinder block or foam concrete.
- If the well is made of modern concrete rings, then it will be difficult to line it. The fact is that factory-made concrete is denser than when mixing the solution yourself, therefore, its surface is smooth, without pores or roughness.
- To give the necessary adhesion, you will have to anchor it yourself. From the outside, holes with a diameter of 5 mm are drilled in a chaotic manner to half the thickness of the concrete ring. The distance between them should vary between 10-15 cm.
- If you go deeper, then over time the anchor may become exposed in this place. Then you will need a masonry (reinforcing) mesh with a cell size of 4-5 cm. It must be completely wrapped around the ring, and the resulting allowance must be folded. But it should not fit tightly; the gap between the metal mesh and the concrete ring is left 1 cm. Curved pieces of wire with a diameter of 5 mm are driven into the prepared recesses. A mesh is tied to the resulting anchors. Such preparatory work will ensure that the base will withstand facing material of any weight - from slab sandstone to boulders.
Lining a concrete well with wood
- Thanks to the heat-saving properties of wood, there will be no problems with condensation in winter. It is thanks to these properties that since ancient times wells were made from logs.
- First you need to make a frame around the concrete ring to attach the wooden planks. A solid shield is made on each side of the future well. To do this, assemble the frame. Edged boards 25 mm thick are tightly nailed to it. When all 4 shields are ready, they are coated with primer in 2 layers.
- They are applied to the well and the points where the shields come into contact with the base are marked. In the marked places, holes are made using a hammer drill and wooden blocks are attached.
- Place the shield and screw one top corner. Then, aligning it horizontally, screw the second side. The entire frame is secured in this way. The resulting voids can be filled with cement mortar with shavings. This guarantees protection even from severe and prolonged frosts.
- Finishing material begins to be attached to the resulting frame. The choice is not limited in any way and depends only on the style of the site or personal preferences.
- It’s easy and quick to make an imitation of logs or beams using wooden block house panels.
- It is better to start installation from the top. Since it is made from natural wood, panels that are identical at first glance may turn out to be of different widths when installed. This may be a very minor difference, but asymmetrical joints are formed at the corners. Therefore, you need to slowly adjust the panels, trying to avoid distortion in the design.
Head for a well made of siding or metal
- Unlike a wooden block house, plastic panels have ideal dimensions and always connect smoothly at the joints. But you need to remember that the richer the color of the panel (for example, dark wood), the higher the likelihood that it will fade in the sun. When the well is in the shade of trees, this is not a problem, but for sunny areas it is better to choose light colors of the material.
- The frame for cladding is prepared according to the method described above.
- The siding begins to be attached from the bottom. First, screw on the starting bar. Its horizontal level must be checked with special care. If there is a slight distortion, it will immediately be reflected in the appearance.
- Next, the corner outer profiles are attached to the self-tapping screws. Their verticality is checked with a level.
- Now I came through the fastenings of the planks themselves. They come in a standard size of 3 m, so first measure the required length and cut it. At the same time, we must not forget about allowances of 1.5-2 cm, which will be inserted into the corner profiles. The first bar from below clings to the starting one, and is screwed on top with self-tapping screws. The next one is inserted into it and snapped into place, which is held from below by the previous plank, and attached to the top with self-tapping screws. This is how the entire well is sewn up. The top is finished in accordance with the intended design.
Sewer well head
- Most country houses have an autonomous sewer system, and its installation often requires that the upper part of the sewer well remains above the ground. In this case, it also needs decoration.
- The principle of wall cladding remains the same. The only difference is that there is no need to make stands for the lifting mechanism, and the height of the walls is much smaller.
- Sometimes it is enough to surround it with large stones and make a decorative cover.
- Or they make circular brickwork, and lay a factory-made sewer hatch on top.
In any case, it is not only beautiful, but also functional, as additional insulation is provided.
Well head design
When choosing a well design, you should rely on the stylistic direction that already exists on the site.
- Russian style. The most characteristic of this style is the well head in the form of a tower. For it, only real logs are used, and not their imitation. Carved wooden elements can be an additional decoration. It is better to put the same roofing material on the roof as on the house itself.
- Modern style . Its main feature is the use of modern rather than traditional materials. Such a well head would be appropriate only if the house itself is made in high-tech style. Tiles are used for cladding, and the racks are made of metal.
- Chalet style . This is a European rustic style, so a combination of natural wood and stone is best for a well head. All materials should be deliberately rough, thick metal, stone boulders, textured wood. You can make the design lighter using forged lightweight elements.
- East style . The most popular among landscape designers are wells designed in a minimalist Japanese style. The main feature is the cap with a hipped roof. Large stones and wood are selected to finish the well. But the Chinese style is the opposite, it is filled with a lot of luxurious and exquisite jewelry. Therefore, bright colors are chosen for the walls of the head, and the posts are made in the form of carved figures of mythical characters.
In addition to traditional style solutions, there are many design options for the well head. They are distinguished by their versatility, which allows them to look good in any landscape design.
- Fairytale tower . These are deliberately bright, almost doll houses. They can be of unusual shape, decorated with bright finishing materials. You can strengthen associations with the help of arranged garden figurines of gnomes or fairies.
- Sea style . Creating it is quite simple; for this you need to take self-explanatory attributes, such as: a rope, a barrel (which can be used instead of a bucket), an anchor, aged wood, a steering wheel instead of a lifting mechanism handle. Figurines of anchors and sea animals are perfect for decorative decoration.
- Painting with paints . This is the most budget option, which does not limit artistic motives. It is enough to simply prime the concrete rings of the well with white and paint them. Or paint a brick or wood head with white paint and paint over it.
But no matter how beautifully the head of the well is made, in order for it to look harmonious, it must be surrounded by plants. To do this, you can plant low-growing flowering shrubs around it or create new compositions from flowering annuals every year. In addition, flowers can be placed in large flowerpots. In this case, they can be rearranged several times during the summer. Plant compositions are suitable for a well made in any style.
Types of filters based on soil composition
Depending on the soil in the aquifer, well filtration is also arranged. Because the soil reacts differently to the movement of water and interacts with it in different ways.
- So, if the bottom of the well is solid dense clay, then a filter is not needed. Such a bottom does not wash out and does not threaten water blockages. Moreover, the installed filter, on the contrary, can block the existing keys.
- If the clay is soft. In this case, you can use coarse crushed stone. The backfill layer must be at least 20 cm.
- If the bottom is sandy, then the filter needs to be arranged in several layers. First, a layer of washed sand (approximately 20-25 cm). Next lay small crushed stone or pebbles (layer about 20 cm). A layer of pebbles with a diameter of 5-7 cm is formed on top.
- If the bottom is floating (very eroded sand), then you will need to use a wooden shield with small holes across the entire surface. Such a shield will act as the lowest layer of the filter. The remaining layers must be made by analogy with the sandy bottom.
Advice from professionals
To obtain the most positive result, you must adhere to the following recommendations from experienced professionals:
- From the wide variety of insulation materials, choose those options that are resistant to a humid environment and respond well to temperature changes. The following should be used for thermal insulation of concrete wells: foam sheets, polystyrene foam, polyurethane foam. Roofing felt, hard plastic, film are suitable for these purposes.
- It is possible to ensure good protection of a well from low temperatures not only by insulating the well shaft, but also by erecting a wooden house above it. The cover of the hydraulic structure must also be thermally insulated; 2 sheets of plywood are used, and insulation is laid between them.
- There is no need to plaster the concrete surface; it is enough to use a waterproofing film.
Method one. Cover insulation
This technology is not complicated and consists of installing an additional cover inside the structure itself at ground level. We remind you that water from a well can be obtained in two ways - the old fashioned way, that is, using buckets, and using an electric pump. This article discusses exclusively the modern method.
You should start by preparing everything you need. Prepare for work:
- plywood sheet;
- glue;
- wire;
- a plastic pipe, which is necessary for ventilation;
- insulation, the thickness of which will be at least 5 centimeters (foam is ideal for this);
- polyurethane foam.
After this, proceed directly to the construction process.
Step one. Take a plywood sheet and cut out a couple of even circles with a diameter similar to the diameter of the structure itself. Make two holes in each circle - one for the hose and the other for ventilation.
On a note! Ventilation in this case is mandatory, since without it the water will soon begin to smell unpleasant, and its taste will noticeably deteriorate.
The diameter of the drilled holes is insignificant - no more than 6 centimeters, otherwise frosty air will be able to penetrate through the resulting cracks. It is more convenient to drill holes at one edge. Next, make 4 more holes for the wire around the perimeter of the second circle.
Step two. We continue to insulate the well for the winter. Cut a third circle of the same diameter, but this time from foam. Glue it to the bottom circle using high-quality wood glue, and fix the third circle on top. Once the glue has dried, place the ventilation pipe into the prepared hole. You can use polyurethane foam to seal joints.
Step three. The work is almost finished, all that remains is to make a special ring from the wire. To do this, take it and wrap it around the first ring, thereby fixing its circumference. After this, attach the wire to the ring, fixed in the four holes of the lower ring. Pass the hose into the required hole, and then lower the finished “sandwich” onto the ground line. The lid will be held in place with a wire, the well will be properly ventilated, but the water will not freeze.
Method two. We thermally insulate the upper ring of the structure
Every specialist will tell you that in order to prevent freezing of a well, you need to reduce the thermal conductivity of its upper ring. This method of thermal insulation is performed in two ways:
- by means of polystyrene foam;
- using polyurethane foam.
Let's look at the first method first.
We use polystyrene foam for the ring “under a fur coat”
Here you should prepare the following consumables for work:
- polyurethane foam;
- paint;
- plaster;
- insulating blocks made of polystyrene foam, which are connected using a tongue-and-groove system.
On a note! According to this technology, the first ring on top will be completely insulated, while the second only partially. Now to work!
Step one. Work should begin with preparatory activities. Dig a pit 20 centimeters wide and approximately 0.5 meters deep around the ring. Then thoroughly clean the surfaces from dirt and install the first “fur coat” ball. At this time, make sure that the density of all connections is maximum! Blow out the joints with foam to seal them. Having finished with the first level, proceed to assembling the second and gluing it to the ring. Blow out the gaps that have formed between the layers with foam.
Step two. Next, begin plastering the surface of the rings. This will protect the foam from the negative effects of the sun's rays, which, as we know, worsen the thermal insulation properties of this material. After the plaster has completely dried, apply paint to it - this will prevent the finish from getting wet.
Step three. All that remains is to fill the pit and thoroughly compact the earth.
Penoplex, we insulate the foundation reliably and correctly
We recommend that you read our article on insulating the foundation yourself. You can find out more here
We use polyurethane foam for the ring “under a fur coat”
If you chose polyurethane foam as insulation, then follow these steps. First, dig a similar pit (as in the previous method of insulating a well for the winter), and then build a wooden frame around the first ring. But this is in general terms; let’s analyze the procedure in more detail. Prepare the following materials for work:
- paint;
- dowels;
- polyurethane foam sprayer;
- collapsible metal formwork;
- plaster;
- a piece of plastic film;
- wooden bars.
Step one. Traditionally, start by digging a pit, but narrower (maximum 10 centimeters). After this, install bars around the first ring in increments of approximately 40 centimeters. Cover the edges of the trench with formwork made of thin sheet steel, which will exactly follow all the contours. Cover the formwork with the prepared film. For what? This is explained by the fact that the adhesion of foam plastic is very significant, and therefore dismantling the formwork is impossible.
Step two. Having finished building the formwork, you will notice that a void has formed between it and the ring - this is what needs to be filled with insulation. Upon completion of pouring, the polyurethane foam will increase in volume, and the trench will therefore be filled as densely as possible.
After this, you need to wait until the material is completely dry. As soon as this happens, dismantle the formwork. Plaster the finished surface and apply a layer of paint to it. Fill the void left after formwork with earth and compact it thoroughly.
On a note! It is also advisable to cover the well with a lid, which was described in one of the previous paragraphs of the article.
What to do if the water in the well is frozen
If the winter turns out to be particularly cold, and for some reason it was not possible to insulate the well, the water will certainly freeze. In this case, the simplest solution would be to postpone insulation work until the ice thaws.
However, you can try to restore the water supply to your home in the following ways:
- If only the top layer is frozen, you can break the thin crust with a pick or shovel, after which you need to cover the well with a lid, which must be insulated.
- If the well is frozen over, but the water is not frozen, and the supply is still interrupted, the problem may be frozen pipelines. You can try warming up the water supply with a hot jet of a hair dryer. Pipes will also need good thermal insulation.
If the water in the well froze so much that none of the methods worked, then there is only one way out: wait for a thaw. As soon as the weather warms up, it is recommended to immediately dig up the well and insulate the walls. Over time, the ice will thaw and the water supply to the house will be restored.
In the case where a summer cottage is visited seasonally, careful insulation of the well for the winter with your own hands is not required. However, it would be a good idea to prepare the well for the winter: pump out the water, clean and treat the walls with a disinfectant, and cover it with an insulated lid for the winter. Additionally, it is recommended to cover the head with film - this method will protect the pumping equipment from freezing and damage.
Why is freezing water dangerous?
Freezing of water is dangerous if only because the springs cannot be used. But that’s not all - the ice plug has serious weight, and if it breaks, it will easily demolish the equipment installed in the mine that is in its path. But even if you don’t have cables and a pump, it’s still dangerous, because, as you know, the volume of ice is greater than the volume of water. Accordingly, the cork presses on the rings. This is fraught with displacement of the rings, rupture of the seams between them, and the appearance of cracks. In turn, this leads to soil blockages. And this will require complex repairs. Therefore, it is better to immediately insulate the well, water supply and sewerage pipes for the winter than to solve the problems that arise later.
The argument in favor of this procedure is the fact that the rings themselves are seriously damaged by ice, which means they begin to age. The rings are destroyed much faster than usual. This means that insulation will save you from the need to dig a new well. Therefore, let's look at how you can prepare for the cold weather.
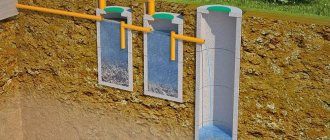
Construction of a plastic drainage well
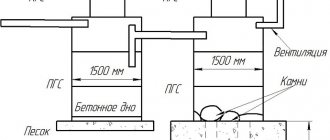
The drainage well consists of the following typical elements:
- a sewer hatch through which access to the underground part of the communications will be provided;
- the neck is a load-bearing element, but it can be abandoned if drainage wells are installed in pedestrian areas;
- shaft - the main part of the well structure;
- bottom - responsible for collecting sediment (sand, silt), but this element is not provided in absorption wells.
Some models can be increased in volume by attaching additional rings.
Why is it dangerous
It is highly recommended not to allow such a situation to occur. This will create an ice plug that will interfere with the use of water. And if the pipes leading to the house are also laid shallow, then they too may freeze.
Even if the well is planned to be used only in the summer, it is important to prepare it for frost. It should be equipped in the same way as the tank that is used in all seasons.
If you don’t take action and try to save on construction, the consequences will be unpleasant:
- Concrete is destroyed. If the material is constantly exposed to temperature-changing moisture, it will easily deteriorate due to regular freezing and heating. First, a plug will form, which will create pressure due to the expanded ice. The lining will regularly crumble and crumble, cracks will begin to form, through which turbidity and many pathogenic bacteria will enter the liquid.
- The rings move. If you don’t figure out how to close the well for the winter, the ice will press too hard. As a result, adjacent joints will lose their tightness and stability, and one of the parts will begin to move. Because of this, particles of the surrounding soil, rain, microbes and other harmful microelements get into it.
- Frequent repairs. If the tank is not prepared for frost, it will have to be repaired frequently, and this is an additional regular unaccounted investment of finances and effort. In addition, this is not easy to do, and during such a period it will not be possible to use water.
Installation of plastic drainage wells
The installation of the well is carried out according to the following scheme:
- The pipe, which was purchased for installation as a tank, is cut to the specified depth of the well.
- Step back 50 cm from the bottom edge, cut holes for connecting drains. Seals are inserted into them.
- The bottom of the well is secured using sealant or mastic.
- The foundation pit is being prepared. To do this, dig a hole of the required depth. Its diameter should be 40 cm larger than the well.
- At the bottom there is either a sand cushion or a concrete lining.
- Drains are connected to the well.
- If this is a perforated filtration well, then you will need to first wrap the product in geotextile. Next, the space between the well and the pit wall is filled with a mixture of sand and gravel.
When all activities are completed, the finished well is covered with a hatch. The last step is to compact the soil around the well, after which a cement frame is made.
Installing a plastic drainage well is a fairly simple matter, so it does not cause any difficulties. The main thing is to choose the right type and diameter of the product according to the project and the characteristics of the area. You can always turn to Europlast consultants for help, who will help you purchase the products you need.
Diameter of plastic drainage wells
The selection of wells is made according to the following principle:
- for rotary wells, a diameter of 0.34 - 0.46 m will be sufficient;
- for the inspection room, if in the future a person will be lowered inside to service the system - about 1 meter, but if the wells are simply inspected and superficially cleaned - then the diameter can be 0.34 - 0.46 m;
- filter wells begin their size range from 0.69 m or more, which depends on the volume of water that the reservoir will receive and discharge into the ground;
- collector or storage tanks are selected taking into account the nuances associated with the removal of accumulated water - either this will be the task of the sewer trucks, or the wastewater will be discharged by gravity into the nearest ditch.
All these nuances are worked out at the design stage of the drainage system. Therefore, the choice of diameter will be made taking into account not only whether a person will descend into the tank, but also what volume and type of wastewater needs to be removed from the ground and where to discharge it.