The insulation foam used in construction (expanded polystyrene) is plastic foamed in a factory, giving it a certain set of performance properties. According to new regulatory documents, it is marked “PPS”. Suitable for insulating a house under construction and additional insulation of an old home, for working outside and inside the building. In this case, the material is selected for specific conditions and tasks, and installation work is carried out in strict accordance with the technology.
Types of foam for insulating frames
Foam-based insulation is divided into several types.
They all have similar characteristics, but are fixed to the walls in different ways.
- penoplex
- expanded polystyrene
- penofol
- liquid foam
- foam itself
At the same time, the foam itself differs in density and function: there is foam for walls, and there is for the base and foundation.
Let's look at the difference in foam density. The higher the density, the correspondingly better its thermal insulation characteristics.
The standard density of foam plastic is usually in the range from 10 to 35 kg/m3.
Thus, foam grades are designated PPT 15 (i.e., with a density of about 15 kg/m3), PPT 20, PPT 25 and PPT 35.
Table of characteristics of foam plastic of different brands
Please note that each of these brands differs in price and also has its own scope of application.
For example, PPT 15 is too soft, its density is low, so it cannot be used for floor insulation.
Although the most universal brand PPT 35 can be used everywhere without damaging the foam, its price is higher than the others, so it would be irrational to insulate walls from inside the room - it is too expensive.
The denser the foam, the better it retains its shape, but less dense foam is marginally warmer.
Polystyrene foam consists of polystyrene balls with air
Thus, PPT 15 is used for roof insulation, PPT 25 for insulating walls and vertical surfaces, and PPT 35 for floor insulation.
Production of foam formwork
From hollow foam blocks you can assemble permanent formwork for the foundation of a residential building with your own hands. This saves time and reduces the cost of construction . Also, polystyrene foam formwork serves as an additional thermal insulation layer for the foundation.
Please note: for this type of work, the density of the foam must be higher than 25 kg/m3.
Work begins with standard marking of the site, digging a trench, and laying a sand and gravel cushion for drainage. Then a thin layer of concrete is poured onto it, which, after hardening, will become the basis for the formwork . Along the perimeter of the entire foundation, reinforcement is embedded in concrete. Foam blocks are placed on it, securely connecting them with jumpers. At the next stage, all blocks are leveled horizontally and filled with concrete. The solution is then compacted using deep vibrators . The walls of a residential building can be built in a similar way.
Thus, polystyrene foam is a universal material that is suitable for thermal insulation of the entire house - from the foundation to the roof. However, if you are insulating a large part of the building with it, take care of high-quality supply and exhaust ventilation. This is important for “non-breathable” polystyrene foam.
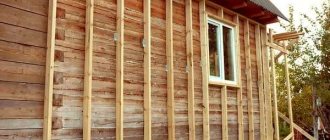
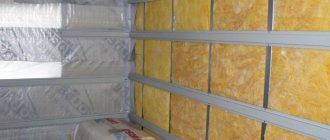
Insulating a frame house with foam plastic inside
Polystyrene foam is traditionally used to insulate the walls of a frame house, but it is still better to use it to insulate the house from the outside, since the technical smell that foam boards emit disappears from the room in at least a week.
In the first week after insulating the walls inside the house, residents may experience headaches and disturbed sleep.
Insulating the walls of a frame house with foam plastic
What you will need to prepare the walls for insulation:
- hammer drill
- grater
- paint brushes
- bucket or other container for diluting mixtures
- spatulas
- needle roller
- hammer
To fix the foam, you need to make a flat wall surface, for which we remove the old finish.
After cleaning the wall from dirt, dust and other coatings, make sure that when applying the foam sheets there are no recesses or air spaces left.
The foam should fit tightly to the wall. If the quality of the walls leaves much to be desired, it is necessary to prime them. To do this, use a brush or spray.
Using a needle roller, we roughen the surface of the foam board.
Important: we start gluing the insulation from the bottom, for which we install a starting strip. This strip will act as a support for the first sheets of polystyrene foam, and will help to install them evenly.
Using a spatula, apply the adhesive mixture to the insulation, then press it to the surface of the wall and press it with your palm.
You cannot use hard things that will damage the foam - only your palm.
After installing the insulation, check for dents, cracks or damage.
We continue to insulate all the walls in the same way, trying not to leave gaps between the foam sheets.
When the work is finished, it is necessary to use special plastic nails, which experts call mushroom.
This mushroom consists of a plastic circle and a sleeve-leg.
Hammer a nail into the sleeve, which is preferably plastic, this will avoid cold spots.
Mushroom for fixing foam boards to the wall
The fungus is attached thanks to holes made using a puncher.
The length of the holes should be 20 mm greater than the size of the fungus. On average, one sheet of polystyrene foam takes 5 fungi.
Fungi are located at the joints of the slabs, additionally pressing the foam sheets against the wall.
Make sure that the caps are level with the insulation, and after hammering the nails, they are heated by 1.5-2 mm.
If, after insulating the wall, gaps of 5 mm or more remain between the sheets, they must be additionally foamed.
The required foam sizes are easy to cut
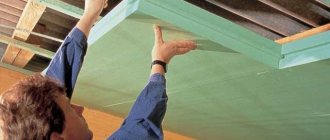
We insulate the ceiling
The ceiling must be insulated without fail, since it is through it that the bulk of the heat escapes. To insulate it you will need:
- PPT slabs;
- Vapor barrier film;
- Double sided tape;
- Nylon thread;
- Nails.
Insulation work is carried out in the following order:
- Just like on the walls, a vapor barrier layer is fixed using double-sided tape and a stapler;
- Nails are placed at the bottom of the beams so that the heads stick out, this is done for further tying with thread;
- Next, the foam slabs are installed between the floor beams and fixed using nylon thread; by the way, additional fixation may not be necessary;
- Afterwards, a second vapor barrier layer is installed, attached to the beams using a stapler.
Subsequent wall finishing after foam plastic
How to do interior finishing after foam plastic? So, you have glued all the foam sheets to the wall, foamed the joints and waited for them to dry.
Next, you need to cut off the excess foam and check the wall for defects.
If some parts of the insulation stick out, they can be smoothed using a grater. This is especially true for unevenly protruding places in the area of joints.
Use a large spatula and apply the adhesive to the entire wall. Make sure that the glue is applied evenly.
Wall finishing after foam plastic
We glue the plaster mesh to the insulation. Since the glue dries quickly, we cut the mesh in advance to a size of approximately 100x100 cm.
A large mesh may not have time to be securely fixed. After the entire wall is covered with mesh, you can begin to apply the leveling layer.
The layer should be about 3 mm thick; for this we also use a large spatula.
After drying, grouting is performed to remove unevenness.
The next layer is a special primer and a finishing coat. Read about interior decoration methods here.
We cut the mesh at the bottom with a construction knife
Insulation reinforcement
The installation of expanded polystyrene blocks does not complete the process of insulating the walls from the outside - the material must be protected using reinforcing mesh and plaster mixture.
Step 1. Prepare a plaster-adhesive mixture from dry powder and water. Choose proportions based on the recipe printed on the package. Mix the solution with a construction mixer.
Mixture preparation process
Step 2: Start with windows and doors. Apply a thin layer of plaster-adhesive mixture to the inner surface of their openings and level it.
Applying a thin layer of mixture
Layer alignment
Step 3. Press the reinforcing mesh, laid on the inner surface of the openings in one of the previous sections of the article, to the adhesive mixture and drown it in it. Smooth the entire top with a rectangular trowel.
The mesh is embedded in the mixture
Step 4. In exactly the same way as in the previous operation, press the mesh belonging to the previously installed profile to the adhesive layer and press it down.
The mesh of the previously installed profile is pressed
Step 5. Repeat the previous three steps on all sides of the window opening.
The same, but with other sides of the opening
Step 6. At the corners near the openings, apply stripes of the adhesive mixture at an angle of 45°. Then lay the reinforcing mesh on them and smooth it with a trowel. Such areas near the openings are called “kerchiefs”.
"Klondike"
Smoothing the reinforcing mesh
Step 7. Measure the corner profile of the required length. Apply a layer of adhesive mixture along the outer perimeter of the window, then lean the profile with mesh against it and the inner surface of the opening and smooth it with a rectangular trowel.
Profile trimming
Applying the adhesive mixture
Profile alignment
Smoothing the mesh
Step 8. Using the same principle, install corner profiles on other surfaces of the window opening.
The same, but on other surfaces of the window opening
Step 9. Attach a small rectangle or square of reinforcing mesh to the inner corners of the opening, straighten it and smooth it with the adhesive mixture.
The mesh is applied to the inner corner
Smoothing the mesh with mixture
Almost done
Step 10: Repeat steps two through nine for each individual window and door opening.
Step 11. Apply adhesive solution around the perimeter of the house to the bottom of the insulation. Then attach the drip profile there. Install it so that there are no air cavities between it and the insulation. Control the process using a building level.
Applying the solution around the perimeter of the house on the lower part of the insulation
A drip profile is attached
Step 12. Apply another layer of plaster over the mesh of the drip profile and smooth it with a rectangular trowel.
Smoothing with a rectangular trowel
Step 13. Using the same principles as outlined above, install the corner profile - apply an adhesive layer, attach the product to it, press it into the mesh and smooth everything on top.
The adhesive layer is applied to the corner
Profile attached
The mesh is smoothed
Step 14. Now proceed to reinforce the entire surface of the walls. Make sections from a roll of mesh with a length corresponding to the height of the insulated walls of the house.
Cutting reinforcing mesh
Step 15. Apply a layer of plaster-adhesive mixture on top of the polystyrene foam and smooth it with a notched trowel.
Applying a plaster-adhesive mixture over foam plastic
Step 16. Place a sheet of reinforcing mesh on top of the adhesive layer, press it and cover it with another layer of mortar on top. Smooth out everything carefully - unevenness and cavities with air are unacceptable.
Laying reinforcing mesh
The mesh is smoothed with a solution
Step 17. Lay the next piece of mesh side by side in exactly the same way. There must be an overlap of at least 100 mm between it and the previous one.
The overlap must be at least 100 mm
Step 18. Let the adhesive mixture dry a little (but not completely!) and scrape off any irregularities.
Uneven surfaces are scraped off
Step 19. Using the rule, search for concavities on the adhesive layer applied over the insulation. Then level them out by adding a little more mixture in the right places.
Finding concavities using a rule
Leveling out unevenness
Step 20. Using the finally hardened adhesive mixture, level the surface again - using putty.
Puttying
After the putty has hardened, the insulation of the walls from the outside with polystyrene foam can be considered complete. Next, all you have to do is apply the final decorative finish in accordance with your tastes and preferences.
How to insulate the floor of a frame house with foam plastic
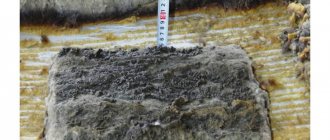
Polystyrene foam has long been used for floor insulation, as it consists of millions of small polystyrene beads that retain air inside.
At the same time, it is not afraid of moisture, does not change its properties for a long time, and has a suitable density (PPT 35) to withstand floor loads.
Insulating the floor of a frame house with foam sheets
At the same time, foam insulation is carried out without much effort and knowledge; anyone can do it, even not a professional.
To begin with, as with insulating walls, it is necessary to prepare the surface for the heat-insulating material.
To do this, we clean it, seal cracks, insect passages, crevices, holes through which rodents can enter the house.
Next, we lay a thick film on the floor, which will provide waterproofing. This layer will prevent water from getting inside the insulation.
We lay the film with an overlap, which should be at least 10 cm, and glue the joints of the film with construction tape.
Modern membrane films not only do not allow moisture to pass through, but also have water-repellent properties, while they also return heat to the room.
Floor insulation scheme for a frame house
We lay sheets of foam plastic on the film. It is better to use with profiled edges, which help to avoid cold bridges.
Foam the joints, as the fixation of the slabs must be reliable. If the sheets are not foamed, after a while the sheets will rub their edges against each other and make unpleasant sounds.
Sometimes, to avoid squeaks, it is proposed to deliberately leave a space between the plates of 5 mm, which is then foamed.
We lay another layer of waterproofing on top of the foam, which will help prevent water from penetrating into the floor if something is spilled on the surface.
Floor insulation in a frame house
Next, we lay the metal mesh and do the rough screed.
We apply the cement so as not to damage the film and move the insulation. Its layer should be at least 5 cm. Next, you can make the finishing floor.
If you have a cement screed on the ground in your frame house, is insulation with foam plastic done as follows?
We lay the film on the cement, then use dowels to attach the foam and treat the joints with foam.
You will receive useful information on how to make heated floors in a frame house in our article.
Remember: if there is a basement, it is better to insulate the floor in the house from the basement side. In this case, an additional layer of air is formed, and the floors will be warmer.
If you are insulating without a basement, do not forget that the surface on which the sheets are laid must be prepared.
The screed must be perfectly flat; for this we use a mesh.
We lay the foam sheets tightly on the film and foam the joints
What is this material and its advantages
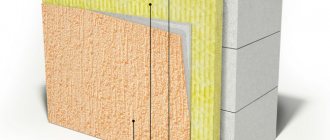
Polystyrene foam is produced by foaming and pressing polystyrene. The result is a slab that consists of many bubbles filled with air. Thanks to this structure, the material has gained popularity as insulation.
It has several positive characteristics:
- Little weight. The design does not load the main structure and problems rarely arise during transportation.
- Good level of thermal insulation. 1 cm of material transmits less heat to the outside than 7 cm of red brick.
- Affordable price. The cost of polystyrene foam is the lowest compared to other insulation materials.
- The material does not shrink even after prolonged use.
A close “relative” of polystyrene foam is extruded polystyrene foam (EPS), which is produced in an extrusion autoclave. It is also used to insulate buildings.
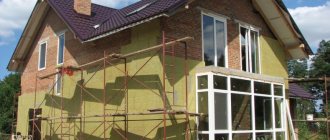
Insulation of a frame house with foam plastic from the outside
Most often, foam boards are used for external insulation of a house.
Since it is not afraid of moisture, it is therefore preferable to use it instead of mineral wool.
As we know, a frame wall consists of several layers, and its last layer is an OSB board.
We insulate a frame house from the outside with polystyrene foam
It is best if the work is carried out in the warm season, since frosts worsen the properties of the glue and the insulation boards will not adhere well.
We attach the foam in the same way as we attached it to the wall. We use dowels after we have glued several sheets. They securely fix the sheets.
And you can be sure that when the adhesive expires, the sheets will not come off.
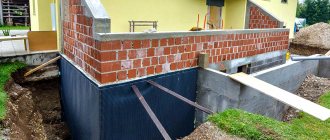
Insulation of the foundation and basement of a frame house
To insulate the base we use 10 cm polystyrene foam, since the base is the coldest part of the wall.
Using a reinforcing mesh, we treat the base with cement mortar. When the cement is completely dry, you can begin exterior finishing.
The most commonly used material is plaster. If you have chosen lime plaster, you must add cement of at least 400 grade to it.
We process the wall in two layers without intermediate grouting. Read about finishing the façade after insulation here.
Finishing work
A prerequisite for completing the work is the installation of a vapor barrier. Polystyrene foam reacts little to moisture; however, the formation of condensation can have a bad effect on the frame and other layers of the structure of a frame house. For vapor barrier, the material used is penofol or its analogues made from foil coverings. In addition, there are new membrane films on the market designed for vapor barrier specifically for frame houses.
Waterproofing is laid as the penultimate layer from bottom to top from the outside of the wall - to protect the thermal insulation, frame, and finish from moisture.
The finishing can be laid directly onto the waterproofing coating. The choice depends on the wishes of the owner of the home - to use siding, facing brick, blackhouse or stone.
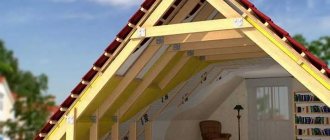
Insulating the roof of a frame house with foam plastic
Since the roof also needs insulation, foam plastic can be used for it, and PTT 15, the softest and most inexpensive, is suitable.
The fact is that there is almost no load on the roof. However, it should be remembered that stiffer and denser foam will last longer.
Roof insulation with foam plastic sheets
Polystyrene foam is suitable for insulating both sloping and straight roofs.
In addition to the fact that polystyrene foam is not afraid of moisture, does not rot or deteriorate, has high thermal insulation properties, it is lightweight, which is especially important when building a frame house.
At the same time, foam sheets are easily cut and fixed with glue.
They have good soundproofing properties, thanks to which during rain the noise from drops falling on the roof will be minimal.
How is insulation material installed?
We lay a vapor barrier over the insulation
The whole process can be divided into stages:
- Laying waterproofing material on rafters.
- Fastening foam boards between or under rafters.
- Sealing the seams with polyurethane foam to eliminate cold bridges.
- Laying vapor barrier indoors.
- Finishing the interior walls and ceiling of the attic.
The board securely fixes the insulation
Foam plastic slabs are usually laid in the space between the rafters, and the laying should be tight, without cracks.
To adjust the size, the foam is cut using a sharp knife along a ruler and broken along the cut.
The sheets are fixed to the rafters using slats or polystyrene glue. Fastening with glue may not be sufficient, so it makes sense to make a binder from a board.
This design should hold the slabs in several places. The resulting voids between the foam board and other elements are foamed.
Read about how to insulate a frame house with mineral wool in our article here.
Fixing in the attic
To get additional living space, some owners of country houses insulate the attic area. Insulating the attic of a frame house with polystyrene foam requires all work to be done inside and outside.
There are some conditions for roof insulation. We are talking about protecting the heat-insulating material from the influence of steam and moisture, forming ventilation, laying the insulation without breaks, ensuring a continuous surface.
The roof structure includes several layers. This is a vapor barrier, interior cladding, insulation itself, sheathing, waterproofing material and roofing. First, waterproofing is laid. Izospan is used for this purpose. They direct it from the lower edges of the roof upward.
The surface layer is secured with a stapler, wood slats with a cross section of 3 by 5 cm are hammered in. They are treated with a special antiseptic composition in advance. After this, a gap is formed by securing the waterproofing to the rafters using a counter batten. The joints near the pipes are sealed with special tape.
The outer walls of the attic are strengthened using the same principle. In the attic, the floor is laid in accordance with the type of foundation. When it is made of wood, insulation is carried out in the following stages:
- A vapor barrier is laid between the beams;
- Extruded polystyrene foam is placed on top;
- Following this comes a layer of vapor barrier;
- The joining is carried out, for complete tightness, with an overlap.
A variety of methods for using ecowool
The second most popular material for thermal insulation of frame buildings is ecowool. But here it is better not to experiment and entrust the work to professionals. Mechanized backfilling will ensure the required density and uniformity of laying. There are three methods of using ecowool:
- dry "spray";
- wet application;
- glue method.
The dry method is applicable for horizontal surfaces, inclined closed cavities, filling interfloor ceilings and non-demountable structures. The packing density of ecowool using this method is 45-65 kg/cubic meter. m depending on the slope.
Wet technology is suitable for vertical open walls. Ecowool flakes are moistened and applied to the surface under pressure. The density of the thermal insulation layer is about 65 kg/cu.m. m.
The adhesive method is similar to the previous one, but instead of water, an adhesive component is added. Advantages of the technique: high adhesion of the insulation to the wall, elasticity of the material and low deformation after drying. The adhesive method is indispensable for thermal insulation of flows from below; this option is also suitable for treating walls.
The issue of insulating a house needs to be thought through at the construction stage. This is more profitable from a financial point of view and technically correct. Structural elements are insulated as the building is erected, and there is no need to carry out major repairs to the building after commissioning.